Transcription
Raspberry Asterisk ConfigurationPart 1 & 21.2.3.4.5.Initial ConfigurationEntering Extensions– Local internal callsIP Phone Setup3.1Snom Phone3.2Other Phones (Future)Softphone Setup4.1Ekiga Configuration (Not working)4.2Zoiper ConfigurationAsterisk to Asterisk Configuration5.1Remote Extensions5.1.1 System A Configuration5.1.2 System B Configuration5.2General Remote Dialin5.2.1 System A Configuration5.2.2 System B ConfigurationFuture Presentations6.Router Requirements6.1Basic Router Firewall Without NAT6.1.1 Router Configuration Single Port6.1.2 Router Setup6.1.3 Firewall Configuration6.1.4 Boot Startup6.2Basic Router Firewall With NAT6.2.1 Port Forwarding6.3DHCP Configuration6.4Testing Remote Access to Asterisk Server6.4.1 Installing nmap on a Windows System6.4.2 Using nmap from Linux (Raspberry)6.4.3 Using Telnet6.5Setting up Dynamic DNS6.5.1 Setting Up DDNS Using noip.com
7.8.9.6.5.2 noip.com InstallationSIP Carrier Options7.1ipcom.net7.2CallCentric.com7.3Asterisk to Carrier ConfigurationAsterisk Hardening8.1Pi Password8.2File Ownership8.3?Enhancements9.1IPv6 Configuration9.1.1 IPv6 Support in Assterisk9.2Voicemail9.3Call Transfer9.4Music On Hold9.5Announcements9.6Call Forwarding9.7MeetMe9.8Interactive Voice Recognition (IVR)9.9Conferencing9.10 VoIP Phone Screen Display9.11 GUI Front End
1. Initial Configuration1.2.3.4.The Asterisk application must be installed on the Raspberry. This is a very simpleprocess as it may be installed using the apt-get install process and is preconfigured for operation with sample files. It is also pre-configured as to theowner being “asterisk” which provides an initial security configuration. You caneither use the sudo prefix or become the administrator (sudo su). It is easier toissue all of the commands as the administrator as you will be editing multiple filesand using the Asterisk command line interface. It is also recommended that thefiles be opened in the background so that you may switch between them withouthaving to close and open repeatedly. Issue the command apt-get update Issue the command apt-get upgrade Issue the command apt-get install asteriskThe installation includes the dahdi library. There is another library, LibPRI, whichis available but is not installed.Sit back and wait for the installation to complete, it takes a little while.DAHDI is the Digium Asterisk Hardware Device Interface which is software tointerface telephony interfaces. It should be installed even if no hardware isinstalled as it provides additional requirements such as MeetMe and is requiredfor timing modules.The LibPRI is not really necessary as it is required for a PRI interface which will notexist on the Raspberry Pi. It should be installed on a stand alone system that canhave additional cards.After the installation has been completed the server must be started. Issue the command asterisk service restartWhenever a server needs to be restarted the above command is issued. If it hasnot yet started then the shutdown process will have no effect. Asterisk includes autility to reread the configuration files while operating which precludes therequirement to restart.Issue the command asterisk –r.Remember that you must do this as the administrator, either using sudo or havingbecome the root administratorThis will start the Asterisk CLI operation. It is required that the service haspreviously been started. When exiting, the service will remain operational. Youwill receive the prompt:raspberrypi*CLI From now on only the CLI will be shown.For general purposes, display the initial dialplan by issuing the command:show dialplan
5.6.7.The sample dialplan will be displayed. You will be making changes to this.At any time the changes to any of the configuration files may be reloaded byissuing the command:core reloadThis is re-reads the /etc/asterisk configuration files.To exit from the Asterisk CLI configuration issue the command:CLI exitObtain the IP address of your system by issuing the command:sudo ifconfigAt this time only the IPv4 address will be used. Configuration for IPv6 is anadvanced topic and will be covered. Record your address:IPv4 Address:Also log the Network address and the Broadcast address:IPv4 Network Address:IPv4 Subnet Address:Next learn the router's address by issuing the following command:# routeUnder the Gateway heading you can fine the router's address. Log it:Router IP Address:You can also find the network address under Destination (ignore all 0.0.0.0addresses:IPv4 Network Address:It may be better for the system to be set up with a static IP address. If a staticaddress is required, the following procedure should be implemented:# cd /etc/networkIn this directory you will find the interfaces file. Use either leafpad or nano (orgedit the file). (If you use the & character at the end you can open multiple files atthe same time.)# leafpad interfaces &You should find the following:iface eth0 inet dhcpChange this to:iface eth0 inet staticaddress selected-IPv4-addressnetmask above-subnet-maskExample192.168.1.10255.255.255.0
network above-network-address192.168.1.0broadcast above-broadcast-address192.168.1.255gateway above-gateway-address192.168.1.1Note that you might want to know the assigned address space of the DHCP serverwhich is normally part of the Internet router. Assigning an address outside of thatrange will insure that no other system is also assigned the same address.After the change is made you will be required to reboot or restart the service byissuing the following command:# /etc/init.d/networking restart8.Change to the /etc directory.9.For protection purposes, make a backup copy of the Asterisk configuration files. Itis a good point to have a backup since there is a lot of examples anddocumentation contained in them. Issue the commands from the /etc directory:# mkdir asterisk.bk# cp –r /etc/asterisk/* /etc/asterisk.bk/10.If the service was not started the asterisk –c command may be issued to startAsterisk and bring up the console. The difference being that when one exits,Asterisk is shut down if the service has not been started.11.During the installation Asterisk was set up as a startup service on booting. Thiscan be validated by issuing the command:# service – –status–allThis completes the basic setup.Least it be said, there are many things going on in the background that provide manyfeatures. Except for a few configuration files they will be ignored for this basic setup.The primary protocol for establishing a connection between two devices is SIP, SessionInitiation Protocol. One's voice is actually carried by the RTP, Real Time Protocol. Digiumalso developed another protocol called IAX, Inter Asterisk Exchange, as an alternative toSIP. IAX has some advantages for inter Asterisk connection when there is a firewall andNAT involved. (IAX2 is the current version.)In a normal PBX system one views phone extensions and trunks. Asterisk has a differentperspective, namely a channel that can request a service and a set of instructions thatdeliver that service. The understanding of the coding is what provides how the service isdelivered.In Asterisk an Extension is the naming of a group of instructions that accomplish anaction. The obvious action is to make a phone to ring but there are other options toenhance the total operation.An Asterisk Extension is denoted as [extenName]. Virtually any unique name may beused but it is best practice to not use a user's name (that individual may leave thecompany). Setting the name to an extension is not encouraged because of securityreasons but it is a simple way of doing things. One popular naming convention is to usethe end device's MAC address, if you want to look it up and type in all those characters.
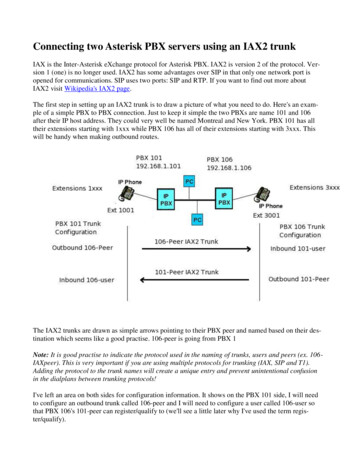
2. Entering ExtensionsOnce the basic setup has been completed, the initial dialplan needs to be developed.Number of extension digits:For this example 3 digits were selected.First digit:List the users and their extensions:User's NameExtension1.2.3.4.5.A separate worksheet should be used to documenting what is to be done.For initial setup you will require at least two extensions. Initially they will beconfigured for Snom phones but others will be similar.For editing purposes the text editor leafpad is used. gedit is also an excellent texteditor.Two files will be modified at for the initial configuration. The files are quite longbecause of the extensive documentation / samples.Where applicable the configuration for both System A and System B will bedisplayed along side of one another. If not, then both systems are the same.Asterisk uses the concept of a channel which is defined by the sip.conf file. Achannel specifies each end device that can originate a service request, note that aservice includes a call but can have more options. The channel not only identifiesthe originating interface but also the destination. The dialplan, or connection isdefined by the extensions.conf file. The dialplan specifies how the requestedservice is to be connected which would be the simple ringing of a phone but mayinclude more enhanced features.The following diagram provides a simple illustration of the connection of twotelephones. Note that the telephone has been identified with a MAC number ofthe instrument but in this example we will be using extension numbers. 11Asterisk The Definitive Guide, 4th Ed., Russel Bryant, 2013
Realize that there actually two different connections being made in an Asterisk system.The first is from the first device to the Asterisk server, the second is from the Asterisksystem to the second device. On the part of the first device, the connection has beencompleted when it connect to the server.1.2.3.4.5.6.7.Edit the sip.conf file.Search for [general].The general section contains generic high level configuration that may beoverwritten by other specific directions at a point.Find the line context publicThis is a name that you select and is not critical as long as it is unique. It points toa section block of code in the extensions.conf file.This can be changed but for now leave as it is.Find the line udpbindaddr 0.0.0.0This specifies that UDP IPv4 connections are accepted. Leave it as is for now.UDP specifies that the UDP protocol is used. This is the normal operationalthough some servers use TCP. The 0.0.0.0 says that it will accept any address.At this time the tcpenable no remains as a TCP connection is not used. This willbe modified later for supporting IPv6.Find the line transport udpThis specifies that the default protocol for outgoing calls is UDP.Find the line allowguestFor now comment this out because unauthenticated calls will not be allowed. At alater time one might wish to allow an unauthorized guest.Find the section for the [snom] phone. We are using this section because that isthe type of phone that was available for the test.Copy the [snom] section and paste it at least twice to the bottom of the file (oncefor each phone that is being set up). There is a lot of extra information and much
8.9.10.11.12.will be deleted as it is either unnecessary or example. The file contains manyexamples so you might want to look through the code to find an example for thephone that you are using.If you look at several of the other phone entries you will see that they all look fairlysimilar with some minor variations.If you have a different vendor phone find that section and copy it down to the endof the file.Go to the first section. Make the following change:[snom] [extension]For this example the extension was set to 314 on Station A and 414 on Station B.Go to the second section. Change the extension to another number.For this example the extension was set to 315 on Station A and 415 on Station B.Uncomment the following (remove the semicolon).[snom]change to[314]type friendleave asfriendcontext from-sipchange tocontext internalsecret blahchange tosecret 314host dynamicleave ashost dynamicdtmfmode inbandchange todtmfmode autoIt is important to note that the context name can contain no spaces. Things don'twork right if there are.Type specifies the type of connection. Options are:peerMatch request to IP address and portuserMatch request to configuration username in the FromheaderfriendMatches for both peer and userContext specifies the code section in the extensions.conf file.Secret specifies a password. For simplicity it is set to the extension number butthis is a poor process.Host specifies the type of connection. It is set to determine what needs to be donerather than a specific location. If a phone is to exclusively ring a specific locationthen a pointer can be specified, such as an IP address.Delete all other lines that are commented out. At this time they are not needed.Do the same to the second copy of the [snom]. The only difference will be tochange to a different extension number. For this example it will be 315.The commented lines are not needed so there is no problem deleting them.In ReviewSetting[ChannelName]type Station A[314]friendStation B[414]friend
context host dtmfmode ]type context host dtmfmode ynamicautoAn alternative to SIP is IAX (version 2). The benefit of using IAX is simpler configurationwhen using a firewall and NAT. For those connections requiring IAX, the iax.conf file isused. IAX uses a single port (4569) whereas SIP uses ports 5059 5061, 5060 is the mostcommonly used.13.Save and close the file.14.From the asterisk CLI issue the commands:CLI core reloadCLI sip show peersCLI sip show usersThis will display the configurations that were just completed to the sip.conf file.15.Edit the extensions.conf file.16.Go to the end of the file.17.Create a new section with the following format:[internal]This is required because you specified it internal in thesip.conf file.18.Add the following line:include demoThis specifies to use the demo section of the file in the local internal sect
9.8 Interactive Voice Recognition (IVR) 9.9 Conferencing 9.10 VoIP Phone Screen Display 9.11 GUI Front End. 1.Initial Configuration 1. The Asterisk application must be installed on the Raspberry. This is a very simple process as it may be installed using the apt-get install process and is pre-configured for operation with sample files. It is also pre-configured as to the owner being .
