Transcription
Visual Workflow: Spring '13Cloud Flow Designer WorkbookLast updated: March 8, 2013 Copyright 2000–2013 salesforce.com, inc. All rights reserved. Salesforce.com is a registered trademark of salesforce.com, inc., as are othernames and marks. Other marks appearing herein may be trademarks of their respective owners.
Table of ContentsTable of ContentsAbout the Cloud Flow Designer Workbook.1Tutorial #1: Creating a Tip Calculator.2Optional Step: Pre-configure Your Flow Using Step Elements.2Step 1: Add a Screen Element to Capture the Bill Information.2Step 2: Create Formulas to Calculate Tip Amount and Total Bill.4Step 3: Add a Screen to Display the Results.6Step 4: Save the Flow.7Step 5: Run the Flow.8Tutorial #2: Creating a Sustainability Survey.10Step 1: Add a Screen Element to Capture Users’ Region.10Step 2: Add and Configure a Decision Element.11Step 3: Add a Screen Element for the AMERICAS Option.12Step 4: Add a Screen Element for the EMEA Option.14Step 5: Collect Commute Information.15Step 6: Collect Email Address.17Step 7: Thank the Respondents.17Step 8: Save the Flow.19Step 9: Run the Flow.19Tutorial #3: Creating a Mortgage Calculator.21Step 1: Add a Screen Element to Capture Users' Information.21Step 2: Add a Record Lookup Element.22Step 3: Save the Flow.23Step 4: Add a Decision Element.24Step 5: Add a Screen Element to Collect Mortgage Information.25Step 6: Add a Record Create Element.27Step 7: Add Apex to Power the Calculation.28Step 8: Add an Apex Plug-in Element.29Step 9: Add the Final Screen.31Step 10: Run the Flow.33Step 11: Confirm that Record Create Worked.34Tutorial #4: Implementing a Flow.35Step #1: Activate a Flow.35Step #2: Create a Visualforce Page.35Step #3: Set Security for Your Visualforce Page.36Step #4: Create a Visualforce Tab.36Next Steps.37Addendum.38i
Table of Contentsii
About the Cloud Flow Designer WorkbookAbout the Cloud Flow Designer WorkbookThis workbook provides a simple introduction to many of the features in Visual Workflow.Visual Workflow allows administrators to build applications, known as flows, that step users through screens for collectingand updating data. For example, you can use Visual Workflow to script calls for a customer support center or to generatereal-time quotes for a sales organization.About Flows and the Cloud Flow DesignerElements are the building blocks of flows. Each element represents an action, such as presenting information to, or collectinginformation from, flow users, or even querying, creating, updating, and deleting information in Salesforce. By connectingelements together in the Flow Designer, you can create a flow, which is a series of screens, inputs, and outputs through whichusers navigate. Resources, such as variables, constants, or formulas, allow you to store or manipulate data and use it throughoutyour flow.The goal of these tutorials is to give you a sampling of what Visual Workflow can do. They increase in complexity as you gothrough the workbook. Each tutorial can stand alone, so if you’re a beginner with flows, we recommend starting with Tutorial#1 to get your feet wet. While touring along, feel free to experiment—change things a little, substitute a different element—andhave fun!Before You BeginThese tutorials are designed to work in an Enterprise, Unlimited, or Force.com Developer Edition environment. You can geta Developer Edition organization for free at http://developer.force.com/join.System RequirementsTo use the Cloud Flow Designer, we recommend: Windows Internet Explorer versions 8 and 9, Google Chrome , or Mozilla Firefox . Internet Explorer 6 is notsupported.Adobe Flash Player version 10.1 and later. The minimum version required to run the Cloud Flow Designer is 10.0.A minimum browser resolution of 1024x768.1
Tutorial #1: Creating a Tip CalculatorTutorial #1: Creating a Tip CalculatorIf you're new to flows and the Flow Designer, this tip calculator tutorial is a simple introduction to the basic elements of aflow and how they work together.Optional Step: Pre-configure Your Flow Using Step ElementsA Step is a placeholder element you can use to quickly sketch out a draft of a new flow or make conceptual changes to anexisting flow. Once you have your flow set up using Steps, you can then convert them into Screens or replace them with otherelements.In this step, we’ll pre-configure the tip calculator flow using Step elements.When thinking about how to draft our tip calculator flow, we know we need to do two things for the users: give them a placeto enter the bill amount and service quality, then show them the recommended tip amount. Let’s start with those.1. Go to Your Name Setup Create Workflow & Approvals Flows.2. Click New Flow.3. From the Palette in the left pane, click and drag a Step element onto the canvas.4. Enter Bill Information Step into the Name field.5. Press TAB, and the Unique Name field should automatically fill in.6. In the Description field, enter Capture bill amount and service quality.7. Click OK.8. From the Palette in the left pane, click and drag another Step element onto the canvas, beneath the first one.9. Enter Tip Amount Step into the Name field.10. In the Description field, enter Display tip amount.11. Click OK.12. Click and drag an arrow connector from the bottom of the Bill Information Step onto the Tip Amount Step.From the user’s perspective, all we need are two screens, representing input (bill amount, service quality) and output (tipamount). However, at least one thing needs to happen that the user will never see: the calculation of the tip amount. We’lluse a Formula resource for that later on.Note: Steps aren't valid elements for active flows. You can have a draft flow with Steps in it and can run it in thedraft state as an administrator, but you must replace the Steps with other elements before you can activate the flowand let users run it.Step 1: Add a Screen Element to Capture the Bill InformationIn the first screen of the flow, we’ll ask the user to input the bill amount and rate the level of service they received.If you bypassed the optional step to pre-configure your flow with Step elements:1. Go to Your Name Setup Create Workflow & Approvals Flows.2. Click New Flow.2
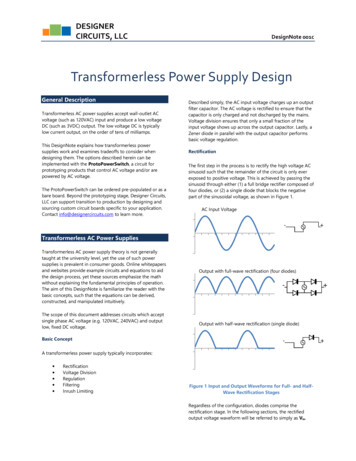
Tutorial #1: Creating a Tip Calculator3. From the Palette in the left pane, click and drag a Screen element onto the canvas.4. Enter Bill Information into the Name field.5. Press TAB, and the Unique Name field should automatically fill in.If you did the optional step to pre-configure your flow with Step elements, we need to convert the Step into a Screen.1. Hover over the Bill Information Step and click .2. Remove Step from the Name field. It should just read Bill Information now.3. Remove Step from the Unique Name field. It should just read Bill Information now.The first thing we want to gather on the screen is the bill amount, so we need to add an input field for it.1.2.3.4.5.Click the Add a Field tab.Double-click to add a Currency field. A blank currency field appears in the right preview pane.Click the currency field in the preview pane to configure it.On the Field Settings tab, enter Bill Amount in the Label field.Enter 2 into the Scale field. The scale is the maximum number of digits allowed to the right of the decimal point. Thisnumber can't exceed 17. If you leave this field blank or set to zero, only whole numbers are displayed when your flow runs.6. Make the field required.The next thing we want to know is how the user rated their service, so we need a choice input field.1.2.3.4.5.6.7.Click the Add a Field tab again.Double-click to add a set of radio buttons.Click the radio button field in the preview pane.On the Field Settings tab, enter Quality of Service in the Label field.Set Value Data Type to Number, because we’ll be storing the service level choice as a number representing tip percentage.Enter 2 into the Scale field.Make the field required.In the Choice Settings section, we need to set up four service level choices for the user. Choices are resources, and we cancreate them here in the Screen overlay.1.2.3.4.5.6.Click the arrow button to the right of the first Choice field, expand the CREATE NEW section, and select Choice.In the Label field, type Excellent.Set the Value Data Type to Number.For Stored Value, enter 20, representing a 20% tip.Click OK.Click Add Choice to repeat these steps three more times, adding new choices with the following values. Label: Good; Stored Value: 15Label: Fair; Stored Value: 10Label: Poor; Stored Value: 07. Verify that your Screen overlay looks like this, then click OK.3
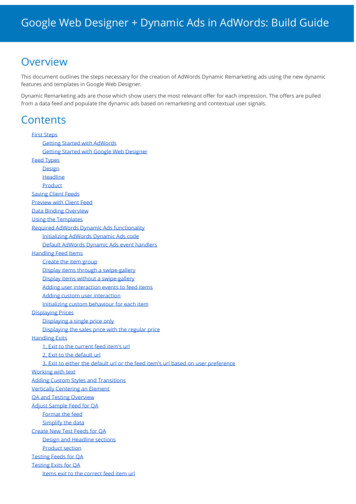
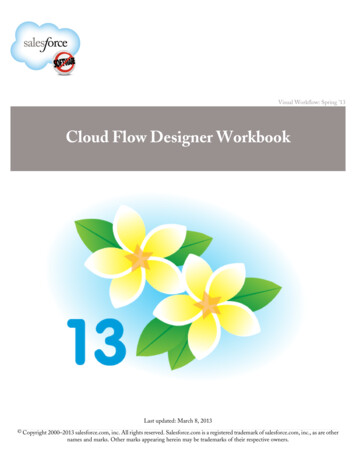
Tutorial #1: Creating a Tip CalculatorStep 2: Create Formulas to Calculate Tip Amount and Total BillTo calculate the tip amount and the total bill, we need to create two formulas. The tip amount is based on the bill amountand service quality. The total bill adds together the bill amount and the result of the tip amount calculation.Calculate the Tip AmountThe tip amount is the bill amount multiplied by the service quality value as a percentage. When setting up our screen in Step1, we gave the Quality of Service choices numeric stored values, which correspond to tip percentages. We’ll set up thisformula to automatically calculate how much tip should be given based on what level of service quality the user chose.1.2.3.4.5.6.7.8.9.Click on the Resources tab.Double-click the Formula resource.Enter TipAmount
This workbook provides a simple introduction to many of the features in Visual Workflow. . updating, and deleting information in Salesforce. By connecting elements together in the Flow Designer , you can create a flow, which is a series of screens, inputs, and outputs through which users navigate. Resources, such as variables, constants, or formulas, allow you to store or manipulate data and .