Transcription
TOSHIBA Bar Code PrinterB-SA4T SeriesKey Operation Specification1st Edition:2nd Edition:3rd Edition:4th Edition:5th Edition:6th Edition:7th Edition:8th Edition:9th Edition:10th Edition:February 21, 2005April 20, 2005March 29, 2006June 30, 2006October 10, 2007February 14, 2008March 30, 2009May 6, 2010May 14, 2013June 20, 2014
TABLE OF CONTENTSPage1. SCOPE.12. OUTLINE .13. OPERATION PANEL .14. KEY OPERATION FLOW.25. ONLINE MODE.35.1 KEY FUNCTIONS .35.2LED FUNCTIONS.35.3LCD FUNCTIONS .35.4ONLINE MODE OPERATION EXAMPLE .45.5THRESHOLD SETTING.55.5.1Outline of Threshold Setting .55.5.2Threshold Setting Operation Example.5INFORMATION MODE.75.65.6.1Outline of the Information Mode.75.6.2Information Mode Operation Example .85.6.3Information Mode Print Sample .95.7 RESET. 105.8 PARAMETER SETTING. 115.8.1Parameter Setting Operation Example . 115.8.2Parameter Setting Items . 165.9 FINE ADJUSTMENT VALUE SETTING. 195.9.1Fine Adjustment Value Setting Operation Example . 195.9.2Fine Adjustment Value Setting Items. 225.10 DUMPING OF RECEIVE BUFFER . 235.10.1 Operation Example of Receive Buffer Dumping . 235.11 BASIC EXPANSION MODE . 235.12 AUTOMATIC CALIBRATION SETTING. 275.12.1 Operation Example of Automatic Calibration Setting . 275.13 LAN ENABLE/DISABLE SETTING . 305.131 Operation Example of LAN Enable/Disable Setting . 305.14 REAL TIME CLOCK (RTC) SETTING. 325.14.1 Operation Example of RTC Setting . 325.15 BASIC SETTING . 355.15.1 Operation Example of BASIC Setting . 355.16 Z-MODE SETTING. 385.16.1 Outline of the Z-Mode . 385.16.2 Operation Example of Z-Mode Setting . 385.17 LCD MESSAGES AND LED INDICATIONS . 40i
5.18 LCD MESSAGES IN DIFFERENT LANGUAGES (UPPER LINE OF LCD) . 436. SYSTEM MODE. 456.1 OUTLINE OF SYSTEM MODE . 456.2 SELF-TEST . 476.2.1Self-test Operation Example . 476.2.2Self-test Items . 516.2.2.1Details of Self-test Result . 566.3 VARIOUS PARAMETERS SETTING . 676.3.1 Various Parameters Setting Operation Example . 676.3.2Details of Various Parameter Setting . 726.4 FINE ADJUSTMENT VALUE SETTING. 866.4.1Fine Adjustment Value Setting Operation Example . 866.4.2Details of Fine Adjustment Value Setting . 886.5 TEST PRINT . 966.5.1Test Print Operation Example . 966.5.2Details of Test Print Setting . 1006.5.3Test Print Samples . 1046.6 SENSOR DISPLAY/ADJUSTMENT . 1096.6.1Sensor Display/Adjustment Operation Example . 1096.6.2Details of Sensor Adjustment Value Display . 1116.7RAM CLEAR . 1126.7.1RAM Clear Operation Example. 1126.7.2Details of RAM Clear . 1146.8IP ADDRESS SETTING . 1186.8.1IP Address Setting Operation Example . 1186.8.2IP Address Setting Operation Flow . 1256.9 BASIC SETTING . 1266.9.1BASIC Setting Operation Example . 1266.10 ADJUSTMENT MODE FOR FACTORY. 1296.11 RFID SETTING . 1316.11.1 RFID Setting Operation Example. 1316.11.2 Details of RFID Setting . 1356.12 Z-MODE SETTING . 1446.12.1 Z-Mode Setting Operation Example . 1447. DOWNLOAD MODE. 147COPYRIGHT 2005-2014 TOSHIBA TEC Corporation All rights reservedii
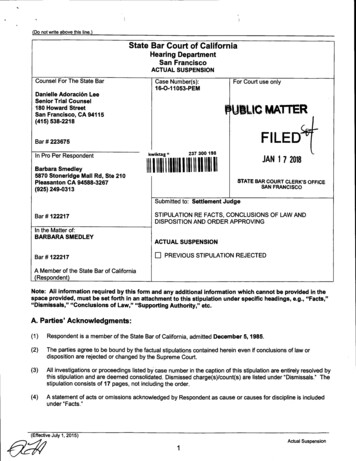
1. SCOPEThis specification describes key operations of the B-SA4T Series general-purpose bar code printers(hereinafter referred to as “B-SA4T”) using the B-SA4T keys and the LCD display.2. OUTLINEThe B-SA4T key operations are performed roughly in two modes: online mode and system mode. Inonline mode, where the B-SA4T is connected to a host device such as a personal computer, the keyoperations are performed mainly to pause or restart the B-SA4T and to display printer status messagesand error messages on the LCD. In system mode, the key operations are performed mainly to conducta self-test and to make various parameter settings. This specification describes the key operations inthese two modes and in download mode.For explanation purposes, this specification uses English key names and LCD messages, althoughother languages are available for key names and LCD messages.3. OPERATION PANELO NLCD (16 digits x 2 lines)L I N EB - S A 4 T - TV 1 . 2 AERROR LED (Red)ON LINE LED (Green)FEED KeyPAUSE keyRESTART key-1-
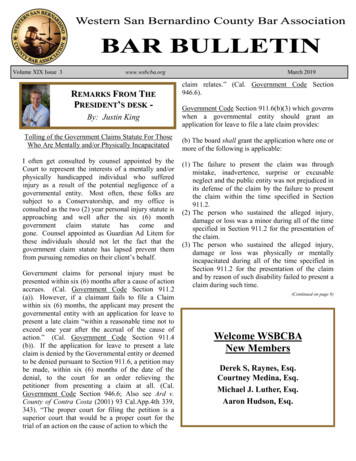
4. KEY OPERATION FLOW[Power OFF]Online modeTurn the power on.[Online][FEED] key[PAUSE] key[Feeds one label.][RESTART] key[Pause]Hold down the [FEED] key for a few seconds.While holding down the [FEED],Information modeHold down the [PAUSE] key for a few seconds.[RESTART], and [PAUSE] keys,[Transmissive sensor threshold setting mode]turn the power on.[FEED] keyDownload mode[Reflective sensor threshold setting mode]Hold down the [RESTART] keyfor a few seconds.System mode[Reset][RESTART] keyWhile holding down the [FEED] and [RESTART][FEED] key[Parameter setting]keys, turn the power on.[FEED] key[RESTART] key[Fine adjustment value setting]While holding down the [FEED] and [PAUSE] keys,turn the power on.[FEED] key[RESTART] key[RESTART] key[Dump mode][RESTART] key[BASIC expansion mode][FEED] key[Automatic calibration mode][RESTART] key[FEED] key[RESTART] key[FEED] key[BASIC setting][FEED] key[FEED] key[RESTART] key[Z-MODE][FEED] key* Supported from C1.9A[FEED] key[RESTART] key[RAM clear][RESTART] key[FEED] key[RESTART] key[Sensor display/adjustment][RESTART] key[FEED] key[RTC setting][Test print][RESTART] key[FEED] key[LAN Enable/Disable][Fine adjustment value setting][RESTART] key[FEED] key[RESTART] key[Parameter setting][RESTART] key[FEED] key[RESTART] key[Self-test][FEED] key[RESTART] key[IP address setting][RESTART] key[Self-test][FEED] key[RESTART] key[BASIC setting][RESTART] key[Parameter setting][FEED] key[RESTART] key[FOR FACTORY][RESTART] key[RESTART] key[FEED] key[Test print][FEED] key[Z-MODE][FEED] key[Fine adjustment value setting][FEED] key[RFID Setting][RESTART] key[FEED] key[RESTART] key* Supported from C1.9A[FEED] key[Z-MODE][FEED] key[FEED] key-2-
5. ONLINE MODE5.1 KEY FUNCTIONS[FEED] key:(1) Feeds or ejects one label. This key is also used to adjust a label to a properposition. When the label is not properly positioned, feed one or two blanklabels using this key before printing so that the printer can start printing at theproper position.(2) Prints data in the image buffer on one label according to the system modesetting.NOTE:When printing is initiated by the [FEED] key, a Clear command or adrawing command should not be sent during printing, otherwise theresulting printout will not be satisfactory showing an incorrect layout.The same may happen if the [FEED] key is pressed to start printingwhile data is being drawn in the image buffer.(3) Shifts the printer mode to the Information Mode (by holding down the [FEED]key for 3 sec. or more while the printer is in pause state.)* For handling of labels having the label pitch of less than 22 mm in cut issuemode, refer to the section, “6.4 FINE ADJUSTMENT VALUE SETTING”.[RESTART] key:(1) Resumes printing when the printer is in a pause state or an error state.(2) Restores the same state as when the power is turned off and on again.(3) Programs various parameters.[PAUSE] key:(1) Stops printing temporarily.(2) Programs threshold values.5.2 LED FUNCTIONS[ON LINE] LED:Indicates that the printer is ready for communication.[ERROR] LED:Indicates that the printer is in an error state.5.3 LCD FUNCTIONSThe LCD displays printer status messages.LCD Size: 16 digits 2 lines-3-
5.4 ONLINE MODE OPERATION EXAMPLEPower ONO NL I N EB - S A 4 T - TV 1 . 2 A* This message is displayed while the printer isidling or printing normally.An error occurs.N OP A P E R1 2 5B - S A 4 T - TV 1 . 2 ALoad label paper and press the [RESTART] key.[RESTART]O NL I N EB - S A 4 T - TV 1 . 2 A[PAUSE]P A U S EB - S A 4 T - T5 2V 1 . 2 AL I N EB - S A 4 T - TNOTE:* This message is displayed and the printingresumes.Press the [PAUSE] key.[RESTART]O N* An error message is displayed when an erroroccurs during printing, then the printing stops.(The number of remaining labels to be printed isdisplayed at the right of the LCD.)V 1 . 2 A* When the [PAUSE] key is pressed during printing,this message is displayed and the printing stops.(The number of remaining labels to be printed isdisplayed at the right of the LCD.)Press the [RESTART] key.* This message is displayed and the printingresumes.[Number of remaining labels to be printed] [Total number of labels to be printed] [Number of labels already printed before an error occurred or the printer stopped temporarily]-4-
5.5 THRESHOLD SETTING5.5.1Outline of Threshold SettingTo always start printing at a proper position, the printer automatically corrects a print startposition using a transmissive or reflective sensor. However, the printer sometimes fails tocorrect the print start position properly.For label papers, a transmissive sensor is used to detect a gap between labels. Whenpreprinted labels are used, transmissivity may vary due to inks used, and the printer may not beable to correct the print start position properly. For tag papers with black marks printed on theback side, a reflective sensor is used to detect the black marks. When reflectivity of the areaother than the black marks varies, the printer may not be able to correct the print start positionproperly.In these cases, the printer can correct the print start position properly by using a transmissivesensor threshold value/reflective sensor threshold value manually determined and stored in anon-volatile memory (EEPROM) by performing the key operation explained in the subsequentsection, “Threshold Setting Operation Example” and by setting the type of sensor for Issue andFeed commands to “3: Transmissive Sensor (when using a manual threshold value)” or “4:Reflective Sensor (when using a manual threshold value)”.5.5.2Threshold Setting Operation ExamplePower ONO N(1) IdlingL I N EB - S A 4 T - TV 1 . 2 A[PAUSE](2) Load a preprinted label paper.(No particular positioning is required.)(3) Press the [PAUSE] key.(4) The printer enters a pause state.P A U S EB - S A 4 T - TV 1 . 2 A[PAUSE]T R A N S M I S S I V EB - S A 4 T - TV 1 . 2 A[FEED]V 1 . 2 A[FEED](6) A sensor, for which a manual threshold valueis to be determined, is displayed.A message to select the transmissive sensor isdisplayed.(7) Press the [FEED] key.R E F L E C T I V EB - S A 4 T - T(5) Hold down the [PAUSE] key for 3 seconds ormore while the printer is in a pause state.(8) A message to select the reflective sensor isdisplayed.(9) Press the [FEED] key.-5-
T R A N S M I S S I V EB - S A 4 T - TV 1 . 2 A[PAUSE]T R A N S M I S S I V EB - S A 4 T - TV 1 . 2 A(14) Press the [RESTART] key.(15) IdlingL I N EB - S A 4 T - T(12) Release the [PAUSE] key when 1.5 or morelabels are fed to stop printing. (The thresholdsetting for the selected sensor (transmissivesensor in this example) is completed.V 1 . 2 A[RESTART]O N(11) Continue holding down the [PAUSE] key.(13) The printer enters a pause state.P A U S EB - S A 4 T - T(10) A message to select the transmissive sensor isdisplayed.V 1 . 2 ACommandO NL I N EB - S A 4 T - TV 1 . 2 A(16) The printer starts printing according to acommand sent from a PC. Supplementary Explanations (1)When the [PAUSE] key is pressed and released within 3 seconds while the printer ispaused, no action is taken.(2)To obtain an accurate threshold value, 1.5 or more labels should be fed. (If less than 1.5labels are fed, the threshold value may not be accurate enough to start printing at a properprint start position. If the print start position is not correct, the threshold setting operationshould be performed again.)(3)When the [PAUSE] key is held down for 3 seconds or more with the head lifted, no action istaken.(4)While the printer is feeding labels to determine a threshold value, no errors, including paperend error and cutter error, are detected.(5)If the printer still does not start printing at the proper print start position after the thresholdsetting operation is performed, it can be suspected that a sensor adjustment is not proper.In this case, readjust the sensor in system mode, then perform the threshold settingoperation again.When the backing paper of a label paper is too thick, the transmissive sensor should bereadjusted.In addition, make sure that the type of sensor for Issue and Feed commands is set to “3:Transmissive sensor (when using a manual threshold value)” or “4: Reflective sensor (whenusing a manual threshold value)”.-6-
5.6 INFORMATION MODE5.6.1Outline of the Information ModeIn the information mode, the total feed amount (*1) counted during feed and printing operations isdisplayed on the LCD or printed in units of centimeter and inch on request. The feed amount iscounted at the end of feed or printing, and saved in the non-volatile memory.NOTES:1. The effective range of the feed amount (*1) is as follows. When the feed amount exceeds themaximum, the maximum value will be saved.In unit of centimeter: 0 to 320000000In unit of inch: 0.0 to 125984251.92. The information mode is supported from the following firmware version:B-SA4T: C2.13. In the following cases, feed or printing is not counted in this feed amount (*1).Reverse feed, Forward feed to the strip position, Pre-strip feed, Auto forward feed, Voidprinting on RFID media, RFID tag position adjustment command (@003 command), Prereverse feed when an expansion I/O device is connected, Printing in offline (Diag. test print,maintenance counter print, test print, dump), Printing in the information mode, Manualthreshold, and Automatic calibration3. Since the feed amount (*1) is counted based on the label pitch specified by the command, alarge margin of error may be generated if the command-specified label pitch differs from theactually-measured label pitch.4. Since the counted feed amount is saved in the non-volatile memory (EEPROM), replacementof the EEPROM is prohibited. (Except for the case the Main PC board is replaced with aservice part.)(*1): Feed amount counted in the information mode-7-
5.6.2Information Mode Operation ExamplePower ONO N(1) IdleL I N EB - S A 4 TC 2 . 1(2) Press the [PAUSE] key.[PAUSE](3) The printer enters Pause state.P A U S EB - S A 4 TC 2 . 1(4) Hold down the [FEED] key for 3 seconds or morewhile the printer is in pause state.[FEED]3 2 0 0 0 0 0 0 0 c mB - S A 4 TC 2 . 1[PAUSE]O NL I N EB - S A 4 T(5-1) Counted feed amount is displayed on the LCD (inunits of cm).(5-2) The unit of measure is switched betweencentimeter and inch by pressing the [RESTART]key.(6-1) Press the [FEED] key to return to the idle state(1).(6-2) Press the [PAUSE] key to print the feed amount.(7) The printer is reset.(8) The printer returns to the idle state (1).C 2 . 1(Supplementary Explanation)(1) When printing is performed in this mode, a quick reset is performed.Performing a quick reset causes the print count (number of labels issued) to be reset to zero and theimage buffer to be cleared. When the automatic calibration is enabled, a calibration is performed after aquick reset. When the automatic call at power on parameter is enabled in the Saved data call command,saved data will be called after a quick reset.(2) Previous print conditions are applied to the printing performed in this mode, except: Printing directionWhen the mirror printing has been specified, only the mirror printing is not performed. Therefore, thebottom first mirror printing and top first mirror printing will be changed to bottom first printing and top firstprinting, respectively. Effective print width and X-coordinate fine adjustmentWhen the number of digits of the feed amount reaches the max. number of digits (74 mm), the feedamount is center-aligned.(3) Before shifting to the Information mode, make sure that the printer has not received any commandsrelated to feed or drawing. If the printer has received such commands, printing will not be performed andthe printer will return to the normal state. At this time, a quick reset will not be performed.(4) Do not send a command to the printer while in the information mode.-8-
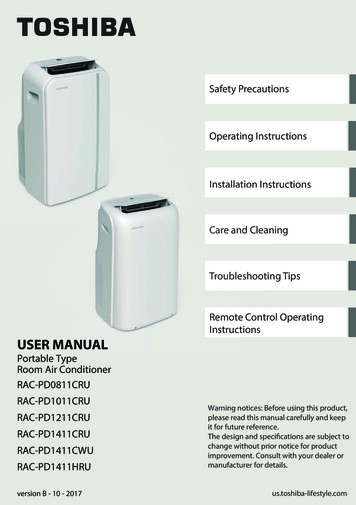
5.6.3Information Mode Print Sample Print sample TOTAL COUNTER LISTMM-dd-yyyy zzzzzzzPRINTER aaaaaaaaacmbbbbbbbbb.binch////Max. number of digits: 74 mm//Effective print width// Print data Item1st line2nd lineInformationRangeTitleTOTAL COUNTER LISTDate and time (*1) MM: Month01 to 12dd: Day01 to 31yyyy: Year2000 to 2099hh: Hour03 to 23mm: Minute00 to 593rd line ModelB-SA4T 203 dpiB-SA4T-GB-SA4T 300 dpiB-SA4T-T4th lineSerial No. (*2)11 to 32-digit half-size alpha-numeric(A to Z, a to z, 0 to 9, space, hyphen5th lineFeed amount in information mode (unit: cm)0 to 3200000006th lineFeed amount in information mode (unit: inch) 0 to 125984251.9*1: When an optional real time clock is not installed, data areas in this line will be blank.(E.g.) “ - : “*2: In the case a serial number has never been registered to the printer, MAC address of wiredLAN is printed without delimiters. If the MAC address of wired LAN cannot be obtained(when a LAN interface board is not installed in the printer), this line will be blank.-9-
5.7 RESETPower ONO N(1) Idling or printing normallyL I N EB - S A 4 T - TV 1 . 2 A(2) Press the [PAUSE] key.[PAUSE]P A U S EB - S A 4 T - T5 2V 1 . 2 A[RESTART][PAUSE]L I N EB - S A 4 T - T(3) Hold down the [RESTART] key for 3 secondsor more while the printer is in a pause state.(4) The reset menu is displayed. 1 R E S E TO N* If the [PAUSE] key is pressed during printing, thismessage is displayed and printing stops.V 1 . 2 A(5) Press the [PAUSE] key.(6) The printer returns to the same state as whenthe power is turned off and on again. Supplementary Explanations (1)When pressing the [RESTART] key can clear an error (a recoverable error by the[RESTART] key), the printer enters reset mode and displays a reset menu when the[RESTART] key is pressed for 3 seconds or more.(2)When the [RESTART] key is pressed and released within 3 seconds in an error state or apause state, the printer resumes printing. (The reset menu is not displayed on the LCD.)When the [RESTART] key is pressed in a communication error state or a command errorstate, the printer returns to the same state as when the power is turned off and on again,whether or not the [RESTART] key is held down for 3 seconds or more.- 10 -
5.8 PARAMETER SETTING5.8.1Parameter Setting Operation ExamplePower ONO N(1) Idling or printing normallyL I N EB - S A 4 T - TV 1 . 2 A[PAUSE]P A U S E(2) Press the [PAUSE] key.5 2B - S A 4 T - TV 1 . 2 A(4) Hold down the [RESTART] key for 3 secondsor more while the printer is a pause state.[RESTART](5) The reset menu is displayed. 1 R E S E T[FEED](6) Press the [FEED] key. 2 P A R A M E T E RS E T[PAUSE] 2 P A R A M E T E RF O N TC O D ES E TP C - 8 5 0 2 P A R A M E T E RF O N TS E T[PAUSE]S P E E DS E T[PAUSE]D A T AL E N G .(13) RS232C communication speed setting:Select a communication speed using the[FEED] and [RESTART] keys.(14) Press the [PAUSE] key.S E T8 b i t s[PAUSE](11) Font 0 setting:Select a style of zero (0) using the [FEED] and[RESTART] keys.(12) Press the [PAUSE] key.9 6 0 0 b p s 2 P A R A M E T E R(9) Character code setting:Select a character code using the [FEED] and[RESTART] keys.(10) Press the [PAUSE] key.0 2 P A R A M E T E R(7) System mode menu display(Parameter setting)(8) Press the [PAUSE] key.[PAUSE]Z E R O(3) “PAUSE” is displayed.(15) RS232C data length setting:Select a data length using the [FEED] and[RESTART] keys.(16) Press the [PAUSE] key.- 11 -
2 P A R A M E T E RS T O PB I TS E T1 b i t[PAUSE] 2 P A R A M E T E RP A R I T Y(18) Press the [PAUSE] key.S E TE V E N[PAUSE] 2 P A R A M E T E RX O N R E A D YS E T[PAUSE]L C DS E T[PAUSE]S E TF O R W A R DO F F[PAUSE]C O D ES E T[PAUSE]S E TP E E LO F F[PAUSE] 2 P A R A M E T E RF E E DK E YS E T[PAUSE]K A N J IC O D E(31) [FEED] key function setting:Select a function of the [FEED] key using the[FEED] and [RESTART] keys.(32) Press the [PAUSE] key.S E TT Y P E 1[PAUSE](29) Strip wait status setting:Enable/disable the strip wait status functionusing the [FEED] and [RESTART] keys.(30) Press the [PAUSE] key.F E E D 2 P A R A M E T E R(27) Control code setting:Select a control code using the [FEED] and[RESTART] keys.(28) Press the [PAUSE] key. 2 P A R A M E T E RS T S(25) Setting of forward feed standby after an issue:Enable/disable the forward feed standbyfunction using the [FEED] and [RESTART]keys.(26) Press the [PAUSE] key.E S C , L F , N U LO F F(23) Setting of language for LCD messages:Select a language for LCD messages using the[FEED] and [RESTART] keys.(24) Press the [PAUSE] key. 2 P A R A M E T E R 2 P A R A M E T E R(21) RS232C flow control method setting:Select a flow control method using the [FEED]and [RESTART] keys.(22) Press the [PAUSE] key.E N G L I S HW A I T(19) RS232C parity setting:Select a parity value using the [FEED] and[RESTART] keys.(20) Press the [PAUSE] key.A U T O 2 P A R A M E T E R(17) RS232C stop bit length setting:Select a stop bit length using the [FEED] and[RESTART] keys.(33) Kanji code setting:Select a Kanji code using the [FEED] and[RESTART] keys.(34) Press the [PAUSE] key.- 12 -
2 P A R A M E T E RE U R OC O D ES E TB 0[PAUSE](36) Press the [PAUSE] key. 2 P A R A M E T E RS E TA U T OO F FH DC H K[PAUSE] 2 P A R A M E T E RA C K / B U S YS E T[PAUSE]S E TW E BO F F[PAUSE]I N P U TP R I M ES E TO NS E TR B N7 0 m[PAUSE] 2 P A R A M E T E RE X . I / OS E TT Y P E 1S E TP L U GO F F[PAUSE] 2 P A R A M E T E RL B L / R B NE N D[PAUSE](47) Expansion I/O operation mode setting:Select an expansion I/O operation mode usingthe [FEED] and [RESTART] keys.(48) Press the [PAUSE] key. 2 P A R A M E T E RP L A Y(45) Ribbon near end detection setting:Select a remaining ribbon length to be detectedas a ribbon near end state using the [FEED]and [RESTART] keys.(46) Press the [PAUSE] key.[PAUSE]&(43) Setting of reset process when the nInit signal isON:Enable/disable the reset process functionusing the [FEED] and [RESTART] keys.(44) Press the [PAUSE] key. 2 P A R A M E T E RE N D(41) Web printer function setting:Enable/disable the web printer function usingthe [FEED] and [RESTART] keys.(42) Press the [PAUSE] key.[PAUSE]N E A R(39) Centronics ACK/BUSY timing setting:Select an ACK/BUSY timing using the [FEED]and [RESTART] keys.(40) Press the [PAUSE] key. 2 P A R A M E T E R 2 P A R A M E T E R(37) Automatic head broken dots check setting:Enable/disable the automatic head broken dotscheck using the [FEED] and [RESTART] keys.(38) Press the [PAUSE] key.T Y P E 1P R I N T E R(35) Euro code setting:Select a Euro code using the [FEED] and[RESTART] keys.(49) Plug-and-play operation setting:Enable/disable the plug-and-play operationfunction using the [FEED] and [RESTART]keys.(50) Press the [PAUSE] key.S E TT Y P 1(51) Label end/ribbon error process setting:Select a label end/ribbon error process usingthe [FEED] and [RESTART] keys.(52) Press the [PAUSE] key.- 13 -
2 P A R A M E T E RS E TP R EO F FP E E LO F F[PAUSE](54) Press the [PAUSE] key. 2 P A R A M E T E RS E TB A C KS T DS P E E D[PAUSE] 2 P A R A M E T E RM A X IC O D ES E T[PAUSE]S E TK BO F F[PAUSE]P E E LO F FT R QT O N ET A B L ES E TR 0S E T[PAUSE]C U TM O D ES E T[PAUSE]S E TM U L T IO F F[PAUSE]P A S S W O R D(67) Multiple-label set issue:Enable or disable the function using the[FEED] or [RESTART] key.(68) Press the [PAUSE] key.S E TO F F - - - [PAUSE](65) High speed cut issue:Select a cut issue type us
1st Edition: February 21, 2005 2nd Edition: April 20, 2005 3rd Edition: March 29, 2006 4th Edition: June 30, 2006 5th Edition: October 10, 2007 6th Edition: February 14, 2008 7th Edition: March