Transcription
PowerSchool 301 Advanced Queriesand Data Export to ExcelFUSD TrainingContextual Help There is a help link in the top right of most screens.Web Page (www.fresno.k12.ca.us/sis) Offers Online training, Site Status, Downloads, and Contact InformationContents1. Ways to Export Quick Export Setting Excel to open exports Copy and Paste2. Special Fields Period Info GPA Period Attendance3. Excel Sort Subtotal AutoFilter Advanced Filter4. Advanced Exporting with DDE5. Advanced Excel: Pivot TablesPowerSchool Version 4.2.5Updated September 28, 2006301 Advanced Queries and Export1FUSD Training
1. Ways to ExportChoose yourinitial GroupExport:1) Quick Export2) By TemplateSearch by Grades/Attendance and choose“Display matching students & Sections”Save FileSelectinformationand copyOpen Excel and Open fileyou savedOpen Excel, create a new fileand paste in informationQuick Export1. Choose your group and select Quick Export from the pull-downmenu or Group Functions screen.2. Enter in the fields you wish to export (use the Data Dictionary orSpecial Fields)3. Click Submit.Windows – Wait for the Save as window to appear. Click Save andgive the file a name and location. You need to remember thisinformation to open in Excel.Mac – You need to use Internet Explorer and set your files of type“.text” to download. You will see a file on the desktop called“student.export.text” that you can open in Excel.How to set Excel to automatically open export files:Your computer may not open the PowerSchool export files automatically in Microsoft Excel, follow thesesteps to allow Excel to automatically open your export files:Internet Explorer - Excel - Windows1. Use Quick Export to export data fromPowerSchool.2. Save the export file to your desktop.3. Locate the export file on your desktop.4. Right-click on the file's icon.5. Choose Open With from the pop-up menu.6. Click Choose Program.7. Choose Excel.8. Click the "Always use the selectedprogram to open this kind of file" checkbox.9. Click OK.301 Advanced Queries and ExportInternet Explorer - Excel - Macintosh1. Choose Preferences from the Explorer menu.2. Click File Helpers.3. Click Add.4. Enter PowerSchool Export in the Description field.5. Enter text/ps-export in the Extension and MIME type fields.6. Click Browse in the File Type Section.7. Choose Microsoft Excel.8. Enter TEXT in the "File type" field.9. Choose View with Application from the How to Handle pop-upmenu.10. Click OK.11. Click OK on the Internet Explorer Preferences window.12. Use Quick Export to export data from PowerSchool.13. Locate the file you exported on your desktop.14. Select the file and choose Show Info from the File menu(Command-I).15. Choose Open with Application from the pop-up menu.2 Click the application icon and choose FUSDTraining16.MicrosoftExcel.17. Click Change All.18. Click Continue.
Copy and PasteWhen using the “Search by Grade/Attendance” function, you can choose the option of “Displaymatching student & sections”. Wait for the resulting screen to appear.1. Click and drag over the entire area you want to copy to Excel.2. Select Copy from the Edit menu3. Open up a new file in Excel.4. Click in the first cell (A1) and select Paste from theEdit menu.301 Advanced Queries and Export3FUSD Training
2. Special FieldsPeriod InfoThe following codes allow you to export period information. These codes export Period 1. For otherperiod, you can change the number.*period info;1;teacher name*period info;1;course name*period info;1;course number*period info;1;current citizenship*period info;1;current grade;S1(the term code is optional)*period info;1;current percent*period info;1;room*period info;1;section number*period info;1;teacher commentYou may also use these codes on the List Students screen in PowerSchool.GPAAs a reminder, mainframe is current owner of official GPA. Mainframe GPA fields are imported intoPowerSchool at the end of each grade reporting period:AGPA- Augmented academic GPA from mainframeCGPA- Cumulative GPA from mainframeEGPA- Eligibility GPA from mainframeUGPA- Un-augmented GPA (10-12) from mainframe*gpa method “simple”Will export the current PowerSchool GPA listed at the bottom of the Quick Lookup screen.You may also use these codes on the List Students screen in PowerSchool.Period AttendanceFor total absences in period 1per.att;1For only a specific code in period 1 – this example shows codes of “I” for“Medical/Emotional/Funeral”per.att;1;IFor all tardiesper.att;1;tar301 Advanced Queries and Export4FUSD Training
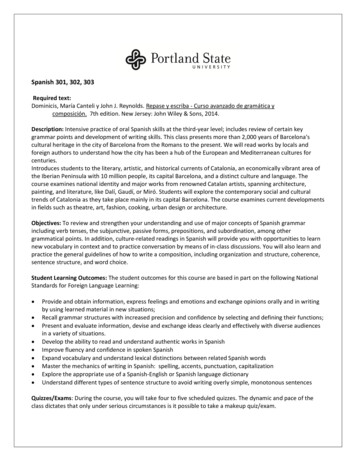
3. ExcelSeveral reports are available that also assist in identifying students. Tofind these reports, Click “Reports” from the start screen or select“Reports Menu” from the Group Functions page. Then click “RunReports”Sort Choose Sort from the Data menu Choose your sort criteria and click OK. Choose multiple sorts, if desired. For example, sort on teachername, then by student name. for alpha lists by teacher.Sub Totals Your list needs to be sorted first for t Choose Subtotals from the Data menu Carefully choose the At each change in: selection. This willdetermine what is being counted. Check a box for Add subtotal to: Check the Summary below data to put a grand total at thebottom. Otherwise this will show at the topExample of Subtotals:Auto Filter Choose Filter, then AutoFilter from the Data menu.Popup menus appear on the top of each column.You can use the menus to quickly filter or sort eachcolumn301 Advanced Queries and Export5FUSD Training
Custom Filter Choose Custom Filter from any AutoFilter menu. Change the criteria toanything you want. Forexample, use the Containscomparator and enterALGEBRA to show allalgebra classes regardless oflevel You may enter more thanone comparison on thecustom filter with either an“and” or “or” conjunction.4. Advanced Exporting with DDE Direct Database ExportTo use DDE, click on “System Direct Database Export (DDE).” A screen like the following shouldappear:1) By default, the Current Table is the Students(1) table. There are several tables within thedatabase and you can change to them by usingthe drop down menu. Each table has a numberassociated with it as well, which can be used toexport information from different tables using thatnumber surrounded by brackets, i.e. [4] wouldallow you to export data from the CC(4) table—thecourse catalog.2) Once you have your table chosen, you select allthe records in that table by clicking on the Selectall xxxx button.3) Once you have a table selected, if you want tonarrow down the information before viewing it or exporting it, you can search the table by selectingdifferent fields within the table.4) Once you select specific fields to search on, you can then search only in the school you were in whenyou entered DDE or search the entire table.301 Advanced Queries and Export6FUSD Training
After clicking on “Export Records” At the top is a drop down box that has the various fieldsin the table. Drop it down and choose Ethnicity, Gender,and Grade Level. You will have to choose one at a timeand they will appear in the box like below:You can also type in the field names if you know them,separating them line by line. Sometimes you can alsopull information from other tables to export by typing inthe table number and field name. For example,[39]Name would pull the name of the school the studentis attending which is stored in Table 39 in a field calledName.d) After listing all of the fields you need, the next step is to export the information. Leave the rest of thescreen like it is and click on the Submit button toward the bottom.5. Advanced Excel: Creating a Pivot TableTo start the Pivot Table wizard in Microsoft Excel, click on the Data tab and choose Pivot table from thedrop down menu and a Wizard should start.For step 1 the information may already bechosen. If not, Microsoft Excel list andPivotTable should be the options to mark. ClickNext to go to step 2.In step 2, the range should already be filled in and relateto the first cell all the way to the final piece ofinformation. If not, browse and highlight all theinformation including the column headings in row 1.Click on Next to go to step 3.301 Advanced Queries and Export7FUSD Training
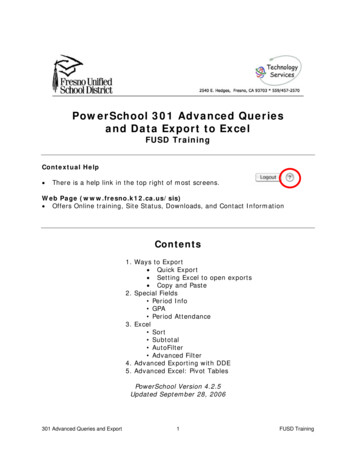
With step 3 you will want to choose NewWorksheet, but before you click on Finishyou need to set up the Layout of the table.Click on the Layout button.The layout window will look similar to the oneto the left. Your column titles are to the rightand what you will do is drag the column title tothe appropriate place on the layout dependingon where you want it to appear.--Drag the Grade Level button from the rightover to the rectangle that has Row and let go.--Repeat for the Gender button.--Drag the Ethnicity button to the Columnrectangle and let go.--And drag the Grade Level button from theright again to the Data box and let go. Doubleclick on it and choose count.This is how your screen should look When you're done, click on OK and your pivot table will becreated and will look something like the example to the left: Each part of the table has its own drop down, so you canchange what's displayed by choosing different parts todisplay.301 Advanced Queries and Export8FUSD Training
Student and Teacher SchedulesSummary: There's a table in PowerSchool called CC (4) that keeps track of the course catalog. The tableincludes courses, the students who are taking them, and the teacher of the course.DDE: Before exporting, you may want to narrow down the data by searching based on term id or schoolid. In the Export Records box, enter the following:[1]lastfirst[5]lastfirst[2]course nameexpressiontermid[1]lastfirst pulls the student's name from the students table, [5]lastfirst pulls the teacher's name from theteachers table, [2]course name pulls the name of the course from the courses table, and expression andtermid pull the period name and terms from the CC table. To get the current year's schedule, search ontermid 1600 before exporting.301 Advanced Queries and Export9FUSD Training
Sep 28, 2006 · 2. Enter in the fields you wish to export (use the Data Dictionary or Special Fields) 3. Click Submit. Windows – Wait for the Save as window to appear. Click Save and give the file a name and location. You need to remember this information to open in Excel. Mac – You need to use Internet Explorer and set your files of typeFile Size: 392KB