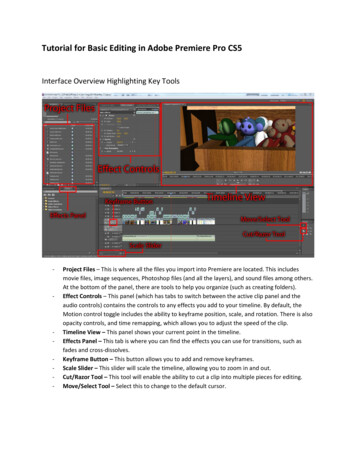
Transcription
Introduction to Pro Tools
Legal Notices 2014 Avid Technology, Inc., (“Avid”), all rights reserved.This guide may not be duplicated in whole or in part withoutthe written consent of Avid.003, 192 Digital I/O, 192 I/O, 96 I/O, 96i I/O, Adrenaline,AirSpeed, ALEX, Alienbrain, AME, AniMatte, Archive,Archive II, Assistant Station, AudioPages, AudioStation,AutoLoop, AutoSync, Avid, Avid Active, Avid AdvancedResponse, Avid DNA, Avid DNxcel, Avid DNxHD, Avid DSAssist Station, Avid Ignite, Avid Liquid, Avid Media Engine,Avid Media Processor, Avid MEDIArray, Avid Mojo,Avid Remote Response, Avid Unity, Avid Unity ISIS,Avid VideoRAID, AvidRAID, AvidShare, AVIDstripe, AVX,Beat Detective, Beauty Without The Bandwidth,Beyond Reality, BF Essentials, Bomb Factory, Bruno, C 24,CaptureManager, ChromaCurve, ChromaWheel,Cineractive Engine, Cineractive Player, Cineractive Viewer,Color Conductor, Command 8, Control 24, Cosmonaut Voice,CountDown, d2, d3, DAE, D-Command, D-Control, Deko,DekoCast, D-Fi, D-fx, Digi 002, Digi 003, DigiBase,Digidesign, Digidesign Audio Engine, DigidesignDevelopment Partners, Digidesign Intelligent NoiseReduction, Digidesign TDM Bus, DigiLink, DigiMeter,DigiPanner, DigiProNet, DigiRack, DigiSerial, DigiSnake,DigiSystem, Digital Choreography, Digital NonlinearAccelerator, DigiTest, DigiTranslator, DigiWear, DINR,DNxchange, Do More, DPP-1, D-Show, DSP Manager,DS-StorageCalc, DV Toolkit, DVD Complete, D-Verb, Eleven,EM, Euphonix, EUCON, EveryPhase, Expander,ExpertRender, Fairchild, FastBreak, Fast Track, Film Cutter,FilmScribe, Flexevent, FluidMotion, Frame Chase, FXDeko,HD Core, HD Process, HDpack, Home-to-Hollywood,HyperSPACE, HyperSPACE HDCAM, iKnowledge, Impact,Improv, iNEWS, iNEWS Assign, iNEWS ControlAir, InGame,Instantwrite, Instinct, Intelligent Content Management,Intelligent Digital Actor Technology, IntelliRender, Intelli-Sat,Intelli-Sat Broadcasting Recording Manager, InterFX,Interplay, inTONE, Intraframe, iS Expander, iS9, iS18, iS23,iS36, ISIS, IsoSync, LaunchPad, LeaderPlus, LFX, Lightning,Link & Sync, ListSync, LKT-200, Lo-Fi, MachineControl,Magic Mask, Make Anything Hollywood,make manage move media, Marquee, MassivePack,MassivePack Pro, Maxim, Mbox, Media Composer,MediaFlow, MediaLog, MediaMix, Media Reader,Media Recorder, MEDIArray, MediaServer, MediaShare,MetaFuze, MetaSync, MIDI I/O, Mix Rack, Moviestar,MultiShell, NaturalMatch, NewsCutter, NewsView,NewsVision, Nitris, NL3D, NLP, NSDOS, NSWIN, OMF,OMF Interchange, OMM, OnDVD, Open Media Framework,Open Media Management, Painterly Effects, Palladiium,Personal Q, PET, Podcast Factory, PowerSwap, PRE,ProControl, ProEncode, Profiler, Pro Tools, Pro Tools HD,Pro Tools LE, Pro Tools M-Powered, Pro Transfer,QuickPunch, QuietDrive, Realtime Motion Synthesis,Recti-Fi, Reel Tape Delay, Reel Tape Flanger,Reel Tape Saturation, Reprise, Res Rocket Surfer, Reso,RetroLoop, Reverb One, ReVibe, Revolution, rS9, rS18,RTAS, Salesview, Sci-Fi, Scorch, ScriptSync,SecureProductionEnvironment, Shape-to-Shape,ShuttleCase, Sibelius, SimulPlay, SimulRecord,Slightly Rude Compressor, Smack!, Soft SampleCell,Soft-Clip Limiter, SoundReplacer, SPACE, SPACEShift,SpectraGraph, SpectraMatte, SteadyGlide, Streamfactory,Streamgenie, StreamRAID, SubCap, Sundance,Sundance Digital, SurroundScope, Symphony, SYNC HD,SYNC I/O, Synchronic, SynchroScope, Syntax,TDM FlexCable, TechFlix, Tel-Ray, Thunder, TimeLiner,Titansync, Titan, TL Aggro, TL AutoPan, TL Drum Rehab,TL Everyphase, TL Fauxlder, TL In Tune, TL MasterMeter,TL Metro, TL Space, TL Utilities, tools for storytellers, Transit,TransJammer, Trillium Lane Labs, TruTouch, UnityRAID,Vari-Fi, Video the Web Way, VideoRAID, VideoSPACE,VTEM, Work-N-Play, Xdeck, X-Form, and XMON are eitherregistered trademarks or trademarks of Avid Technology, Inc.in the United States and/or other countries.Bonjour, the Bonjour logo, and the Bonjour symbol aretrademarks of Apple Computer, Inc.Thunderbolt and the Thunderbolt logo are trademarks of IntelCorporation in the U.S. and/or other countries.This product may be protected by one or more U.S. and nonU.S. patents. Details are available at www.avid.com/patents.Product features, specifications, system requirements, andavailability are subject to change without notice.Guide Part Number 9329-65428-00 REV A 06/14
ContentsIntroduction to Pro Tools. . . . . . . . . . . . . . . . . . . . . . . . . . . . . . . . . . . . . . . . . . . . . . . . . . . . . . . 1Connecting Headphones or Speakers . . . . . . . . . . . . . . . . . . . . . . . . . . . . . . . . . . . . . . . . . 1Playing Back the Demo Session . . . . . . . . . . . . . . . . . . . . . . . . . . . . . . . . . . . . . . . . . . . . . 2Creating a New Session . . . . . . . . . . . . . . . . . . . . . . . . . . . . . . . . . . . . . . . . . . . . . . . . . . . 6Recording Audio . . . . . . . . . . . . . . . . . . . . . . . . . . . . . . . . . . . . . . . . . . . . . . . . . . . . . . . . 6Measuring Time in Minutes and Seconds or Bars and Beats . . . . . . . . . . . . . . . . . . . . . . . . . 9Importing Audio . . . . . . . . . . . . . . . . . . . . . . . . . . . . . . . . . . . . . . . . . . . . . . . . . . . . . . . . 13Editing Audio . . . . . . . . . . . . . . . . . . . . . . . . . . . . . . . . . . . . . . . . . . . . . . . . . . . . . . . . . . 16Sequencing MIDI with a Virtual Instrument Plug-In . . . . . . . . . . . . . . . . . . . . . . . . . . . . . . . 20Mixing and Plug-In Processing . . . . . . . . . . . . . . . . . . . . . . . . . . . . . . . . . . . . . . . . . . . . . 28Exporting Your Mix . . . . . . . . . . . . . . . . . . . . . . . . . . . . . . . . . . . . . . . . . . . . . . . . . . . . . . 36Learn More . . . . . . . . . . . . . . . . . . . . . . . . . . . . . . . . . . . . . . . . . . . . . . . . . . . . . . . . . . . 37Introduction à Pro Tools . . . . . . . . . . . . . . . . . . . . . . . . . . . . . . . . . . . . . . . . . . . . . . . . . . . . . . 38Connexion d'un casque ou de haut-parleurs . . . . . . . . . . . . . . . . . . . . . . . . . . . . . . . . . . . 38Lecture de la session de démonstration . . . . . . . . . . . . . . . . . . . . . . . . . . . . . . . . . . . . . . . 39Création d'une nouvelle session . . . . . . . . . . . . . . . . . . . . . . . . . . . . . . . . . . . . . . . . . . . . 43Enregistrement audio . . . . . . . . . . . . . . . . . . . . . . . . . . . . . . . . . . . . . . . . . . . . . . . . . . . . 43Mesure du temps en minutes et secondes ou en mesures et temps . . . . . . . . . . . . . . . . . . 47Importation de fichiers audio . . . . . . . . . . . . . . . . . . . . . . . . . . . . . . . . . . . . . . . . . . . . . . . 51Édition audio . . . . . . . . . . . . . . . . . . . . . . . . . . . . . . . . . . . . . . . . . . . . . . . . . . . . . . . . . . 55Programmation MIDI avec un plug-in d'instrument virtuel . . . . . . . . . . . . . . . . . . . . . . . . . . 59Mixage et traitement de plug-in . . . . . . . . . . . . . . . . . . . . . . . . . . . . . . . . . . . . . . . . . . . . . 67Exportation de votre mix . . . . . . . . . . . . . . . . . . . . . . . . . . . . . . . . . . . . . . . . . . . . . . . . . . 75Pour en savoir plus. . . . . . . . . . . . . . . . . . . . . . . . . . . . . . . . . . . . . . . . . . . . . . . . . . . . . . 76Contentsiii
Einführung in Pro Tools. . . . . . . . . . . . . . . . . . . . . . . . . . . . . . . . . . . . . . . . . . . . . . . . . . . . . . . 77Anschließen von Kopfhörern oder Lautsprechern . . . . . . . . . . . . . . . . . . . . . . . . . . . . . . . . 77Wiedergabe der Demo-Session . . . . . . . . . . . . . . . . . . . . . . . . . . . . . . . . . . . . . . . . . . . . 78Erstellen einer neuen Session . . . . . . . . . . . . . . . . . . . . . . . . . . . . . . . . . . . . . . . . . . . . . . 82Aufnehmen von Audio . . . . . . . . . . . . . . . . . . . . . . . . . . . . . . . . . . . . . . . . . . . . . . . . . . . 82Zeitmessung in Minuten und Sekunden oder Takten und Schlägen . . . . . . . . . . . . . . . . . . . 85Importieren von Audiodateien . . . . . . . . . . . . . . . . . . . . . . . . . . . . . . . . . . . . . . . . . . . . . . 90Bearbeiten von Audiomaterial . . . . . . . . . . . . . . . . . . . . . . . . . . . . . . . . . . . . . . . . . . . . . . 93MIDI-Sequencing mit einem Virtual Instruments-Plug-In . . . . . . . . . . . . . . . . . . . . . . . . . . . 97Mischen und Plug-In-Verarbeitung . . . . . . . . . . . . . . . . . . . . . . . . . . . . . . . . . . . . . . . . . 106Exportieren Ihres Mix . . . . . . . . . . . . . . . . . . . . . . . . . . . . . . . . . . . . . . . . . . . . . . . . . . . 114Weitere Informationen . . . . . . . . . . . . . . . . . . . . . . . . . . . . . . . . . . . . . . . . . . . . . . . . . . 115Introducción a Pro Tools . . . . . . . . . . . . . . . . . . . . . . . . . . . . . . . . . . . . . . . . . . . . . . . . . . . . . 116Conectar auriculares o altavoces . . . . . . . . . . . . . . . . . . . . . . . . . . . . . . . . . . . . . . . . . . 116Reproducción de la sesión de demostración . . . . . . . . . . . . . . . . . . . . . . . . . . . . . . . . . . 117Creación de una sesión . . . . . . . . . . . . . . . . . . . . . . . . . . . . . . . . . . . . . . . . . . . . . . . . . 121Grabación de audio . . . . . . . . . . . . . . . . . . . . . . . . . . . . . . . . . . . . . . . . . . . . . . . . . . . . 121Medición del tiempo en minutos y segundos o barras y compases . . . . . . . . . . . . . . . . . . 124Importación de audio . . . . . . . . . . . . . . . . . . . . . . . . . . . . . . . . . . . . . . . . . . . . . . . . . . . 129Edición de audio . . . . . . . . . . . . . . . . . . . . . . . . . . . . . . . . . . . . . . . . . . . . . . . . . . . . . . 132Secuenciación MIDI con un plug-in de instrumento virtual . . . . . . . . . . . . . . . . . . . . . . . . 136Mezclas y procesamiento con plug-ins . . . . . . . . . . . . . . . . . . . . . . . . . . . . . . . . . . . . . . 145Exportación de la mezcla . . . . . . . . . . . . . . . . . . . . . . . . . . . . . . . . . . . . . . . . . . . . . . . . 153Más información . . . . . . . . . . . . . . . . . . . . . . . . . . . . . . . . . . . . . . . . . . . . . . . . . . . . . . . 154Pro Tools ࡢᴫせ . . . . . . . . . . . . . . . . . . . . . . . . . . . . . . . . . . . . . . . . . . . . . . . . . . . . . . . . . 155 ࢻ ࣥ ࡓࡣࢫ ࣮ ࣮ ᥋ ࡍ . . . . . . . . . . . . . . . . . . . . . . . . . . . . . . . . . . . 155ࢹ࣭ࣔࢭ ࢩࣙࣥ ࡍ . . . . . . . . . . . . . . . . . . . . . . . . . . . . . . . . . . . . . . . . . . . . . 156᪂つࢭ ࢩࣙࣥ సᡂࡍ . . . . . . . . . . . . . . . . . . . . . . . . . . . . . . . . . . . . . . . . . . . . . . . 161 ࣮ࢹ 㘓㡢ࡍ . . . . . . . . . . . . . . . . . . . . . . . . . . . . . . . . . . . . . . . . . . . . . . . . . . 161ศ ࡓࡣᑠ ᢿ࡛ 㛫 ࡍ . . . . . . . . . . . . . . . . . . . . . . . . . . . . . . . . . . . . . 165 ࣮ࢹ ࣥ ࣮ࢺࡍ . . . . . . . . . . . . . . . . . . . . . . . . . . . . . . . . . . . . . . . . . . . . . 169 ࣮ࢹ ⦅㞟ࡍ . . . . . . . . . . . . . . . . . . . . . . . . . . . . . . . . . . . . . . . . . . . . . . . . . . 173 ࣮ࢳ࣭ࣕࣝ ࣥࢫࢺ ࣓ࣝࣥࢺ࣭ ࣛࢢ ࣥ ࡋ࡚ MIDI ࢩ࣮ࢣࣥࢫ సᡂࡍ . 177 ࢩࣥࢢ ࣛࢢ ࣭ࣥ ࣟࢭ ࢩࣥࢢ . . . . . . . . . . . . . . . . . . . . . . . . . . . . . . . . . . . 186 ࢡࢫ ࢡࢫ ࣮ࢺࡍ . . . . . . . . . . . . . . . . . . . . . . . . . . . . . . . . . . . . . . . . . . . . . 195ࡉ ヲࡋࡃᏛࡪ ࡣ . . . . . . . . . . . . . . . . . . . . . . . . . . . . . . . . . . . . . . . . . . . . . . . . . . 197Contentsiv
Pro Tools キϸ. . . . . . . . . . . . . . . . . . . . . . . . . . . . . . . . . . . . . . . . . . . . . . . . . . . . . . . . . . . 199䔋ᣒ㕠ᱧᝃយฝக . . . . . . . . . . . . . . . . . . . . . . . . . . . . . . . . . . . . . . . . . . . . . . . . . . . . . 199᧚ᩫ ጒ . . . . . . . . . . . . . . . . . . . . . . . . . . . . . . . . . . . . . . . . . . . . . . . . . . . . . . . . . 200݈ᐧ ጒ . . . . . . . . . . . . . . . . . . . . . . . . . . . . . . . . . . . . . . . . . . . . . . . . . . . . . . . . . . 204䴠 ᒂ ݣ . . . . . . . . . . . . . . . . . . . . . . . . . . . . . . . . . . . . . . . . . . . . . . . . . . . . . . . . . . . . 204В “ ܳহ ” ᝃ “ ᄼ㞯হ ၽ ” 䛼ᬣ䬡 . . . . . . . . . . . . . . . . . . . . . . . . . . . . . . . . . . . . 207ᄩ ڒ 䴠 . . . . . . . . . . . . . . . . . . . . . . . . . . . . . . . . . . . . . . . . . . . . . . . . . . . . . . . . . . . . 211㑃䒾䴠 . . . . . . . . . . . . . . . . . . . . . . . . . . . . . . . . . . . . . . . . . . . . . . . . . . . . . . . . . . . . 214Ҭ 㮇᠌ͽக У㑃䒾 MIDI Ꮌ݄ . . . . . . . . . . . . . . . . . . . . . . . . . . . . . . . . . . . . . . . . 217 䴠হ Уั . . . . . . . . . . . . . . . . . . . . . . . . . . . . . . . . . . . . . . . . . . . . . . . . . . . . . . . 224ᄩ ܧ 䴠 . . . . . . . . . . . . . . . . . . . . . . . . . . . . . . . . . . . . . . . . . . . . . . . . . . . . . . . . . . . . 232γ㼐ᰡ็ . . . . . . . . . . . . . . . . . . . . . . . . . . . . . . . . . . . . . . . . . . . . . . . . . . . . . . . . . . . . 233Contentsv
Introduction to Pro ToolsRead this guide if you are new toPro Tools Software. This guide provides examples of how to record, edit, and mix audio, as wellas how to use MIDI in Pro Tools.If you have not yet installed Pro Tools, install itnow according to the instructions in the Pro ToolsInstallation Guide. For information on connectingand installing drivers for your audio hardware,refer to its documentation.Connecting Headphones orSpeakersTo hear the audio from Pro Tools, connect headphones or speakers to your audio hardware (thisguide uses a Pro Tools Mbox audio interface asan example). If you are using headphones, lowerthe Headphone level control (by turning it counterclockwise). If you are using speakers, lower theMaster volume control (by turning it counterclockwise). It is important to start with the volume sufficiently low to avoid damaging your ears or yourequipment. Once you have started Pro Tools andopened a session (or created a new one) you can adjust the volume controls to a comfortable listeninglevel.Headphone levelMaster volumelevel1/4-inch headphone jackMbox front panel connectors and controlsMbox back panel speaker connectionsIntroduction to Pro Tools1
Playing Back the DemoSessionUse the demo session to test your headphones andspeakers, and start exploring what you can do withPro Tools.To install and open the demo session:1Do one of the following: Insert the Pro Tools Installer disc into your DVDdrive, locate and open the Additional Filesfolder, and then drag the Demo Session folder toyour hard drive (for best performance, use anAvid-qualified external hard drive rather than thesystem drive).2Launch Pro Tools.3Do one of the following, depending on what yousee on-screen: If the Quick Start dialog appears, click OpenSession, then click OK. Locate the Demo Session file (.ptx), select it, and click Open. If the Quick Start dialog does not appear, chooseFile Open Session, then locate the Demo Session file (.ptx), select it, and click Open.For more information about the demo session,see the Demo Session Read Me. Download the Pro Tools demo session from youronline Avid account to your hard drive (for bestperformance, use an Avid-qualified external harddrive rather than the system drive).ToolbarTracksIntroduction to Pro Tools2
To play the Demo Session:12Turn the volume down on your audio interfaceso that you don’t play back audio at anuncomfortably high level.Start playback of the demo session in Pro Tools.To start or stop Pro Tools, do one of the following: Press the Spacebar on your computer keyboard. Click the Play or Stop button in the Transportwindow (Window Transport) or in the Edit window toolbar.StopPlay The Transport window provides controls fortransport related functions such as Play, Stop,Record, Fast Forward, and Rewind. Plug-In windows provide controls for audio processing and virtual instrument plug-ins. MIDI Editor windows let you edit MIDI datausing a “piano-roll” style interface, breakpointediting, and traditional music notation. The Score Editor window lets you edit the session’s MIDI data using traditional music notation. You can even print the score directly fromPro Tools. The Workspace provides an interactive databasefor all of the media in your session as well as foryour system.5Press the Spacebar or click the Stop button tostop playback.6When you’re finished checking out the DemoSession, choose File Close Session.Stop and Play controls in the Transport window3While the session plays, raise the volume onyour audio interface to a comfortable listeninglevel.4Explore Pro Tools while the demo session playsback (see the different options available in theWindow menu):The Demo Session is an example of a finishedproject that has been arranged, edited, andmixed. You don’t need to return to the DemoSession for anything else in this guide, but youmight want to check it out again later, afteryou’ve been introduced to a few morePro Tools features. The Edit window provides a Timeline display ofaudio, video, MIDI data, and mixer automationfor recording, editing, and arranging on tracks.Use the Edit window for editing and arrangingaudio, MIDI, and automation data in your session. The Mix window shows tracks as channelstrips—much like a mixing board—with levelmeters and controls for plug-in and hardware inserts, sends, input and output assignments, panning, volume, solo, mute, and record enable. Usethe Mix window for routing and mixing audioand MIDI in your session.Introduction to Pro Tools3
Viewing the Edit and Mix WindowsThe Edit window and the Mix window are the two main work areas in Pro Tools. Throughout the rest of thisguide, you will see examples of both windows being used for different types of production work.Viewing the Edit WindowTo display the Edit window: Choose Window Edit.To display all Edit window view options: Select View Edit Window All.Edit windowIntroduction to Pro Tools4
Viewing the Mix WindowTo display the Mix window: Choose Window Mix.To display all Mix window view options: Select View Mix Window All.Mix window (with Transport and Plug-In windows shown)Introduction to Pro Tools5
Creating a New SessionRecording AudioThis section shows you how to create a newsession. You can create a new session when youfirst launch Pro Tools or while it is already running.This section shows how to connect a microphone orinstrument (such as a guitar or keyboard) to anMbox and record audio.To create a new session:Connecting a Microphone or Instrumentto an Mbox1If Pro Tools is not already running, launchPro Tools.2Do one of the following:To connect a microphone or an instrument:1Do one of the following: When launching Pro Tools, if the Quick Startdialog opens, select Create Blank Session andclick OK. If you are using a microphone, connect it to aMic/Line input on the Mbox using an XLRcable. Choose File New Session. If you currentlyhave a session open, you will be prompted tosave any changes. In the New Session dialog,select Create Blank Session and click OK. If you are using an instrument, connect it to a DIinput on the Mbox using a 1/4-inch cable.3In the Save dialog, navigate to where you wantto save the session, name it, and then click Save.You have just created a new session with no tracks.Next, you will connect a microphone or instrumentcable and create new tracks for audio recording.Input 1 source selector(Front/Rear switch)2Do one of the following: With an Mbox, ensure that the Front/Rear switchis set correctly for either a front panel or rearpanel connection. With an Mbox Mini, depending on which inputyou are using, ensure that the Line/DI switch orthe Mic/Line switch is set correctly for the typeof connection.Input 1Mic/Line inputConnecting a mic to Mic/Line Input 1 on the rear panel of an Mbox with an XLR cableIntroduction to Pro Tools6
Creating a Track5Pro Tools uses tracks for recording audio and MIDIin a session. Before you can record audio, you needto create an Audio track.To create and prepare an audio track for recording:1Create a new session, or open an existingsession.2Choose Track New.3To record a single microphone or instrumentconnected to your audio interface, set the NewTracks dialog for 1 Mono Audio Track, inSamples, and click Create.In the middle of the new track’s channel strip,notice where it says “Analog 1 (Mono).” Thisshows which Input channel (Input 1 or Input 2)is assigned to this track. (To specify a differentInput channel, click the Audio Input Pathselector and choose the other channel.)Audio InputPath selectorRecording Your Performance to a TrackCreating a new mono audio trackTo record an audio track:1If you want to record both inputs at once, create onestereo track or two mono tracks depending on whatyou have plugged in and what you plan to record: To record two different sources (such as one vocal mic and one electric guitar), create 2 Monoaudio tracks. This lets you record two input signals simultaneously. After recording, these canbe edited, processed, and balanced independently. To record a two-channel stereo source (such as astereo keyboard), create 1 Stereo audio track.4Make sure the Mix window is open by choosingWindow Mix.Introduction to Pro ToolsClick the track’s Record Enable button to armthe track for recording. The button flashes red.Record Enable buttonRecord enabling a track in the Mix window2Sing or play into the mic, or play yourinstrument.Watch the meter level in the Pro Tools track whileyou raise the input gain on your audio interface.(Note that moving the on-screen fader has no effecton input levels; it’s only for adjusting monitoringlevels.)7
3Turn up the input gain on your audio interfaceuntil you see the on-screen track meter showgreen most of the time, or yellow for louderpassages.4In the Transport window, click the Return toZero button if you want to start recording fromthe beginning of the session.5Click the Record button in the Transport torecord arm the session. The button flashes red.(This tells Pro Tools that you are ready torecord—think of this as a “master” recordenable button for the session.)Input 1 Gain (Mbox)Return to ZeroPlayRecord If the track meter shows red, gain is too high;lower the input gain. If you barely see green in the track meter, gain istoo low; raise the input gain.Track meter6Choose Window Edit so you can watch whathappens when you record.7When you are ready to start recording, press theSpacebar or click the Play button in theTransport. The Transport Record button and thetrack’s Record Enable button turn solid redwhile recording.8To stop recording, press the Spacebar again orclick the Stop button in the Transport. (TheTransport Record button disengages, but thetrack’s Record Enable button remains enabledand flashes red until you click it).You have just recorded your first audio track.A mono audio track after recordingIntroduction to Pro Tools8
Listening to Your RecordingAfter you have recorded some audio, you can playit back for review, editing, and mixing.To play back a recorded track:1Click the track’s Record Enable button again totake it out of Record mode. The Record Enablebutton stops flashing red.2To start playback, press the Spacebar or clickPlay in the Transport.3To stop playback, press the Spacebar or clickStop in the Transport.Recording More TracksSimply repeat the same steps to create anotheraudio track (mono or stereo) and continuerecording more tracks. In this way, you can recordadditional parts against the tracks you haverecorded previously. This is a common productiontechnique for layering different parts to create anarrangement of a song.Measuring Time in Minutesand Seconds or Bars andBeatsPro Tools lets you measure time in minutes andseconds (absolute time), or bars and beats (relativetime). For music production, it is often desirable tomeasure time in bars and beats. The timing of beatsis relative in that it depends on the tempo. Thetiming of bars is relative in that it depends on themeter.Pro Tools lets you set tempo and meter changesusing markers in the session Timeline at the top ofthe Edit window. These settings scale the relativetime of bars and beats against the absolute time ofminutes and seconds (or samples). This distinctionis referred to in Pro Tools as tick-based (relative)time versus sample-based (absolute) time, and bothaudio and MIDI data can be set to follow either ona track-by-track basis (for more information, seethe Pro Tools Reference Guide).Main CounterGrid modeTimebaseRulersTimelinePro Tools Timeline and Main Counter (with the Main Time Scale set to Minutes and Seconds)Introduction to Pro Tools9
The Pro Tools Main Time Scale for the session’sTimeline is set to Min:Secs (minutes and seconds)by default, but you can change the Main TimeScale to Bar Beats (bars and beats) if you want torecord with a click track in a specified meter at aspecified tempo. Setting the Main Time Scale tobars and beats is also useful if you want to create,edit, and arrange audio and MIDI on a bar/beatgrid.Recording with a Click TrackA click track provides a metronomic click fortempo reference while recording. Set the MainScale to Bar Beats to record and edit your trackmaterial according to the specified meter andtempo instead of Min:Secs.To create a click track:1Changing the Main Time ScaleTo set the Main Time Scale, do one of the following: Click a Main Counter selector (located at the topof the Edit or Transport window (when it is set todisplay Counters) and select a Time Scale.Pro Tools creates a new Auxiliary Input track withthe Click II plug-in on the first track insert. Whenyou start playback or recording, the click providesa countoff and continues according to the meter andtempo map in the Pro Tools Timeline.2Select View Transport MIDI Controls to viewthe MIDI controls in the Transport Window.3In the Transport, ensure that the Metronome andCount Off buttons are selected.4Ensure that the Conductor button is enabled ifyou want the click to follow the session tempo(on the Timeline). Disable the Conductor buttonif you want to adjust the tempo manually.5Press the Spacebar or click the Play button in theTransport to start playback and hear the click.Main Counter selector (in the Edit window) If a Timebase ruler is displayed, click its nameso it becomes highlighted.Setting the Main Time Scale to the timebasecurrently displayed in the Sub Counterswitches the two Time Scales, setting the SubTime Scale to the previous timebase of theMain Time Scale.Choose Track Create Click Track.TempoCount Off buttonMetronome buttonSetting the Main Time Scale to Bars BeatsIntroduction to Pro ToolsConductor button10
To set the Click settings:1Choose Setup Click/Countoff.2Select one of the following options: During play and record—the click sounds duringplayback and recording Only during record—the click only sounds whilerecording and not during playback Only during countoff—the click only soundswhen counting off before recording or playbackstartsSetting the Session MeterBe sure to set the session meter to match the meterof your music. If your session’s meter does notmatch the music you’re recording, the accentedclicks from the Click track will not line up withwhat you’re playing, and, as a result, the recordedmaterial may not align with the bars and beats gridin the Edit window.To set the meter for a session:1Double-click the Current Meter button in theTransport window.Current Meter button2Enter the Meter for the session and set theLocation to 1 1 000 (to ensure that the insertedmeter event replaces the default).Click/Countoff dialog3Click OK.To silence the click track, do one of the following: Mute the Click track by clicking the M (Mute)button in the Track controls for the Click track. In the Transport window, deselect the Metronome button so it is not highlighted blue. Thendeselect the Count Off button so it is not highlighted. (Doing both silences the click track anddisables Count Off.)Introduction to Pro ToolsMeter Change dialog3From the Click pop-up menu, select a note valuefor the beat. (For example, if you are in 6/8,select a dotted-quarter note).4Click OK to insert the new meter event.11
Setting the Session TempoNew sessions in Pro Tools default to a tempo of120 BPM. If you want to record with a click at atempo other than 120 BPM, make sure to set thetempo accordingly.To change the session tempo:13Set the Location to 1 1 000 (to ensure that theinserted tempo event replaces the default sessiontempo).4From the Resolution pop-up menu, select thenote value for the beat. (For example, if you arein 6/8, select a dotted-quarter note.)5Click OK.Do one of the following: Double-click the Song Start Marker in the Editwindow. Click the Add Tempo Change button ( ) at thehead of the Tempo ruler.Song Start MarkerUsing Manual Tempo ModeIn Manual Tempo mode, Pro Tools ignores tempoevents in the Tempo ruler and instead plays back aManual Tempo. This tempo can be set numericallyby tapping in the tempo.To set tempo manually:Tempo ruler1Ensure that the MIDI controls are shown in theTransport by selecting View Transport MIDIControls.2In the Transport, disable the Tempo ruler byclicking the Conductor button so it is not highlighted. Pro Tools switches to Manual Tempomode. In this mode, any tempo events in theTempo ruler are ignored.Add Tempo Change buttonTempo ruler2In the Tempo Change dialog, enter the BPMvalue for the session.Tempo ResolutionTempoConductor buttonManual Tempo mode3Click the Tempo Resolution selector and select anote value. (For example, if you are in 6/8, selectthe dotted-quarter note, or if you are in 3/4,select the quarter note.)Tempo Change dialogYou can type in a specific tempo, or you canuse the T key to tap in the tempo.Introduction to Pro Tools12
4To enter a new tempo, do one of the following: Click the Tempo value, type a new number, andpress Enter. Click the Tempo value and drag up or down tochange the setting. For finer resolution, holdCommand (Mac) or Control (Windows) whiledragging. Click the Tempo value and press t
Introduction to Pro Tools 1 Introduction to Pro Tools Read this guide if you are new to Pro Tools Software. This guide provides exam-ples of how to record, edit, and mix audio, as well as how to use MIDI in Pro Tools. If you have not yet installed Pro Tools, install it now according to the instructions