Transcription
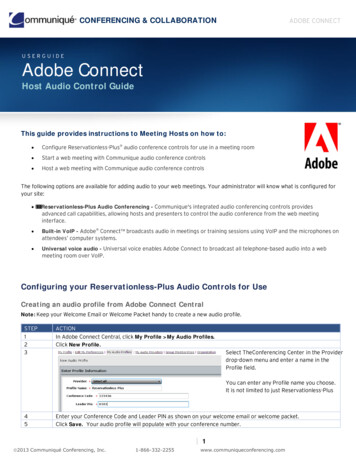
CONFERENCING & COLLABORATIONADOBE CONNECTUSERGUIDEAdobe ConnectHost Audio Control GuideThis guide provides instructions to Meeting Hosts on how to: Configure Reservationless-Plus audio conference controls for use in a meeting room Start a web meeting with Communique audio conference controls Host a web meeting with Communique audio conference controlsThe following options are available for adding audio to your web meetings. Your administrator will know what is configured foryour site: Reservationless-Plus Audio Conferencing - Communique's integrated audio conferencing controls providesadvanced call capabilities, allowing hosts and presenters to control the audio conference from the web meetinginterface. Built-in VoIP - Adobe Connect broadcasts audio in meetings or training sessions using VoIP and the microphones onattendees’ computer systems. Universal voice audio - Universal voice enables Adobe Connect to broadcast all telephone-based audio into a webmeeting room over VoIP.Configuring your Reservationless-Plus Audio Controls for UseCreating an audio profile from Adobe Connect CentralNote: Keep your Welcome Email or Welcome Packet handy to create a new audio profile.STEP123ACTIONIn Adobe Connect Central, click My Profile My Audio Profiles.Click New Profile.Select TheConferencing Center in the Providerdrop-down menu and enter a name in theProfile field.You can enter any Profile name you choose.It is not limited to just Reservationless-Plus45Enter your Conference Code and Leader PIN as shown on your welcome email or welcome packet.Click Save. Your audio profile will populate with your conference number. 1 2013 Communiqué Conferencing, Inc.1-866-332-2255www.communiqueconferencing.com
CONFERENCING & COLLABORATIONADOBE CONNECTEditing or Deleting an Audio ProfileYou can change the profile name, and enable or disable an existing audio profile.STEP1234ACTIONIn Adobe Connect Central, click My Profile My Audio Profiles.Select a profile and click EditChange the profile name or status and click Save.To delete an audio profile, select it and click Delete.Associating an Audio Profile with a MeetingWhen you associate an audio profile with a meeting, you include the audio conferencing settings as part of your webconference.STEP1ACTIONYou can do one of the following: Create a meeting and enter the required information (click Meetings New Meeting). 2Open an existing meeting and click Edit Information .In the Audio Conference Settings section, select Include this audio conference with this meeting. In the dropdown menu, select the Profile name as you entered it (e.g. Reservationless-Plus).Note: If you change the audio profile once you start the meeting, the new audio conference settings take place only after you closeand restart the meeting. Wait a few minutes to see the changes appear.3Click Save.Starting a Web Meeting using Audio Conference ControlsStarting an Audio Conference Using an Audio Profile 2 2013 Communiqué Conferencing, Inc.1-866-332-2255www.communiqueconferencing.com
CONFERENCING & COLLABORATIONADOBE CONNECTOnce you have created an audio profile and associated it with a meeting, Adobe Connect uses the dial-in steps in the profile toconnect to Communique and start the meeting.STEP123ACTIONNavigate to the Meeting Information page for a specific meeting.Click Enter Meeting Room.Inform the operator that you plan to record this meeting in conjunction with an Adobe Connect meeting and asilent participant line will be dialing in. Simultaneously, From the Audio menu, select Start Meeting Audio.4The Start Meeting Audio dialog box appears.You can select how you want attendees to jointhe meeting’s audio:4a4b Using Computers (via VoIP), go to step4a Using Phone (via audioconferencing), go to step 4b. Both (via audio conferencing orvia computer microphone), go to step4c.If you select Using Computers, you can also choose to enable microphone rights for participants. This optiongives participants the ability to talk through the microphone so other participants can hear them during themeeting. Make sure to deselect the Using Phone option if you select this option.To enable your microphone so others can hear you, under the Microphone icon, select Connect My Audio.A Microphone icon will appear next to your name in the participant list indicating that you are connected byMicrophone. The icon appears only when you are actively speaking.If you select Using Phone, you can also startto broadcast telephony audio. This will allowyou to broadcast your voice either via thephone or via computer. By default only hostsand presenters can broadcast audio.Make sure to deselect the Using Computersoption if you select this option.You and your participants will see the JoinAudio Conference dialog box appear.If you select Dial-out option button, enter your 3 2013 Communiqué Conferencing, Inc.1-866-332-2255www.communiqueconferencing.com
CONFERENCING & COLLABORATIONADOBE CONNECTtelephone number as shown in the example (e.g. Country Code-Area/City Code-Number) and click Join. Shortlythereafter, you will receive a phone call asking you to join the audio conference. Follow the audio prompts tojoin the conference.If you select Dial-in to the Audio Conference via Phone option, then follow the instructions in the dialog box tojoin the audio conference.4cBy checking both Using Computers andUsing Phone options, you present alloptions to join the audio portion of themeeting. To start the meeting audio, go tothe Audio menu and select Start MeetingAudio. You and your participants willreceive a Join Audio Conference dialog boxwith three options to join the audio: Dial-out Dial-in Using ComputerAttendees must select an option to join.If attendees join using multiple methods in asingle web meeting, then you will have a blend of attendees using the phone and VoIP during the meeting. 4 2013 Communiqué Conferencing, Inc.1-866-332-2255www.communiqueconferencing.com
CONFERENCING & COLLABORATIONADOBE CONNECTStop Meeting AudioThe Host can stop the meeting audio at any time during the meeting. This action will disconnect the meeting host(s),presenter(s) and all attendees from the audio conference.STEP1ACTIONFrom the Audio menu, select Stop Meeting Audio.All audio conference lines will disconnect from the meeting.Change Meeting Audio ModeThe Host can change the audio mode at any time during the meeting. This allows the Host to modify how attendees join themeeting either via audio either via audio conference or via computer (VoIP).STEP12aACTIONThe Change Meeting Audio Mode dialog boxappears. You can select how you want attendeesto join the meeting’s audio: Using Computers (via VoIP), go to step 2a Using Phone (via audioconferencing), go to step 2b Both (via audio conferencing orvia computer microphone), go to step 2c,If you select Using Computers, you can also choose to enable microphone rights for participants. This optiongives participants the ability to talk through the microphone so other participants can hear them during themeeting.Make sure to deselect Using Phone option if you select this option.To enable your microphone so others can hear you, under the Microphone icon, select Connect My Audio.A Microphone icon will appear next to your name in the participant list indicating that you are connected byMicrophone. The icon appears only when you are actively speaking. 5 2013 Communiqué Conferencing, Inc.1-866-332-2255www.communiqueconferencing.com
CONFERENCING & COLLABORATION2bADOBE CONNECTIf you select Using Phone, you can also start tobroadcast telephony audio. This will allow youto broadcast your voice either via the phone orvia computer. By default only hosts andpresenters can broadcast audio.Make sure to deselect Using Computers if youselect this option.You and your participants will see the JoinAudio Conference dialog box appear.If you select the Dial-out radio button, enteryour telephone number as shown in the example (e.g. Country Code-Area/City Code-Number) and click Join.Shortly thereafter, you will receive a phone call asking you to join the audio conference. Follow the audioprompts to join the conference.2cIf you select Dial-in to the Audio Conference via Phone, then follow the instructions in the dialog box to join theaudio conference.By checking both Using Computers and UsingPhone options, you present all three optionsto join the audio portion of the meeting. Tostart the meeting audio, go to the Audio menuand select Start Meeting Audio. You and yourparticipants will receive a Join AudioConference dialog box with three options tojoin the audio: Dial-out Dial-in Using ComputerAttendees must select an option to join. If attendees join using multiple methods in a single web meeting, thenyou will have a blend of attendees using Reservationless-Plus audio conferencing and VoIP during the meeting.Note: When changing the meeting audio mode, it is recommended that you notify your attendees in advance astheir lines may be disconnected depending on what option(s) you choose to enable. 6 2013 Communiqué Conferencing, Inc.1-866-332-2255www.communiqueconferencing.com
CONFERENCING & COLLABORATIONADOBE CONNECTStart or Stop Audio BroadcastThe audio broadcast uses the universal voice line to broadcast all telephone-based audio into a web meeting room over VoIP.STEP1ACTIONTo start audio broadcast, select Start Audio Broadcast in the Audio menu. Apop-up message will appear in the top right corner of your screen confirmingyour selection.2To stop audio broadcast, select Stop Audio Broadcast in the Audio menu.A pop-up message will appear in the top right corner of your screen confirmingyour selection.Call a New UserThe host can dial out to an individual to include as a participant in the audio conference call.STEP1ACTIONFrom the Audio menu, select Call a New User.234The Call Telephone User dialog box appears. Enter theName and Phone Number as shown (e.g. Country CodeArea/City Code-Number).Click Call.To cancel the call, click Cancel. 7 2013 Communiqué Conferencing, Inc.1-866-332-2255www.communiqueconferencing.com
CONFERENCING & COLLABORATIONADOBE CONNECTMicrophone Rights for ParticipantsWhen using computer or VoIP or a blend of both Reservationless-Plus audio and VoIP, the Host can enable microphone rightsfor attendees. This allows those attendees to speak to the host, presenter(s) and attendees in the meeting.STEP1ACTIONTo enable microphone rights for attendees, select Microphone Rights forParticipants under the Audio menu.2Once you select this option, attendees will see a microphone iconenabled next to their names in the attendee list.Note: The microphone icon will appear for attendees that have joined whether they joined via computer (VoIP) orvia phone (Reservationless-Plus). For attendees that joined via Reservationless-Plus audio, to use the VoIPmicrophone, they must disconnect from the Reservationless-Plus audio first.Hosting a Web Meeting with Audio Conference ControlsAudio StatusAfter participants connect to an audio conference, status icons appear next to their names in the participant list.StatusIconDialing in progressConnected on phoneVoIP user with Microphone rightsMutedPhone user actively speakingVoIP user actively speaking 8 2013 Communiqué Conferencing, Inc.1-866-332-2255www.communiqueconferencing.com
CONFERENCING & COLLABORATIONADOBE CONNECTDrag and Drop Attendee MergeThe meeting host can merge the attendee name with the attendee’s phone number when an attendee uses the dial-in option.STEP1ACTIONTo merge the attendee name with the attendee’s phone number inthe attendee pod, select the phone number of the attendee anddrag to the name of the attendee that you want to merge it with.2A small dialog box appears next to the name of the attendee confirming the merge. Click once to confirm andthe attendee name and phone number will merge into a one entry on the attendee list. A phone icon will alsoappear next to the attendee’s name.Editing My InfoMeeting hosts can modify his or her own name and/or phone number as it appears in the attendee pod.STEP1ACTIONTo edit your info, go to Pod Optionsdown menu.2and select Edit My Info in the drop-The Edit My Info dialog box appears. You can edit thename and phone number. Click OK to save your changes,or to cancel your changes, click Cancel. 9 2013 Communiqué Conferencing, Inc.1-866-332-2255www.communiqueconferencing.com
CONFERENCING & COLLABORATIONADOBE CONNECTEditing User InfoMeeting hosts can edit an attendee’s name and phone number as it appears in the attendee pod.STEP1ACTIONTo edit user info, highlight the name of the attendee that you want to edit in theattendee list.Then, go to Pod Optionsmenu.and select Attendee Options in the drop-down2A sub-menu appears. Select Edit User Info and editthe attendee’s name and phone number.3Click OK to save your changes, or to cancel your changes, click Cancel. 10 2013 Communiqué Conferencing, Inc.1-866-332-2255www.communiqueconferencing.com
CONFERENCING & COLLABORATIONADOBE CONNECTMuting and Unmuting an AttendeeThe meeting host can mute and/or unmute attendees from the Adobe Connect user interface.STEP1ACTIONTo mute an attendee, highlight the name of the attendee that you want to mutein the attendee list.Then, go to Pod Options and select Attendee Options in the drop-down menu.2A sub-menu appears. Select Mute and the attendee’s line will be muted. AMuted icon will appear next to the name of the participant that is muted.3To unmute an attendee, repeat step 1 and step 2 but select Unmute from the Attendee Options sub-menu. 11 2013 Communiqué Conferencing, Inc.1-866-332-2255www.communiqueconferencing.com
CONFERENCING & COLLABORATIONADOBE CONNECTMuting or Unmuting All UsersMeeting hosts can mute and/or unmute all user lines at the same time.STEPACTION1To mute all attendees from the meeting audio, go to Pod OptionsAttendee Options in the drop-down menu.2A sub-menu appears. Select Mute All Users and all lines will be muted in theconference.and selectNOTE: This action also mutes the Host and Presenter lines as well. You mustselect #6 on your telephone keypad to unmute your own line. Attendees can alsounmute their own lines by selecting #6 on their telephone keypad. Analternative would be to utilize the *5/#5 option on your telephone keypad tomute/unmute all lines except the leader’s.3To unmute all users, go to Pod Optionsand select Attendee Options in the drop-down menu. A sub-menuappears. Select Unmute All Users. All lines will be automatically unmuted. 12 2013 Communiqué Conferencing, Inc.1-866-332-2255www.communiqueconferencing.com
CONFERENCING & COLLABORATIONADOBE CONNECTDisconnect an Attendee from the AudioThe meeting host can disconnect an attendee from the meeting audio. Please note that this does not prevent the attendeefrom rejoining the audio conference call.STEP1ACTIONTo disconnect the attendee from the meeting audio, highlight the name of theattendee that you want to disconnect in the attendee list.Then, go to Pod Options and select Attendee Options in the drop-down menu.2A sub-menu appears. Select Hang Up and the attendee’s line will be disconnected.NOTE: This action does not prevent the attendee from rejoining the audio conference call. If this is yourintention, then you should choose the Lock Conference option on your Reservationless-Plus account. This willprevent attendees from joining.Creating Breakout RoomsBreakout rooms are subrooms that can be created within a meeting or training session. They are useful for splitting a largegroup into smaller groups that can talk and collaborate with each other.Note: To use the breakout rooms feature, you must have the subconferencing feature enabled on your CommuniqueReservationless-Plus account. Once enabled, your account can handle up to 15 breakout rooms with the maximum number ofports set up on your account. If you do not know if your account has subconferencing feature enabled please contact yoursales representative.STEP1ACTIONTo create a breakout room, click on Breakout Room ViewAttendee Pod. A new Breakout Room View will appear. 13 2013 Communiqué Conferencing, Inc.1-866-332-2255www.communiqueconferencing.comin the
CONFERENCING & COLLABORATION2ADOBE CONNECTBefore you start the breakout sessions, you must set up the number ofbreakout rooms that you want (up to 15 is supported on yourReservationless-Plus account).To add a breakout room, click on Create a New Breakout Room andadd the number of breakout rooms that you want. The additionalbreakout rooms will appear in the Attendee Pod.3To add an attendee into a breakout room, you can either (a) evenly distribute them into the breakout room(s) or(b) you can individually add them into the room of your choice. For option a, go to step 4a or for option b, go tostep 4b.4aTo evenly distribute attendees into the breakout rooms, click Evenly Distributedistributed evenly amongst the breakout rooms.4bTo add attendees into the breakout room your choice, left-click the attendee’s name in list and select the breakoutroom.from Main. Attendees will beThe attendee’s name will then appear under the breakout room that you selected5To start the breakout session(s), click Start Breakouts in the Attendee Pod. 14 2013 Communiqué Conferencing, Inc.1-866-332-2255www.communiqueconferencing.com
CONFERENCING & COLLABORATIONADOBE CONNECTBringing Attendees into the Main MeetingThe Host can bring attendee(s) back into the Main Meeting at any time during the breakout session(s).STEP1ACTIONTo bring an attendee back into the main meeting, left-click on the attendee’s name in the Attendee list and selectMain Meeting.Ending Breakout RoomsSTEP1ACTIONTo end the breakout session(s), click End Breakouts in the Attendee Pod. Attendees will be automatically joinedto the main meeting.Note: Attendees’ names will still appear under their individual breakout rooms in the event that you want to startanother breakout session.Removing audio rights from allThis option allows the host to disconnect all Reservationless-Plus audio and VoIP lines from all presenters and attendees.STEP1ACTIONTo remove audio rights from all, go to Pod Options and select Remove audiorights from all. 15 2013 Communiqué Conferencing, Inc.1-866-332-2255www.communiqueconferencing.com
CONFERENCING & COLLABORATIONADOBE CONNECTFrom the Speaker MenuMuting and Unmuting Your Computer SpeakersMeeting hosts, presenters and participants can mute or mute their computer speakers from the web meeting interface.STEP1ACTIONTo mute your computer speakers, under the Speaker icondrop-down menu, select Mute My Speakers.2To unmute your computer speakers, under the Speaker icon drop-down menu,select Unmute My Speakers.Mute Conference Audio OnlyThe Host can mute conference audio only when connected to the meeting via phone. This option mutes the computer audiowhen you are actively speaking via the phone on your Reservationless-Plus audio conference.STEP1ACTIONTo mute conference audio only, under the Speaker icon drop-down menu, selectMute Conference Audio Only.2To unmute conference audio, under the Speaker icon drop-down menu, de-select Mute Conference Audio Only.At this time, the host will hear the audio through both the computer and phone.Tip: Unmuting conference audio while connected to the phone is not recommended because it can be distractingfor the host when speaking in the meeting.Adjust Speaker VolumeThe host, presenter(s), and attendees can adjust their computers’ speaker volume during the meeting.STEP1ACTIONTo adjust the speaker volume, under the Speaker icon2drop-down menu, select Adjust Speaker Volume.The Adjust Speaker Volume dialog box appears. Drag the slider to adjust the speaker volume for the meeting toyour liking. Click OK to confirm the adjustment. Or, click Cancel to cancel the adjustment. 16 2013 Communiqué Conferencing, Inc.1-866-332-2255www.communiqueconferencing.com
CONFERENCING & COLLABORATIONADOBE CONNECTFrom the Phone MenuMuting and unmuting your phon
For attendees that joined via Reservationless-Plus audio, to use the VoIP microphone, they must disconnect from the Reservationless-Plus audio first. Hosting a Web Meeting with Audio Conference Controls Audio Status After participants connect to an audio conference, status


