Transcription
User GuideAT&T Wireless Home Phoneand InternetAT&T Home Base
Welcome to AT&TThank you for purchasing the AT&T Home Base (Model: Z700A). To get themost from your new device, check out our videos and interactive tutorials atatt.com/homebasesupport.i
ContentsGetting Started.1In the Box.1Getting to Know Your Device. 2How It Works. 4Device Installation. 4Voicemail. 11Setup. 11Message Waiting.11Retrieving Messages.11Remote Retrieval.11Transferring a Phone Number.12AT&T Home Base Manager.12Using Your Device. 14Calling. 14Making Calls. 14Three-Way Calling. 14Call Waiting. 14Call Forwarding.15Call Log.15Internet Access. 16Connect Other Devices. 16Changing Wi-Fi Network Name and Password.17Important Messages.17Managing Connected Devices.17iiiii
Checking Your Voice and Data Usage. 18Helpful Tips.20Home Answering Machines.20Adjusting Volume.2 1Powering On/Off.2 1TTY Support.2 1Important Information. 22E911 Service. 22Power Outages. 22Back-up Battery. 22Device Compatibility.2 3In-Home Wiring.2 3Frequently Asked Questions. 24Troubleshooting. 27General. 27Phone. 28Internet. 3 1Device Configuration.34Wi-Fi Settings. 34Basic. 34Connections. 35Security. 36WPS. 37Network. 38Connections. 38APN. 39ivFirewall. 4 1Mac/IP/Port Filtering. 4 1Port Forwarding. 4 3DMZ. 44Advanced. 45Administrator. 45Router. 46Time/Date. 47Device Reset. 47Specifications. 48Safety Instructions. 49Radio Frequency (RF) Energy. 50FCC Regulations. 51RF Exposure Information. 52CTIA . 53Warranty. 54How to Get Warranty Service. 55Other Warranty Programs. 55v
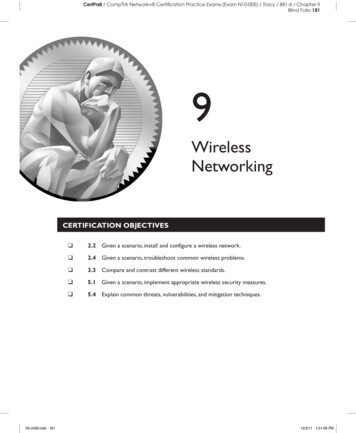
Getting StartedIn the BoxThe package contains the following items:The AT&T Home BasePhone Cable(Optional)Back-upBatteryPower CordAlso IncludedQuick StartAT&T Wireless Home Phoneand InternetAT&T Home Base Quick StartviUser GuideAT&T Wireless Home Phoneand InternetAT&T Home Base User Guide1
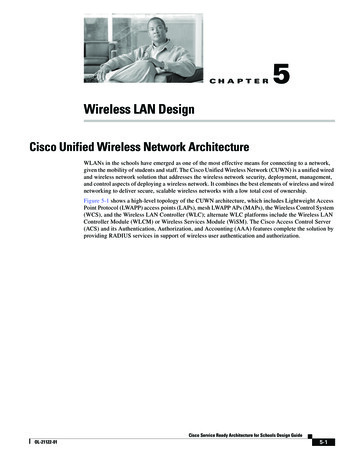
Getting to Know Your DeviceLED IndicatorsThe table below describes possible states for each of the LED indicators.KeyIcon NamePowerPowerVoicemailSignal StrengthVoicemailWi-FiInformationInformation(See “AT&T Home BaseManager” on page SignalStrengthIndicatorStatusGreen solidOnGreen blinkingBattery: More than 50%Yellow blinkingBattery: 20 – 50%Red blinkingBattery: Less than 20%OffNo powerGreen blinkingNew voicemailOffNo new voicemailGreen blinkingCheck the AT&T Home BaseManager – see messagesOffNo unread messagesGreen solidWi-Fi onGreen flickeringData transferringOffWi-Fi offGreen solidStrong signalYellow solidModerate signalRed solidNo serviceRed blinkingCheck SIM* Allows WPS-enabled devices to be connected via Wi-Fi without typing a Wi-Fi password.For detailed instructions, please refer to page 16.23
How It WorksThe AT&T Home Base uses the AT&T cellular network to provide phone service toyour cordless or corded home phone(s) and Internet access to your computerand Wi-Fi enabled devices. Place it anywhere in your home where you have astrong wireless signal. It does not require the use of a home phone wall jack liketraditional home phone service.The AT&T Home Base provides many calling services, such as voicemail, CallerNumber ID, Call Waiting, Call Forwarding, and Three-way Calling for your homephone(s). It also includes a back-up battery in case of a power outage.Device InstallationBefore You BeginThe AT&T Home Base works exclusively with the AT&T cellular network and DOESNOT use your home phone wall jacks.Your device should be located: Where you have a strong signal from a celltower, typically near a window or outsidewall. Signal strength may vary in differentparts of your home. Near an electrical wall outlet. In the general area where you’ll be usingyour home phone, computer, or Wi-Fi enabled devices.Select which phone and computer/Wi-Fi enabled device you will use with theAT&T Home Base: A cordless phone system with multiple handsets should be used to placephones throughout your home. If using an existing phone, unplug it from the wall jack. For Internet access, you may connect up to 10 devices via Wi-Fi and onevia Ethernet simultaneously.4STEP 1: Set Up Your DeviceAInstall the Back-up Battery1. R emove the bottom of the device by pushing the entire coverin the direction of the arrow.Ports2. Insert the back-up battery.Battery3. Replace the cover.NOTES: The back-up battery is intended for backup purposes only and may takeapproximately eighteen (18) hours to fully charge. Charge time may be impacted by environmental factors and the backup battery will stop charging when the ambient temperature is outside ofthe temperature range allowed for charging (32 F - 131 F).5
STEP 1: Set Up Your Device (continued)BTurn on Your DeviceSTEP 2: Connect Your PhoneAOn/OffHold 3 secondsCCheck the Wireless Signal ait a few seconds for the signal strength light to turn on, while your deviceWconnects to the cellular network.Confirm signal strengthSignallight is green for optimalStrengthperformance. Yellowindicates a moderatesignal and maybe sufficient.NOTE: If you do not see a green light, you may want to choose anotherlocation in your home, such as near a window or outside wall.6Unplug your Phone from the Wall JackThe AT&T Home Base is not used with your home phone wall jack.NOTE: If you have a cordless phone, keep it plugged into a power outlet.1. Plug the power cord into an electrical wall outlet.2. Connect the other end of the power cord into the Power Input port onthe back of your AT&T Home Base.3. Press and hold down the round On/Off button for 3 full seconds until thepower light stays solid green.BConnect your Phone to the DevicePlug your phone into the “Phone 1” port on the AT&T Home Base, using yourexisting phone cable or the included phone cable.NOTE: Do not plug the AT&T Home Base or your phones into your wall jacks.7
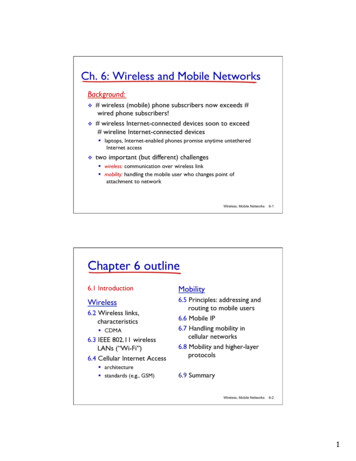
STEP 2: Connect Your Phone (continued)C Place a Test CallSTEP 3: Connect to the InternetA8Wi-Fi NetworksATT-HOMEBASE-XXXXOther NetworkGuest WiFiFree Public WiFiTo Connect via Ethernet:Use an Ethernet cable (not included) to connect your computer or otherdevice to the Ethernet port on the back of your AT&T Home Base. Go toatt.net (or your favorite website) to confirm your Internet connection.Skip Steps 3B and 3C.To connect via WPS, see page 16.Important Phone Tips V oicemail is included with your service. Dial “1” to set up and access. Ifyou choose to use an answering machine instead, set it to fewer thanfour (4) rings. To place phones throughout your home, use a cordless phone systemwith multiple handsets. Wall jacks are not used with the AT&T Home Base. The “Phone 2” port can be used to connect an additional phone orstandalone answering machine. It uses the same phone number as the“Phone 1” port. Your AT&T Home Base does not support incoming/outgoing fax serviceor home alarm systems. Your AT&T Home Base does not support rotary or pulse-dialing phones.Details on using voicemail and transferring a landline phone number can befound on pages 11-12.Select Your Internet ConnectionTo Connect via Wi-Fi:1. Open the Wi-Fi network manager onyour computer or Wi-Fi enabled device.2. Find and select the AT&T Home BaseWi-Fi network name (SSID)(e.g., ATT-HOMEBASE-XXXX).Place a test call from your connected home phone. Make sure todial the 10-digit phone number, including area code.For best results, place the cordless phone base at least 12 inchesfrom the AT&T Home Base.BEnter Wi-Fi Network PasswordWhen prompted, enter the Wi-Fi password found on the bottom of theAT&T Home Base.Wi-Fi AccessUse the following information to connect to the Internet:Network Name: ATT-HOMEBASE-XXXXPassword: XXXXXXXXHelpful service information:Thelight will blink green when you have an importantmessage from AT&T about your service plan.On any device connected to the AT&T Home Base, go to:URL: http://att.homebaseLogin: attadmin9
STEP 3: Connect to the Internet (continued)CConfirm Internet Connection Go to att.net (or your favorite website) to confirm your Internet connection.When your device is transmitting to and from the Internet, the Wi-Fi light willflicker green.VoicemailYour AT&T Home Base comes with standard wireless voicemail. Follow the stepsbelow to setup and use your voicemail.SetupDial 1 on any home phone connected to the AT&T Home Base and wait four (4)seconds to connect to your AT&T wireless voicemail. Simply follow the voiceprompts to complete setup. To enable remote voicemail retrieval and for addedsecurity be sure to create a password during setup.For more help on setting up your AT&T voicemail, go to att.com/voicemailsetup.Message WaitingImportant Internet Tips T o check your data usage or manage your account, go to att.com/myatt. To customize your device settings, view important messages about your AT&Tservice plan, and check your data usage, use the AT&T Home Base Manager.On any device connected to the AT&T Home Base, enter http://att.homebasedirectly into your browser address field and use “attadmin” as your login. T o setup a free AT&T email account, go to att.net/signup and select Start Now.There are two indicators for a new message waiting: 1) the voicemail icon; and2) an intermittent dial tone.The voicemail iconon your AT&T Home Base blinks when a voicemailmessage is waiting. You will also hear an intermittent dial tone on any connectedphone handset before placing a call.Retrieving MessagesTo retrieve voice messages, dial 1 on any home phone connected to the AT&THome Base and wait four (4) seconds to connect to your AT&T wireless voicemailbox. Simply follow the voice prompts to listen to and manage your messages.(Alternately, you may dial your 10-digit home phone number to access yourvoicemail box.)Remote RetrievalTo retrieve voicemail messages from a phone not connected to the AT&T HomeBase, dial the number associated with your AT&T Home Base service. Whenvoicemail picks up, press *. You will then be prompted to enter your password.Simply follow the prompts to listen to and manage your voicemail messages.1011
Transferring a Phone NumberTransferring a landline phone number to your AT&T Home Base can take aboutfour (4) days. Outgoing calls can be made immediately using your AT&T HomeBase, however incoming calls (including 911) will continue through your old serviceuntil the transfer is complete. Keep a phone connected to your wall jack or priorservice to continue to receive incoming calls until the transfer is complete. Tocheck the status of your transfer, visit att.com/port.AT&T Home Base ManagerThe AT&T Home Base Manager allows you to easily manage your AT&T HomeBase. You can: Customize settings Change your Wi-Fi network name and password Check signal strength, data usage, and important messages from AT&T Get help and informationTo access the AT&T Home Base Manager, first connect to your AT&T Home Base.In your browser address field, enter http://att.homebase and log in using“attadmin” (Note: You can customize the login that is used to access theAT&T Home Base Manager by going to Settings Advanced Administrator).12The AT&T Home Base Manager includes a navigation panel on the left side of thescreen, which contains the following sections: Home – displays general device information and help. Connected Devices – view devices currently connected to your
1. Open the Wi-Fi network manager on your computer or Wi-Fi enabled device. 2. Find and select the AT&T Home Base Wi-Fi network name (SSID) (e.g., ATT-HOMEBASE-XXXX). Wi-Fi Networks ATT-HOMEBASE-XXXX Other Network Guest WiFi Free Public WiFi To Connect via Ethernet: Use an Ethernet cable (not included) to connect your computer or other