Transcription
User guideXperia Z1C6902/C6903/C6906
ContentsGetting started.6Overview.6Assembly.7Starting your device for the first time.8Why do I need a Google account?.9Charging your device.10Learning the basics.11Using the touchscreen.11Locking and unlocking the screen.13Home screen.13Application screen.15Navigating applications.16Small apps.16Widgets.17Lock screen.18Shortcuts and folders.18Background and themes.19Status and notifications.20Icons in the status bar.21Application overview.22Downloading applications.24Downloading applications from Google Play .24Downloading applications from other sources.24Internet and networks.25Browsing the web.25Internet and messaging settings.25Wi-Fi .26Sharing your mobile data connection.27Controlling data usage.28Selecting mobile networks.29Virtual private networks (VPNs).30Basic settings.31Accessing settings.31Sound, ringtone and volume.31Date and time.32X-Reality for Mobile.32Screen settings.33Language settings.33Airplane mode.332This is an Internet version of this publication. Print only for private use.
Enhancing the sound output.34Typing text.35On-screen keyboard.35Phonepad.36Entering text using voice input.37Editing text.37Personalising the Xperia keyboard.38Calling.39Making calls.39Receiving calls.40Ongoing calls.41Using the call log.41Forwarding calls.42Restricting calls.42Multiple calls.42Conference calls.43Voicemail.43Emergency calls.44Contacts .45Transferring contacts.45Searching and viewing contacts.46Adding and editing contacts.47Favourites and groups.48Sending contact information.48Avoiding duplicate entries in the Contacts application.48Backing up contacts.49Messaging and chat.50Reading and sending messages.50Organising your messages.51Calling from a message.52Messaging settings.52Instant messaging and video chat.52Email.54Setting up email.54Sending and receiving email messages.54Email preview pane.56Organising your email messages.56Email account settings.57Gmail .57Socialife .59Using the Socialife application.593This is an Internet version of this publication. Print only for private use.
Music .60Transferring music to your device .60Listening to music.60WALKMAN home screen .61Playlists.62Sharing music.63Enhancing the sound.64Visualiser .64Recognising music with TrackID .64Music Unlimited online service.66FM radio.67Listening to the radio.67Favourite radio channels.68Sound settings.68Camera.69Taking photos and recording videos.69Face detection.70Using Smile Shutter to capture smiling faces.70Adding the geographical position to your photos.71General camera settings.71Still camera settings.72Video camera settings.75Album.78Viewing photos and videos.78Sharing and managing photos and videos.79Editing photos with the Photo editor application.80Photo albums.81Viewing your photos on a map.82Videos.84Watching videos in the Movies application.84Transferring video content to your device .85Managing video content.86Video Unlimited service.86Connectivity.87Sharing content with DLNA Certified devices.87NFC.89Bluetooth wireless technology.91Connecting your device to a computer.94Connecting your device to a TV set using a cable.97Screen mirroring.97Using a headset .98Smart Connect.984This is an Internet version of this publication. Print only for private use.
Synchronising data on your device.100About synchronising data on your device.100Synchronising with Google services.100Synchronising with Microsoft Exchange ActiveSync .101Synchronising with Facebook .101Maps and locations.103Location services and sources.103Using GPS.103Google Maps .104Getting directions.104Calendar and alarm clock.106Calendar.106Alarm clock.106Locking and protecting your device.109IMEI number.109SIM card protection .109Setting a screen lock.110Support and maintenance.112Updating your device.112Finding your device.113Memory.113Backup and restore application.114Resetting and restarting.116Battery and power management.116Support application.118Usage info.118Recycling your device.118Important information.119Important information leaflet.119Limitations to services and features.119Protecting your device from water and dust.119Legal information.121Index.1225This is an Internet version of this publication. Print only for private use.
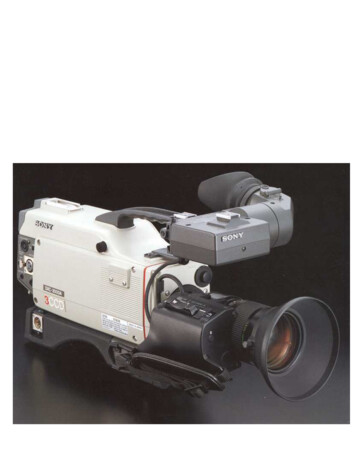
Getting startedOverview1Headset jack2Proximity sensor/Light sensor3Ear receiver/Charging light/Notification light4Front camera lens5Micro SIM card slot cover6Power key7Volume/Zoom key8Camera key9Strap hole10Main speaker and microphone6This is an Internet version of this publication. Print only for private use.
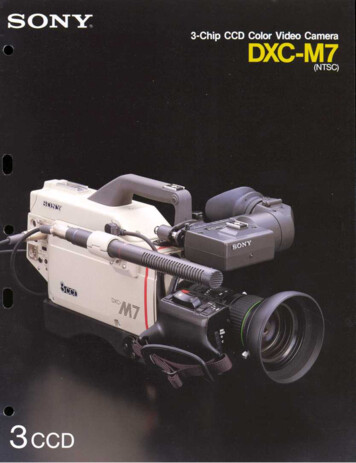
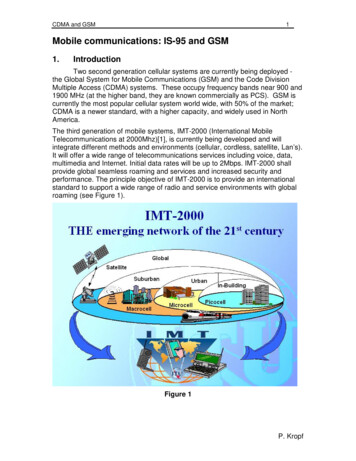
11Main camera lens12Camera light13Second microphone14NFC detection area15Memory card slot cover16Charger/USB cable port cover17Charging dock connectorDo not insert fingers or other objects into the opening for the second microphone (illustrated initem 13 above) to avoid damaging your device.AssemblyA protective plastic sheet is attached to the screen. You should peel off this sheetbefore using the touchscreen. Otherwise, the touchscreen might not functionproperly.To insert the micro SIM cardDo not insert a memory card into the micro SIM card slot.12345Insert a fingernail into the gap between the micro SIM card slot cover and thedevice, then detach the cover.Using a fingernail, pull out the micro SIM card holder.Place the micro SIM card on the holder, with the gold-coloured contacts on themicro SIM card facing up.Insert the micro SIM card holder back into the device.Re-attach the micro SIM card slot cover.Inserting the micro SIM card into the device without the SIM card holder could damage yourmicro SIM card or your device, and Sony Mobile does not warrant and will not be responsiblefor any damage caused by such action.To insert the memory cardDo not insert the memory card into the micro SIM card slot.7This is an Internet version of this publication. Print only for private use.
123Insert a fingernail into the gap between the memory card cover and the device,then detach the memory card cover.Place the memory card in the memory card slot, with the gold-colouredcontacts facing towards you, then push the memory card all the way into theslot until you hear a locking sound.Re-attach the memory card cover.A memory card may not be included at purchase in all markets.To remove the micro SIM card12345Remove the cover of the micro SIM card slot.Pull out the micro SIM card holder.Remove the micro SIM card.Insert the micro SIM card holder back into its slot.Re-attach the micro SIM card slot cover.To remove the memory card123Turn off the device, or unmount the memory card from Settings Storage Unmount SD card.Remove the cover of the memory card slot, then press against the edge of thememory card and release it.Draw the card outwards to remove it fully.Starting your device for the first timeThe first time you start your device, a setup guide opens to help you configure basicsettings, sign in to some accounts, and personalise your device. For example, if youhave a Sony Entertainment Network account, you can sign in to it here and get set upstraight away. And you can download Internet and Wi-Fi settings.You can also access the setup guide later from the Settings menu.To turn on the deviceMake sure that the battery is charged for at least 30 minutes before you turn on the device forthe first time.8This is an Internet version of this publication. Print only for private use.
12345Press and hold down the power key until the device vibrates.If your screen goes dark, briefly press the power key to activate the screen.Enter your SIM card PIN when requested, then tap.If your screen is locked, place a finger on the screen and swipe up or down tounlock it.Wait a while for the device to start.Your SIM card PIN is initially supplied by your network operator, but you can change it laterfrom the Settings menu. To correct a mistake made while entering your SIM card PIN, tap.123To turn off the devicePress and hold down the power keyIn the options menu, tap Power off.Tap OK.until the options menu opens.It may take a while for the device to shut down.Why do I need a Google account?Your Xperia device from Sony runs on the Android platform developed byGoogle . A range of Google applications and services are available on your devicewhen you purchase it, for example, Gmail , Google Maps , YouTube and GooglePlay , the online store for downloading Android applications. To get the most outof these services, you need a Google account. For example, a Google account ismandatory if you want to: Download and install applications from Google Play .Synchronise email, contacts and the calendar.Chat with friends using the Hangouts application.Synchronise your browsing history and bookmarks.For more information about Android and Google , go towww.sonymobile.com/support.123To set up a Google account on your deviceFrom your Home screen, tap .Find and tap Settings Add account Google.Follow the registration wizard to create a Google account, or sign in if youalready have an account.You can also sign in to or create a Google account from the setup guide the first time youstart your device. Or you can go online and create an account at www.google.com/accounts.9This is an Internet version of this publication. Print only for private use.
Charging your deviceThe battery is partly charged when you buy the device. You can still use your devicewhile it is charging. Read more about the battery and how to improve theperformance in Battery and power management on page 116.To charge your device1234Plug the charger into a power outlet.Plug one end of the USB cable into the charger (or into the USB port of acomputer).Plug the other end of the cable into the micro USB port
1 Insert a fingernail into the gap between the memory card cover and the device, then detach the memory card cover. 2 Place the me