Transcription
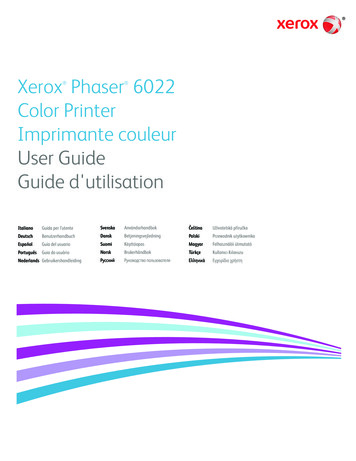
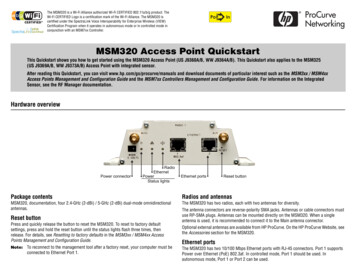
VIEWCertifiedThe MSM320 is a Wi-Fi Alliance authorized Wi-Fi CERTIFIED 802.11a/b/g product. TheWi-Fi CERTIFIED Logo is a certification mark of the Wi-Fi Alliance. The MSM320 iscertified under the SpectraLink Voice Interoperability for Enterprise Wireless (VIEW)Certification Program when it operates in autonomous mode or in controlled mode inconjunction with an MSM7xx Controller.InMSM320 Access Point QuickstartThis Quickstart shows you how to get started using the MSM320 Access Point (US J9360A/B, WW J9364A/B). This Quickstart also applies to the MSM325(US J9369A/B, WW J9373A/B) Access Point with integrated sensor.After reading this Quickstart, you can visit www.hp.com/go/procurve/manuals and download documents of particular interest such as the MSM3xx / MSM4xxAccess Points Management and Configuration Guide and the MSM7xx Controllers Management and Configuration Guide. For information on the IntegratedSensor, see the RF Manager documentation.Hardware overviewPackage contentsRadios and antennasMSM320, documentation, four 2.4-GHz (2-dBi) / 5-GHz (2-dBi) dual-mode omnidirectionalantennas.The MSM320 has two radios, each with two antennas for diversity.Reset buttonPress and quickly release the button to reset the MSM320. To reset to factory defaultsettings, press and hold the reset button until the status lights flash three times, thenrelease. For details, see Resetting to factory defaults in the MSM3xx / MSM4xx AccessPoints Management and Configuration Guide.Note:To reconnect to the management tool after a factory reset, your computer must beconnected to Ethernet Port 1.The antenna connectors are reverse-polarity SMA jacks. Antennas or cable connectors mustuse RP-SMA plugs. Antennas can be mounted directly on the MSM320. When a singleantenna is used, it is recommended to connect it to the Main antenna connector.Optional external antennas are available from HP ProCurve. On the HP ProCurve Website, seethe Accessories section for the MSM320.Ethernet portsThe MSM320 has two 10/100 Mbps Ethernet ports with RJ-45 connectors. Port 1 supportsPower over Ethernet (PoE) 802.3af. In controlled mode, Port 1 should be used. Inautonomous mode, Port 1 or Port 2 can be used.
MSM320 Access Point Quickstart2About controlled mode and autonomous modeThe MSM320 can operate in one of two modes: controlled (the default) or autonomous.Switching modes resets all configuration settings to factory defaults.HP ProCurve NetworkingStatus light behavior in autonomous modeIn autonomous mode, the status lights provide the following information:Light Controlled mode: To become operational, the MSM320 must establish a managementtunnel with an MSM7xx Controller via Ethernet Port 1 (do not use Port 2 in controlledmode). The controller manages the MSM320 and provides all configuration settings.Discovery of the service controller is automatic if default settings are used on theMSM320 and the controller, and both devices are on the same subnet. See Working withcontrolled APs in the MSM7xx Controllers Management and Configuration Guide.Status light behavior in controlled modeRadioDuring startup/discovery in controlled mode, the MSM320 status lights provide the followinginformation:Status light behaviorDescriptionPower light blinks once every two seconds. The MSM320 is starting up.Power light blinks once per second.The MSM320 is looking for an IP address, orbuilding the list of VLANs on which toperform discovery. The management tool isavailable until discovery occurs.Power light, Ethernet light, and Radio lightblink in sequence from left to right.The MSM320 has obtained an IP address andis attempting to discover a controller.Power light is on. Radio and Ethernet lights The MSM320 has found a controller and isblink alternately until the secureattempting to establish a secure managementmanagement tunnel is established.tunnel with it.Power light and Radio light blink alternately The MSM320 has received a discovery replyand quickly. Ethernet light is off.from two or more controllers with the samepriority setting. The MSM320 is unable toconnect with either controller until thepriority conflict is resolved.Power light and Radio light blink slowly.Power light and Ethernet light blink slowly.EthernetThe MSM320 is attempting to establish alocal mesh link to a master node.The MSM320 is attempting to establish wiredconnectivity.Once the discovery process is complete, and the MSM320 has established a securemanagement tunnel to a controller, the Power light remains on and the Ethernet and Radiolights blink to indicate the presence of traffic.DescriptionOffThe MSM320 has no power.BlinkingThe MSM320 is starting up. If the Power light continues toblink after several minutes, it indicates that the software failedto load. Reset or power cycle the MSM320. If this conditionpersists, contact HP ProCurve Customer Care.OnThe MSM320 is fully operational.OffThe port is not connected or there is no activity.BlinkingThe port is transmitting or receiving data.BlinkingEither or both radios are transmitting or receiving data.Power Autonomous mode: Once switched to autonomous mode, the MSM320 operates as astand-alone AP. An autonomous MSM320 is configured and managed via its web-basedmanagement tool as described in Initial configuration (autonomous mode) on page 3.StateImportant information to read before installingWarning: PROFESSIONAL INSTALLATION REQUIRED. For indoor installation only.Prior to installing or using the MSM320, consult with a professional installer trained inRF installation and knowledgeable in local regulations including building and wiringcodes, safety, channel, power, indoor/outdoor restrictions, and license requirements forthe intended country. It is the responsibility of the end user to ensure that installation anduse comply with local safety and radio regulations.Surge protection and grounding: If you plan on connecting an outdoor antenna to theMSM320, make sure that proper lightning surge protection and grounding precautions aretaken according to local electrical code. Failure to do so may result in personal injury, fire,equipment damage, or a voided warranty. The HP ProCurve hardware warranty provides noprotection against damage caused by static discharge or a lightning strike.Cabling: You must use the appropriate cables, and where applicable, surge protection, foryour given region. For compliance with EN55022 Class-B emissions requirements, useshielded Ethernet cables.Plenum installation: The MSM320 can be installed in a plenum (UL2043 rating). It shouldbe installed in a similar orientation as in a ceiling installation. However, it is left to a qualifiedinstaller to determine how to install/secure the MSM320 in a plenum in an appropriate andsafe manner. Plenum-rated cables and attachment hardware must be used.Country of use: In some regions, you are prompted to select the country of use during setup.Once the country has been set, the MSM320 will automatically limit the available wirelesschannels, ensuring compliant operation in the selected country. Entering the incorrectcountry may result in illegal operation and may cause harmful interference to other systems.See Regulatory Notice for European Union and EFTA member countries on page 5.
MSM320 Access Point QuickstartCaution: External Antennas: When using an external antenna, depending on thecountry of use, the antenna selected, and your radio settings, it may bemandatory to reduce the radio transmission power level to maintainregulatory compliance. For specific power limits for your country, consult theAntenna Power-Level Setting Guide available on the HP ProCurve manualspage for the MSM3xx/4xx Access Points atwww.hp.com/go/procurve/manuals.To set the radio power transmission level, for controlled access points see Transmit powercontrol in the MSM7xx Controllers Management and Configuration Guide. For autonomousaccess points, see Transmit power control in the MSM3xx / MSM4xx Access PointsManagement and Configuration Guide.3HP ProCurve NetworkingNote:For controlled mode configuration, instead see Working with controlled APs in theMSM7xx Controllers Management and Configuration Guide.In autonomous mode, the MSM320 is managed via its web-based management tool using atleast Microsoft Internet Explorer 7/8 or Firefox 3.x.Caution: Wireless SecurityFor initial configuration convenience, a factory-default MSM320 that has been switchedto autonomous mode has all wireless security options disabled. It is stronglyrecommended that after performing this procedure, you enable a wireless security optionto properly safeguard the wireless network from intruders. See Wireless protection in theMSM3xx / MSM4xx Access Points Management and Configuration Guide.Note:Do not power on the MSM320 until directed.Safety: Take note of the following safety information during installation: If your network covers an area served by more than one power distribution system, besure all safety grounds are securely interconnected. Network cables may occasionally be subject to hazardous transient voltages (caused bylightning or disturbances in the electrical power grid). Handle exposed metal components of the network with caution. The MSM320 is powered-on when Ethernet Port 1 is plugged into a PoE power sourceor when an external power supply is connected. The MSM320 and all interconnected equipment must be installed indoors within thesame building (except for outdoor models / antennas), including all PoE-powerednetwork connections as described by Environment A of the IEEE 802.3af standard.InstallationA. Configure your computer1. Disconnect your computer LAN port and configure it to use a static IP address in therange 192.168.1.2 to 192.168.1.254, and a subnet mask of 255.255.255.0. Set thedefault gateway to 192.168.1.1, and DNS server to 192.168.1.1. For example to do thisin Windows Vista, use Control Panel Network and Sharing Center Manage NetworkConnections Local Area Connection, right-click Properties then select InternetProtocol Version 4 (TCP/IPv4) Properties.2. Disable any wireless connection on your computer.B. Connect the cables and power on the MSM3201. Connect the cables: If using a PoE switch, use standard Ethernet cables to connect your computer and theMSM320 to an unused factory-default PoE switch.When mounting the MSM320 on a wall or ceiling, ensure that the surface to which youattach the MSM320 and the fasteners you use can support at least .9 kg (2 pounds). Allowextra weight for cables. If using a PoE injector, use a crossover Ethernet cable to connect your computer toIf you intend to install the MSM320 in a plenum, see Plenum installation under Importantinformation to read before installing on page 2. If you are using a power supply, use a crossover Ethernet cable to connect yourPowering the MSM320The MSM320 can be powered by: A PoE-enabled switch. Various PoE-enabled switches are available from HP ProCurve. An HP ProCurve 1-Port Power Injector (J9407A) An HP ProCurve MSM32x Power Supply (J9405A).Initial configuration (autonomous mode)This procedure describes how to switch a factory-default MSM320 to autonomous modeand then perform its initial configuration that enables you to establish a wireless connectionthrough the MSM320 to the Internet.the data in port of the PoE injector and a standard Ethernet cable to connect theMSM320 to the data and power out port of the PoE injector.computer to the MSM320 Ethernet port.2. Power on the MSM320: If using a PoE switch or injector, power it on. If using a power supply, connect it to the MSM320 then power on the supply.Initially, the MSM320 power light will blink once every two seconds. Wait approximatelya minute until it begins blinking once per second before proceeding to the next step.C. Switch the MSM320 to autonomous modeNote:A factory-default MSM320 is assumed.1. In a web browser, enter the address: https://192.168.1.1.2. A security certificate warning is displayed the first time you connect to the managementtool. This is normal. Select whatever option is needed in your Web browser to continue
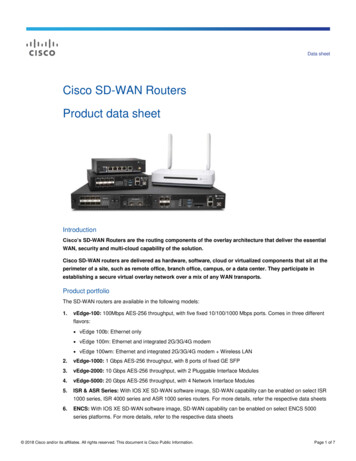
MSM320 Access Point Quickstartto the management tool. The security warning will not appear again unless you changethe IP address of the MSM320.3. On the Login page, specify admin for both Username and Password and then selectLogin. The MSM320 management tool home page opens.4. Select Switch to Autonomous Mode and confirm the change. The MSM320 restarts inautonomous mode.Note:To avoid a delay after switching modes, clear the ARP (addressresolution protocol) cache on your computer. In Windows for example,from the Windows Start menu, select Run and enter “arp -d”(without the quotes). Select OK.D. Log in1. Wait until the Power light stops blinking and remains on.2. On the Login page, specify admin for both Username and Password and then selectLogin.3. On the License Agreement page, read the agreement and select Accept LicenseAgreement.4. The registration page appears. It is recommended that you register later by selectingMaintenance Registration.5. If a Country prompt appears, select the country in which the MSM320 will operate.Caution: The correct country must be selected. See Country of use on page 3.6. At the password prompt it is recommended that you change the default password andselect Save. Passwords must be at least six characters long and include four differentcharacters.The management tool is organized with menus and sub-menus. Instructions for makingmenu selections, such as “select Wireless Local mesh” instruct you to select the Wirelessmenu and then the Local mesh sub-menu, as follows:4HP ProCurve Networking Let the DHCP server automatically assign an IP address. By default, the DHCP serverwill assign an IP address once the MSM320 connects to the network. Once the DHCPserver has assigned the MSM320 an IP address, you can then find the IP address of theMSM320 by looking for its Ethernet base MAC address in the DHCP server log. Forexample after Step F.4 below, you could go to the DHCP server log to retrieve the IPaddress assigned to the MSM320. Assign a static IP address to the MSM320. The address must be on the same subnet asthe network to which the MSM320 will connect.1. Select Network DNS, and set the DNS server address. Select Save.2. Select Network Ports Bridge port.3. Select Static and then Configure. Configure settings as follows: IP address: Set an address that is on the same subnet as the network to whichthe MSM320 will connect once installed. Respect any DHCP server-mandatedstatic address ranges. Mask: Set the corresponding mask for the IP address. Default gateway: Set the IP address of the gateway on the network.4. Select Save. Connection to the management tool is lost.F. Test the wireless networkFor the purposes of this procedure, the network must have a DHCP server and an Internetconnection. Broadband routers typically include a DHCP server.1. Disconnect your computer from the PoE switch or injector or the MSM320.2. Power off the MSM320: If using a PoE switch or injector, disconnect the Ethernet cable from the MSM320. If using a power supply, disconnect it.3. Use a standard Ethernet cable to connect the switch or the data in port of the injector tothe network.4. Reconnect and power on the MSM320: If using a PoE switch or injector, use a standard Ethernet cable to reconnect theE. Assigning an IP address to the MSM320By default the MSM320 operates as a DHCP client. This means that if the network has aDHCP server, the MSM320 will automatically receive a new IP address in place of its defaultaddress of 192.168.1.1 upon connecting to the network. Use one of the following methods toassign an IP address to the MSM320: Pre-configure the DHCP server to assign a specific IP address to the MSM320. To dothis you need to specify the MSM320 Ethernet MAC address and a reserved IP addresson the DHCP server. The MSM320 Ethernet MAC address is printed on the MSM320label identified as Ethernet Base MAC, and listed on the management tool Home pageas Ethernet base MAC address.MSM320 to the PoE switch or the data and power out port of the injector. If using a power supply, use a standard Ethernet cable to connect the MSM320 to thenetwork, and reconnect the MSM320 power supply.5. Enable the wireless network interface of your computer, and verify that it is set to obtainan IP address automatically.For example, to do this in Windows Vista, use Control Panel Network and SharingCenter Manage Network Connections Wireless Network Connection, right-clickProperties and select Internet Protocol Version 4 (TCP/IPv4) Properties, and makesure that Obtain an IP address automatically and Obtain a DNS server addressautomatically are both enabled.
MSM320 Access Point Quickstart6. By default, the MSM320 creates a wireless network named HP ProCurve. Connect yourcomputer to this wireless network. For example, in Windows Vista from the Start menu,select Connect to, and then HP ProCurve from the list of available wireless networks.You may have to wait a short time for this wireless network name to appear in thewireless networks list.7. Confirm that you can browse the Internet using the wireless network.G. Performing additional configurationConfigure your computer LAN port and connect it to the same network as the MSM320. Relaunch the MSM320 management tool at https:// IP address where IP address is theMSM320 IP address from Step E above.Note:See the Caution regarding WIRELESS SECURITY on page 3.Enabling access to other resourcesBy default, the MSM320 only permits traffic that is addressed to the default gateway on thenetwork (which enables you to connect to the Internet). To enable access to other resources:1. Select VSC Profiles and then select the HP ProCurve profile.2. On the Add/Edit Virtual Service Community page clear the Wireless security filterscheckbox.3. Select Save.Regulatory Notice for European Union and EFTA member countriesAs of July 1st 2010, all wireless devices sold in EU countries and any countries that participate in theEU free market must meet stringent Dynamic Frequency Selection (DFS) requirements for radardetection and avoidance (EN 301.893 v1.5.1). The MSM320 is compliant.Compliance notes Software version 5.3.5 is released for both rev A and rev B MSM320 APs. On both radios of a rev A MSM320, the 5 GHz DFS channels are enabled and can be used. On both radios of a rev B MSM320, the following additional 5 GHz DFS channels are disabled andcannot be used: Channels 52, 56, 60 and 64 in the 5250-5350 MHz band Channels 100, 104, 108, 112, 116, 132, 136 and 140 in the 5470-5725 MHz band.Note: Customers will not have to disable these 5 GHz DFS channels on rev A MSM320APs received prior to July 1st, 2010.For non-EU/EFTA customers using the WW version of the MSM320, there is no change to theavailability of DFS channels.5HP ProCurve Networking
MSM320 Access Point Quickstart6HP ProCurve Networking Copyright 2010 Hewlett-Packard Development Company, L.P. Theinformation contained herein is subject to change without notice.February 2010Printed inDocument part # 5998-0472*5998-0472*
MSM320 Access Point Quickstart 3 HP ProCurve Networking Caution: External Antennas: When using an external antenna, depending on the country of use, the antenna selected, and your radio settings, it may be mandatory