Transcription
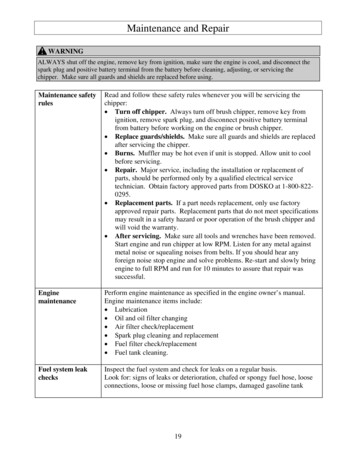
Maintenance and RepairWARNINGALWAYS shut off the engine, remove key from ignition, make sure the engine is cool, and disconnect thespark plug and positive battery terminal from the battery before cleaning, adjusting, or servicing thechipper. Make sure all guards and shields are replaced before using.Maintenance safetyrulesRead and follow these safety rules whenever you will be servicing thechipper: Turn off chipper. Always turn off brush chipper, remove key fromignition, remove spark plug, and disconnect positive battery terminalfrom battery before working on the engine or brush chipper. Replace guards/shields. Make sure all guards and shields are replacedafter servicing the chipper. Burns. Muffler may be hot even if unit is stopped. Allow unit to coolbefore servicing. Repair. Major service, including the installation or replacement ofparts, should be performed only by a qualified electrical servicetechnician. Obtain factory approved parts from DOSKO at 1-800-8220295. Replacement parts. If a part needs replacement, only use factoryapproved repair parts. Replacement parts that do not meet specificationsmay result in a safety hazard or poor operation of the brush chipper andwill void the warranty. After servicing. Make sure all tools and wrenches have been removed.Start engine and run chipper at low RPM. Listen for any metal againstmetal noise or squealing noises from belts. If you should hear anyforeign noise stop engine and solve problems. Re-start and slowly bringengine to full RPM and run for 10 minutes to assure that repair wassuccessful.EnginemaintenancePerform engine maintenance as specified in the engine owner’s manual.Engine maintenance items include: Lubrication Oil and oil filter changing Air filter check/replacement Spark plug cleaning and replacement Fuel filter check/replacement Fuel tank cleaning.Fuel system leakchecksInspect the fuel system and check for leaks on a regular basis.Look for: signs of leaks or deterioration, chafed or spongy fuel hose, looseconnections, loose or missing fuel hose clamps, damaged gasoline tank19
Maintenance and Repair (cont’d)Checking andadjusting belttensionLubricationDrive Belts: Check and adjust according to pg. 27.Hydraulic Belt: Check and adjust according to pg. 28.Your chipper was greased at the factory. The operator needs to lubricate thechipper main bearings and feed roll bearings periodically. Bearings shouldbe greased weekly or every 10 hours of use.There are two Chipper Main Bearings (in the front and rear).There are four Feed Roll Bearings (2 on each side).Note: Do not over grease. Too much grease will damage bearing seals.Use EP-2 lithium base grease for bearings.Feed RollBearingsChipper MainBearings20
Maintenance and Repair (cont’d)1. Feed Roller Blades and KnifesThere are two blade systems that are key to your chipper operation. The first is called the feed rollerblades. They grasp the incoming material and force it into the chipper cutting blades. The feed rollerblade rotates at different speeds depending on how much material they are feeding into the chipperblades.The second set of blades (or knives) are called the chipper wheel blades. These are mounted on thelarge spinning wheel which drives the blades (knives) past the incoming material at a high rate ofspeed and causes the “chipping” action. Routine inspection of the chipper and feed roll blade forsharpness will ensure the chipper is operating at full efficiency. Operating with a worn or damagedknives or blades will cause extreme stress and vibration to the machine and make chipping difficultfor the operator.While the chipper knives are made from the highest grade of chipper steel, which is heat treated andground to a very sharp edge, their life is relative to what they chip. They may dull the first day orlast for months. The life span depends on the amount of dirt and rocks that enter the chipper.Sometimes trees will have nails or wire embedded into the surface.Knives should be checked for damage before each use. They should be turned or changed asnecessary. Dull knives: Cause excessive fuel consumption.Cause unnecessary stress and strain on the machine.Produce poor quality chips.Reduce production rate slowing the feed rate.Actually wear further and faster.To check or sharpen the feed roll blades, you will have to gain access to them by moving the feedroll assembly.To check, turn or change the chipper wheel knives you will have to remove the chipper deflectorhood.Accessing Feed Roll AssemblyAccessingFeed RollAssembly Lower and pin rear support leg. Raise or lower jack until rear support legmakes solid contact with ground.Remove (2) 5/8” nuts holding feed roll assembly to the chipper body.Remove (2) 3/4” x 2” bolts and (2) 3/4” flat washers on the infeed lock plates,on either side, holding it to the chipper frame.Slide the entire in-feed hopper backward, being careful of hoses.To close, reverse procedure. Be sure not to pinch hoses.Torque 5/8” nuts 112 ft. lbsTorque to 3/4” x 2” bolts to 130 ft. lbs21
Maintenance and Repair (cont’d)ChipperbodyFeed rollassemblyInfeedhopper3/4” flatwasherInfeed lockplate5/8” nuts3/4” x 2”boltSupport legWARNING:Check all chipper bolts and nuts to maintain proper torques. Always tighten bolts to ourrecommended torque. Do not attempt to operate chipper without doing so.Sharpening Feed Roll BladesSharpen Feed RollBladesWARNING:Wear protective equipment such as heavy-duty gloves, long-sleeve shirt, safetyglasses and face shield while sharpening blades.As the feed roll blades become dull they may be sharpened with a small handgrinder without being removed from the machine. To do this: Lower and pin rear support leg. Raise or lower jack until rear support legmakes solid contact with ground.Open chipper body by rolling away feed roll as described in section“Accessing Feed Roll Assembly”.Place a piece of wood under the feed roller to keep it from turning whilesharpening blades.Grind the angled side of the blade only to a 45 angle, do not grind frontface. NOTE: It is extremely important to consistently maintain the 45 angle for proper performance.Turn feed roller to get all blades.22
Maintenance and Repair (cont’d) Inspect feed roll bolts for tightness by looking thru slots in roll body.Roll bodySlotBladeGrind herePlace woodhereOpening Chipper Deflector HoodOpen ChipperDefector Hood Lower and pin rear support leg. Raise or lower jack until rear support legmakes solid contact with ground.Discharge tube should face forward towards the tongue and be pinned soit will not rotate.Remove (2) 1/2” nyloc nuts, (2) 1/2” washers and Guard Side Lock.Remove (2) 1/2” x 2“ bolts, (4) 1/2” washers and (2) 1/2” nyloc nuts onchipper deflector hood handle.One man lifts the handle from the left side, a second man positioned onthe right side of the machine catches the chipper deflector hood/dischargetube and pulls it slowly to its stop position.To close the deflector hood, reverse the procedure.Reinstall bolts and torque to 90 ft. lbs.1/2” nyloc nuts1/2” washers1/2”x 2” boltsGuard side lock1/2” washers1/2” nyloc nuts23
Maintenance and Repair (cont’d)Changing or Turning the Chipper KnivesChangingKnivesTo turn or change the knives:CAUTION:Wear gloves while changing knives. Loosen bolts with 1-1/8” impact or socket wrench.Remove first knife.Clean knife and knife pockets on disc.Turn the knife; or if it has nicks or damage, replace the knife.Install all 5 knife bolts before tightening bolts to 130 ft. lbs.Repeat the process for the second knife.Cutter wheel(5) Knife boltsKnifeBed knife24
Maintenance and Repair (cont’d)Adjust BedKnifeAfter changing or turning knives, they will need to be re-adjusted to the bedknife plate to keep the bed knife properly adjusted for an efficient runningchipper. If the gap is not set correctly, you will have excessive vibration whenchipping and the knife will seem to be dull.To adjust the bed knife: Loosen bed knife using a impact or socket wrench just enough so itwill move but still have a slight resistance. You can now slide it up or down (in or out) to achieve the correctgap setting.Adjust bed knife to proper gap of .090 to .095 inch.CAUTION: Adjust both knivesSince knives may vary from one to the other, check each knife gap with a knife gauge.Be sure to adjust to the closest knife.When adjusted, tighten 5/8-11 x 1-3/4” bed knife bolts, to 112 ft. lbs. torque.Bed knifeCutterwheelKnife5/8-11 x 1-3/4” bolt(s)25
Maintenance and Repair (cont’d)2. Belt and Sheave CareProper belt tension and sheave alignment is vital to brush chipper performance. Here are a fewproblems that can occur when belts and sheaves are not properly maintained or cared for.Loose Belt: A loose belt will slip and then glaze over. Once this happens the belt will not transmitpower to the flywheel which can cause the chipper to clog and also cause excess sheave wear.Over-tightened Belt: You can break the crankshaft of the engine or ruin the clutch (if equipped)from too much side load. Too much belt tension can cause premature bearing wear. When the beltsare worn out from over-tightening they will only cause the sheaves to wear.Misaligned Sheaves: When sheaves are not aligned properly the belts will glaze very quickly andslipping will occur. This will also cause the belt to bounce or vibrate causing damage to bearings,clutch (if equipped) and metal stress on the machine.26
Maintenance and Repair (cont’d)Chipper BeltTension AdjustmentNote: Belt tension and alignment are inter-related. Do not adjust onewithout checking the other.1. Open belt guard.2. Remove (1) 5/16” x 2” bolt,(2) 5/16” washers, and (1)5/16” nut.3. Lift guard to vertical positionuntil it rests against its stop.4. Loosen all (4) engine mountbolts.5. Loosen jam nut on tensionbolt.6. Turn tension bolt to moveengine to the side.Tension boltand nutNote: Proper alignment is for the front and back of both sheaves (all 4faces) to be in a straight line. Use a long straight edge to check alignment.Straight edge27
Maintenance and Repair (cont’d)7. Check for proper belt tension (20lb force results in 0.3" deflection)using a belt tension gauge.8. When belt tension is proper, retighten nut on tension bolt, and retightenengine mount nuts and bolts to 53 ft. lbs. torque.9. Close belt guard.WARNING:Do not operate the machine without making sure all guards are in place afterservicing.Note: New belts require a “break-in” period of approximately 2 hours.Readjustment may be necessary after “break-in.”Note: Use only factory recommended belts. Contact your DOSKO dealer.Hydraulic PumpBelt TensionAdjustmentThe proper belt tension and sheave alignment is essential for trouble freeperformance and optimum production of your chipper. If the sheaves arenot loosened or moved, the belts can be tightened by simply sliding thepump bracket.(3) 3/8”-16 nuts1.2.3.4.Tension bolt andRemove belt guard.nutLoosen (3) 3/8”-16 nuts.Loosen nut on tension bolt.Tighten tension bolt to tension the belt, moving the pump.Proper tension: 9 lbs. with a .25” deflection (model 2964000) or7 lbs. with a .25” deflection (model 2964010).5. Re-tighten 3/8”-16 nuts to 23 ft. lbs. torque.6. Re-tighten tension nut.If sheaves are removed, follow directions for sheave installation.Note: Use only factory recommended belts. Contact your DOSKO dealer.28
Maintenance and Repair (cont’d)Sheave Installation& AlignmentBefore installing sheaves, make sure the chipper shaft and engine shaft areclean and square or parallel to each other. This can be done by using twolarge contractor’s squares.Assemble bushings into sheaves by leaving them loose, then slide them onthe shafts and install the key. Be sure to consider belt guard and coverclearance.Slide the sheaves on and off the shafts of the engine and chipper body asneeded to make sure they are in line. Use a long straight edge to align themwith each other.Tighten all setscrews evenly; chipper and engine sheave bushings should betorqued according to the chart on page 33.Tighten belts keeping sheaves properly aligned.29
Maintenance and Repair (cont’d)3. HydraulicsThe safety control bar is connected to the direction control valve causing the feed roll to turnforward, neutral or reverse.The speed control valve is located next to the hydraulic tank.Before opening the filler cap, wipe the top of the tank clean. Keep hydraulicOiloil level within 2 inches from the top. Do not overfill.WARNING: Burn hazardNever open oil fill port while engine is running. Hot oil can spray over face andbody. PumpUse a good grade anti-wear hydraulic fluid equivalent to ISO-32.Check with the manufacturer for severe hot or severe cold oilrecommendations.Keep your hydraulic system clean.Replace oil yearly or immediately if it becomes contaminated andthoroughly clean the tank.Clean filter screen.FilterThe spin-on type hydraulic filter must be changed after the first ten(10) hours of use, this allows for the initial system cleanout.Then change the filter after every 250 hours of use.The hydraulic pump is belt driven directly from the engine so that the systemis continuously under pressure when the engine is running. Keep the belttight. To tighten and adjust the hydraulic pump belt, see “Maintenance: Beltand Sheave Care”.30
Maintenance and Repair (cont’d)Pressure ReliefValveThe system pressure is set for 2500 psi.CAUTION:Do not raise the pressure relief beyond 2500 psi. Doing so would damage themotors.4. Smart Feed SystemThe Smart Feed system monitors the engine shaft speed and automatically stops the feed rollerbefore clogging occurs. Smart Feed will increase bearing, belt, and clutch life while reducingengine stress.Normal Operation ENGINE: Bring the engine speed up slowly to operating speed of 3600 RPM. The feed rollerwill not turn until the engine exceeds 3200 RPM, then the feed roller will start automatically.Smart Feed is always on, and in operation. The feed rollers will not turn if the chipper is notturning at proper speed.Smart Feed may be by-passed by removing its fuse. If a failure occurs, you may want to dothis. Chipping can continue; however the operator must monitor the material intake by using theforward, neutral, reverse bar located at the back of the hopper.31
Maintenance and Repair (cont’d)5. Maintenance ScheduleMake copies of the abbreviated check listDAILYCheckedOkay ServicedCheckedOkay Serviced1. Engine Oil5. Air Cleaner2. Chipper Belt Tension6. Fuel Level3. Hyd. Pump Belt Tension7. Hydraulic Oil Level4. Condition of KnivesServiced By:DateWEEKLYCheckedOkay ServicedCheckedOkay ServicedDO NOT OVER GREASE1. Bed Knife Adjustment2. Check Tail Lights & Brakes5. Grease Chipper Bearings (2)3. Tires and Lug Nuts6. Grease Feed Roll Bearing (4)4. Check for Loose Nuts, Bolts7. Check Feed Roll MotorCouplingsServiced By:DateMONTHLYCheckedOkay ServicedCheckedOkay Serviced4. Check Swivel Clamp1. Check Entire HydraulicSystem for function & leaks5. Check Total hours for2. Check Feed Roll BladesEngine Oil Change6. Check Total Hours forHydraulic Oil Filter Change3. Check Discharge DeflectorServiced By:DateIMPORTANT:If a part needs replacement, only use parts that meet the manufacturer’s specifications.Replacement parts that do not meet specifications may result in a safety hazard or poor operation ofthe chipper.Contact DOSKO Customer Service at 1-800-822-0295for any questions, problems, or parts orders.32
Maintenance and Repair (cont’d)6. Bolt Torque ChartBolt SizeLocationBolt GradeTorque, ft lbs.3/4-10 NCRoll Open Feed Roller51303/4-16 NFKnife Bolts (5 each)81305/8-11 NCAdjust Hitch to Tongue81125/8-11 NCFeed Roll Shaft Bearings51125/8-11Bed Knife (4 each)51121/2-20 NFWheel Lug Nuts81001/2-13 NCEngine Hold Down Disks,Fan Blades8901/2-13 NCCovers5903/8-16 NCHyd. Pump Mount &Fenders5375/16-18 NCFlanges & Covers5205/8 Set ScrewTaper Bushing671/2 Set ScrewTaper Bushing367/16 Set ScrewTaper Bushing233/8 Set ScrewTaper Bushing15Note: These values are based on clean, dry threads33
Maintenance and Repair (cont’d)7. Hydraulics TroubleshootingPROBLEMPOSSIBLE CAUSE1. Low oil level.2. Dirty oil filter.3. Feed roll jammed.Hydraulic oil hot or systemrunning slow.4. Damaged hose.5. Pressure relief valve stuckopen.6. Worn pump.Feed roller turns slow or notat all.7. Wrong hydraulic oil.1. Plugged suction linescreen.2. Pump belt slipping.3. Feed control valve wornor not shifting properly.4. Plugged cartridge valve.5. Smart Feed stoppingfeed roller.SOLUTIONFill.Replace.Open roll away feel roll andclean.Replace.Call Dosko Customer Service@ 1-800-822-0295.Call Dosko Customer Service@ 1-800-822-0295.Clean and replace.Clean.Tighten or replace.Repair or replace.See below.See next page.SolenoidCartridgeCartridge valveSuspect plugged cartridgevalve.1. Follow standard safety procedures: Always remove keyfrom engine ignition and remove positive battery terminalfrom battery.2. Remove solenoid.3. Remove cartridge.4. Check for debris and wash cartridge will solvent (brakecleaner).5. Reassemble.34
Maintenance and Repair (cont’d)8. Smart Feed TroubleshootingPROBLEMFeed rollers will not turn.POSSIBLE CAUSESOLUTION1. No power to SmartFeed box2. Chipper not running at fullspeed3. Forward/reverse feedcontrol valve in neutralposition4. Sensor dirty5. Sensor out of adjustmentSmart Feed will notoperate – feed rollers keepturning.1. Fuse blown2. Check for power to SmartFeed Check for loose wiringconnections or blown fuse.Set engine at 3600 RPM. (Useseparate tach to check RPM)Set in forward direction (pullout).Clean sensor, ensuring correctspacing.Set sensor to .015” from engineflywheel. See belowReplace fuse.Measure 12 volts.Check for 12 volts at coil at full3. Coil on cartridge valve notRPM. If power is present,operatingreplace coil.4. Wiring is damaged.Replace.015”Engine flywheelSmart Feed sensorSmart Feed sensor –connected to engine35
Maintenance and Repair (cont’d)Smart Feed Wiring Diagram36
Maintenance and Repair (cont’d)9. Trailer Wiring Diagram37
parts, should be performed only by a qualified electrical service technician. Obtain factory approved parts from DOSKO at 1-800-822-0295. Replacement parts. If a part needs replacement, only use factory approved repair parts. Replacement parts that do not meet specifications may res