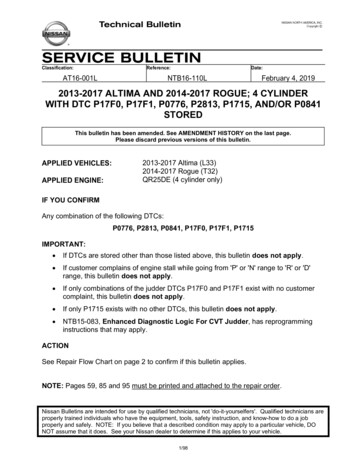
Transcription
ebruary 4, 20192013-2017 ALTIMA AND 2014-2017 ROGUE; 4 CYLINDERWITH DTC P17F0, P17F1, P0776, P2813, P1715, AND/OR P0841STOREDThis bulletin has been amended. See AMENDMENT HISTORY on the last page.Please discard previous versions of this bulletin.APPLIED VEHICLES:APPLIED ENGINE:2013-2017 Altima (L33)2014-2017 Rogue (T32)QR25DE (4 cylinder only)IF YOU CONFIRMAny combination of the following DTCs:P0776, P2813, P0841, P17F0, P17F1, P1715IMPORTANT: If DTCs are stored other than those listed above, this bulletin does not apply. If customer complains of engine stall while going from 'P' or 'N' range to 'R' or 'D'range, this bulletin does not apply. If only combinations of the judder DTCs P17F0 and P17F1 exist with no customercomplaint, this bulletin does not apply. If only P1715 exists with no other DTCs, this bulletin does not apply. NTB15-083, Enhanced Diagnostic Logic For CVT Judder, has reprogramminginstructions that may apply.ACTIONSee Repair Flow Chart on page 2 to confirm if this bulletin applies.NOTE: Pages 59, 85 and 95 must be printed and attached to the repair order.Nissan Bulletins are intended for use by qualified technicians, not 'do-it-yourselfers'. Qualified technicians areproperly trained individuals who have the equipment, tools, safety instruction, and know-how to do a jobproperly and safely. NOTE: If you believe that a described condition may apply to a particular vehicle, DONOT assume that it does. See your Nissan dealer to determine if this applies to your vehicle.1/98
Repair Flow ChartA.Does any combination of the following DTCs exist?P17F0, P17F1, P0776, P2813, P0841, P1715NoYesYesDoes only P1715 exist?NoDoes only a combination of P17F1, P17F0 existwith no other DTCsand NO customer complaint of Judder?YesNoCustomer complains of engine stall while goingfrom “P” or “N” range to “R” or “D” or “L” range?YesThis bulletin does notapplyRefer to ASIST forfurther diagnosticinformation.NoDoes P17F0 exist?YesNoEvidence of CVT belt slippage?YesPage 8Noa. Replace the sub-assembly. Page 17And thenInstall a new valve body onlyb. Install a new control valve (valvebody). Page 71Page 71Check TCM part numberand if needed perform reprogrammingStep 138 on Page 79IMPORTANT: Reprogramming, if needed, must bedone before performing additional services.Perform ADDITIONAL SERVICE WHENREPLACING CONTROL VALVE. Page 852/98NTB16-110L
Table of Contents Required Tools / Material . page 4 Essential Tools . .page 4 Weights page 6 Precautions when Disassembling a CVT Assembly page 7 Control Valve (Valve Body) Removal and CVT Belt Inspection .page 8 CVT Assembly Removal . page 17 Remove the Converter Housing, Oil Seals, Oil Pump Cover, Oil Pump andOil Filter page 20 Clean the CVT case surfaces . .page 28 Clean the Oil Passages in the CVT Case, Oil Pump Cover, and CVT FilterArea .page 29 New Oil Pump Installation . . .page 31 Replace the Side Cover – Pulleys and Belt (sub-assembly) . .page 33 Clutch Total Endplay Adjustment – Thrust Bearing Selection page 56 Clean the Converter Housing Passages page 61 CVT Reassembly .page 63 Control Valve (Valve Body) Strainer and Pan Installation .page 71 Install the CVT Assembly .page 77 TCM Reprograming. . page 78 Perform ADDITIONAL SERVICE WHEN REPLACING CONTROLVALVE .page 85 Trouble Shooting page 90 PARTS INFORMATION page 92 CLAIMS INFORMATION .page 93 PARTS KITS REFERENCE TABLE . .page 953/98NTB16-110L
Required Tools / MaterialsB. Cherry picker / engine hoist / lifting arm (never handle replacement CVTsub-assembly by hand)Strap or chain to lift and lower CVT and sub-assemblyPetroleum jelly or equivalentExtendable magnetLarge clean surface / 1 to 2 work tablesVernier calipersBrake cleanerRubbing alcoholPlastic scraperEssential ToolsAdditional Essential Tools are available from Tech Mate online: www.nissantechmate.com,or by phone: 1-800-662-2001.J-50255CVT Service Tool KitJ-50818CVT2 Oil PumpSeal InstallerJ-25721-ASlide Hammer SetJ-50272Digital DepthGaugeJ-51923J-Hook CaseSeparatorJ-50271Gauge BlockJ-8092Driver HandleJ-52282Output Seal InstallerFigure 14/98J-52281CVT Case DifferentialSeal InstallerNTB16-110L
Essential Tools (continued). Tools that are not indicated as specifically for one model areused for all models.C.J-51959Guide PinsFigure 2CAUTION: Always handle the CVT and component assemblies carefully and with theappropriate lifting tools.J-51595-1Eyelet & linkageJ-51595Lifting Fixture (top)Figure 3J-52082Use for RogueOnlyJ-52082-2Figure 45/98NTB16-110L
Essential Tools (continued)CAUTION: Always handle the CVT and component assemblies carefully and with theappropriate lifting tools.J-51909Lifting Fixture (side cover)Use for AltimaonlyFigure 5Tech Cam J-51951Lens swab J-51963(not part of J-51951)Figure 6 D.Remove protectivefilm before first useAdditional Tech Cam J-51951 kits or components are available from Tech Mate.Weights CVT assembly: 300 lbs. approximately CVT sub-assembly: 65 lbs. approximately6/98NTB16-110L
SERVICE PROCEDUREIMPORTANT: Repairs performed for this bulletin require CONSULT-III plus Diagnosticresult reporting function-Setting be turned ON and Diagnosis (All Systems) be performed. Ifnot done, it may result in a repair being non-warrantable.E.Precautions when Disassembling a CVT AssemblyTransmissions are vulnerable to particles (dust, metal, lint, etc.).When disassembling a CVT, make sure your work environment (shop, workbench, etc.),transmission area (sub-frame, oil pan, harness connector, etc.), and your hands are free ofcontamination.IMPORTANT: Wash and clean the exterior of the CVT assembly prior to disassembling.CAUTION: Cover all air breather and drive shaft holes to prevent water intrusion.Apply rust penetrant to locator / dowel pins on torque converter housing and sidecover of CVT and allow to soak as needed.Refrigerating oil seals may help in assembly (axle and T/C seals).Only disassemble those parts which are mentioned in this bulletin.Make sure all parts are clean prior to assembling / installing. Unpack service parts just before installation. Store the related parts that havebeen removed separately to preventbeing mixed up; small cups can beused.Figure 7IMPORTANT: The CVT unit “wiring harnessconnector” will be reused during thisprocedure. The wiring harness can bedisconnected from the valve body at thewiring harness connector and remain in theCVT.Figure 87/98NTB16-110L
Control Valve (Valve Body) Removal and CVT Belt Inspection1. Write down all radio station presets.PresetsAMFM 1FM 2SAT 1SAT 2/3Bass1Treble234BalanceFade56Speed Sen. Vol.2. Disconnect both battery cables, negative cable first.3. Remove the valve body.Before lifting the vehicle; Place the transmission gear selector in Neutral. Refer to the appropriate ESM, section Transaxle & Transmission, for valve bodyremoval.NOTE: The number ‘7’ is on the head of all bolts that need to be removed for valvebody removal. Do not remove any bolt that does not have the number ‘7’.CAUTION: Never allow any chemicals or fluids other than NS-3 CVT fluid orequivalent to enter the CVT assembly. Never allow any foreign debris, dust,dirt, etc. to enter the CVT assembly. For additional information, see video # 544: “CVT Belt Inspection”. This video islocated under the TECH TRAINING GARAGE VIDEOS tab in Virtual Academy.8/98NTB16-110L
Exploded View(Total of 9 bolts)Figure 91.Transaxle assembly2.Terminal cord assembly3.CVT fluid temperature sensorbracket4.Control valve5.Bracket6.O-ring7.New-style oil strainer assembly8.Old-style oil strainer assembly9.Oil pan gasket10.Oil pan11. Drain plug13.Magnet14. Spring washer15. Manual plate16.Lip seal17. Snap ring18. Overflow plug19.O-ring12. Drain plug gasket: Always replace after every disassembly.: Nꞏm (kg-m, ft-lb): Nꞏm (kg-m, in-lb)9/98NTB16-110L
4. Secure the front right tire with a suitablestrap, so that it cannot rotate. This will assist in making the beltturn.5. Mark the front left tire with a suitablemarking. This will assure all 360 of the belt isinspected.Figure 106. Using borescope J-51951 with mirrorattachment, inspect the entirety of thetwo sides of the belt that come in contactwith the pulleys (see page 12, Figure15). Reference the Figures on pages 12through 16 for comparison of an OKand NG belt condition.BeltPulleyCaseNOTE:o Be sure to remove the protective filmfrom the mirror before the first use.o Clean the camera lens and mirrorbefore each inspection. Use 90%isopropyl alcohol and a lens swabfrom Lens Swab packet J-51963listed in the PARTS INFORMATION.o Before inspecting, make sure thecamera handle’s AA batteries arecharged and the LCD monitor’sbattery is charged.Step 6aStep 6cFigure 11Cameraflexible tubeFronta. Insert the camera lens between theCVT case and pulley where shown inFigure 11 and Figure 12. Insert the lens approximatelyseven (7) inches, and then viewthe side of the belt that contactsthe pulley.Figure 1210/98NTB16-110L
b. Slowly and carefully turn the front lefttire one full turn in the forwardrotation to view all of the belt. Holding the borescope with onehand allows for turning the tirewith the other hand(see Figure 13).CAUTION: If the tire is rotated in therearward rotation, the camera lensmay get caught between the belt andpulley.Figure 13c. If the inspection result is OK, inspectthe other side of the belt. Insert the camera lens in thesecond location where shownin Figure 11 and Figure 14, andthen perform step 6b again.PulleyFrontd. If the inspection result is OK 360 onboth sides of the belt, proceed tostep 7 on the next page. For additional information, seevideo # 544: “CVT BeltInspection”. This video is locatedunder the TECH TRAININGGARAGE VIDEOS tab in VirtualAcademy.Figure 14e. If the inspection result is NG,proceed to step 8 on the next page.11/98NTB16-110L
7. If the belt inspection result is OK, replace only the valve body, and then reprogram theTCM if applicable. For valve body replacement, go to page 71, Control Valve (Valve Body) Strainerand Pan Installation. Check TCM part number (step 138 on page 79) and if needed performreprogramming (step 138 on Page 79) if applicable.IMPORTANT: Reprogramming, if needed, must be done before performingadditional services.8. If the belt inspection result is NG, replace the CVT sub-assembly and valve body, andthen check step 138 on page 79 to confirm if a TCM reprogram is available. Go to CVT Assembly Removal, page 17.Inspect these sidesDo not inspectthese sidesFigure 1512/98NTB16-110L
Figure 16: New beltFigure 17: Close-up of section to be inspected13/98NTB16-110L
Pictures in Figure 18 and Figure 19 were taken with borescope J-51951.OKVisuallinesFigure 18: Belt is OKOKVisuallinesFigure 19: Belt is OK14/98NTB16-110L
NGScuffingFigure 20: Example of NG beltNGLines“smeared”Figure 21: Example of NG belt15/98NTB16-110L
A.Pictures in Figure 22-Figure 24 were taken with borescope J-51951.NGFigure 22: Example of NG beltNGFigure 23: Example of NG beltNGFigure 24: Example of NG belt16/98NTB16-110L
CVT Assembly RemovalOverview of Sub-assembly Repair1. Apply rust penetrant as necessary to the dowel pins on the converterhousing side and sub-assembly side cover2. Remove CVT from the vehicle3. Remove the Converter Housing, Oil Seals, Oil Pump Cover, Oil Pump andOil Filter4. Clean the CVT case surfaces5. Clean the Oil Passages in the CVT Case, Oil Pump Cover, and CVT FilterArea6. Check initial pulley movement characteristics7. New Pump Installation8. Replace the Side Cover – Pulleys and Belt9. Confirm shift selector movement10. Recheck new pulley movement characteristics matches that of the originalassembly11. Clutch Total Endplay Adjustment – Thrust Bearing Selection12. Clean the Converter Housing Passages13. CVT Reassembly14. Control Valve (Valve Body) Strainer and Pan Installation15. Install the CVT AssemblyNOTE: For additional information review video # 547: “CVT Belt and PulleyReplacement”. This video is located under the TECH TRAINING GARAGE VIDEOS tabin Virtual Academy.17/98NTB16-110L
9. Temporarily install the oil pan gasket and oil pan with four oil pan bolts to corners of theoil pan, hand tight (Figure 25).NOTE: It is not necessary for the control valve to be installed, a new one will beinstalled later in the service procedure.Figure 2510. Remove the CVT from the vehicle. Refer to the Electronic Service Manual (ESM), section Transaxle & Transmissionfor removal information.AWD VehiclesCAUTION:o Use extreme care when moving the axle in and out of the transfer case assembly.o To avoid seal damage or deformation, properly support and guide the axle.18/98NTB16-110L
11. Place the CVT on a workbench with theoil pan side down. Use wood or plastic blocks to keepthe CVT steady.CAUTION: Do not deform the oilpan.12. Remove the torque converter.Figure 2613. Drain CVT fluid out of the torqueconverter.TorqueconverterFigure 27Primary speedsensor14. Remove the primary speed sensor.IMPORTANT: The speed sensor will bere-used.Figure 2819/98NTB16-110L
Remove the Converter Housing, Oil Seals, Oil Pump Cover, Oil Pump and Oil Filter15. Remove all 23 converter housingmounting bolts (see Figure 29).NOTE: These bolts will be replaced with newones and will not be reused. Apply rust remover to the dowel pinsif needed.Dowel PinFigure 2916. Separate and then remove the converter housing from the CVT case. Use Slide Hammer J-25721-A and Slide Hammer Bolt J-50255-UPD with J-Hook J51923 at the cut out areas similar to the one shown in Figure 30 and Figure 31.CAUTION: DO NOT use a pry-bar, chisel, etc. to separate the converterhousing from the CVT case.J-25721-A-----J-50255-UPD-----J-51923One of threecutout areasFigure 30Figure 3120/98NTB16-110L
17. Note the location of the pin shown in Figure 32.CAUTION: This pin can slip out during movement of the CVT while converter housing isremoved.Figure 32O-ring18. Remove the O-ring from the input shaft. This O-ring will be replaced with anew one.Figure 3319. Carefully remove the reduction gear assembly (Figure 34).20. Carefully remove the differential assembly (Figure 35).Reduction gearassemblyDifferentialassemblyFigure 35Figure 3421/98NTB16-110L
21. Remove the following oil seals usingsuitable tools:CAUTION: Be careful not to damageany of the seal bore surfaces.a. CVT case differential side oil seal(drive shaft seal). See Figure 36.Figure 36b. Torque converter seal (Figure 37).Figure 37c. Converter housing differential side oilseal (drive shaft seal). See Figure 38.NOTE: All wheel drive transfer caseO-ring will be replaced later in thisprocedure.Figure 3822/98NTB16-110L
22. Remove the two (2) nuts from baffleplate A, and then remove baffle plate A(see Figure 39).CAUTION: To avoid rounding off thesenuts, it is best to use a 3/8 inch drive 6pt 10 mm socket.Baffleplate nutsBaffleplate AFigure 3923. Remove the oil pump chain, driven and drive sprockets as one assembly (Figure 40). Spread the snap ring to remove sprocket (Figure 41).IMPORTANT: The drive sprocket has a specific top and bottom. Keep the sprocketsand chain together after removed.Drive sprocketDriven sprocketSnap ringOil pump chainFigure 40Figure 4123/98NTB16-110L
Thrust washer24. Remove the “Pump cover” (dummycover) thrust washer (Figure 42). This thrust washer will be reused.Dummy coverFigure 42Snap ring25. Remove the Oil pump snap ring (Figure43). Lightly push the ends of the snapring together, rotate one sideupwards while pulling the snap ringtowards the pump opening.Figure 43Oil pumpbracket26. Remove the Oil pump bracket (Figure44). Retained by two bolts.Figure 4424/98NTB16-110L
27. Remove the three bolts from baffle plateB, and then remove baffle plate B(Figure 45).Baffleplate BFigure 4528. Remove the two bolts from baffle plateC, and then remove baffle plate C(Figure 46).Baffleplate C29. Remove the five dummy cover bolts, andthen remove the dummy cover. SeeFigure 47.NOTE: These bolts will be reused.Figure 46IMPORTANT: Lift the dummy cover from sides ONLY. Do NOT lift from the input shaft (Figure 47.This can lift the clutch pack out. Do NOT remove the lathe cut seals (white seals in Figure 48) from the dummycover. These seals will be reused. Lathe cut seals must be in their correct positions during final assembly toprevent drivability issues.DummycoverDo not lift hereLathe cut seals(white seals)DummycoverFigure 48Figure 4725/98NTB16-110L
Lathe cut seals(white seals)30. Remove the thrust bearing from theclutch assembly bore (Figure 49).NOTE: Take care removing the thrustbearing so that the lathe cut seals arenot knocked out of their grooves.IMPORTANT: The thrust bearing has two differentsides. As the thrust bearing isremoved, note the thrust bearingorientation so that the new bearingcan be installed in the sameorientation. Thrust bearingSecondaryspeed sensorFigure 49This bearing will not be re-used.31. Wipe any metallic debris from the face ofthe secondary speed sensor(Figure 49).Top ofCVTOil pan gasketsurface32. Remove the oil pump as follows:a. Remove the fitting bolt located abovethe left rear corner of the oil pangasket surface (Figure 50).Fitting boltFigure 50b. Remove the three oil pump Allenhead bolts, and remove the oil pump(Figure 51).NOTE: Do NOT discard the Allen-headbolts. Bolts will be re-used. New oil pump will be installed atlater steps.Figure 5126/98NTB16-110L
33. Remove CVT fluid filter as follows:a. Remove the 4 bolts and then removethe CVT fluid filter cover (Figure 52).NOTE: Bolts will be reused.CVT fluid filter coverFigure 52b. Remove the CVT fluid filter withgrommet seal and O-ring seal(Figure 53). Discard the oil filter and seal.They will be replaced. Grommet is fitted to the bottomend of the filter and is includedwith replacement filter(Figure 54).Fluid filterO-ring sealFigure 53GrommetFigure 5427/98NTB16-110L
Clean the CVT case surfaces34. Thoroughly clean the mating surfaces of the CVT case and Torque Converter Housing. A plastic scraper can be used.CAUTION:o DO NOT use sanding discs, similar abrasive tools, or metal blades.o Use brake spray or equivalent solvent and lint-free towels only.o Make sure brake spray or solvents used are compatible with local regulations.oPrevent debris from entering in the CVT.o Make sure rust and debris have been cleaned off of dowel pins and receiving holes(Figure 55).35. Clean the dowel pins and dowel pin receiving holes of any rust or debris (Figure 55).NOTE: Use small wire brush or similar tool at the inside surface of dowel pin holes. DONOT SCRAPE CVT CASE mating surfaces.Clean dowel pinreceiving holesDowel pinFigure 5528/98NTB16-110L
Clean the Oil Passages in the CVT Case, Oil Pump Cover, and CVT Filter AreaIn the following steps: Brake spray or a suitable cleaning solvent and compressed air will be used to cleanout oil passages in the CVT assembly. Make sure the brake spray or solvents are compatible with local regulations.WARNING: Wear eye / face protection when using compressed air and cleaningfluids.CAUTION: Regulate air pressure up to a maximum of 75 PSI.Clean withinthis area36. Clean the area where the CVT fluid filterfits (Figure 56). Make sure the old filter grommet sealis removed.37. Clean the fluid passages to and from thefilter (Figure 56).FluidpassagesFigure 5629/98NTB16-110L
38. Spray brake clean in all oil passages of the CVT case where shown in Figure 57 andFigure 58. Do not spray brake clean into the clutch pack.39. Apply compressed air in the same passages.NOTE: Do not stand in front of the passages while using
Nissan Bulletins are intended for use by qualified technicians, not 'do-it-yourselfers'. Qualified technicians are properly trained individuals who have the equipment, tools, safety instruction, and know-how to do a job . GARAGE VIDEOS tab in V