Transcription
ImproMed* Infinity/IDEXXReference LaboratoriesIntegration User GuideImageVue CR20Digital Imaging SystemQuick Reference GuideStarting and stopping the systemTo start the system:1. To turn on the scanner, press the Standby switchThe Ready lamp illuminates.on the scanner operation panel.2. Turn on the computer; the software starts automatically.To shut down the system:1. Tapin the upper right corner of the software window, and then select Shut Down.2. Tap OK to confirm. Both the computer and the scanner shut down.Requesting an image captureFrom the Cornerstone* software:1. Set up invoice items to initiate the Image Request special action.ORFrom the Patient Clipboard*, open the patient record, right-click the patient’s name in the PatientList, and then select Imaging Image Request.Requests are listed by patient in the ImageVue* CR20 RIS window.2. Select the patient in the ImageVue CR20 RIS window, and then tap3. In the Study window, tap.to display the Shot Selection window. See “Capturing the images.”From a non-Cornerstone practice management system:1. Use the modality worklist feature to send the image request to the ImageVue CR20 software.2. Follow steps 2–3 in the previous section.1From a standalone ImageVue CR20 system:1. In the RIS window, tapto display the Patient Information window.2. Enter a new patient record, and then tap. See “Capturing the images.”
Proprietary rights noticeInformation in this document is subject to change without notice. Companies, names, and data used in examples are fictitious unless otherwise noted. Nopart of this document may be reproduced or transmitted in any form or by any means, electronic, mechanical, or otherwise, for any purpose, without theexpress written permission of IDEXX Laboratories. IDEXX Laboratories may have patents or pending patent applications, trademarks, copyrights, or otherintellectual or industrial property rights covering this document or subject matter in this document. The furnishing of this document does not give a license tothese property rights except as expressly provided in any written license agreement from IDEXX Laboratories. 2017 IDEXX Laboratories, Inc. All rights reserved. 10711-00*IDEXX, LabREXX, and VetConnect are trademarks or registered trademarks of IDEXX Laboratories, Inc. or its affiliates in the United States and/or othercountries. All other product and company names and logos are trademarks of their respective holders. The IDEXX Privacy Policy is available at idexx.com 2017 ImproMed, LLC. All rights reserved.No part of this publication may be reproduced, transmitted, transcribed, stored in a retrieval system, or translated into any language or computer language,in any form or by any means without the prior written permission of ImproMed, LLC.2
ContentsIntroduction . 4Requirements and supported software versions. 4Requesting a VetConnect* account. 4Adding staff members to the VetConnect PLUS account. 5Setting up VetConnect PLUS services in your ImproMed Infinity software. 5Setting up your ImproMed Infinity software to use VetConnect PLUS services to order testing anddownload test results. 5To add staff member login information to ImproMed Infinity software. 5To link ImproMed Infinity products to LabREXX codes:. 7Using LabREXX to create a test requisition. 7How it works. 8Configuring lab request sheets. 8Configuring the Lab Imports module. 9Creating a requisition for individual test orders. 9Web-based requests. 9Lab request sheets. 10Opening a draft requisition. 10Viewing a completed or pending requisition. 10Downloading test results. 11Configuring the VetConnect PLUS lab service. 11Notification of available results. 11Downloading the PDF attachment of results. 11Managing final and partial results. 113
IntroductionIDEXX Reference Laboratories and VetConnect* PLUS are now integrated with ImproMed* Infinity software. UsingVetConnect PLUS, your practice can:1. Seamlessly create electronic test requisition forms for your IDEXX Reference Laboratories test orders.2. Automatically download IDEXX Reference Laboratories results into your patients’ medical records.There are several benefits to using VetConnect PLUS: Improved order accuracy with bar-coded LabREXX* forms and automatic error checking Elimination of misspelled patient, doctor, and staff names Automatic capturing of test fees, to reduce missed chargesThis document explains how to set up and start using VetConnect PLUS in ImproMed Infinity, how to use VetConnect PLUS toorder tests, and how to download IDEXX Reference Laboratories results into your software.Requirements and supported software versionsYour practice must provide the following:1. Internet access on all computers that will be used to create test requisitions2. A VetConnect PLUS account and an IDEXX web services ID and password (instructions for obtaining both are included inthis document)3. ImproMed* Infinity version 4.4 or higher4. ImproMed* Universal Lab Reader version 5.27 or higher5. VetConnect PLUS user ID and password for each veterinarian6. LabREXX license file from ImproMedRequesting a VetConnect* accountTo use VetConnect services through ImproMed Infinity software, your practice must have a VetConnect PLUS account andan IDEXX web services account ID and password. If your practice does not already have these, contact VetConnect PLUScustomer support: In the U.S., call 1-888-433-9987, or go to vetconnect.com and click Subscribe now, or email vccontactus@idexx.com In Canada, call 1-800-667-3411, or e-mail vccanada@idexx.com.Be prepared to provide the following information:1. Your IDEXX Reference Laboratories account number2. The name of the person at your practice who will administer the account, including their email address3. The name of your practice management softwareIDEXX will provide a user name and password for the VetConnect PLUS and will provide an IDEXX web services account IDand password. You will need all of these to complete the integration.Note: If you think your practice may already have a VetConnect PLUS account but are not sure who the account administratoris, contact customer support, as described above.4
Adding staff members to the VetConnect PLUS accountBefore you can start using VetConnect PLUS services to create test requisitions, the VetConnect PLUS administrator mustadd the practice’s staff members to the VetConnect PLUS account.To add members to the VetConnect PLUS account:1. Go to vetconnect.com (U.S.) or vetconnect.ca (Canada).2. Enter the administrator user name and password, and then click Enter VetConnect.3. Select the Account Administration tab, and then click the Practice Administration link at the top of the page.4. In the Practice Members area, click Add New Member to display the New Account information form.5. Fill in the required fields (marked with asterisks), and then click Create.6. In the Permissions area, select the permissions for this member:a. View Lab Reports: User can view all laboratory result reports for your practice.b. Order Tests/Consult: User can request additional testing and internal medicine consultations through vetconnect.com.c. Administer Practice: User can edit practice information and add or delete account members.7. Click Save.8. Keep a list of the VetConnect user names and passwords because these may be needed in a future step.Setting up VetConnect PLUS services in your ImproMed Infinity softwareNow that you have everything you need from IDEXX, you must set up your ImproMed Infinity software so that you can useVetConnect PLUS to create test requisitions and so your software can automatically download test results from IDEXX Reference Laboratories.Setting up your ImproMed Infinity software to use VetConnect PLUS services to order testing and download test resultsNote: The following directions are for ImproMed Infinity v5.0 and higher. If you are running a version lower than 5.0, pleaseremove thebutton from the steps. The screens may be different.5
To add staff member login information to ImproMed Infinity software:Employee setup information in Infinity must include LabREXX information. If you need to set up an Infinity employee, pleasefollow instructions in “Creating an employee;” otherwise, please refer to “Editing an employee.”Creating an employee1. Click Setup Employees Employees. The Setup Employees dialog box opens.2. Select Create in the Mode area.3. Enter the desired information into the correct tabs: General, Address, Images, Custom Fields, Signature Images, LabREXXUser. The following steps are specific to the LabREXX tab:a. Enter the LabREXX User Name.b. Enter the LabREXX Password.c. Re-enter the LabREXX Password.4. Click Apply and OK to save the changes and close the dialog box.Editing an employee1. Click Setup Employees Employees. The Setup Employees dialog box opens.2. Select the Employee from the Name drop-down menu.3. Select Edit in the Mode area.4. Enter the desired information into the correct tabs: General, Address, Images, Medical Records, Security, and Desktops.The following steps are specific to the General tab:a. Enter the LabREXX User Name.b. Enter the LabREXX Password.c. Re-enter the LabREXX Password.6
5. Click Apply and OK to save and close the changes.To link ImproMed Infinity products to LabREXX codes:IDEXX and Infinity will prompt for a product when the LabREXX requisition is being compiled or practices can set the productlist ahead of time. Infinity automatically displays the product setup for IDEXX and allows users to select the correct Infinityproduct.IMPORTANT: This tab is set up per practice.1. Double-click the correct row for the Infinity Product. A Link Item window will appear.2. Select the product.3. Click Setup Products if the product is new.4. Click OK.5. Repeat steps 1–4 for all desired LabREXX services.Using LabREXX to create a test requisitionThe LabREXX integration lets Infinity operators generate test requisition forms online or using Infinity Lab requests. Once therequest is generated, operators then print them out to include with specimens sent to IDEXX for testing, while invoicing theclient for the tests performed.When you use the LabREXX module: You can find and select tests quickly, using the online searchable test database. The printout is clear and easy to read, with a bar code containing patient information for safe and accurate sample identification. You’ll never run out of forms just when you need them most.The Infinity Lab Requests feature provides a means for a doctor to request (order) lab work to be completed for a patient.Lab requests then reside in a queue in which the status of each request is reported back. The requests list can be filtered byrequesting provider, date, and/or the status of the requested lab work.Requests are entered into the queue through the use of special lab request sheets (travel sheets). At the time lab work isordered, the charge for the lab work is added to the client’s invoice.Additionally, the Lab Requests feature provides these enhancements: Lab results from select lab equipment providers can be automatically imported into a patient’s record. Imported lab results can be viewed from the Lab Requests tab in the Lab Imports module. Labels specific to Lab Requests may be printed to facilitate the identification of samples and provide any neededinformation. The original format of the lab results can be viewed as a PDF file linked within the imported lab result.7
How it worksThe Lab Results module contains an optional tab called Lab Requests. From the Lab Requests tab, the operator clicks Newto generate a lab work request. A Lab Request (Travel) sheet will open.The operator selects the desired Sheet, Employee, Date/Time Performed, and any other designations as if they were usingtravel sheets to add products to an invoice/estimate/treatment plan, etc.Next, the operator selects the requested lab work and clicks Create. This assigns the request a unique identification number(Lab ID) and adds the request to the list of requests.Once the request is made and added to the list of requests, it is assigned a status of Created, Pending, Imported, or NotCompleted.The Created status means the request has been made and nothing has changed with it.The Pending status means the results are ready to be imported, but they require attention. The result must be manuallyaddressed by going to the ImproMed Universal Reader tab, selecting the result, and addressing whatever specific needsthe result has. The most common reason for a result to be Pending is the need to make the proper field associations for theresults or if there is no match for the Lab ID.The Imported status indicates the result has been imported into the patient’s record and is ready for review.The Not Completed status will be displayed only when a LabREXX requisition has not been completed by the operator, butinstead the operator saved a draft.Configuring lab request sheetsNote: This feature is available with Infinity v5.0 and higher.To set up the Lab Requests feature in Infinity, go to Setup Medical Records Dynamic Lab Screens LabResult Paths and check the box to Show Lab Request Tab. This will display a new tab called Lab Requests as the first anddefault tab in the Lab Imports module.Then click the following: Setup Patient Processing Travel Sheets and create the needed Lab Request Sheet(s).8
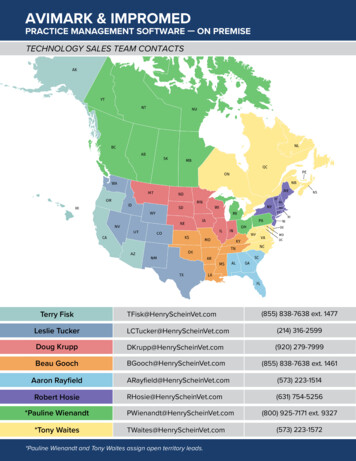
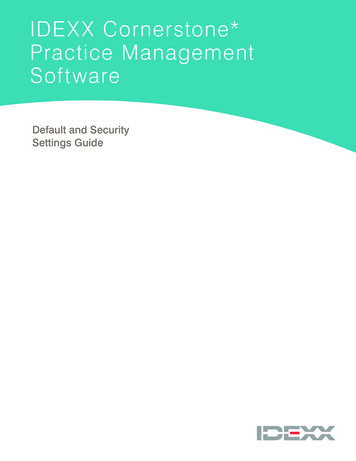
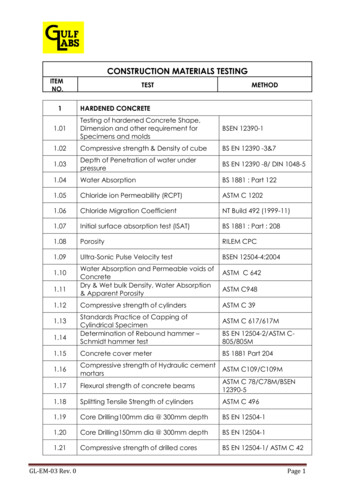
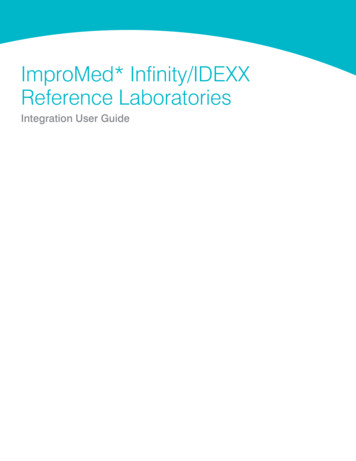
Note: The Travel Sheets module is required to use the Lab Requests feature.When creating the Travel Sheet for Lab Requests, it is important to designate the lab machine the sheet is for. The followingillustration shows the Lab drop-down menu as seen in the Setup Travel Sheets screen:It is important to remember that the Request Sheets are unique to each piece of equipment and must be created for each labthat requests are going to be generated for.Select IDEXX LabREXX to use Travel Sheets when ordering lab tests.Configuring the Lab Imports moduleFrom the Infinity Desktop:1. Click Setup Medical Records Dynamic Lab Screens Lab Requests. The Setup Lab Request Labs dialogbox appears.2. Select the Check for Lab Machine results every interval to refresh the labrequests tab.3. Select Show/Import Lab Results for all Businesses, if desired.4. Choose how to handle attachments:a. Do not save lab attachments leaves the PDF file alone.b. Attach to dynamic lab records creates a link with the PDF file in theimported lab record.5. Choose how to handle labels.6. Click OK to save the changes and close the dialog box.Creating a requisition for individual test ordersIMPORTANT: The Lab Request tab must be activated.Note: The date and time of the LabREXX Request will come directly from IDEXX.Web-based requestsNote: This method can be used with Infinity v4.4 or higher.9
From the Infinity Desktop:1. Click Modules Lab Results Import. The Lab Import module opens.2. Click the New IDEXX LabREXX Request button.3. Verify that the client and patient are correct or use Find Client to select the correct client and patient.4. Select the IDEXX LabREXX User of the request.5. Click OK. The LabREXX website will open. If any assistance is needed with using the LabREXX or vetconnect.com site,please contact VetConnect PLUS customer support at 1-888-433-9987.6. Once the requisition is created, print the requisition and submit it along with the patient samples to IDEXX.7. If prompted, select the Species, Breed, or Sex Code.8. Verify the products on the Move Products screen.9. Click OK.Lab request sheetsNote: This method can be used with Infinity v5.0 or higher.From the Infinity Desktop:1. Click Modules Lab Results Import. The Lab Import module opens.2. Select the client and patient for the request.3. Click the New button.4. Select an Employee as the Provider.5. Select the IDEXX LabREXX Sheet from the Selected Sheet.6. If desired, select Business, Destination, and SuperMode.7. Check the tests to perform and invoice.8. Click Create.9. Choose the IDEXX LabREXX User and click OK.10. If prompted, select the Species, Breed, or Sex Code. The LabREXX website will open. If any assistance is needed withusing the LabREXX or vetconnect.com site, please contact VetConnect PLUS customer support at 1-888-433-9987.11. Print the requisition and submit it along with the patient samples to IDEXX.12. Verify the products on the Move Products screen.13. Click OK.Opening a draft requisitionTo review an imported IDEXX Reference Laboratories result, double-click the request line or highlight the request and click theShow Results button. Clicking the Show Request button will also display the Lab Requests Sheet for the selected request.Viewing a completed or pending requisitionIf the import is successful, the status of the result changes to Imported.A result status of Imported means the result has been processed, the patient’s medical record has been updated with theresults, and the results are ready to be reviewed. Double-clicking the result will open the lab report for quick review.10
Downloading test resultsTest results from IDEXX Reference Laboratories can be downloaded automatically to your software and saved to patientrecords.Configuring the VetConnect PLUS lab service1. Click Start [All] Programs Infinity ImproMed Universal Lab Reader Setup ImproMed Universal Lab Reader.2. Click Add a Lab Service.3. Select IDEXX VetConnect/LabREXX (Beta) from the Service Type.4. Select a Practice.5. Select a Download Frequency. ImproMed recommends every 30 minutes.6. Enter the VetConnect PLUS user name and password.7. Check Include Preliminary Results, if desired. This option forces only final results to be importe
Setting up your ImproMed Infinity software to use VetConnect PLUS services to order testing and down-load test results Note: The following directions are for ImproMed Infinity v5.0 and higher. If you are running a version lower than 5.0, please remove