Transcription
User GuideView eFax NEXT Video
2011 j2 Global Communications, Inc. All rights reserved.eFax User GuideThis manual, as well as the software described in it, is furnished under license and may be used or copied only in accordance with the terms of such license. Thecontent of this manual if furnished for informational use only, is subject to change without notice, and should not be construed as a commitment by j2 GlobalCommunications, Inc. j2 Global Communications assumes no responsibility or liability for any errors or inaccuracies that may appear in this documentation.Except as permitted by such license, no part of this publication may be reproduced, stored in a retrieval system, or transmitted, in any form or by any means,electronic, mechanical, recording, or otherwise, without the prior written permission of j2 Global Communications, Inc.Any references to company names in screenshots are for demonstration purposes only and are not intended to refer to any actual organization.eFax, eFax Messenger, eFax Free, eFax Plus, eFax Pro and the eFax logo are registered trademarks or trademarks of j2 Global Communications, Inc. in theUnited States and/or other countries. Microsoft and Windows are either registered trademarks or trademarks of Microsoft Corporation in the United Statesand/or other countries. Apple, Mac, and Macintosh are trademarks of Apple Computer, Inc. registered in the United States and/or other countries. All othertrademarks are the property of their respective owners.j2 Global Communications, Inc., 6922 Hollywood Boulevard, Los Angeles, California 90028, USA.A note about eFax featuresSome eFax features may or may not be available with your particular eFax account. In general, an eFax Free account allows receiving a limited number of faxpages each month, delivered as EFX fax files, which you can view with eFax Messenger. eFax Plus and eFax Pro accounts provide greater functionality,including increased incoming fax limits, the ability to send faxes and the choice of a local or toll-free fax number. Terms and conditions of each service maychange. Please visit www.efax.com for complete details.
ContentsGetting StartedeFax Customer SupportReceiving Faxes556Changing your Fax File Format Preference7Viewing faxes received as TIF or PDF files7Sending Faxes8Sending a Fax by Email8Sending a Fax Online Using Websend in eFax My Account9Sending a Fax Using eFax Messenger (Windows)10Sending a Fax Using eFax Messenger (Mac)13eFax My Account15Logging in to My Account15Updating your Customer Profile15Updating your Account Preferences16Viewing your Usage and Fax Activity Logs18About the Billing Tab19About Message Center (Your Inbox)23Sharing Large Files35eFax Enhanced Security36Mobile Faxing37Using the eFax iPhone App37Using eFax with a Mobile Device39Installing eFax MessengerSystem requirements (Windows and Mac OS)4141
Installing eFax Messenger (Windows and Mac OS)41Configuring your eFax Messenger User Settings42Automatically Opening TIF Faxes with eFax Messenger45Configuring the eFax Messenger System Tray Preferences45Disabling Banner Ads in eFax Messenger46Using eFax Messenger47Using the Messenger Task Pane48Validating your eFax Account49The Messenger Toolbars49Advanced Viewing Features50Advanced Sending Features51Cover Pages52Using the eFax Messenger Address Book55Uninstalling eFax Messenger for Windows57Getting Help58Online Help58Phone Support58Supported File Types59
Chapter 1:Getting StartedWelcome to eFax ! This eFax User Guide provides comprehensive information about using your eFaxservice. Your membership includes access to sophisticated fax management tools allowing you to easilyview faxes. With your eFax Plus or Pro account, these tools also provide advanced features such as faxsending, fax forwarding, custom cover pages, digital signatures, digital fax markup, address bookintegration, and advanced fax-image editing tools, all to help you get the most out of your eFax account.There are three ways to access and use your eFax account. Pick the method that fits you best:EmailThe most basic way to use your eFax account, emailoffers a quick and easy way to receive and send faxes.Any email account will work. To set account preferencesand manage your account, you'll need to log in to theeFax website.My AccounteFax My Account is a full-featured online interface thatoffers the ability to view and send faxes, along with asuite of advanced editing tools. Log in atwww.efax.com/login and you'll also have access to theMessage Center, an online Inbox where you can view andmanage your faxes.eFaxMessengereFax Messenger is an optional, free fax managementprogram with advanced fax editing and sending features.Messenger is supported for both Windows and Mac, and isavailable for free download at the eFax website.eFax Customer SupporteFax Customer Support is available by email at help@mail.efax.com. Or, you can contact CustomerSupport at https://www.efax.com/help/contactSupport.eFax Plus and Pro customers may speak with a Customer Service Representative 24/7.eFax User Guide
Chapter 2:Receiving FaxesWhen someone sends a fax to your eFax number, it will arrive in your email inbox attached to an emailfrom eFax. eFax Plus and eFax Pro users can choose to receive faxes delivered in one of three file formats: PDF, which can be viewed with free Adobe Reader software, available for download athttp://get.adobe.com/reader/otherversionsTIF, which supports multi-page images and can be opened in many programs, including Imaging(the default Windows TIF viewer) and eFax MessengerEFX, which can be viewed with your eFax Messenger softwareNOTE: eFax Free users may only receive and view faxes in EFX format (see Installing eFax Messenger onpage 41).Your faxes will also be delivered to your Message Center so you can access your faxes online, even whenyou can't access your email. eFax Plus and eFax Pro customers receive unlimited fax storage in MessageCenter; your faxes will be available until you delete them. eFax Free membership provides 30 days of faxstorage in Message Center.NOTE: If you have activated the optional eFax Enhanced Security feature for your account, you will onlybe able to view your faxes online in your Message Center. For more information, see eFax EnhancedSecurity on page 36.To view a fax received by email:1. Log in to your email account2. Find and open the email message from eFax [message@inbound.efax.com]TIP: Add eFax to your Contact list3. Click on the attachment to open the faxTo view a fax in Message Center:You may view your faxes online by logging in to your eFax Message Center.1. Log in to eFax My Account at www.efax.com/login2. Click View FaxesMessage Center opens and displays the faxes in your Inbox folder3. To preview only the first page, single-click the Subject of a fax in the list4. To view full-screen in a tab, double-click the Subject of a fax in the list5. To view faxes received by another fax number on your account, select that number from the list inthe top right corner of Message CenterTo view a fax in eFax Messenger:eFax User Guide
7Chapter 2Receiving FaxesMessenger is a great tool for viewing faxes received in either EFX or TIF format. If you haven't already,download and install the free eFax Messenger software (see Installing eFax Messenger on page 41).1. Open the email with your eFax file attached2. Save the attachment to your computer3. Open eFax Messenger4. Click File Open, then locate and select the desired fileChanging your Fax File Format PreferenceeFax Plus and eFax Pro customers can select their preferred file format for inbound fax delivery. eFax Freeusers always receive faxes in EFX format.To change your fax file format preference:1. Log in to eFax My Account at www.efax.com/login2. Click UPDATE ACCOUNT3. On the Preferences tab, in the Receive Fax Options section, click Edit4. From the Fax File Format list, choose the format in which to receive faxes: EFX, TIF, or PDF5. Click UpdateViewing faxes received as TIF or PDF files(eFax Plus and eFax Pro)TIF fax files can be viewed by both eFax Messenger and most image viewing programs for Windows andMac OS computers. For PDF fax files, you will need to download and install the free Adobe Reader. Manycomputers come with Adobe Reader already installed.eFax User Guide
Chapter 3:Sending FaxeseFax Plus and eFax Pro customers can send faxes in several convenient ways, including: Send faxes by email Send faxes by logging in to the eFax My Account website Send faxes through eFax Messenger (see Using eFax Messenger on page 47) Send faxes using your mobile device (see Mobile Faxing on page 37After sending your fax, you'll receive a delivery receipt via email indicating either the successful delivery ofyour fax, or the reason for failure. A copy of each fax you send is saved in the Sent folder in MessageCenter, allowing you to review or resend faxes any time the need arises.NOTE: Sending faxes is not available for eFax Free users.Sending a Fax by EmailSending a fax is as easy as email. You can send a fax from any standard email program, or using a webbased email service like Yahoo or Gmail. Just create an email and then attach up to 10 files (18MB max)you want to fax. If you attach multiple files, eFax will combine the files into one fax in the order they wereattached to the email.To send a fax by email:1. Open your email program and create a new email messageNOTE: You must send the email from an email address in your Send Email Addresses accountpreference2. In the To field, enter the recipient’s fax number followed by @efaxsend.comFor example:To send to the US fax number 1 323 555 1234, type 13235551234@efaxsend.com, where 1equals the Country Code, 323 the Area Code, and 5551234 equals the fax numberTo send to the UK number 44 (0)20 7555 1234, type 442075551234@efaxsend.com, where44 equals the Country Code, 207 the Area Code, and 5551234 equals the fax numberTIP: You can find a full list of Country Codes online at http://home.efax.com/s/r/DialingCodes3. Attach up to 10 files you want to fax to your outgoing email message (maximum 18MB)4. To include a cover page, type the cover page text in the body of the email message5. Send the emaileFax User Guide
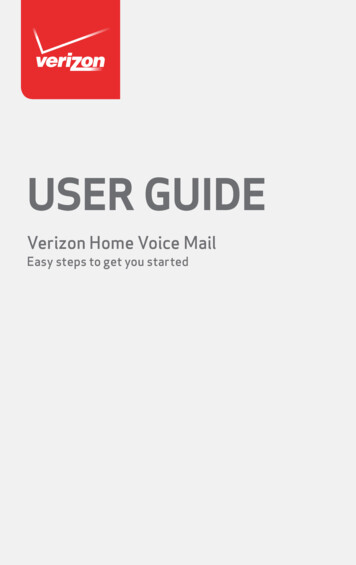
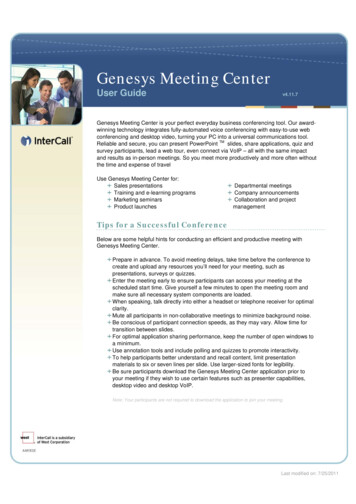
9Chapter 3Sending FaxesSending a Fax Online Using Websend in eFax MyAccountDon't have email access? You can also send faxes using Websend in eFax My Account.To send a fax using Websend:1. Log in to eFax My Account at www.efax.com/login2. Click SEND FAXES3. In the Websend popup, type the Name and Company Name of the recipientIf you've added Contacts to your Message Center Address Book, a list of matching Contacts appearsas you typeSelect a Contact and eFax automatically fills out the recipient information using the Contact details4. To access your Message Center Contacts directly, hold the pointer over Choose From Contactsuntil the list of contacts appearsSelect a Contact and eFax automatically fills out the recipient information using the Contact details5. In the Select Fax To Country list, select the destination country6. If you didn't select a Contact, type the Fax Number of the recipienteFax User Guide
10Chapter 3Sending FaxesWhen sending to international numbers using eFax, it isn't necessary to include the "0" before thefax numberFor example, if you wanted to send a fax to the UK number (0) 20 7555 1234, you would selectUK (44) from the Select Fax To Country list and type 2075551234 in the Fax Number box7. To include a cover page, check the Include Cover Page box, then type the Subject and Messagein the boxes provided8. To select a document to fax, click Browse, select a file on your PC, and then click OKThe name of your document appears in the Attachments box (Repeat to add up to 10documents/18MB max)9. Optional: type a Reference ID10. Optional: from the Send Receipt list, select the email address for send receipt delivery (otherwise,the receipt will be sent to the Default Send Address set in your Account Preferences)11. From the Select Quality list, select a resolution for your fax12. Click Send FaxSending a Fax Using eFax Messenger (Windows)The optional eFax Messenger software provides advanced editing features and two methods for sendingfaxes from your computer: eFax Print Driver Messenger Compose FaxThe eFax Print Driver is installed as a printer when you install the free Messenger software. It works justlike any other printer installed on your computer, and should appear in all of the programs you haveinstalled. When you need to fax a document from your computer, just "print" that document to the eFaxPrint Driver, enter the recipient's information, and Messenger sends the file as a fax.To send a fax using Messenger Compose Fax, you just double-click an icon on your desktop, select thefile(s) to fax, and enter recipient information. Select this option to take advantage of advanced Messengerfeatures like custom cover pages.To send a fax using the eFax Print Driver:1. Open the document you'd like to fax using the program that created it (for example, open a Word filein Microsoft Word)2. Click File Print3. In the Print window, from the Name list, select eFax 4.4, and then click OKeFax Messenger opens and converts your document to a fax fileeFax User Guide
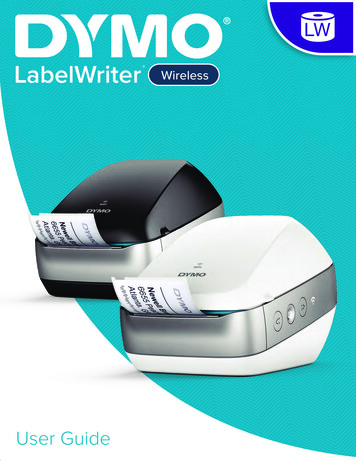
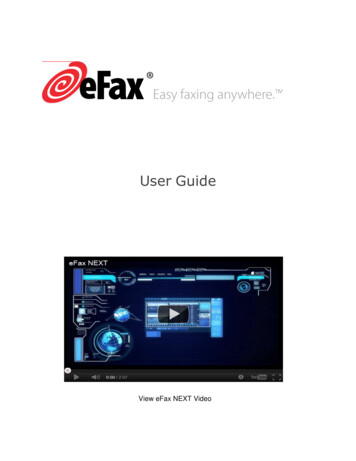
11Chapter 3Sending Faxes4. Click File Send To Fax Recipient5. In the Compose Fax window, type the recipient’s contact information, such as their Name andCompany6. Type the destination Fax Number and verify the proper Country Code is selected7. Click Add to include the person in the list of recipients8. Repeat the previous steps for each additional recipient, if any9. If you would like to send a cover page with your document, type the Subject and Message in theboxes provided10. Click Send FaxTo send a fax using the Compose Fax icon:1. Double-click the eFax Compose Fax icon on your DesktopIf you don't have a Compose Fax icon, you can also click Start All Programs eFaxMessenger 4.4 Compose Fax2. In the Compose Fax window, type the recipient’s contact information, such as their Name andCompany3. Type the destination Fax Number and verify the proper Country Code is selected4. Click Add to include the person in the list of recipientseFax User Guide
12Chapter 3Sending Faxes5. Repeat the previous steps for each additional recipient, if any6. In the Attachments section at the bottom of the window, click Attach to locate and select the documents you'd like to send in the outgoing fax (maximum 10)7. If you would like to send a cover page with your document, type the Subject and Message in theboxes provided8. Click Send FaxTo scan and fax a printed document:eFax Messenger can connect to your scanner to allow you to scan and fax printed documents right fromyour computer. Before scanning and faxing, you'll need to make sure your scanner driver software isinstalled and configured properly.1. Position the document you want to fax in your scanner2. Open eFax Messenger and click File ScanNOTE: To ensure smaller file sizes, the recommended scan settings are 150dpi and grayscaleeFax User Guide
13Chapter 3Sending Faxes3. eFax Messenger scans the first page and asks if you’re finished scanning, or if you have more pagesto scan4. Click either Scan Another Page or Finished ScanningWhen finished, Messenger displays your scanned pages5. Click File Send To Fax Recipient6. In the Compose Fax window, type the recipient’s contact information, such as their Name andCompany7. Type the destination Fax Number and verify the proper Country Code is selected8. Click Add to include the person in the list of recipients9. Repeat the previous steps for each additional recipient, if any10. If you would like to send a cover page with your document, type the Subject and Message in theboxes provided11. Click Send FaxTIP: If your scanner has a sheet feeder, choose Tools User Settings, click the Scan Optionstab, and uncheck Multi-Page Flatbed ScanSending a Fax Using eFax Messenger (Mac)Messenger on the Mac provides a single method for sending faxes.To send a fax using Messenger on a Mac:1. If you haven’t already, download and install eFax Messenger for Mac at http://www.efax.com/products/internet-fax?tab downloads2. Open eFax Messenger and in the Task Pane, click Create a new fax3. In the Compose Fax window, type the recipient’s contact information, such as their Name andCompany4. Type the destination Fax Number and verify the proper Country Code is selected5. Click Add to include the person in the list of recipients6. Repeat the previous steps for each additional recipient, if any7. In the Attachments section at the bottom of the window, click Attach to locate and select the documents you'd like to send in the outgoing fax (maximum 10)8. If you would like to send a cover page with your document, type the Subject and Message in theboxes provided9. Click Send FaxeFax User Guide
Chapter 314Sending FaxesNOTE: You can also send a fax by printing a document, clicking Save as PDF, and then selectingFax via eFax MessengereFax User Guide
Chapter 4:eFax My AccountMy Account is an online resource providing tools to view, edit, sign, and send faxes, change your usersettings, update your billing details, view usage reports, and more.Logging in to My Account1. Go to www.efax.com/login2. Enter your eFax Number and PIN in the boxes provided. For Example: To log in using the US/Canada number 1 323 555 1234, type 13235551234 To log in using the UK number 44 (0)20 7555 1234, type 442075551234If you have trouble logging in, click the FORGOT NUMBER or FORGOT PIN tab for help.Updating your Customer ProfileThe Customer Profile contains your name, company name, email address, and telephone number(s).Please keep your contact details current to ensure you receive service updates.To update your Customer Profile:1. Log in to eFax My Account at www.efax.com/login2. Click UPDATE ACCOUNT3. Click the Profile tab4. Referring to the table below, click Edit beside the information you'd like to update:NameThe contact name for your eFax account - thisname is inserted into fax cover pages sentusing WebsendContact EmailThe email address eFax will use to contact youwith service updates, password resets, etc.PINA 4-digit number used to log in to eFaxCompany NameYour company name (optional)eFax User Guide
16Chapter 4eFax My AccountHome NumberYour home telephone numberWork NumberYour work telephone numberMobile NumberYour mobile telephone numberNOTE: Your profile must contain at least one telephone number.5. Enter the new information and click UpdateTo remove information, delete the text and then click UpdateUpdating your Account PreferencesYou may customize your settings according to your needs.To get to the Account Preferences, just click UPDATE ACCOUNT anywhere in eFax My Account, then clickthe Preferences tab.To update your Account Preferences:1. Log in to eFax My Account at www.efax.com/login2. Click UPDATE ACCOUNT3. Click the Preferences tab4. Referring to the table below, click Edit beside the preference you'd like to update:NOTE: If you have multiple fax numbers liked to one account, some preference settings will affectyour entire eFax account, while others will affect only a single eFax number on your account.EnhancedSecurityIndicates whether the eFax Enhanced Security feature is onor off (affects entire account). Please contact CustomerService to change this feature setting - see eFax EnhancedSecurity on page 36Applies only to eFax Plus and eFax Pro usersLanguagePreferenceSet the language used for email sent to you from eFax(affects entire account)eFax User Guide
17Chapter 4eFax My AccountThis setting does not change the eFax website languageTime/DatePreferenceDefault HomePageSend EmailAddressesSet the time zone and time/date format (affects entireaccount)Set the page displayed when you first log in to My Account,either My Account home or Message Center (affects singlenumber only)Edit a list of up to five email addresses from which ou
Contents. GettingStarted 5. eFaxCustomerSupport 5. ReceivingFaxes 6. ChangingyourFaxFileFormatPreference 7 ViewingfaxesreceivedasTIForPDFfiles 7. SendingFaxes 8File Size: 831KB