Transcription
Practice FusionBilling Guide
Billing Interface SetupHow to connect your billing account with your EHR2
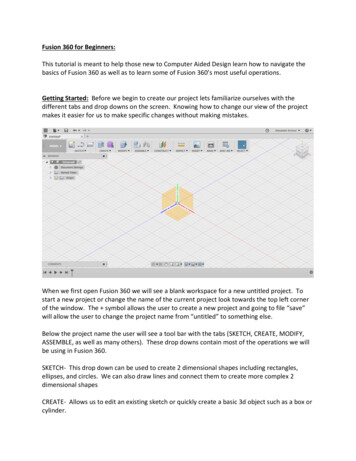
Step 1: Select “Billing” from the dashboard of the EHR3
Step 2: Billing Dashboard1. Select “Existing Billing System” to begin the process of connecting your billing system to Practice Fusion From this screen your customers can also learn how to create Superbills4
Step 3: Choose Billing Solution1.Select EZClaim from the list of preferred billing partners2.Enter the required fields then click submit.5
*Help Tip – How to Add New Users In Your Account1) Select Settings 2) Users1 3) Add User Information236
Step 4: Confirmation You will receive two emails from Practice Fusion after requesting your integrationconnection. First email will confirm that your request was receivedSecond email will confirm whether your request was approved and completed or denied.Practice Fusion aims to complete your integration process within 5-7 business days.7
Creating & submitting a superbill8
Step 1: Create and complete a “Chart Note” for a patient visit1) Under “Charts” select your patient2) Select the type of new encounter129
Step 1: Create and complete a “Chart Note” for a patient visitComplete a chart note for a patient visit.1.2.Ensure the “Seen By” field reflects the correct provider, as this information will be passed through to [Company Name].Once the chart note is complete, sign the chart note. (note: signing the chart will lock this patient chart for future edits)1210
Step 2: Create superbillOnce the chart note is complete you can add your superbill in two ways:1. By selecting “Superbill Record” at the bottom of the chart noteOR2. By selecting the “Actions” dropdown menu you can “Add superbill” from the chart note(Note: the chart note does not have to be signed in order to create or send a superbill, however it is recommended)Under the “Actions”dropdownOR11At the end of the chart note
Step 2: Create superbill1. Fill in necessary information2. Ensure that the “Rendering Provider” and “Seen At Facility” fields reflect the correct provider & facility where serviceswere rendered.3.Mark the superbill as “Save as draft”, “Ready for biller” or “Archive” by using the drop down button at the bottom of yourscreen. “Ready for biller” will send the superbill to your billing system.12312
Step 3: Finding submitted superbills1) Superbills will appear under the “Billing Reports”Superbill Status: Draft - Superbill is not final or not ready to be sent to biller/billing system Ready for biller - Superbill is ready and will be sent to biller/billing system. Archived - Superbill has been sent to biller/billing system and claim is beingprocessed.113
*Help Tip: Successful superbills Archive - Successful superbills (picked up by your billing system) will be filed under Archive. Error – Unsuccessful superbills will be under Error and will potentially require a fix.14
Practice Fusion aims to complete your integration process within 5-7 business days. 7. Creating & submitting a superbill 8. . Mark the superbill as “Save as draft”, “Ready for biller” or “Archive” by