Transcription
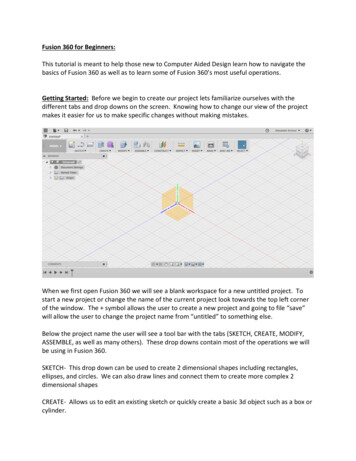
Fusion 360 for Beginners:This tutorial is meant to help those new to Computer Aided Design learn how to navigate thebasics of Fusion 360 as well as to learn some of Fusion 360’s most useful operations.Getting Started: Before we begin to create our project lets familiarize ourselves with thedifferent tabs and drop downs on the screen. Knowing how to change our view of the projectmakes it easier for us to make specific changes without making mistakes.When we first open Fusion 360 we will see a blank workspace for a new untitled project. Tostart a new project or change the name of the current project look towards the top left cornerof the window. The symbol allows the user to create a new project and going to file “save”will allow the user to change the project name from “untitled” to something else.Below the project name the user will see a tool bar with the tabs (SKETCH, CREATE, MODIFY,ASSEMBLE, as well as many others). These drop downs contain most of the operations we willbe using in Fusion 360.SKETCH- This drop down can be used to create 2 dimensional shapes including rectangles,ellipses, and circles. We can also draw lines and connect them to create more complex 2dimensional shapesCREATE- Allows us to edit an existing sketch or quickly create a basic 3d object such as a box orcylinder.
MODIFY- The modify drop down allows us to make larger changes to different bodies.On the left side of the screen we see a drop down with the top tab being our project name.Currently the only thing we can see below this is a tab marked origin, but as we create newbodies and sketches they will be shown as separate tabs on the left side of the screen.All tabs present on this side of the screen have a lightbulb icon that allows us to hide specificpieces of our project. This is useful when we only want to edit one specific sketch or body ofour project and don’t want to make unintended changes.(Notice how the origin disappears when the lightbulb is off)Notice that having the origin on shows us three yellow squares. These squares represent theXY, YZ, and XZ planes.*In fusion 360 it is important to realize that most of our work begins as a 2 dimensionalsketch that we then bring into the 3rd dimension at a later point*Now let’s look toward the bottom of the screen. Here we can see a bar that gives us the abilityto view our workspace from different perspectives.The “Pan” option represented by the hand icon allows us to drag and move the workspace.The “Look at” option represented by the rectangle icon allows us to view one 2 dimensionalplane in our workspace. Simply click the icon and then click one face on either the origin or anexisting bodyThe “Orbit” option represented by the leftmost icon allows the user to spin or rotate the entireworkspace by clicking and dragging it. (This can also be achieved by clicking and dragging on thecube in the top right corner of the screen)
Time to build: Below I will discuss how we can make a very basic house as a project. I’ll gothrough how to make new sketches and as well as how to use some of the most usefuloperations in Fusion 360.Recall that when we want to create something new in our project that we start by working onlyin 2 dimensions. To do this we start by selecting one of the planes on our origin or on anexisting body and then clicking on the “SKETCH” drop down menu. This will bring us into a 2dimensional point of view.Let’s start by creating a box. Within the SKETCH drop down move to rectangle and then select2-point Rectangle. After doing this click once to set the location of the first point. Then eitherdrag or begin typing to set the dimensions of the rectangle (Begin typing to set the firstdimension and click tab to be able to set the second dimension).At this point select “stop sketch” on the right side of the top toolbar. Now we have a newrectangle sketch, which we can hide or show using the “Sketches” drop down on the left side ofthe screen.Now that we’ve successfully made a 2 dimensional sketch let’s bring that sketch into the thirddimension. We will achieve this by using the Extrude / Press Pull operations, which are foundin the CREATE and MODIFY tabs respectively. These operations can also be accessed by rightclicking on the desired sketch. Using extrude allows us to assign a third dimension. You caneither drag the arrow or type a positive value into one of the fields marked 0.00mm.
On the above example I assigned a Distance value of 35.00mm. Now I will show how we canuse extrude to hollow out pieces of our project.Above I created a new rectangle sketch on top of our existing box. I then accessed the extrudeoperation and assigned a negative value resulting in the image on the right.*Extrude is one of the easiest ways to add or cut away material from your project. You canalways create a new sketch and use extrude to modify an existing body or create a new one*By repeating the same process of making a new sketch and using extrude I was able to addwindows and a door to our house.
Now let’s create a roof for our house. We do this by creating a new sketch and then usingextrude. This time though we will adjust the “taper angle” so we have less material as weextrude. Note that a negative taper angle causes the extrusion to narrow while a positive onewill cause it to widen.Using only extrusion and sketches we have created a basic model of a house.Other important operations:Fillet: The fillet operation allows us to curve the edges of the bodies we create. This can bedone by either going to the MODIFY drop down, selecting fillet and then the desired or simplyby right clicking on the edge you want to add a fillet to.It is often important to use fillets on many of the edges in a project because the 3d printersoften have trouble printing at 90 degrees.References:https://www.youtube.com/watch?v A5bc9c3S12g (Lars Christensen youtube channel)
Written By Alex Armour
Fusion 360 for Beginners: This tutorial is meant to help those new to Computer Aided Design learn how to navigate the basics of Fusion 360 as well as to learn some of Fusion 360’s most useful operations. Getting Started: Before we begin to create our project lets familiarize oursel