Transcription
Postage MetersDM125, DM225Digital Postage MeterOperator GuideUS English EditionSV63203 Revision BFebruary, 2016
2016 Pitney Bowes Inc.All rights reserved. This book may not be reproduced in whole or in part in any fashion or stored in aretrieval system of any type or transmitted by any means, electronically or mechanically, without theexpress written permission of Pitney Bowes.The use of this information by the recipient or others for purposes other than the training of customers onPitney Bowes equipment may constitute an infringement of intellectual property rights of Pitney Bowes,and Pitney Bowes assumes no responsibility for any such use of the information.We have made every reasonable effort to ensure the accuracy and usefulness of this manual. However,we cannot assume responsibility for errors or omissions or liability for the misuse or misapplication of ourproducts.Except as provided in writing, duly signed by an officer of Pitney Bowes, no license either express orimplied, under any Pitney Bowes or third party’s patent, copyright or other intellectual property rights isgranted by providing this information.
About this BookThis Operator Guide is designed to assist in the daily operations of the DM125, DM225 Digital PostageMeter. Use this book as a reference, as it includes system operating procedures.
Version HistoryDocument Part NumberRelease DateCommentsSV63203 Rev. BJanuary 2016Rebranding and Remove Alalog and Perform FlareConversion
Pitney Bowes Contact ListMachine IdentificationProduct Name: DM125 and DM225PCN: PR00, PR05 or PROR (for DM125) and PRL1, PRL5 or PRLR (for DM225)If you need to contact customer support, refer to What Information You Need to Provide CustomerSupport before making the call.ResourcesFor Account InformationVisit us online at pitneybowes.com and sign in.For Customer SupportVisit us online at pitneybowes.com/support.For SuppliesVisit us online at pitneybowes.com/support and click Ink & Supplies.
Table of ContentsVersion HistoryivPitney Bowes Contact Listv1 - SafetyIntroductionPrinting Advertisement, Date and Time Only(no meter stamp)36Adding and Removing Inscriptions37Seal the Envelope Only - Bypass All Printing38Adjusting the Horizontal Print Position of theMeter Stamp3912Battery Handling (California Customers Only) 13Ear Protection/Noise Exposure Guidelines14System Power15Operation16Maintenance172 - Getting Started4 - Running MailPower up the Machine42Checking the Amount of Postage Available43Determine the Amount of Postage Needed44Do You Need Add-On USPS Services?46Applying Postage Entering Postage InManually47Parts of the Machine20Applying Postage Entering Weight In Manually 49The Control Panel22Connections on the Back of the Machine24Applying Postage Using The WeighingPlatform51Apply Postage Using Differential WeighingMode533 - What You Can Print on MailPieces5 - Using Batch Count FeaturePrinting Options28What's in the Meter Stamp29Check the Meter Stamp Imprint30Printing a Meter Stamp with an Advanced Date31Turning the Date On/Off for a Meter Stamp33Printing only the Date and Time (no meterstamp)34Adding and Removing Advertisements at theMachine35Pitney BowesOperator GuideFebruary, 2016Viewing the Batch Mail Count56Printing the Batch Count57Clearing the Batch Count586 - MaintenanceInk Cartridge Replacement Messages60Page vii of 242
Printing a Test Pattern61Special Services ReportPurging the Print Heads62Printing a Single Account Report100Replacing the Print Head63Printing a Multi-Account Summary Report101Replacing the Ink Cartridge67Configuration Report102Filling The Moistener Tank70System Setup Report103Cleaning the Moistener Brush71Account List Report (Standard Accounting)104Cleaning the Moistener Wick and Holder73Error Report1057 - How to Enter Text9910 - Configuring Your MailingMachineAbout Entering Text768 - AccountingAbout System Settings108Setting System Time109Setting the Contrast of the LCD Display110Turning Features On and Off111About Accounts80Setting the Date, Time and Timeouts112Turning Accounts On and Off81Setting Normal Time Preset113Creating an Account83Editing Account Name and Password84Setting ENERGY STAR Sleep ModeActivation Time114Selecting an Account85Setting Autodate Advance115Viewing Account Totals86Correct Drift116Printing a Single Account Report87Setting Daylight Savings Time117Printing a Multi-Account Summary Report88Setting Up or Disabling the Lock Code118Clearing All or Some of the Accounts89Deleting an Account90Setting Up or Disabling the SupervisorPassword119Turning On Account Passwords Globally91Turning Scale On or Off120Turning Off Account Passwords Globally92Zeroing the Scale121Setting Weight Change Options122Setting Class Change Options123Setting the High Funds Warning1249 - ReportsSetting the Low Funds Warning125About Reports94Enabling Scale Stabilizing126Funds Report96Setting Barcode Scanner Options127Add Postage Report97Setting Language Preference128Rates Summary Report98Install Mode Options129Pitney BowesOperator GuideFebruary, 2016Page viii of 242
Table of Contents11 - Using the Preset FeatureAdding Postage to Your Machine152Withdrawing Postage Funds from the Meter 154About Presets132Defining New Values for the Normal Preset134Viewing A Custom Preset135Selecting a Custom Preset136Defining a New Custom Preset137Editing a Custom Preset Name138Deleting a Custom Preset13912 - PasswordsAbout Passwords and Meter Functions15 - Meter Downloads, Updates,and InspectionsAbout Meter Downloads, Updates, andInspections156About Postal Rate Changes158Procedure for Downloading New PostalRates, Updates, Inscriptions or Ads159Performing Meter Inspections16014216 - Using PC Meter Connect13 - Connecting to the DataCenterAbout Connecting to the PB Data Center144Connect to PB Data Center via the Internet Ethernet Cable to LAN Port145Connect to PB Data Center via the InternetUsing a Wireless Connection (Wi-Fi)146Connect to the Data Center via PC MeterConnect147About PC Meter Connect163Installation Requirements164Network Specifications and Requirements forPC Meter Connect165PC Meter Connect Installation170Launching the Application171Displaying PC Meter Connect on SystemTray172Accessing Features from the System Tray174Starting PC Meter Connect 175PC Meter Connect Application Main Window 17714 - Adding PostageChecking the Postage Amount using PCMeter Connect179Checking Postage Funds in the Meter150Adding Postage using PC Meter Connect180Checking Postage By Phone AccountBalance151Downloading New Postal Rates Using PCMeter Connect182Pitney BowesOperator GuideFebruary, 2016Page ix of 242
Performing Meter Inspections using PC MeterConnect18319 - TroubleshootingPrinting a Meter Stamp with an AdvancedDate using PC Meter ConnectGetting Help216What Information You Need to ProvideCustomer Support217Display Problems218Adding or Removing Postal Inscriptions usingPC Meter Connect188Feeding Problems219Printing Problems220Setting the System Time using PC MeterConnectAccidentally Printing the Wrong Postage222Adding or Removing Ads Using PC MeterConnect184186190Resetting the Scale to Zero Using PC MeterConnect192Setting up the Weight Hold Method using PCMeter Connect193Setting the High Value Warning using PCMeter ConnectSetting the Low Funds Warning using PCMeter Connect195196Viewing Account Totals using PC MeterConnect197Printing an Account Report using PC MeterConnect198Printing a Refill Summary Report using PCMeter Connect201Viewing Meter Software Version UsingPC Meter Connect204Moistening Problems (envelopes don't seal) 223Viewing System Configuration Levels225Troubleshooting Communications Problems 226Problems Connecting to the Data Center ViaPC Meter Connect227Troubleshooting Your Internet Connection233Text Error Messages234Numeric Error Codes235Exception List23820 - GlossaryViewing PC Meter Connect Software Version 20517 - Supplies and OptionsSupplies and Options20818 - SpecificationsSpecifications (Equipment and Materials)Pitney BowesOperator GuideFebruary, 2016212Page x of 242
1 - SafetyIntroductionBattery Handling (California Customers Only)Ear Protection/Noise Exposure GuidelinesSystem PowerOperationMaintenance121314151617
SafetyIntroductionFamiliarize yourself with proper procedures and methods before you install, operate or repair the systemto avoid personal injury or damage to the equipment.Pitney BowesOperator GuideFebruary, 2016Page 12 of 242
SafetyBattery Handling (California Customers Only)The battery used in this product contains perchlorate material. California requires perchlorate containingproducts to be accompanied by the following notice:Perchlorate Material - Special handling may apply. For more information refer to the following .Pitney BowesOperator GuideFebruary, 2016Page 13 of 242
SafetyEar Protection/Noise Exposure GuidelinesEar protection is required if noise exposure exceeds OSHA standard. There are many factors to be takeninto consideration in each individual work area when dealing with ear protection. Factors such as floornoise, length of exposure to noise, loss of hearing history in individual employees can all play a role inrequirements. Analyze your specific work area environment to ensure safe practices.OSHA Standards85dBA time weighted average over an 8-hour shift requires hearing protection be made available toemployees and use is recommended. (European Union standard is 80dBA)90dBA time weighted average over an 8-hour shift mandates hearing protection is used. (EuropeanUnion standard is 85dBA)NOTE: Local jurisdictions may have more stringent requirements. Refer to local regulations for standards andrequirements in your area.Pitney BowesOperator GuideFebruary, 2016Page 14 of 242
SafetySystem PowerllUse the power cord supplied with the machine chassis at the power entry and plug it into aproperly grounded (earthed) and easily accessible wall outlet located near the machine. Failure toproperly ground (earth) the machine can result in severe personal injury and/or fire.The power cord wall plug is the primary means of disconnecting the machine from AC powersupply for Lock Out/Tag Out.lDO NOT use an adapter plug on the line cord or wall outlet.lDO NOT remove the ground pin from the line cord.lThe machine will be connected to a dedicated AC power line.lDO NOT route the power cord over sharp edges or trap it between furniture.llllEnsure there is no strain on the power cord where it becomes jammed between the equipment,walls or furniture.Be certain the area in front of the wall receptacle into which the machine is plugged is free fromobstruction.Ensure there is no strain on the power cord where it becomes jammed between the equipment,walls or furniture.For Input modules and Output modules - power is distributed from the chassis. Use the ACconnectors supplied with the modules to connect to system power. Do not connect externaldevices to the inserter.Pitney BowesOperator GuideFebruary, 2016Page 15 of 242
SafetyOperationllllllllllllOnly trained personnel are permitted to operate this equipment. Training must include instructionin operation under normal conditions and emergency situations.The machine will only be serviced by trained and authorized personnel. Disconnect power sourcebefore servicing.Personnel working on or near this equipment must be instructed about the location and operationof pertinent stopping devices.Never run the machine when any of the covers or guards are missing.This equipment is to be used only for the purpose for which it is constructed. Read this manual forthe proper use of this equipment.Under no circumstances are the safety characteristics of this equipment to be altered. Routineinspections and preventative maintenance measures are to be conducted according to theappropriate schedules in order to ensure that all guards and safety features are active andfunctioning properly.Eliminate the risk of entanglement in certain areas of this machine by keeping loose clothing,jewelry, long hair and neckties away from all moving parts. Make sure that clothing and hair fitclosely to your body and that all jewelry is removed.Before starting the machine, check that: - All persons are clear of the machine – No maintenancework is being performed on the machine - All guards are in place – The machine is free of scraps,jams and foreign objects.When opening guards, wait for all parts to stop moving before placing hands near paper path.When removing jammed material, avoid using too much force to prevent personal injury anddamaging equipment.It is essential that personnel employ safe working practices and observe all related regulations andlegal requirements for safety when operating this product.WARNING & CAUTION statements are used in the text of this manual to identifyspecific hazards, which have potential to cause injury. Pitney Bowes declines all liabilityin the event of material damage or bodily injury resulting from negligence in theapplication of these precautions, from non-observation or lack of elementarysupervision in respect to handling, operation, servicing or repair, even if not expresslystated in this instruction notice.Pitney BowesOperator GuideFebruary, 2016Page 16 of 242
SafetyMaintenancellllIf you train equipment operators, it's important to explain safety precautions to your students andencourage safety awareness.Only documented qualified service personnel should service this equipment per local nationalrequirements.Only set-up maintenance, as described in this manual, is to be performed by operators. Anyservice that requires removal of protective covering is to be performed by qualified servicepersonnel only.Use the right tool for the job. A set-up tool is supplied to accommodate running different size paperon the inserter.lUse only Pitney Bowes approved printer ink and cleaners.lTo prevent overheating, do not cover the vent openings.lDo not store flammable fluids inside this machine.lDo not place any container with liquid on this machine, i.e. coffee cups, soda, etc.lDo not use flammable cleaners in this machine.llDo not use aerosol air canisters. It is recommended that a vacuum cleaner be used to remove dustand debris from the machine paper path. If you have to use shop air, be sure to turn the system offbefore you begin cleaning. Be sure shop air does not contain excessive oil or water.Do not spray liquid onto or into any part of the machine. Use a cloth to apply cleaning solution.Pitney BowesOperator GuideFebruary, 2016Page 17 of 242
This page intentionally left blank.
2 - Getting StartedParts of the MachineThe Control PanelConnections on the Back of the Machine202224
Getting StartedParts of the MachinePitney BowesOperator GuideFebruary, 2016Page 20 of 242
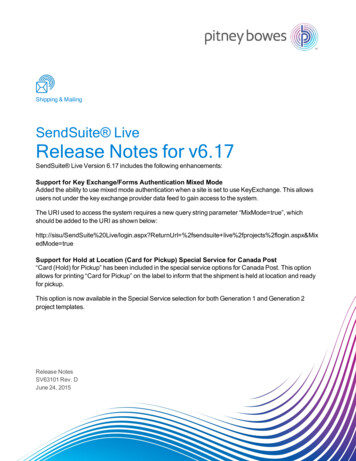
Getting StartedParts of the MachineItem Description1Control Panel: Allows you to enter and set up information on your mailing system.2Top Cover: Open this to replace the ink cartridge.3Weighing Platform (optional): Allows you to weigh a mail piece for postage calculation.4LED: Lights green when your machine is on; amber when your machine is in sleep mode.5Utility Slot: Allows you to store the Quick Reference Guide, tape strips, etc. for easy access.6Stacker Tray: Allows the neat stacking of finished mail pieces.7Transport Release Lever (two position:Home - transport rollers engaged for processing mail (normal)Released - transport rollers disengaged so you can clear a stalled mail piece.NOTE: The machine won't process mail when the lever is left in the released position.8Feed Deck: Supports your envelope, post card or tape sheet as it passes under the print mechanism.9Moistener (optional): Applies sealing fluid to the envelope flap.10Storage Drawer (DM225 only): Holds Return Receipt and Confirmation Services labels.11Ink Waste Tank: partially hidden in figure)Pitney BowesOperator GuideFebruary, 2016Page 21 of 242
Getting StartedThe Control PanelControl PanelPitney BowesOperator GuideFebruary, 2016Page 22 of 242
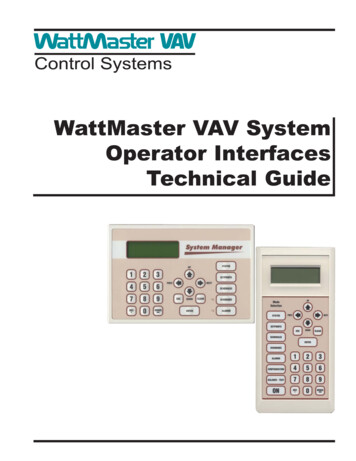
Getting StartedItemDescription1Screen Selection Keys: Allows you to select an option on the screen with the corresponding key.2LCD Display: Shows the current status of your system and prompts you through all operations.3Page Up/ Page Down: Allows you to scroll up and down through menu choices (when lit, itindicates more choices).4Lock/Power Key: Allows you to power up or power down machine. If the lock code feature has beenenabled, you can either power down the machine or put the machine into lock-down mode. In lockdown mode, access to the machine requires entering a four-digit lock code.5Yes/Enter and No Keys: Allows you to confirm an operation or answer “Yes” or "No" to a prompt (theYes key also functions as the Enter key for data entry)6Alpha/Numeric Keypad: Allows you to type in numbers and letters for account names, postagevalues, and other information, see How to Enter Text for more information.ItemDescription7Feature Keys: Allows you quick access to the key features on the system:Home: Allows you to recall settings that contain the most commonly printed postage value you usein your home or office, see Using the Preset Feature for more information.Custom Preset: Allows you access to up to five or ten custom settings that you can assign valuessuch as postage amount, ad, account number, etc., see Using the Preset Feature for moreinformation.Funds: Allows you to check your postage funds and number of mail pieces processed, see Addingand Withdrawing Postage for more information.Add Postage: Allows you to add (refill) postage funds to your machine convenient, see Adding andWithdrawing Postage for more information.Reports: Allows you to generate reports for postage, accounting, and other types of data, seeReports for more information.Weight/Rate: Allows you to weigh and calculate postage based on service selectedOptions: Allows you to access system setup information such as date, time, postage, accounts,passwords, etc., see Configuring Your Mailing Machine for more information.Print Menu: Allows you access to all the information printed on a mail piece such as date, time,postage, ad, inscriptions, etc., see What You Can Print on Mail Pieces for more information.IMPORTANT: When you press one of the Feature keys, any entry in the preceding screen is lost unless youhave first pressed the Yes/Enter key to confirm the entry. For example, if you entered an account name onone screen and then immediately pressed another Feature key, the account name will not be recorded bythe system.Pitney BowesOperator GuideFebruary, 2016Page 23 of 242
Getting StartedConnections on the Back of the MachinePitney BowesOperator GuideFebruary, 2016Page 24 of 242
Getting StartedItemDescription1Power Receptacle: Connects to AC power cord (supplied)2USB Port (type B peripheral port): Used to connect to: the Pitney Bowes Data Center via a USB cable connected to a Windows PC that has Internet access(known as PC Meter Connect desktop application). See Chapter 6, Adding Postage or Appendix A formore information. Data Exchange via a PC (optional software product), which allows you to transfer Standard Accountingdata from your machine to your PC3USB Port (type A host port): Used to connect: to the Pitney Bowes Data Center via LAN Internet using a USB to LAN network adapter (known asConstant Connection; see Chapter 6, Adding Postage) an external printer to print report data a scanner for scanning barcodes applied to certain USPS Confirmation Services on mail pieces an external weighing platform (scale) a USB flash drive to store accounting data for high-end accounting systems (e.g., InView )4Power Input: Connects to AC power cord (supplied)Pitney BowesOperator GuideFebruary, 2016Page 25 of 242
This page intentionally left blank.
3 - What You Can Printon Mail PiecesPrinting OptionsWhat's in the Meter StampCheck the Meter Stamp ImprintPrinting a Meter Stamp with an Advanced DateTurning the Date On/Off for a Meter Stam
Pitney Bowes Contact List Machine Identification Product Name: DM125 and DM225 PCN: PR00, PR05 or PROR (for DM125) and PRL1, PRL5 or PRLR (for DM225) If you need to contact customer support, refer to What Information You Need to Provide Customer Support