Transcription
OpenDNS Solution Guide for MerakiCloud-Managed NetworksIntroduction to this GuideAs the administrator of a Meraki device, you are able to connect to the free and fast OpenDNS recursive DNS servicewhich will offer you visibility into all Internet traffic originating from your Meraki device, and result in a faster Internetexperience for your users. If you then want to add an additional layer of DNS security to your Meraki device, theeasy-to-establish connection to OpenDNS enables you to access our free trial – which you can setup (by yourself)in less than five minutes.Using OpenDNSOpenDNS is a leading provider of network security and DNS services, enabling the world to connect to the Internet withconfidence on any device, anywhere, anytime. The Umbrella cloud-delivered network security service blocks command& control callbacks, malware, and phishing from compromising systems and exfiltrating data over any port, protocol, orapp. We apply statistical models to real-time and historical DNS data to predict domains that are likely malicious andcould be used in future attacks. OpenDNS protects all devices globally without hardware to install or software to maintain.OpenDNS has data centers across all regions of the world to ensure that the first hop to the service is as fast as possible.Traditionally there are several places where a network administrator might change public recursive DNS settings to useOpenDNS, but exactly where the change is made depends on the network configuration.Note: If you’re not certain whether you have a DNS forwarder configured, the best way to determine what needs to bechanged is to see what device is being used as the DNS server for client workstations that are receiving DHCP from thenetwork. This information is typically in the DNS section of the network adapter settings on the client workstation.This document covers how to configure your Meraki network to use the OpenDNS IP addresses of 208.67.222.222and 208.67.220.220. Additionally, if you are using a DNS forwarder as the primary DNS server for your network, thisdocument covers how to update Windows 2003 Server, Windows 2008 Server, Windows 2012 Server or BIND Server touse OpenDNS.Once you’ve configured your Meraki infrastructure to point to OpenDNS, then you can sign up for either a free premiumDNS account or a free 14-day trial of OpenDNS Umbrella.Free Premium DNS:We offer a free, fast recursive DNS service which gives you visibility into all of your Internet traffic originating from yourMeraki device.https://store.opendns.com/premiumdns/?utm source meraki&utm medium ciscopartner&utm campaign meraki-guide-free-trial-home 1992–2015 Cisco Systems, Inc. All rights reserved.www.cisco.com www.opendns.com 1
Free OpenDNS Umbrella 14-Day Trial at:If you want to add an additional layer of DNS security to your Meraki device, try our free trial – which you can set up byyourself in less than five minutes.https://signup.opendns.com/freetrial/?utm source meraki&utm medium ciscopartner&utm campaign meraki-guide-free-trial#companySetting up OpenDNS for a Meraki networkThere are two ways in which you can configure your Meraki networks to use OpenDNS. The first is to use DHCP todistribute the OpenDNS server IP information directly to clients. This is available on all Meraki platforms. The secondmethod, available only on MX Security Appliances and Z1 Teleworker Gateways, is to configure the MX itself to use theOpenDNS servers and to proxy client DNS requests to those same servers.How to configure OpenDNS for clientsFor MX Security Appliances: From your cloud dashboard, select Security Appliance Configure DHCP. Under theDHCP scope you wish to configure, select Use OpenDNS from the DNS nameservers drop-down. DHCP must beenabled for the desired subnet for this option to appear.For MS Switches: From your cloud dashboard, select Switch Configure Routing and DHCP. Select the route youwish to modify the DHCP service for, and select Use OpenDNS from the DNS nameservers drop-down under DHCPSettings. DHCP must be enabled for the desired subnet for this option to appear.For more information on how to configure the DHCP server for MX Security Appliances and MS Switches, please see:http://documentation.meraki.com/MS/Layer 3 Switching/Configuring DHCP Services on the MX and MSFor MR Access Points (NAT Mode SSIDs only): From your cloud dashboard, select Wireless Configure AccessControl. Select the SSID you wish to configure, and select Custom DNS from the Content filtering drop-down underAddressing and Traffic. Enter in the OpenDNS server IP addresses: 208.67.222.222 and 208.67.220.220.How to configure your Meraki network to proxy DNS to OpenDNS(MX Security Appliance and Z1 Teleworker Gateway only)Note: Static IP configuration for the MX and Z1 devices must performed locally and cannot be done via the clouddashboard. Once logged into the local status page, browse to the Uplink Configuration page and configure the DNSsettings to use 208.67.222.222 and 208.67.220.220 under IP Assignment. This method can only be used withStatic IP addressing.For more information on how to access the local configuration, please see:https://docs.meraki.com/display/MX/MX Local Status and ConfigurationFrom your cloud dashboard, select Security Appliance Configure DHCP. Under DNS nameservers selectProxy to upstream DNS. 1992–2015 Cisco Systems, Inc. All rights reserved.www.cisco.com www.opendns.com 2
Configuring your DNS forwarder for OpenDNSEven with a Cisco or Meraki device in place at the gateway or egress, DNS for networks is often handled by DNSforwarders installed on DNS servers within the network environment. A DNS forwarder is a DNS server on a network thatforwards DNS queries for external domain names to the OpenDNS servers. A DNS server on a network is designated asa forwarder when the other DNS servers in the network are configured to forward the queries that they cannot resolvelocally to that DNS server.The following instructions cover how to configure your DNS forwarder to use the OpenDNS public DNS servers for BINDand Windows Server 2003, 2008 and 2012.Windows Server 2003 and 2003 R21. From the Start menu, navigate to Administrative Tools DNS.2. Choose the DNS server you want to edit.3. Select Forwarders.4. Select All Other DNS domains in the DNS domains list.5. Add OpenDNS addresses to the selected server’s forwarder IP address list.Please write down your current DNS settings before switching to OpenDNS, in case you want to return to your oldsettings for any reason.OpenDNS’ addresses are 208.67.222.222 and 208.67.220.220.6. Click OK to confirm the changes.We recommend that you flush the DNS resolver cache of the server and the DNS caches of the clients/users usingthe DNS server to ensure that your new DNS configuration settings take immediate effect.For more information, see: https://support.opendns.com/entries/26336865 1992–2015 Cisco Systems, Inc. All rights reserved.www.cisco.com www.opendns.com 3
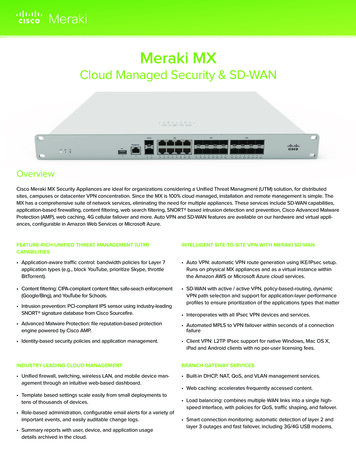
Windows Server 2008 and 2008 R21. From the Start menu, navigate to Administrative Tools DNS.2. Choose the DNS server you want to edit.3. Select Forwarders.4. Click Edit.5. Add OpenDNS addresses in the selected server’s forwarder IP address list.Please write down your current DNS settings before switching to OpenDNS, in case you want to return to your oldsettings for any reason.OpenDNS’ addresses are 208.67.222.222 and 208.67.220.220.6. Click OK.7. Click OK again to confirm the changes.We recommend that you flush the DNS resolver cache of the server and the DNS caches of the clients/users usingthe DNS server to ensure that your new DNS configuration settings take immediate effect.For more information, see: ws Server 2012 and 2012 R21. In the Start menu, type DNS into Search.2. Select DNS from the search results.3. Choose the DNS server you want to edit.4. Select Forwarders.5. Click Edit.6. Add OpenDNS addresses to the selected server’s forwarder IP address list.Please write down your current DNS settings before switching to OpenDNS, in case you want to return to your oldsettings for any reason.OpenDNS’ addresses are 208.67.222.222 and 208.67.220.220. 1992–2015 Cisco Systems, Inc. All rights reserved.www.cisco.com www.opendns.com 4
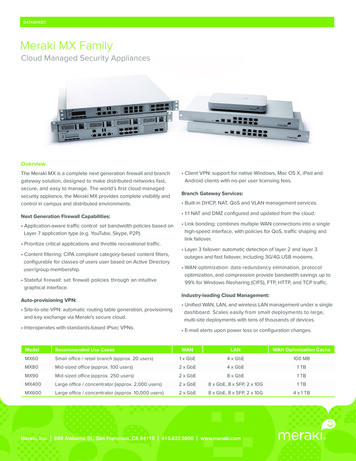
7. Click OK.8. Click OK again to confirm the changes.BIND based DNS server: Configure BIND to use Open DNS viathe shell and WebminTo point your BIND-based DNS server to use OpenDNS resolvers for external resolution you need to modify the filenamed.conf.options and add the OpenDNS resolvers as forwarders.This can be done in one of two ways: Via the command line, Shell\SSH Via a GUI if you have Webmin installed on your BIND serverShell\SSH Instructions1. Connect directly to your server or SSH to it.2. Go into /etc/bind.Note: this is the default location, so you may need to change this based on your configuration.3. Edit named.conf.options in your favorite text editor.4. Click Edit.5. In named.conf.options, look for a line that starts with forwarders {If the forwarders are already configured then just change the current resolver IPs to OpenDNS’ IP addresses, whichare 208.67.222.222 and 208.67.220.220.If the line starting with forwarders { isn’t there, you can add it right above the last };forwarders {208.67.222.222;208.67.220.220;};6. Save the file to confirm your changes. 1992–2015 Cisco Systems, Inc. All rights reserved.www.cisco.com www.opendns.com 5
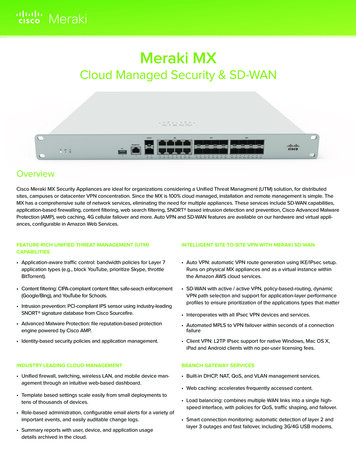
Webmin InstructionsThese steps produce a result that is the exact same as the above, except that the Webmin GUI will modifythe file named.conf.options for you.1. Log into Webmin.2. Navigate to Servers BIND DNS Server.3. Choose Forwarding and Transfers.4. Add OpenDNS’ IP addresses, which are 208.67.222.222 and 208.67.220.220, under the Servers to forwardqueries to section:5. Click Save to confirm the changes. 1992–2015 Cisco Systems, Inc. All rights reserved.www.cisco.com www.opendns.com 6
Open DNS Service and SupportOpenDNS customers should continue to use the existing process for configuration and support on OpenDNS technology.Cisco will notify you in advance of any change to the support process.OpenDNS support: https://www.opendns.com/support/Legal InformationTHE SPECIFICATIONS AND INFORMATION REGARDING THE PRODUCTS IN THIS MANUAL ARE SUBJECT TO CHANGEWITHOUT NOTICE. ALL STATEMENTS, INFORMATION, AND RECOMMENDATIONS IN THIS MANUAL ARE BELIEVED TOBE ACCURATE BUT ARE PRESENTED WITHOUT WARRANTY OF ANY KIND, EXPRESS OR IMPLIED. USERS MUST TAKEFULL RESPONSIBILITY FOR THEIR APPLICATION OF ANY PRODUCTS.THE SOFTWARE LICENSE AND LIMITED WARRANTY FOR THE ACCOMPANYING PRODUCT ARE SET FORTH IN THEINFORMATION PACKET THAT SHIPPED WITH THE PRODUCT AND ARE INCORPORATED HEREIN BY THIS REFERENCE.IF YOU ARE UNABLE TO LOCATE THE SOFTWARE LICENSE OR LIMITED WARRANTY, CONTACT YOUR CISCOREPRESENTATIVE FOR A COPY.The Cisco implementation of TCP header compression is an adaptation of a program developed by the University ofCalifornia, Berkeley (UCB) as part of UCB’s public domain version of the UNIX operating system. All rights reserved.Copyright 1981, Regents of the University of California.NOTWITHSTANDING ANY OTHER WARRANTY HEREIN, ALL DOCUMENT FILES AND SOFTWARE OF THESE SUPPLIERSARE PROVIDED “AS IS” WITH ALL FAULTS. CISCO AND THE ABOVE-NAMED SUPPLIERS DISCLAIM ALL WARRANTIES,EXPRESSED OR IMPLIED, INCLUDING, WITHOUT LIMITATION, THOSE OF MERCHANTABILITY, FITNESS FOR APARTICULAR PURPOSE AND NONINFRINGEMENT OR ARISING FROM A COURSE OF DEALING, USAGE, OR TRADEPRACTICE.IN NO EVENT SHALL CISCO OR ITS SUPPLIERS BE LIABLE FOR ANY INDIRECT, SPECIAL, CONSEQUENTIAL, ORINCIDENTAL DAMAGES, INCLUDING, WITHOUT LIMITATION, LOST PROFITS OR LOSS OR DAMAGE TO DATA ARISINGOUT OF THE USE OR INABILITY TO USE THIS MANUAL, EVEN IF CISCO OR ITS SUPPLIERS HAVE BEEN ADVISED OFTHE POSSIBILITY OF SUCH DAMAGES.Any Internet Protocol (IP) addresses and phone numbers used in this document are not intended to be actual addressesand phone numbers. Any examples, command display output, network topology diagrams, and other figures included inthe document are shown for illustrative purposes only. Any use of actual IP addresses or phone numbers in illustrativecontent is unintentional and coincidental.All printed copies and duplicate soft copies are considered un-Controlled copies and the original on-line version shouldbe referred to for latest version.Cisco has more than 200 offices worldwide. Addresses, phone numbers, and fax numbers are listed on the Ciscowebsite at www.cisco.com/go/offices.Cisco TrademarkCisco and the Cisco logo are trademarks or registered trademarks of Cisco and/or its affiliates in the U.S. and othercountries. To view a list of Cisco trademarks, go to this URL: www.cisco.com/go/trademarks. Third-party trademarksmentioned are the property of their respective owners. The use of the word partner does not imply a partnershiprelationship between Cisco and any other company. (1110R)Cisco Copyright 2014 Cisco Systems, Inc. All rights reserved.
The Umbrella cloud-delivered network security service blocks command & control callbacks, malware, and phishing from compromising systems and exfiltrating data over any port, protocol, or . OpenDNS servers and to proxy client DNS requests to those same servers. How to configure OpenDNS for clients For MX Security Appliances: From your cloud .File Size: 409KB