Transcription
Volume Licensing Service Center
HOW DO I ?REGISTER ON THE VOLUME LICENSING SERVICE CENTER . 3NAVIGATE THE VOLUME LICENSING SERVICE CENTER . 7VIEW AND REQUEST PERMISSIONS . 8ADDING AN OPEN LICENSE . 9REMOVE A LICENSING ID . 11VIEW LICENSING IDS ASSOCIATED WITH A USER . 12EDIT A USER’S PERMISSIONS . 12ADD A LICENSING ID TO A USER’S PROFILE . 14REMOVE A LICENSING ID FROM A USER . 15APPROVE/DENY PENDING PERMISSION REQUESTS . 16ADD A NEW USER . 17DEACTIVATE A USER . 17VIEW LICENSING INFORMATION . 18VIEW ORDER DETAILS . 25VIEW A SELECT PLUS STEP-UP REPORT . 26VIEW A SELECT PLUS ORDER RENEWALS REPORT . 27VIEW A REPORT ON MY VOLUME LICENSING ENTITLEMENTS . 28DOWNLOAD VOLUME LICENSING SOFTWARE . 31OBTAIN PRODUCT KEYS . 40ACCESS ONLINE SERVICES SUBSCRIPTIONS MANAGEMENT . 44ACCESS MSDN AND TECHNET SUBSCRIPTIONS MANAGEMENT. 44ACCESS SOFTWARE ASSURANCE BENEFITS MANAGEMENT . 45GET HELP AND CONTACT SUPPORT . 47CREATE A WINDOWS LIVE ID . 48GLOSSARY . 502
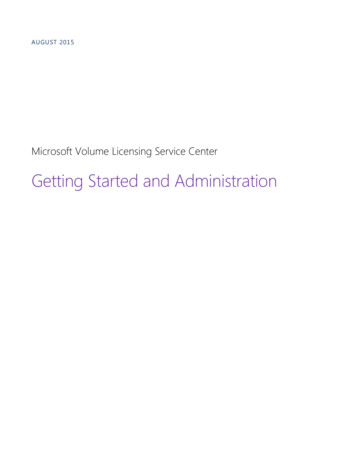
REGISTER ON THE VOLUME LICENSING SERVICE CENTERAccess the Volume Licensing ServiceCenter (VLSC) erAll users must register and sign-in toVLSC.Click Sign in Now to begin.Click!Enter your Windows Live ID E-mailaddress and Password; then click onthe Sign-In button.VLSC will validate whether you are aregistered user. Unregistered users willbe invited to self-register.Go to Page 48 to find outhow to create a WindowsLive ID.Unregistered users will enter theirbusiness e-mail and click Submit.Click!3
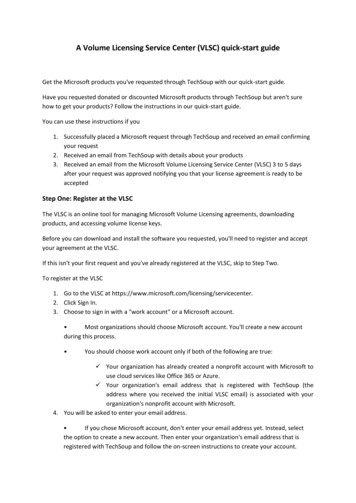
A validation e-mail will be sent to thebusiness e-mail address provided tovalidate the user. Click on the linkwithin the e-mail to complete theregistration process.Click!While receipt of this email is usuallywithin a short period of time aftersubmitting the business e-mailaddress, in a small number of casesit may take up to 48 hours to receivethis e-mail.The homepage for a registered user willdisplay.The menu bar items and notificationsdisplayed will be dependent on yourrole and permissions.See Page 8 for more information onroles and permissions.4
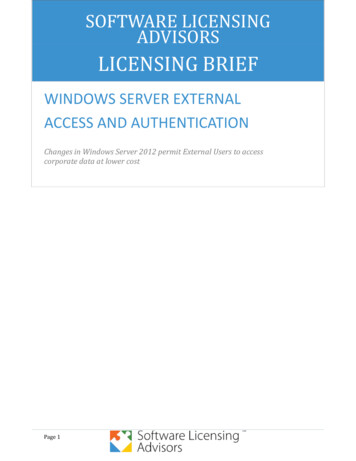
Open License CustomersWhen a user logs-in, VLSC will check ifthat user has Open Licenseagreements with unsigned Terms &Conditions.Any user with an unsigned OpenLicense agreement will be prompted to‘sign’.1. Select the Open License Type2. Select Country of Usage3. Select Language4. Click GoThe relevant Open License agreementwill display for review.5. Enter your full name and click IAccept.If Terms & Conditions are not accepted,all Open Licenses will be removed fromthe user’s profile during that session.Click!A single acceptance only isrequired across all Terms &Condition types and across bothcurrent and future Open Licenseagreements assigned to the user.5
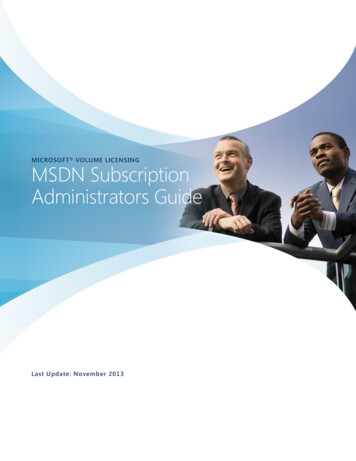
Administrator CustomersWhen a customer with theAdministrator role on a parentagreement signs-in to VLSC, theAdministrator Inheritance Option pageis displayed.If the opt-in is selected, the user willautomatically become an Administratoron all child agreements associated withthe parent agreement.1. Select Opt In or Opt Out2. Click ContinueClick!The Administrator Inheritance Optionpage will be presented only once,immediately after initial registration.To review or edit this option at a latertime:1. Click Administration2. Click My Preferences3. Click Save before navigatingaway from this page to save anyupdates.Click!6
NAVIGATE THE VOLUME LICENSING SERVICE CENTERYou now have access to VLSC to viewyour Volume Licensing information,download software and view VolumeLicense keys.Top Menu Navigation to: Licenses Downloads Product Keys Software Assurance Subscriptions Online Services Administration HelpNotification Area for site alertsWhat’s New section for VolumeLicensing newsMain Tasks: Find What You Need - Fast Track Licensing Info Leverage Entitlements Learn MoreExample of menu displayed for user with the role of AdministratorExample of menu displayed for a non-administrator user with aDownload role7Note - this is an active section of thehomepage. Content is updatedperiodically.Users are given permissions to a licensevia specific user roles. Users will seecustomized menu options andnotifications based upon their assignedroles, i.e. enabling of particular menu andsub-menu items depending on a user’srole or display of notifications specific tousers role.
VIEW AND REQUEST PERMISSIONSAn individual user will have the abilityto view their own permissions,request changes to their permissionsand request access to a newlicensing ID.To view your own permissions:1. Click Administration2. Click My PermissionsClick!Each licensing ID associated with theuser is listed along with a graphicalindication of the roles currentlyassigned.To request additional permissions orassociation to a new licensing ID:1. Click Administration2. Click Request PermissionsClick!3. Within Licensing ID Accesschoose the Program andenter the Enrollment number(this field will vary dependingon Program selected).4. Within Permission RoleRequested select therequired role.5. A pop-up window will display.Choose the permissions to berequested.6. Click OK8
Repeat as required for each role, i.e.Subscription Manager or OpenLicense Subscription (OLS) ServicesManager.7. Add comments if necessary.8. Click Add to save and sendrequest.Click!The Administrator for this licensingID will be informed via e-mail of thispending request. Once logged-in toVLSC, the Administrator can approveor deny the request. The userrequesting permissions will receivean e-mail notifying them of theAdministrator’s action.ADDING AN OPEN LICENSEThe Add Open License functionalityenables a registered user to add alimited set of permissions for OpenLicense agreements only. Thesepermissions include: Viewing Open Licenseinformation Downloading licensed software Accessing product keys Viewing a Software Assurancesummary Viewing or managing MicrosoftsubscriptionsUsers should not use this feature inplace of Request Permissions but asan alternative for users who havebeen authorized to manage thelicense for the administrator or theOpen License customers.9
To request access to an OpenLicense :1. Click Administration.2. Click Add Open License.3. Enter a valid LicenseNumber and AuthorizationNumber pair.4. Click the “I Acknowledge ”check box to show you areeither the reseller of record,the owner of the OpenLicense or have been grantedspecific permissions by ownerof the Open License.5. Click Submit.Once the authorization and licensenumbers are validated a confirmationmessage will appear in green at thebottom of the screen.An e-mail is then sent to theAdministrator(s) of record for thatlicense, notifying them of the request.It can take up to 24 hours to processthe request.If the details provided were invalid anotification message in red willappear at the bottom of the screen toinform the user that request could notbe submitted.10
REMOVE A LICENSING IDAn individual user will have the abilityto remove a licensing ID from theirprofile.To remove a licensing ID:1. Click Administration2. Click My PermissionsClick!3. Click on the “X” adjacent tothe specific licensing ID.4. A warning message willdisplay. Click OK to continue.The licensing ID will no longer beassociated with the user’s profile.It is not possible for a user toremove a licensing ID from theirprofile via the My Permissionspage if they are the NoticesCorrespondent or PrimaryContact on the licensing ID.11
VIEW LICENSING IDs ASSOCIATED WITH A USERThis is applicable to users with anAdministrator role only. Users whoare not Administrators will not haveaccess to the Manage Users submenu item.To view the licensing IDs associatedto a user:1. Click Administration2. Click Manage UsersAll users associated to the licensingID on which you have anAdministrator role are listed.3. Click on the user’s EmailAddress to view theirassociated licensing IDs.EDIT A USER’S PERMISSIONSThis is applicable to users with anAdministrator role only. Users whoare not Administrators will not haveaccess to the Manage Users submenu item.Complete the steps outlined in thesection on View Licensing IDsAssociated with a User above toopen the Edit User Permissionspage.User’s roles and permissions arelisted for each licensing ID. Reviewthe legend for a role description.1. Click on Role to be assignedto a licensing ID, i.e. SoftwareAssurance Manager12
Software Assurance Managerwindow opens, allowing assignmentof permissions under this role.2. Select the permissions to berequested.3. Click OKClick!Newly assignedpermissions may takeup to 2 hours to bereflected in VLSC.Repeat as required for each role, i.e.Subscription Manager or OLSServices Manager.Once complete return to the EditUser Permissions page.4. Click Add to save allupdates.Click!In this example the user has partialOLS Services Manager and fullSoftware Assurance Managerpermissions. This can be determinedby the symbol coding of the role.The user whose permissions havebeen updated will receive an e-mailnotifying them of the Administrator’saction.13
ADD A LICENSING ID TO A USER’S PROFILEThis is applicable to users with anAdministrator role only. Users who arenot Administrators will not have accessto the Manage Users sub-menu item.Complete the steps outlined in thesection on View Licensing IDsAssociated with a User above toopen the Edit User Permissionspage.1. In Edit User Permissions pageclick Add Licensing ID.Click!Available Licensing IDs are displayedfor which you are an Administrator, butare not currently associated with.2. Select the user roles andpermissions for the appropriatelicensing ID.3. Click Add to save changes.Click!14
REMOVE A LICENSING ID FROM A USERThis is applicable to users with anAdministrator role only. Users who arenot Administrators will not have accessto the Manage Users sub-menu item.Complete the steps outlined in thesection on View Licensing IDsAssociated with a User above toopen the Edit User Permissionspage.1. Click on of the red X in theStatus column.2. Click OK in the Warning pop-upwindow to continue.Click!This removes the association of alicensing ID from a user.It is not possible to remove alicensing ID from a user’s profileif the use is the NoticesCorrespondent or PrimaryContact on the licensing ID.15
APPROVE/DENY PENDING PERMISSION REQUESTSThis is applicable to users with anAdministrator role only. Users who arenot Administrators will not have accessto the Manage Users sub-menu item.Where a user requests additionalpermissions, a user request is sent tothat licensing ID’s Administrator forapproval. Administrators also receivenotification of pending approvals viaemail.To review and approve or deny arequest :1. Click Administration2. Click Manage Users3. Pending user requests aredisplayed. Click on RequestNumber to view request details.4. Choose Accept or Deny5. Add a message to the requestorif required.6. Click OKClick!The user will then receive a notificatione-mail to inform them of the status oftheir request.16
ADD A NEW USERApplicable to users with an Administratorrole only. Users who are notAdministrators will not have access to theAdd User sub-menu item.To add a new user to a licensing ID:1. Click Administration2. Click Add User3. Enter the new user’s E-mail, FirstName and Last NameLicenses associated with theAdministrator are displayed.4. Assign user roles and permissionsfor the required licensing IDs.5. Click Add to save the updates.The new user will receive an e-mailnotifying them of the Administrator’saction.DEACTIVATE A USERThis is applicable to users with anAdministrator role only. Users who arenot Administrators will not have accessto the Manage Users sub-menu item.To deactivate a user :1. Click Administration2. Click Manage Users3. In the Status column clickDeactivate17
4. Click OK in the confirmation popup window to continueThis removes all associations betweenthe user and the licensing IDsassociated with that Administrator. Theuser’s status will be moved to Inactive.It is not possible to deactivate auser if the user is the NoticesCorrespondent or PrimaryContact on a licensing ID.VIEW LICENSING INFORMATIONView Summary of All My Volume Licensing IDs1. Click on Relationship Summaryin the Licensing Info menu.Click!2. The Summary shows all VolumeLicensing Agreements and OpenLicenses associated to yourWindows Live ID. 18Filter on Volume LicensingProgram and Status(Active, Inactive or All).Click on the Licensing IDnumber to view details.Click on the # of Orders toview purchase orderssubmitted for that LicensingID.Click on the ParentProgram number to viewdetails.
View Parent Program Details1. Click on Relationship Summaryin the Licensing Info menu.Click!2. In the Relationship Summary,click on the Parent Program linkto view details.Click!Parent Program details can beviewed for the Campus, School,Select, Select Plus and Enterpriseprograms.3. On the Enrollment Details page,navigate between the menu tabsto view: Parent Programinformation: includingAgreement Start & End datesand Organization details. Offerings Contacts Performance Summary (forthe Select Program only)19
4. The Offerings tab shows detailsof product pools (Applications,Systems and/or Servers) that areactive for ordering on thisAgreement and the associatedpricing level.5. The Contacts tab displayscontacts associated to thisParent Program.Users need Administratorpermissions to view theContacts information.View a Performance Summary for the Select Program1. Click on Relationship Summaryin the Licensing Info menu.Click!20
2. In the Relationship Summary,click on the Parent Program linkto view details.Click!3. On the Enrollment Details page,click on the PerformanceSummary tab.Click!4. The Performance Summaryshows progress towards theForecast Target per product pool.This includes: Forecast Target: defined whensigning the Select MasterAgreement Purchase Points: pointsassociated to license purchasesmade under this AgreementAll purchases reported over the 3year lifetime of the Agreement areincluded on this report.Contact your Microsoft Authorized Reselleror local Microsoft Sales Subsidiary fordetails on the Select Program.For more information, you can also log onto: http://www.microsoft.com/licensing.21
View Licensing ID details1. Click on Relationship Summary inthe Licensing Info menu.Click!2. In the Relationship Summary, clickon the Licensing ID link to viewdetails.Click!3. On the Licensing ID Details pagenavigate between the menu tabs toview: Offerings Contacts Licenses Product Keys Order Confirmations22
4. The Licensing ID Offerings pagedisplays: Licensing ID Info: includesAgreement Start & End datesand Organization details. Offerings: includes productpools (including Applications,Systems and/or Servers) thatare active for ordering and theassociated pricing level.5. The Licensing ID Contacts pagedisplays contacts associated to thisLicensing ID such as Primary andNotices Correspondent.23
6. The Licensing ID Licenses pagedisplays the estimated LicenseEntitlement: Product Family and currentVersion.Effective Quantity: the numberof Volume Licensing entitlementsper product and version afterupgrades have been applied.Unresolved Quantity: when thenumber of upgrade licenses isgreater than the underlyingqualifying full licenses.Active SA Quantity: the numberof licenses covered by SoftwareAssurance (version upgradeprotection).7. The Product Keys page providesdetails on any associated productkeys for that licensing ID.Users can view product keysdirectly on screen or downloadlisted keys.24
VIEW ORDER DETAILS1. Click on Relationship Summaryin the Licensing Info menu.Click!2. In the Relationship Summary,click on the Number of Orderslink to view details.Click!3. The Order Confirmations pageshows a summary of all PurchaseOrders submitted to Microsoft byyour Microsoft Authorized Resellerand includes: Customer Order Number Order Date Usage Date Reseller Company NameClick on the Purchase OrderNumber link to view the details ofthat order.Click!25
4. The Order Details page displaysthe following information for theselected purchase order: Microsoft Part Number Product Description Quantity License Count (applicableto Select or Select Plusorders) Usage Country for thatproductVIEW A SELECT PLUS STEP-UP REPORTStep-up reports are only available tousers with a Select Plus Affiliate role.The Select Plus Step-up Reportdetails Software Assurance, OnlineServices, and subscription renewals(also known as ‘SA Step-Ups’)To view a Select Plus Step-up Report:1. Click Licenses2. Click RelationshipSummary3. Click on a Licensing IDwhich is associated with aSelect Plus agreement.Click!26
4. Click on the SA Step-Ups tabto view the Select Plus StepUp report.Click!The Coverage End Date and LineItem filters can be used to refine aSelect Plus Step-up Report.5. On selecting the appropriatefilters click Go to refine thereport.VIEW A SELECT PLUS ORDER RENEWALS REPORTOrder Renewal reports are onlyavailable to users with a Select PlusAffiliate role.To view a Select Plus Step-up Report:1. Click Licenses2. Click RelationshipSummary3. Click on a Licensing IDwhich is associated with aSelect Plus agreement.Click!4. Click on the Order Renewalstab to view the Select PlusOrder Renewals report.Click!27
The Coverage End Date and LineItem filters can be used to refine anOrder Renewals Report.5. On selecting the appropriatefilters click Go.VIEW A REPORT ON MY VOLUME LICENSING ENTITLEMENTS1. Click on License Summary inthe Licensing Info menu.Click!2. The License Summary showsthe estimated Volume Licenseentitlements per each Microsoftproduct family and version for allLicensing IDs associated to yourWindows Live ID.Click on the Filter LicensingIDs link for further displayoptions.Click!28
3. You can include and excludeLicensing IDs by clicking on thecheck box beside eachLicensing ID.Click on the Create Summarybutton to re-calculate theLicense entitlement.Click!4. The License Summary displays:Product Family and currentVersion Effective Quantity: the number ofVolume Licensing entitlements perproduct and version afterupgrades have been applied. Unresolved Quantity: when thenumber of upgrade licenses isgreater than the underlyingqualifying full licenses. Active S
5 Open License Customers When a user logs-in, VLSC will check if that user has Open License agreements with unsign