Transcription
Symantec NetBackup Appliance Getting StartedGuideRelease 2.0NetBackup 5200 and 5220
The software described in this book is furnished under a license agreement and may be usedonly in accordance with the terms of the agreement.Documentation version: 2.0Legal NoticeCopyright 2011 Symantec Corporation. All rights reserved.Symantec and the Symantec Logo, NetBackup, and Veritas are trademarks or registeredtrademarks of Symantec Corporation or its affiliates in the U.S. and other countries. Othernames may be trademarks of their respective owners.The product described in this document is distributed under licenses restricting its use,copying, distribution, and decompilation/reverse engineering. No part of this documentmay be reproduced in any form by any means without prior written authorization ofSymantec Corporation and its licensors, if any.THE DOCUMENTATION IS PROVIDED "AS IS" AND ALL EXPRESS OR IMPLIED CONDITIONS,REPRESENTATIONS AND WARRANTIES, INCLUDING ANY IMPLIED WARRANTY OFMERCHANTABILITY, FITNESS FOR A PARTICULAR PURPOSE OR NON-INFRINGEMENT,ARE DISCLAIMED, EXCEPT TO THE EXTENT THAT SUCH DISCLAIMERS ARE HELD TOBE LEGALLY INVALID. SYMANTEC CORPORATION SHALL NOT BE LIABLE FOR INCIDENTALOR CONSEQUENTIAL DAMAGES IN CONNECTION WITH THE FURNISHING,PERFORMANCE, OR USE OF THIS DOCUMENTATION. THE INFORMATION CONTAINEDIN THIS DOCUMENTATION IS SUBJECT TO CHANGE WITHOUT NOTICE.The Licensed Software and Documentation are deemed to be commercial computer softwareas defined in FAR 12.212 and subject to restricted rights as defined in FAR Section 52.227-19"Commercial Computer Software - Restricted Rights" and DFARS 227.7202, "Rights inCommercial Computer Software or Commercial Computer Software Documentation", asapplicable, and any successor regulations. Any use, modification, reproduction release,performance, display or disclosure of the Licensed Software and Documentation by the U.S.Government shall be solely in accordance with the terms of this Agreement.Symantec Corporation350 Ellis StreetMountain View, CA 94043http://www.symantec.com
ContentsChapter 1Introduction. 5About NetBackup appliance deployment . 5About NetBackup 5220 and Symantec Storage Shelf matchedpairs . 7Chapter 2Hardware installation . 9About mounting NetBackup appliance components . 9Connecting electrical and communications cables to NetBackupappliances . 10Chapter 3Configuration. 15About appliance configuration guidelines .About the appliance initial configuration .About NetBackup appliance roles and modes .About appliance configuration sequence .Configuring a new appliance from the appliance interface .Configuring a new appliance from the appliance shell menu .About post appliance configuration tasks .Adding an appliance media server to an appliance masterserver .Adding a storage expansion unit to an appliance .Adding the appliance host name to the NetBackup masterserver .Installing NetBackup client software on clients used withappliances .About appliance and NetBackup documentation .151718192031373738394041
4Contents
Chapter1IntroductionThis chapter includes the following topics: About NetBackup appliance deployment About NetBackup 5220 and Symantec Storage Shelf matched pairsAbout NetBackup appliance deploymentNetBackup appliance deployment consists of the complete installation andconfiguration of all appliance components to create a backup environment thatis ready to use.The Symantec NetBackup Getting Started Guide provides you with the informationto get your appliance environment operational. Updates to this document wereexpected at the time of release. For the latest version of this document with themost recent updates, click on the following link:http://www.symantec.com/docs/DOC2792The following provides a brief description of the available appliance systemcomponents:
6IntroductionAbout NetBackup appliance deploymentTable 1-1Available appliance componentsComponentDescriptionServersNetBackup 5200: 4U rackmount unit Built-in disk storage With NetBackup appliance Release 2.0, use as a masterserver or a media server.NetBackup 5220:Storage expansion unit 2U rackmount unit Built-in disk storage Use as a master server or a media serverSymantec Storage Shelf: 3U rackmount unit Includes 16 disk drivesNote: The Symantec Storage Shelf is supported for use onlywith the NetBackup 5220.The following describes the supported NetBackup appliance configurations thatyou can deploy:Table 1-2Supported NetBackup appliance deploymentsSystem componentsDeployment descriptionMaster serverSingle (standalone) NetBackup 5200 or NetBackup 5220appliance with combined master server and media serverfunctionality.Master server with storageexpansion unitSingle (standalone) NetBackup 5220 appliance withcombined master server and media server functionality anda Symantec Storage Shelf.Master server and mediaserversA NetBackup 5200 or 5220 master server, and a 5200 or5220 media server.Master server, media servers, Same combinations as listed above, and one Symantecstorage expansion unitStorage Shelf can be connected to each NetBackup 5220.Media server only for anon-appliance NetBackupsystemNetBackup 5200 or 5220 media server for use with atraditional NetBackup master server.For the deployments that use a NetBackup 5220, oneSymantec Storage Shelf can be connected to the appliance.
IntroductionAbout NetBackup 5220 and Symantec Storage Shelf matched pairsThe following describes the required tasks to deploy your NetBackup applianceenvironment:Appliance deployment tasksTable 1-3StepTaskDescription1Install hardware Mount all appliances in a 19-inch rack. Mount the optional storage expansion unit in a19-inch rack.2Connect cablesand turn on unitsConnect a ground wire to the appliance (NetBackup5200 only). Connect the appliance to the corporate network. Connect the optional storage expansion unit to theappropriate appliance. Connect a laptop to the appliance (required forappliance configuration). Connect power cords to the appliance and to theoptional storage expansion unit. Turn on the optional storage expansion unit. Note: For the systems that include a SymantecStorage Shelf, this unit must be turned on first andallowed to boot up completely.3Configure Turn on the appliances. Configure all appliances. Add the storage expansion unit to the appropriateappliance.About NetBackup 5220 and Symantec Storage Shelfmatched pairsWhen you order a NetBackup 5220 and a Symantec Storage Shelf together, theseunits are initialized together at the factory to create a matched pair. Matchedpairs provide optimum performance and they should always be used together tohelp ensure successful installation and configuration.To help you identify matched pairs, check the labels on the back of each SymantecStorage Shelf. Each unit has two labels that identify the serial numbers of thematched pair.7
8IntroductionAbout NetBackup 5220 and Symantec Storage Shelf matched pairs
Chapter2Hardware installationThis chapter includes the following topics: About mounting NetBackup appliance components Connecting electrical and communications cables to NetBackup appliancesAbout mounting NetBackup appliance componentsEach appliance system component includes guide rails and fasteners forinstallation in a 19-inch rack.The following describes the guide rail styles that are included with each systemcomponent:Table 2-1Guide rails styles for NetBackup appliance systemsComponentGuide rail styleNetBackup 5200 (4U)Screw mountNetBackup 5220 (2U)Snap-in mountSymantec Storage Shelf (3U)Screw mountNote: Mounting methods vary by rack manufacturer. Racks may contain mountingrails with square holes, round holes, or round threaded holes. You may need toacquire other mounting hardware to install the guide rails in your rack.
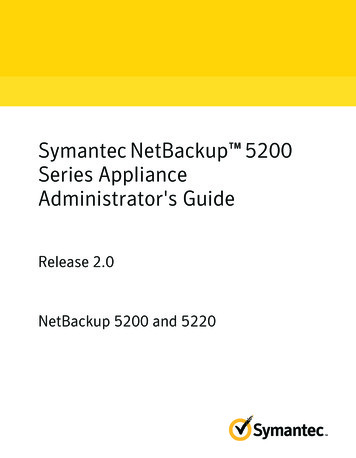
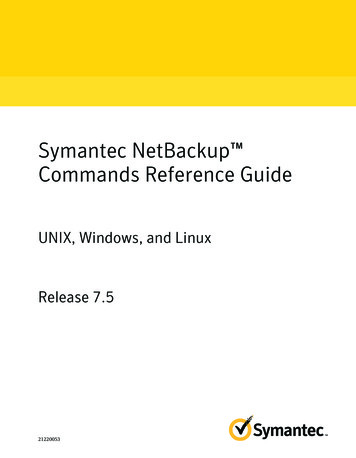
10Hardware installationConnecting electrical and communications cables to NetBackup appliancesConnecting electrical and communications cables toNetBackup appliancesAfter all appliance hardware installation is completed, you are ready to make allthe necessary cable connections.Use the following procedure to connect electrical and communications cablesfrom the appliance to the appropriate sources.To connect electrical and communications cables from the appliance to theappropriate sources1For 5200 appliances, connect a ground wire from the appliance ground screwto a true earth ground.2For 5200 appliances, connect your corporate network to the followingappliance ports:Additional Ethernet ports (10GB) NIC3 (eth2) and higherAC power jacks1GB EthernetportsNIC2 (eth1)Corporate networkconnectionPower switchNIC1 (eth0)LaptopconnectionNote: The number of expansion card ports (NIC3/eth2 and higher) variesdepending on the hardware configuration that was ordered.
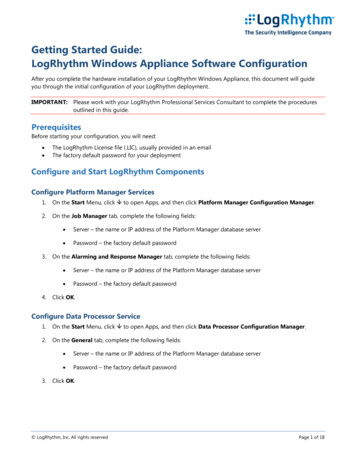
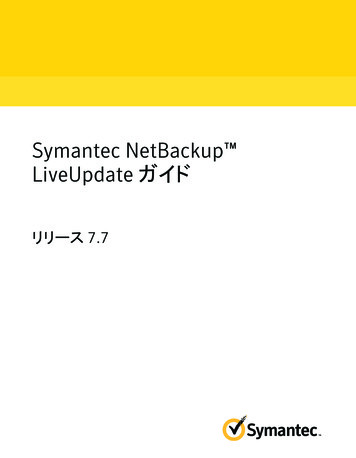
Hardware installationConnecting electrical and communications cables to NetBackup appliances3For 5220 appliances, connect your corporate network to the followingappliance ports:FAdditional Ethernet ports (1GB or 10GB) NIC3 (eth2) and higherNIC1 (eth0)Laptopconnection1GB EthernetportsNIC2 (eth1)Corporate networkconnectionAC power jacksNote: The number of expansion card ports (NIC3/eth2 and higher) variesdepending on the hardware configuration that was ordered.4Connect a standard Ethernet cable from a laptop computer to appliance portNIC1.11
12Hardware installationConnecting electrical and communications cables to NetBackup appliances5If your system includes a storage expansion unit, connect two SAS cables tothe SAS In ports on the unit.Note: For optimum performance, make sure that you connect the storageexpansion unit to the appliance that it is matched with from the factory. Tohelp you identify matched pairs, check the labels on the back of each SymantecStorage Shelf. Each unit has two labels that identify the serial numbers ofthe matched pair.SAS In portsSASInSASOutSASInSASOutPower switchesAC power jacksConnect the other ends of the SAS cables to the available expansion cardports on the NetBackup 5220 appliance.Warning: Once these connections are made, the storage expansion unitbecomes an electrically integral part of the appliance. Any disconnection ofthese cables requires that you contact Symantec Technical Support.6Connect both power cables to the appliance, then plug in the other ends tothe AC power source.For systems with a storage expansion unit, connect the appropriate powercables to the unit and plug the other ends into the AC power source.7This step describes the sequence to turn on all units. If your system includesa storage expansion unit, the sequence for turning on the equipment is criticalto ensure correct communication.The following describes the order in which to turn on the units inconfigurations with or without storage expansion units: For the systems that consist only of appliance servers, turn on allappliances. The sequence is not critical.
Hardware installationConnecting electrical and communications cables to NetBackup appliances For the systems that include storage expansion units: Turn on all storage expansion units and wait for each unit to boot upcompletely.When all of the lights on the units stop blinking and are on steady, theboot up is complete. Turn on all appliances.The power switches on the 5200 server and the storage expansion unit arelocated on the rear panel.The power switch on the 5220 server is located on the front panel.8Turn on the laptop computer.The appliance is now ready for configuration.See “About appliance configuration guidelines” on page 15.13
14Hardware installationConnecting electrical and communications cables to NetBackup appliances
Chapter3ConfigurationThis chapter includes the following topics: About appliance configuration guidelines About the appliance initial configuration About appliance configuration sequence Configuring a new appliance from the appliance interface Configuring a new appliance from the appliance shell menu About post appliance configuration tasks About appliance and NetBackup documentationAbout appliance configuration guidelinesUse the following configuration guidelines when you deploy new appliances:
16ConfigurationAbout appliance configuration guidelinesTable 3-1Appliance configuration guidelinesParameterDescriptionRequired namesand addressesBefore you start the configuration, make sure that you have thefollowing information:Network IP addresses, netmask, and gateway IP addresses for theappliance. Network names for all appliances DNS or host informationIf DNS is used, make sure that the network names of all appliancesand the master server are DNS resolvable (FQHN and short name).If DNS is not used, make sure that you enter the proper host entriesfor the appliance that you are configuring. Password for appliance accessThe default password for appliance access is P@ssw0rd. Names for disk storage unitsThe Storage Name fields appear only when you configure theappliance as a media server For use with a traditional NetBackupmaster server. You can change the default names or leave them. Firewall portusageDisk storageoption licensesMake sure that the following ports are open on any firewall that existsbetween a master server and a media server: 13724 (vnetd) 13720 (bprd) 1556 (PBX)NetBackup appliances include one-year temporary license keys forthe NetBackup Deduplication and the AdvancedDisk storage options.The keys are added to the master server automatically during theinitial appliance configuration.You must replace these keys with permanent keys before they expire.NetBackup version NetBackup appliance Release 2.0 includes NetBackup version 7.1.compatibilityTo use an appliance media server with a traditional NetBackup masterserver, the master server must also use NetBackup version 7.1 or later.If the NetBackup master server currently uses NetBackup version 7.0or earlier, it must first be upgraded to version 7.1 before you configurethe appliance.For all configurations, the master server must always use the sameor a later version of NetBackup than the NetBackup version used onmedia servers.
ConfigurationAbout the appliance initial configurationAbout the appliance initial configurationAfter you log in to the appliance from the laptop, a series of pages guide youthrough the initial configuration. The first page presents an overview of theappliance setup to inform you about the information that you must provide tocomplete the configuration.You can click Help on any initial configuration page if you need more informationabout what you need to provide in the data entry fields.The following describes the information on the initial configuration pages.Table 3-2Initial configuration pagePage titleDescriptionOverview ofappliance setupShows the order of configuration and a brief summary of the pagesthat follow.NetworkConfigurationProvides the following data entry fields for the appliance networksetup:Host and SytemConfigurationTimeZone andDateConfiguration IP Address Subnet Mask NIC Bond Mode Destination IP Destination Subnet Mask Default GatewayProvides the following data entry fields for the appliance host namesetup: Host Name DNS Name Server(s) IP Address Domain Name Suffix Search Domain(s) Host Name ResolutionIP Address, Fully-Qualified-Hostname, and Short-Hostname.Provides the following choices and the data entry fields for theappliance time zone and date setup:NTPServer IP Address NoneDate and Time Time Zone 17
18ConfigurationAbout the appliance initial configurationTable 3-2Initial configuration page (continued)Page titleDescriptionSecurityProvides the following data entry fields for the appliance passwordsetup:Appliance Role Old Admin Password New Admin Password Confirm New Admin PasswordProvides the following choices and the data entry fields for theappliance role setup and the disk configuration: Master ServerMedia ServerFor use with a traditional NetBackup master serverThe NetBackup master server must have NetBackup version 7.1or later installed.For use with an appliance master server Enter the fully qualified host name of master serverRequired only when you select a media server role. AdvancedDisk volume (See note.) Storage Unit Name (See note.)Note: The AdvancedDisk volume and the Storage Name fields appearonly when you select the media server role For use with a traditionalNetBackup master server.About NetBackup appliance roles and modesWhen you configure your appliance for the first time, you must select a role anda mode for the appliance. The role refers to the server type and the mode refersto the interface that is used for system administration.The following describes the available roles and the associated modes:Table 3-3Appliance role and mode descriptionsRole—server typeMode—user interfaceMaster ServerSelect this role to configure the appliance as a master server.This role provides the traditional NetBackup interfaces toback up and restore applications and file systems.
ConfigurationAbout appliance configuration sequenceTable 3-3Appliance role and mode descriptions (continued)Role—server typeMode—user interfaceMedia ServerChoose one of the following modes:For use with a traditional NetBackup master serverThe NetBackup master server must have NetBackupversion 7.1 or later installed.Before configuration, you must add this appliance hostname to the Additional Servers list on the NetBackupmaster server. For use with an appliance master serverAfter configuration, you must add this appliance to theappliance master server. About appliance configuration sequenceIf your system includes more than one appliance or a storage expansion unit,configuration must be done in a specific order.The following describes the proper sequence for appliance configuration, basedon the system components.Table 3-4Appliance configuration orderSystemConfiguration orderSingle appliance system(standalone)Configure the appliance as a master server.See “Configuring a new appliance from the applianceinterface” on page 20.See “Configuring a new appliance from the appliance shellmenu” on page 31.Multiple appliance system(master server and mediaservers) Configure the first appliance as a master server. Configure the remaining appliances as media serversfor use with an appliance master server.See “Configuring a new appliance from the applianceinterface” on page 20.See “Configuring a new appliance from the appliance shellmenu” on page 31.19
20ConfigurationConfiguring a new appliance from the appliance interfaceTable 3-4Appliance configuration order (continued)SystemConfiguration orderAppliance media server (foruse with an existingappliance master server)Configure the appliance as a media server (For use with anappliance master server) and add it to the appliance masterserver.See “Configuring a new appliance from the applianceinterface” on page 20.See “Configuring a new appliance from the appliance shellmenu” on page 31.See “Adding an appliance media server to an appliancemaster server” on page 37.Appliance media server (foruse with an existingtraditional NetBackup masterserver)Before you configure this type of media server, you must
About NetBackup 5220 and Symantec Storage Shelf matched pairs About NetBackup appliance deployment NetBackup appliance deployment consists of the complete installation and configuration of all appliance components to create a backup environment that . appliance setup to