Transcription
Behind-the-Ear hearing aidsManufacturer:Phonak AGLaubisrütistrasse 28CH-8712 StäfaSwitzerlandEU Representative:Phonak GmbHD-70736 6-02/V1.00/2011-06/A W/FO Printed in Switzerland Phonak AG All rights reservedUser Guide
Contents1. Welcome2. Important safety information:Please read before operating your hearingaid for the first time56Hazard warnings6Information on product safety83. Hearing aid description104. Step-by-step instructions for usingthe hearing aid132Step 8. Removing the hearing aid25Step 9. Turning off the hearing aid27Step 10. Changing the battery28Step 11. Changing the battery in hearingaids with a secured battery compartment285. Care and maintenance306. Troubleshooting337. Wireless accessories358. FM systems36Step 1. Getting to know your hearing aid13Step 2. Battery preparation15General information36Step 3. Inserting the battery15FM system description37Step 4. Turning on the hearing aid16Option A: Design-integrated FM receiver37Step 5. Inserting the hearing aid17Option B: Audio shoe with universal FM receiver 39Step 6. Adjusting the volume controlbehind the ear23Step 7. Selecting the hearing programbehind the ear249. Service and warranty43Local warranty43International warranty43Warranty limitations433
Contents1. Welcome2. Important safety information:Please read before operating your hearingaid for the first time56Hazard warnings6Information on product safety83. Hearing aid description104. Step-by-step instructions for usingthe hearing aid132Step 8. Removing the hearing aid25Step 9. Turning off the hearing aid27Step 10. Changing the battery28Step 11. Changing the battery in hearingaids with a secured battery compartment285. Care and maintenance306. Troubleshooting337. Wireless accessories358. FM systems36Step 1. Getting to know your hearing aid13Step 2. Battery preparation15General information36Step 3. Inserting the battery15FM system description37Step 4. Turning on the hearing aid16Option A: Design-integrated FM receiver37Step 5. Inserting the hearing aid17Option B: Audio shoe with universal FM receiver 39Step 6. Adjusting the volume controlbehind the ear23Step 7. Selecting the hearing programbehind the ear249. Service and warranty43Local warranty43International warranty43Warranty limitations433
1. WelcomeContents10. Compliance information4411. Information and explanation of symbols47Your new hearing aid is a premium Swiss quality product.It was developed by Phonak, one of the world‘s leadingcompanies in hearing technology. Your hearing aidoffers the most modern digital hearing technologycurrently available on the market.Please read these user instructions thoroughly in orderto benefit from all the possibilities your new hearingaid has to offer. With proper use and care, you will beable to enjoy your hearing aid for many years to come.If you have any questions, please consult your hearingcare professional.Phonak - life is onwww.phonak.com045945
1. WelcomeContents10. Compliance information4411. Information and explanation of symbols47Your new hearing aid is a premium Swiss quality product.It was developed by Phonak, one of the world‘s leadingcompanies in hearing technology. Your hearing aidoffers the most modern digital hearing technologycurrently available on the market.Please read these user instructions thoroughly in orderto benefit from all the possibilities your new hearingaid has to offer. With proper use and care, you will beable to enjoy your hearing aid for many years to come.If you have any questions, please consult your hearingcare professional.Phonak - life is onwww.phonak.com045945
2. Important safety informationPlease read the information on the following pagesbefore using your hearing aid.A hearing aid will not restore normal hearing andwill not prevent or improve a hearing impairmentresulting from organic conditions. Infrequent useof a hearing aid does not permit a user to attain fullbenefit from it. The use of a hearing aid is onlypart of hearing habilitation and may need to besupplemented by auditory training and instructionin lipreading.2.1 Hazard warningsUse only hearing aids that have been specially programmed for you by your hearing care professional.Other hearing aids may be ineffective and may, incertain cases, damage your hearing.Changes or modifications to the hearing aid thatwere not explicitly approved by Phonak are notpermitted. Such changes may damage your ear orthe hearing aid.6Hearing aid batteries are toxic if they are swallowed!Keep out of reach of children and pets. If batteriesare swallowed, consult your physician immediately!If you feel pain in or behind your ear, if it is inflamed,if skin irritation or accelerated accumulations ofear wax occur, please check with your hearing careprofessional or physician.In very rare cases, the dome can remain in your earcanal when removing the hearing tube from theear. In the unlikely case that the dome does get stuckin your ear canal, it is strongly recommended tosee a physician for safe removal.Hearing programs in the directional microphonemode reduce background noises. Please be awarethat warning signals or noises coming from behind,e. g. cars, are partially or entirely suppressed.The hearing aid contains small parts which can beswallowed by children.7
2. Important safety informationPlease read the information on the following pagesbefore using your hearing aid.A hearing aid will not restore normal hearing andwill not prevent or improve a hearing impairmentresulting from organic conditions. Infrequent useof a hearing aid does not permit a user to attain fullbenefit from it. The use of a hearing aid is onlypart of hearing habilitation and may need to besupplemented by auditory training and instructionin lipreading.2.1 Hazard warningsUse only hearing aids that have been specially programmed for you by your hearing care professional.Other hearing aids may be ineffective and may, incertain cases, damage your hearing.Changes or modifications to the hearing aid thatwere not explicitly approved by Phonak are notpermitted. Such changes may damage your ear orthe hearing aid.6Hearing aid batteries are toxic if they are swallowed!Keep out of reach of children and pets. If batteriesare swallowed, consult your physician immediately!If you feel pain in or behind your ear, if it is inflamed,if skin irritation or accelerated accumulations ofear wax occur, please check with your hearing careprofessional or physician.In very rare cases, the dome can remain in your earcanal when removing the hearing tube from theear. In the unlikely case that the dome does get stuckin your ear canal, it is strongly recommended tosee a physician for safe removal.Hearing programs in the directional microphonemode reduce background noises. Please be awarethat warning signals or noises coming from behind,e. g. cars, are partially or entirely suppressed.The hearing aid contains small parts which can beswallowed by children.7
2. Important safety informationExternal devices may only be connected if theyhave been tested in accordance with correspondingIECXXXXX standards. Only use accessories approvedby Phonak AG.2.2 Information on product safetyYour hearing aid is resistant to water, sweat anddust under the conditions listed in chapter 5. Afterexposure to any of these elements the hearing aidmust be rinsed in fresh water and dried.Protect your hearing aid from heat (never leave itnear a window or in the car.) Never use a microwaveor other heating devices to dry your hearing aid.Ask your hearing care professional about suitabledrying methods.Do not drop your hearing aid! Dropping onto a hardsurface can damage your hearing aid.Always use new batteries for your hearing aid.You can return used batteries to your hearing careprofessional.Remove the battery if you are not using your hearingaid for a long period of time.X-ray radiation (e. g. CT scans, MRI scans) mayadversely affect the correct functioning of yourhearing aids. We recommend that you removethem before undergoing X-ray procedures andkeep them outside the room.Do not use your hearing aid in areas where electronicequipment is prohibited.When you are not using your hearing aid, leave thebattery compartment open so that any moisturecan evaporate. Make sure that you always completelydry your hearing aid after use. Store the hearingaid in a safe, dry and clean place.89
2. Important safety informationExternal devices may only be connected if theyhave been tested in accordance with correspondingIECXXXXX standards. Only use accessories approvedby Phonak AG.2.2 Information on product safetyYour hearing aid is resistant to water, sweat anddust under the conditions listed in chapter 5. Afterexposure to any of these elements the hearing aidmust be rinsed in fresh water and dried.Protect your hearing aid from heat (never leave itnear a window or in the car.) Never use a microwaveor other heating devices to dry your hearing aid.Ask your hearing care professional about suitabledrying methods.Do not drop your hearing aid! Dropping onto a hardsurface can damage your hearing aid.Always use new batteries for your hearing aid.You can return used batteries to your hearing careprofessional.Remove the battery if you are not using your hearingaid for a long period of time.X-ray radiation (e. g. CT scans, MRI scans) mayadversely affect the correct functioning of yourhearing aids. We recommend that you removethem before undergoing X-ray procedures andkeep them outside the room.Do not use your hearing aid in areas where electronicequipment is prohibited.When you are not using your hearing aid, leave thebattery compartment open so that any moisturecan evaporate. Make sure that you always completelydry your hearing aid after use. Store the hearingaid in a safe, dry and clean place.89
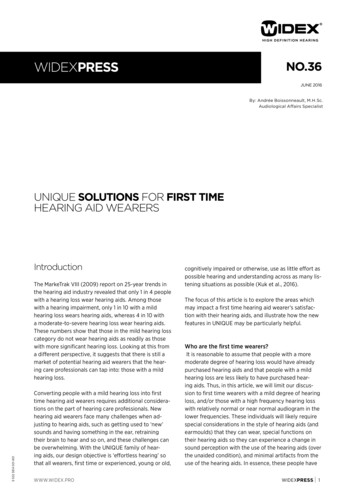
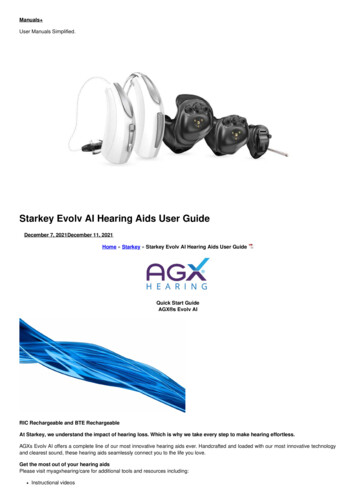
3. Hearing aid descriptionThe following user instructions describe Nios S H2Ohearing aid.Option A: with classic earmoldedThe hearing aid can be adapted with a variety ofearmolds.cfOn the following pages use the labeled drawings toidentify the hearing aid and the earmold that youuse.gYour hearing aid uses a size 13 battery.babcdefg10aRight or left indicator (right red, left blue)Battery compartment with ON/OFF switchPush buttonMicrophone inputHook/sound outputHearing tubeClassic earmold11
3. Hearing aid descriptionThe following user instructions describe Nios S H2Ohearing aid.Option A: with classic earmoldedThe hearing aid can be adapted with a variety ofearmolds.cfOn the following pages use the labeled drawings toidentify the hearing aid and the earmold that youuse.gYour hearing aid uses a size 13 battery.babcdefg10aRight or left indicator (right red, left blue)Battery compartment with ON/OFF switchPush buttonMicrophone inputHook/sound outputHearing tubeClassic earmold11
3. Hearing aid descriptionOption B: with domefhijk12Hearing tubeEarmold: DomeRetentionEarmold: SlimTipRemoval handleOption C: with SlimTipffhjik4. Step-by-step instructions for usingthe hearing aidThe following chapter provides step-by-step instructionson how to use your hearing aid. Please follow thesesteps carefully. In the drawings, the parts that areparticularly important for each step are shown ingreen.Step 1. Getting to know your hearing aidTake the hearing aid in your hand and try out thehearing aid controls. This will make it easier for you tofeel and operate the controls later on when wearingthe hearing aid.13
3. Hearing aid descriptionOption B: with domefhijk12Hearing tubeEarmold: DomeRetentionEarmold: SlimTipRemoval handleOption C: with SlimTipffhjik4. Step-by-step instructions for usingthe hearing aidThe following chapter provides step-by-step instructionson how to use your hearing aid. Please follow thesesteps carefully. In the drawings, the parts that areparticularly important for each step are shown ingreen.Step 1. Getting to know your hearing aidTake the hearing aid in your hand and try out thehearing aid controls. This will make it easier for you tofeel and operate the controls later on when wearingthe hearing aid.13
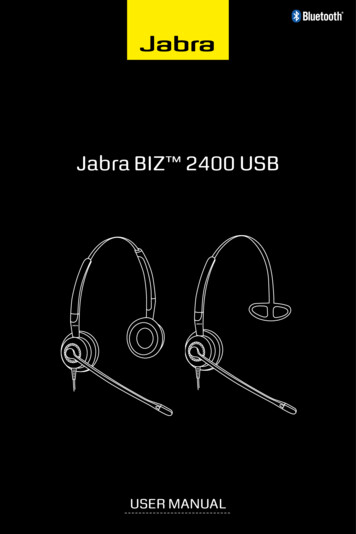
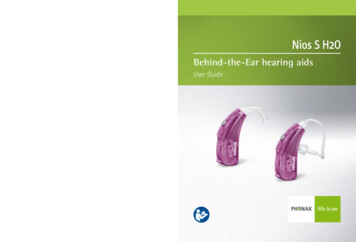
4. Using the hearing aidYour hearing care professional can configure yourhearing aid (push) button as either a volume controlor a program selector.To increase the volume, press the button on yourright hearing aid. To decrease the volume, press thebutton on your left hearing aid (Fig. 1a).DecreasevolumeStep 2. Battery preparationRemove the protective foil from the new battery (Fig. 2).Wait for two minutes before inserting to activate thebattery.IncreasevolumeFig. 2Step 3. Inserting the batteryLeft hearing aidRight hearing aidTake the hearing aid in your hand (Fig. 3a) and openthe battery door. Insert the battery so that you see the symbol on the battery (Fig. 3b).Fig. 1bFig. 3aFig. 1aIn order to change ahearing program, pressthe button displayed(Fig. 1b).14Fig. 3b15
4. Using the hearing aidYour hearing care professional can configure yourhearing aid (push) button as either a volume controlor a program selector.To increase the volume, press the button on yourright hearing aid. To decrease the volume, press thebutton on your left hearing aid (Fig. 1a).DecreasevolumeStep 2. Battery preparationRemove the protective foil from the new battery (Fig. 2).Wait for two minutes before inserting to activate thebattery.IncreasevolumeFig. 2Step 3. Inserting the batteryLeft hearing aidRight hearing aidTake the hearing aid in your hand (Fig. 3a) and openthe battery door. Insert the battery so that you see the symbol on the battery (Fig. 3b).Fig. 1bFig. 3aFig. 1aIn order to change ahearing program, pressthe button displayed(Fig. 1b).14Fig. 3b15
4. Using the hearing aidStep 4. Turning on the hearing aidSwitch on the hearing aid by closing the batterycompartment (Fig. 4).The hearing aid is now switched on. It can take upto 15 seconds before it starts. (When you wear thehearing aid, you will hear an acoustic signal).Step 5. Inserting the hearing aidThis step shows you how to correctly insert the hearingaid. The type of earmold determines how the hearing aidis inserted.Fig. 4Open and close the battery compartment gentlyand carefully.Check if you feel resistance when closing thebattery compartment. Check to make sure thebattery is correctly inserted and in the correctdirection. If the battery is inserted the wrongway, the hearing aid will not work and thebattery compartment can be damaged.16Each hearing aid is individually programmed foryour right or left ear. For the first step identifyright and left so you will be able to insert yourhearing aid in the correct ear.17
4. Using the hearing aidStep 4. Turning on the hearing aidSwitch on the hearing aid by closing the batterycompartment (Fig. 4).The hearing aid is now switched on. It can take upto 15 seconds before it starts. (When you wear thehearing aid, you will hear an acoustic signal).Step 5. Inserting the hearing aidThis step shows you how to correctly insert the hearingaid. The type of earmold determines how the hearing aidis inserted.Fig. 4Open and close the battery compartment gentlyand carefully.Check if you feel resistance when closing thebattery compartment. Check to make sure thebattery is correctly inserted and in the correctdirection. If the battery is inserted the wrongway, the hearing aid will not work and thebattery compartment can be damaged.16Each hearing aid is individually programmed foryour right or left ear. For the first step identifyright and left so you will be able to insert yourhearing aid in the correct ear.17
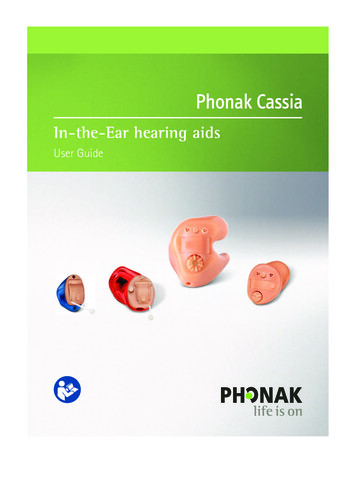
4. Using the hearing aidStep 5.1 Identifying the hearing aid for theright and left earColor indicator:right redleft blueStep 5.2 Inserting the hearing aid with classic earmoldWith your right hand, take your earmold for the rightear (red mark on the hearing aid, see step 5.1) betweenyour thumb and forefinger (Fig. 5b).Take the earmold up to your ear (Fig. 5b). Place the earcanal part of the earmold into your ear canal (see thepart circled in green (Fig. 5b). Next place the hearingaid behind your ear (Fig. 5c). Then insert the upper partof the earmold into the upper part of the bowl of yourear (Fig. 5d).Fig. 5aFig. 5b18Fig. 5cFig. 5d19
4. Using the hearing aidStep 5.1 Identifying the hearing aid for theright and left earColor indicator:right redleft blueStep 5.2 Inserting the hearing aid with classic earmoldWith your right hand, take your earmold for the rightear (red mark on the hearing aid, see step 5.1) betweenyour thumb and forefinger (Fig. 5b).Take the earmold up to your ear (Fig. 5b). Place the earcanal part of the earmold into your ear canal (see thepart circled in green (Fig. 5b). Next place the hearingaid behind your ear (Fig. 5c). Then insert the upper partof the earmold into the upper part of the bowl of yourear (Fig. 5d).Fig. 5aFig. 5b18Fig. 5cFig. 5d19
4. Using the hearing aidIf you have problems inserting the hearing aid, useyour other hand to gently pull your earlobe downwards.This opens the ear canal a little more and you canrotate the earmold until it fits correctly.Check the fit by running your finger over the bowl ofthe ear. You know it fits correctly if, when doing so, youfeel the contour of the bowl of the ear and not thehearing aid (Fig. 5e). In the beginning, please use a mirrorto check.Step 5.3 Inserting the hearing aid with a domeWith your right hand, place the right hearing aid (redmark on the hearing aid, see step 5.1) behind yourright ear (Fig. 5f). Place the hearing tube between yourthumb and forefinger. Insert the dome deep enoughinto the ear canal so that the hearing tube lies flat onyour ear (Fig. 5g). If your hearing aid has a retentioncord, then press it into the bowl of the ear in order toretain the dome in the ear canal (Fig. 5h).Fig. 5eFig. 5fFig. 5gFig. 5hYou have now successfully inserted the right hearingaid. Now insert your left hearing aid in the same way(marked in blue, see step 5.1).2021
4. Using the hearing aidIf you have problems inserting the hearing aid, useyour other hand to gently pull your earlobe downwards.This opens the ear canal a little more and you canrotate the earmold until it fits correctly.Check the fit by running your finger over the bowl ofthe ear. You know it fits correctly if, when doing so, youfeel the contour of the bowl of the ear and not thehearing aid (Fig. 5e). In the beginning, please use a mirrorto check.Step 5.3 Inserting the hearing aid with a domeWith your right hand, place the right hearing aid (redmark on the hearing aid, see step 5.1) behind yourright ear (Fig. 5f). Place the hearing tube between yourthumb and forefinger. Insert the dome deep enoughinto the ear canal so that the hearing tube lies flat onyour ear (Fig. 5g). If your hearing aid has a retentioncord, then press it into the bowl of the ear in order toretain the dome in the ear canal (Fig. 5h).Fig. 5eFig. 5fFig. 5gFig. 5hYou have now successfully inserted the right hearingaid. Now insert your left hearing aid in the same way(marked in blue, see step 5.1).2021
4. Using the hearing aidIf you have problems inserting the hearing aid, useyour other hand to gently pull your earlobe downwards.This opens the ear canal a little more and you canrotate the dome until it fits correctly.You have now successfully inserted the right hearingaid. Now insert your left hearing aid in the same way(marked in blue, see step 5.1).Step 5.4 Inserting the hearing aid with a SlimTipFollow the instructions in Step 5.3, as this procedureis identical.Step 6. Adjusting the volume control behind the earYour hearing care professional can configure yourhearing aid (push) button as either a volume control ora program selector.To increase the volume, press the button on your righthearing aid. To decrease the volume, press the buttonon your left hearing aid. Use your thumb to lightlysupport the hearing aid (Fig. 6a).Decrease volumeLeft hearing aidIncrease volumeRight hearing aidFig. 6a2223
4. Using the hearing aidIf you have problems inserting the hearing aid, useyour other hand to gently pull your earlobe downwards.This opens the ear canal a little more and you canrotate the dome until it fits correctly.You have now successfully inserted the right hearingaid. Now insert your left hearing aid in the same way(marked in blue, see step 5.1).Step 5.4 Inserting the hearing aid with a SlimTipFollow the instructions in Step 5.3, as this procedureis identical.Step 6. Adjusting the volume control behind the earYour hearing care professional can configure yourhearing aid (push) button as either a volume control ora program selector.To increase the volume, press the button on your righthearing aid. To decrease the volume, press the buttonon your left hearing aid. Use your thumb to lightlysupport the hearing aid (Fig. 6a).Decrease volumeLeft hearing aidIncrease volumeRight hearing aidFig. 6a2223
4. Using the hearing aidStep 7. Selecting the hearing program behind the earStep 8. Removing the hearing aidIn order to select or change a hearing program, pressthe program button displayed (Fig. 7a).Step 8.1 Removing the hearing aid with classicearmoldTake the hearing aid from behind your ear (do not touchthe tube!) and lift it above the upper part of your earand then gently let go (Fig. 8a).Fig. 8aFig. 7aIf you press it again, you change to the next program.A signal indicates the change.A signal tone can only be easily heard if you have turnedon the hearing aids and you are wearing it correctlybehind the ear.Use your thumb and forefinger to grasp the earmoldin your ear (not the tube!) and gently remove it fromyour ear (Fig. 8b).Fig. 8b2425
4. Using the hearing aidStep 7. Selecting the hearing program behind the earStep 8. Removing the hearing aidIn order to select or change a hearing program, pressthe program button displayed (Fig. 7a).Step 8.1 Removing the hearing aid with classicearmoldTake the hearing aid from behind your ear (do not touchthe tube!) and lift it above the upper part of your earand then gently let go (Fig. 8a).Fig. 8aFig. 7aIf you press it again, you change to the next program.A signal indicates the change.A signal tone can only be easily heard if you have turnedon the hearing aids and you are wearing it correctlybehind the ear.Use your thumb and forefinger to grasp the earmoldin your ear (not the tube!) and gently remove it fromyour ear (Fig. 8b).Fig. 8b2425
4. Using the hearing aidStep 8.2 Removing the hearing aid with a domeStep 9. Turning off the hearing aidGrasp the hearing aid by the hearing tube andcarefully remove it from your ear (Fig. 8c).You can turn off your hearing aid by opening the batterycompartment (Fig. 9).Fig. 8cIn very rare cases, the dome can remain in yourear canal when removing the hearing tube from theear. In the unlikely case that the dome does getstuck in your ear canal, it is strongly recommendedto see a physician for safe removal.Fig. 9Step 8.3 Removing the hearing aid with SlimTipFollow the instructions in Step 8.2, as this procedureis identical.2627
4. Using the hearing aidStep 8.2 Removing the hearing aid with a domeStep 9. Turning off the hearing aidGrasp the hearing aid by the hearing tube andcarefully remove it from your ear (Fig. 8c).You can turn off your hearing aid by opening the batterycompartment (Fig. 9).Fig. 8cIn very rare cases, the dome can remain in yourear canal when removing the hearing tube from theear. In the unlikely case that the dome does getstuck in your ear canal, it is strongly recommendedto see a physician for safe removal.Fig. 9Step 8.3 Removing the hearing aid with SlimTipFollow the instructions in Step 8.2, as this procedureis identical.2627
4. Using the hearing aidStep 10. Changing the batteryBefore the battery is completely empty, your hearingaid will indicate to you that the battery soon needs tobe changed with an acoustic signal. Once thishappens, you have about 30 minutes (in some caseslonger) to change the battery. The battery warningsignal is repeated every half hour. We recommend thatyou always keep a spare battery on hand.After you have opened the battery compartment, pushthe battery out of the battery compartment with thesupport of a pen back (Fig. 11a). Insert the new batteryso that you see the symbol on the battery (Fig. 11b).Push the plastic tab towards the battery (Fig. 11c).Step 11. Changing the battery in hearing aids with asecured battery compartmentFig. 11aFig. 11bFig. 11cFig. 11dThe hearing aid has a secured battery compartment forsafety reasons.Close the battery compartment. The battery is nowlocked in position and cannot be removed (Fig. 11d).2829
4. Using the hearing aidStep 10. Changing the batteryBefore the battery is completely empty, your hearingaid will indicate to you that the battery soon needs tobe changed with an acoustic signal. Once thishappens, you have about 30 minutes (in some caseslonger) to change the battery. The battery warningsignal is repeated every half hour. We recommend thatyou always keep a spare battery on hand.After you have opened the battery compartment, pushthe battery out of the battery compartment with thesupport of a pen back (Fig. 11a). Insert the new batteryso that you see the symbol on the battery (Fig. 11b).Push the plastic tab towards the battery (Fig. 11c).Step 11. Changing the battery in hearing aids with asecured battery compartmentFig. 11aFig. 11bFig. 11cFig. 11dThe hearing aid has a secured battery compartment forsafety reasons.Close the battery compartment. The battery is nowlocked in position and cannot be removed (Fig. 11d).2829
5. Care and maintenanceDiligent and routine care of your hearing aidcontributes to outstanding performance and a longservice life.Nios S H2O hearing aids modified with either thedesign integrated FM receiver or tamperproofbattery door are also WaterResistant.Please use the following specifications as a guideline:Nios S H2O hearing aids modified with a batterycompartment allowing use of an audio shoe anduniversal FM receiver, are no longer WaterResistant.General informationBefore using hair spray or applying cosmetics, youshould remove your hearing aid from your ear, becausethese products may damage it.Nios S H2O is WaterResistant!Nios S H2O hearing aids are resistant to water(including temporary immersion), sweat and dust underthe following conditions:J The battery door is fully closed. Ensure that noforeign objects such as hair is caught in the batterydoor when it is closed.J After exposure to water, sweat or dust, the hearingaid is rinsed in fresh water and dried.J The hearing aid is used and maintained as describedin this user guide.30Always remove your hearing aid before diving,snorkeling, waterskiing or other activities where itcould be immersed for an extended period of timeor subject to excessive force.Use of your hearing aid in and around water canrestrict air flow to the batteries causing it to stopworking. Should your hearing aid stop workingafter coming into contact with water, refer to thetroubleshooting steps in chapter 6.31
5. Care and maintenanceDiligent and routine care of your hearing aidcontributes to outstanding performance and a longservice life.Nios S H2O hearing aids modified with either thedesign integrated FM receiver or tamperproofbattery door are also WaterResistant.Please use the following specifications as a guideline:Nios S H2O hearing aids modified with a batterycompartment allowing use of an audio shoe anduniversal FM receiver, are no longer WaterResistant.General informationBefore using hair spray or applying cosmetics, youshould remove your hearing aid from your ear, becausethese products may damage it.Nios S H2O is WaterResistant!Nios S H2O hearing aids are resistant to water(including temporary immersion), sweat and dust underthe following conditions:J The battery door is fully closed. Ensure that noforeign objects such as hair is caught in the batterydoor when it is closed.J After exposure to water, sweat or dust, the hearingaid is rinsed in fresh water and dried.J The hearing aid is used and maintained as describedin this user guide.30Always remove your hearing aid before diving,snorkeling, waterskiing or other activities where itcould be immersed for an extended period of timeor subject to excessive force.Use of your hearing aid in and around water canrestrict air flow to the batteries causing it to stopworking. Should your hearing aid stop workingafter coming into contact with water, refer to thetroubleshooting steps in chapter 6.31
5. Care and maintenance6. TroubleshootingDailyInspect the earmold and tube for earwax and moisturedeposits. Clean the surfaces with a lint-free cloth.Never use cleaning agents such as household detergents,soap, etc. for cleaning your hearing aid. If you needto clean your hearing aid intensively, ask your hearingcare professional for advice and information on filtersor drying capsules.Hearing aids sound softer than usual / no soundFirst check whether you can adjust and make thesound louder with the volume control. Then check thehearing tube and earmold for earwax residue andclean if necessary. Check whether the battery is correctlyinserted and properly fitted, adjust the fit if necessary.If there is no improvement, change the battery. If theproblem persists, contact your hearing care professional.WeeklyClean the earmold with a soft, damp cloth or witha special cleaning cloth for hearing aids. For more indepth maintenance instructions or for more thanbasic cleaning, please see your hearing care professional.Hearing aid stops working after contact with waterRinse the hearing aid in fresh water and dry it with asoft cloth or tissue. Open the battery compartment,allow the hearing aid to dry and replace the battery.Should any water be present in the hearing tube, removeit from the hearing aid, tap it gently to disperse thewater and re-attach it to the hearing aid. If the problempersists, contact your hearing care professional.MonthlyInspect your hearing tube for color changes, hardening,or
A hearing aid will not restore normal hearing and will not prevent or improve a hearing impairment resulting from organic conditions. Infrequent use if skin irritation or accelerated accumulations of of a hearing aid does not permit a user to attain full benefit from it. The use of a hearing aid is only professional or physician.