Transcription
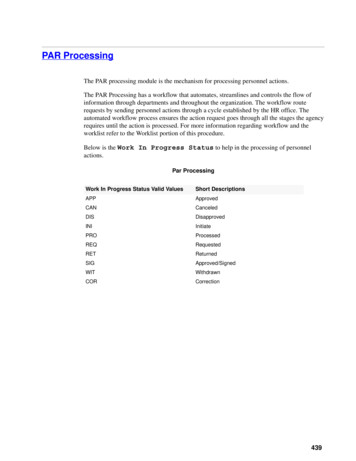
PAR ProcessingThe PAR processing module is the mechanism for processing personnel actions.The PAR Processing has a workflow that automates, streamlines and controls the flow ofinformation through departments and throughout the organization. The workflow routerequests by sending personnel actions through a cycle established by the HR office. Theautomated workflow process ensures the action request goes through all the stages the agencyrequires until the action is processed. For more information regarding workflow and theworklist refer to the Worklist portion of this procedure.Below is the Work In Progress Status to help in the processing of personnelactions.Par ProcessingWork In Progress Status Valid ValuesShort roved/SignedWITWithdrawnCORCorrection439
This section presents the following topics:Action Table SetupHire EmployeeOrg Structure Mass ChangeUpdate Reports ToMass Reports To UpdateAddress ProcessingAdjudication InformationSchoolsLC Initiate PARLC Approve PARWho Has The PARHR ProcessingUpdate Applied ActionCorrect Applied ActionCancel Applied ActionHistory CorrectionUpdate NFC FlagsCreate New OpridEmployee Password ResetMass ActionsDepartmental TransferEmployee Security ClearanceAction Table SetupTo modify or add an Action Table Setup:1. Select the PAR Processing menu group.2. Select the Action Table Setup component. The Find An Existing Value tab - ActionTable page is displayed. The information on this page will allow you to locate existingdata in order to enter or change the applicable information. Enter the search criteria.3. Click Search. The Action Table tab page (Figure 308 )is displayed.ORSelect the Add A New Value tab - Action Table page is displayed. The information onthis page will allow you to add data in order to enter new information. Enter the newcriteria.4. Click Add. The Action Table tab page (Figure 308) is displayed.440
Figure 308. Action Table tab page5. Complete the fields as follows:CompanyThis field is populated from the existing value or add a value page.ActionThis field is populated from the existing value or add a value page.*Effective DateThis the date on which a table row becomes effective; the date that an actionbegins. This date also determines when to view and change the information.*StatusThis field defaults to Active. Change by selecting data from the drop-downlist. The valid values are Active, Freeze, and Inactive.DescriptionEnter the description of the table that corresponds to the action type.Short DescriptionEnter the short description of the table that corresponds to the action type.441
6. Click Save. The transaction will be saved.ORClick Add to add another action table.ORClick Update/Display.to update the page.ORClick Correct History to correct a history record.ORClick Include History to include a history record.Hire EmployeeThis section explains how to process an Appointment. See the Guide to Processing PersonnelActions, Chapter 9, at http://www.opm.gov/feddata/gppa/gppa.asp for more information.Note: Be sure to verify that manage position information is correct and does not requiremodification. Modify manage position actions prior to inputting a personnel action.If a Pay Adjustment requires a change to the employee’s pay plan or grade, i.e. from GM toGS pay plan, the employee’s position must reflect that change.When an employee leaves one of the agencies serviced by EmpowHR and transfers to aNon-EmpowHR agency that is serviced by NFC, the losing agency must process an actionwhich will code the employee as terminated in the EmpowHR application only and will notbe sent to NFC. The action will be coded EmpowHR Only in the status box.To Hire an Employee:1. Select the PAR Processing menu group.2. Select the Hire Employee component. The Add A New Value tab - Hire Employee USFpage is displayed. The information on this page will allow you to add data in order toenter new information. Enter the new criteria.3. Click Add. The Data Control tab - Hire Employee USF page (Figure309 ) is displayed.This will allow the system to automatically assign the Employee ID (EmplID) numberand assigned number to indicate a new record. The Data Control tab - Hire Employe442
USF page (Figure 309 ) is displayed. This page is used to record the type of action, thereason for the action and the effective date.Figure 309. Data Control tab - Hire Employee USF page4. Complete the fields as follows:Empl Rcd NbrThis field is populated when the Hire Employee is completed and cannot bechanged. This field is displayed on each page in the hire process.EmplIdThis field is populated when the Hire Employee is completed and cannot bechanged. This field is displayed on each page in the hire process.Effective DateEnter the effective date of the new hire or select a date from the calendar icon.The effective date should always reflect the action date of the Personnel Action.This field is displayed on each page in the hire process. This the date on which atable row becomes effective; the date that an action begins. This date alsodetermines when to view and change the information.Transaction StatusThis field defaults to In Progress. To change the transaction status, selectdate from the drop-down list. The transaction status reflects the status of thetransaction being processed.443
Effective SeqThis field is populated based on the Auth Date.Auth DateEnter the authorization date of the action or select a date from the calendar icon.Contact EmplIDEnter the contact employee identification number or select data by clicking theserach icon.*ActionThis field defaults to HIR (Hire) when processing a New Hire.PAR StatusThis field defaults to INI (Initiated) when the new action is entered.Other valid values are as follows:PAR Status Valid ValuesDescriptionINIInitiated (New Hire)ProProcessed (Processed by HumanResources)RV1RV1*Reason CodeDescribes the Hire Action. Enter the applicable information in this field. Theliteral is displayed after the code is entered.AgencyThis field describes the type of agency processing the hire. This field defaults toFederal. To change, select data from the drop-down list. The valid values areFederal, County, GAO, and LOC.NOA CodeEnter the Nature of Action Code for the action being processed. The literal isdisplayed after the code is entered. Use guidance from the Guide to ProcessingPersonnel Action and the 5 CFR. This field is displayed on each page in the hireprocess.Authority (1)Enter the authority (1) for the NOA. The literal is displayed after the code isentered. Use guidance from the Guide to Processing personnel Action and the5 CFR.444
Authority (2)Enter the authority (2) for the NOA if applicable. The literal is displayed afterthe code is entered. Use guidance from the Guide to Processing personnelAction and the 5 CFR.Not To Exceed DateEnter the ending date of a temporary action (the date the temporary appointmentexpires) or select a date from the calendar icon. This is a required field on alltemporary actions.Employee ClassificationWork Study (LOC)This field defaults to N/A .Click the down arrow to select the classification.PAR Request #Vacancy Number(LOC)Enter the SF-52, Request for Personnel Action number.5. Click the Process Monitor link to print a Standard Form 52 (SF-52), and/or a StandardForm 50 (SF-50). These forms are used for information purposes only and not forOfficial Use.6. Click Report Manager link to view or generate a report. The transaction only appearson this report when the transaction has applied at NFC.7. Click the PAR Remarks link. The PAR Remarks page (Figure 310 )is displayed.If the Nature of Action is a resignation, the remarks must include the forwardingaddress.The purpose of PAR Remarks is to record items of information, which relate to theactions being taken and which are required for documentation purposes. The remarkcode can be typed in the field or selected from the search list. (For codes, check theguide to Processing Personnel Actions). There is a limit of up to 10 remarks that can beadded. If a remark contains **** within the text, this indicates that data must beadded to the remark statement. The asterisks must be removed from the text, if not,EmpowHR will think that no data was entered and give an error message.445
Figure 310. PAR Remarks page8. Enter the fields as follows:Remark CodeEnter the 3 position remark code or select data by clicking the search icon. Thetab key generates the specific code.Insertion RequiredCheck the box if applicable.PAR RemarksPAR remarks are items of information which relate to the actions and arerequired for documentation purposes. There is a limit of up to 10 remarks peraction. The remark code can be typed in the field or data can be selected fromthe search list.9. Click to add an additional remarks code.10. Click OK to save the remarks. The Data Control tab - Hire Employee USFpage (Figure 309 )is displayed.ORClick Cancel. The remarks information is not saved. The Data Control tab - HireEmployee USF page (Figure 309 )is displayed.Note: The Award Data link is not activated until an employee exists in the EmpowHRapplication.11. Click the Tacking Data link. The PAR Tracking Data page (Figure 311) is displayed.This page displays information needed to track a PAR action taken on the employee.446
There are three tabs on this page Tracking Data User Information, and Comments.Each tab displays a view only version of the status and where the PAR is in theprocess.Figure 311. PAR Tracking Data page12. Click OK. The Data Control tab - Hire Employee USF page (Figure 309 ) is displayed.ORClick Cancel. The information is not saved. The Data Control tab - Hire EmployeeUSF page (Figure 309 ) is displayed.13. Click the Justification link. The Justification page (Figure 312 ) is displayed.447
Figure 312. PAR Justification page14. Complete the fields as follows:ContactEnter the contact name for the PAR.LCREnter the Library of Congress requester name.Recommending OfficialEnter the name of the recommending official for the PAR.PAR JustificationEnter the justification for the creation of the PAR.15. Click OK to save the remarks. The Data Control tab - Hire Employee USFpage (Figure 309 ) is displayed.ORClick Cancel. The remarks information is not saved.16. Click View Edit Errors link to view any errors for the PAR. The View Edit Errorspage (Figure 313) is displayed.448
Figure 313. View Edit Errors pageNote: If not errors exist the No Validation Errors Exist for this Personnel Actionpop-up (Figure314) is displayed.Figure 314. No Edit Validation Error Exist For This Personnel Action pop-up17. Click OK the Data Control tab - Hire Employee USF page (Figure309) is displayed.18. Click the GPPA Website link. The GPPA Website page (Figure 315) is displayed. Thisis a website the resides outside of the EmpowHR application.449
Figure 315. GPPA Website page19. Close the window and return to the EmpowHR application.20. Click Print SF-52. The copy of the Request For Personnel Action formpage (Figure 316) is displayed. Print the form from this page.Figure 316. Request For Personnel Action form page21. Close the window and return to the Data Control tab -Hire Employee USFpage (Figure309).450
Note: The Print SF-50 option is not available until the employee is hired.22. Click Add Attachment to add an attachment to the the PAR. The Add Attachment pageis displayed (Figure 317).Figure 317. Add Attachment page23. Click Browse. to select the document to attach.24. Click Upload. To attach the document.ORClick Cancel. The Data Control tab - Hire employee USF page (Figure309) isdisplayed.Note: Do not click Save at this time. Click Save when the PAR is complete.25. Click Validate Edits. The Validate Edits page (Figure 318) is displayed. This optioncan only be used after the PAR has been completed and saved.451
Figure 318. Validate Edits page26. Select the Personal Data tab - Hire Employe USF page. The Personal Data tab - HireEmployee USF page (Figure 319 ) is displayed. The Personal Data tab stores personalinformation for the employee. The links at the bottom of the page allows the storage ofAdditional Birth Info, Mailing Address, Personal Phone Numbers, Veterans Info,Marital Info, and Education Details. These links are selected after the Personal Datapage has been completed.Note: The Personal Phone Numbers and Marital Info links can be completed but arenot sent to NFC.452
Figure 319. Personal Data tab - Hire Employee USF page27. Complete the fields as follows:EmplIDThis field populate from the add a value or search page.Empl Rcd#This field is populated from the add a value page.Effective DateThis field is populated. This field displays the order that documents areprocessed when more than one action is entered with the same effective date.Transaction #/SeqThis field is populated.PAR StatusThis field is populated from the Data Control tab.NOA CodeThis field is populated from the Data Control tab.Act TypeThis field is populated from the Hire Employee component.453
Empl StatusThis field is populated.FirstOn New Hires enter the full name of the employee. Enter the first name of theemployee. The First name includes upper and lower case letters. If all uppercase letters are used, the name will appear out of order on the reports. The firstname plus the suffix cannot exceed twenty characters.MiddleEnter the middle name if applicable.LastOn New Hires enter the full name of the employee. Enter the last name of theemployee. The Last name includes upper and lower case letters. If all upper caseletters are used, the name will appear out of order on the reports.SuffixEnter the applicable information or select data from the drop-down list. Thevalid values are:Suffix Valid ValuesIIIIIIIVJrSrVVINameOn New Hires enter the full name of the employee. Enter the employee’s fullname.Pref First NameEnter the employee’s preferred first name, if applicable.Gender MaleThis code indicates the sex of the employee. Check this box if the gender of theemployee is male. This is a required field.454
Gender FemaleThis code indicates the sex of the employee. Check this box if the gender of theemployee is female. This is a required field.*Date Of BirthThis field is the employee’s date of birth. Enter the date (MM/DD/YYYY) orselect a data from the calendar icon. This is a required field.*CountryThis field is populated.CitizenshipEnter the applicable Citizenship Status or select data by clicking the search icon.This field identifies the citizenship status of the employee.Disability CodeEnter the applicable Disability Code or click the icon to search for theapplicable code. This field defaults to 05 No Handicap. Change data byclicking the search icon. This code indicates whether or not an employee has aphysical or mental disability.RNOThe Race and National Origin code describes the minority group category intowhich the employee has been categorized. Enter the applicable information orselect data by clicking the search icon. This is a required field. For moreinformation refer to Guide to Processing Personnel Actions and/or NFCprocedure manual.Date Of DeathEnter the date (MM/DD/YYYY).Draft StatusClick the down arrow and make the applicable selection. This field reflect anemployee’s registration status with the draft board. The valid values are NotApplicable, Not Yet Registered, and Registered.*Highest Education LevelEnter the highest level of education for the employee or select data from thedrop-down list. The valid values are:Highest Education Level Valid Values1 Yr College2 Yr College455
Highest Education Level Valid Values3 Yr College4 Yr College - No Degree6th-Yr DegreeAssociates DegreeBachelor’s DegreeCompl Terminal Occupational PgDoctorate DegreeElementary School CompletedFirst ProfessionalHS Graduate or EquivalencyMaster’s DegreePost-Bachelor’s WorkPost-Doctorate WorkPost-First ProfessionalPost-Master’s WorkSome CollegeSome HS Didn’t GraduateSome Terminal Occup PrgCountryEnter the applicable Country Code or select data by clicking the search icon.This field defaults to USA.*Type/DescriptionEnter the applicable information or select data from the drop-down list. Thevalid value is PR.National IDEnter the applicable National ID (social security number).28. Click the Additional Birth Info link at the bottom of the Personal Data tab - Hireemployee USF page (Figure 319 ). The Addl Birth Info page (Figure 320 ) isdisplayed. The information on the page can be entered; however, this information isnot sent to NFC.456
Figure 320. Addl Birth Info29. Complete the fields as follows:Birth LocationEnter the birth location of the employee.Birth StateEnter the birth state of the employee or select data from the drop-down list.Birth CountryThis field defaults to USA. To change, select data by clicking the search icon.30. Click OK to save the information. The Personal Data tab - Hire Employee USFpage (Figure 319 ) is displayed.ORClick Cancel to cancel the information on the page. The Personal Data tab - HireEmployee USF page (Figure 319 ) is displayed.31. Click the Mailing Address link at the bottom of the page (Figure 319 ). The EnterAddress Information page (Figure 321 ) is displayed and is used to record theemployee’s home address. For a New Hire this mandatory.457
Figure 321. Address Information page32. Complete the fields as follows:Effective DateThis field is populated from the Data Control tab - Hire Employee USF page.Tansaction StatusThis field is populated from the Data Control tab - Hire Employee USF page.Home/Address 1Enter the applicable information.Home/Address 2Enter the applicable information.Home/Address 3Enter the applicable information.Home/CityEnter the city or select data by clicking the search icon.Home/StateEnter the state.458
Home/Zip CodeEnter the zip code.Home/CountyEnter the county.Home/CountryThis field defaults to USA(United States) or search by clicking thesearch icon.Check Mailing/Address1Enter the applicable information.Check Mailing/Address 2Enter the applicable information.Check Mailing/Address 2Enter the applicable information.Check Mailing/Address 3Enter the applicable information.Check Mailing/CityEnter the city or select data by clicking the search icon.Check Mailing/StateEnter the state.Check Mailing/PostalCode - OtherEnter the zip code.Check Mailing/CountyEnter the county.Check Mailing/CountryThis field defaults to USA(United States) or search by clicking thesearch icon.33. Click OK to save the address information. The Personal Data tab - Hire EmployeeUSF page (Figure 319 ) is displayed.OR459
Click Cancel. The Personal Data tab - Hire Employee USF page (Figure 319 ) isdisplayed.34. Click the Phone Nbrs link at the bottom of the page. The Personal Phone Numberspage (Figure 323) is displayed. The Personal Phone Numbers page (Figure 323 ) isused to record all types of phone number for the employee.Figure 322. Personal Phone Numbers window*Phone TypeEnter the phone type or select data from the drop-down list. The valid values areas follows:Phone Type Valid ValuesBusinessCampusDormitoryFaxFlex PhHomeMainMobileOtherPager 1Pager 2Telex460
Effective DateThis field is populated.TelephoneEnter the telephone number that corresponds to the phone type.Phone ExtensionEnter the telephone extension if applicable.PreferredCheck this box if the telephone number entered is the preferred number to call.35. Click OK to save the phone information. The Personal Data tab - Hire Employee USFpage (Figure 319 ) is displayed.ORClick to add an additional phone number.ORClick to delete a phone number.ORClick Cancel. The Personal Data tab - Hire Employee USF page (Figure 319 ) isdisplayed.36. Click the Veterans Info link at the bottom of the page. The Veterans Infopage (Figure 323) is displayed. The Veterans Info page (Figure 323 ) is used to recordany applicable veteran’s information for an employee.461 page
If a Pay Adjustment requires a change to the employee’s pay plan or grade, i.e. from GM to GS pay plan, the employee’s position must reflect that change. When an employee leaves one of the agencies serviced by EmpowHR and transfers to a Non-EmpowHR agency that is serviced by NFC, the losing agency must process an actionFile Size: 1MB