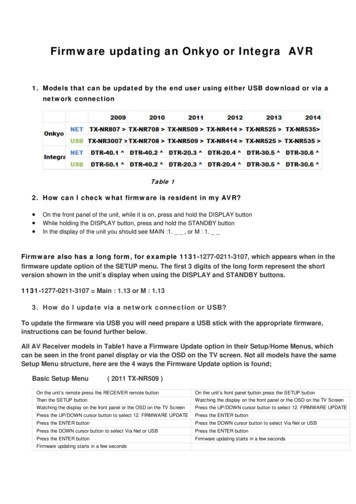
Transcription
NS-6130Language select / Sélection de la langue / Selección de idioma / Selezione lingua / Sprachauswahl / Taal selecteren / Välj landsSvenska
Before Start Part Names Install Initial Setup PlaybackSupplementary information Advanced Setup OthersNETWORK AUDIO PLAYERNS-6130InstructionManualBefore StartWhat's in the box . 2Part NamesFront Panel . 3Rear Panel . 4Remote Controller . 5Display . 6InstallConnections with an amplifier . 7Connecting the power cord, etc. . 9Initial SetupPower On & Initial Setup . 10PlaybackUSB Storage Device/HDD . 12Internet Radio . 14Spotify . 15AirPlay . 16Music Server . 17Entering text . 19Supplementary informationSupplementary information for player functions . 20Advanced SetupAdvanced Settings. 21Firmware Update . 24OthersTroubleshooting . 26General Specifications . 28License and Trademark Information . 29EN
Before Start Part Names Install Initial Setup PlaybackSupplementary information Advanced Setup OthersWhat's in the boxBefore StartENMain unit (1)Power cord (1)Remote controller (RC-942E) (1), Batteries (AAA/R03) (2)Analog audio cable (1)RI cable (1)20 The power cord must be connected only after all other cable connections are completed.0 We will not accept responsibility for damage arising from the connection of equipmentmanufactured by other companies.0 Functionality may be introduced by firmware updates and service providers may ceaseservices, meaning that some network services and content may become unavailable inthe future.0 Specifications and appearance are subject to change without prior notice.
Before Start Part Names Install Initial Setup PlaybackSupplementary information Advanced Setup OthersFront PanelPart Names 1. ÍON/STANDBY button: Turns the unit on or to standby mode.2. Remote control sensor3. Display ( P6)4. Play button: : This button stops playback.1/; : Play or pause play.5. MENU/ENTER dial (:/9)When playing, turn left or right to select the folder or file, then press to confirm.Press and hold to show the settings screen. While the menu is displayed, turn the dial toselect items and press to confirm the settings.0 Depending on the input, the operation may not start.6. USB port: Connect a USB storage device or HDD (hard disk drive) to play music files. You canalso supply power (maximum 5 V/0.5 A) to USB devices with a USB cable.0 When connecting a HDD that requires more than 5 V/0.5 A, connect to the USB port(maximum 5 V/1 A) on the rear of the unit. EN 7. DISPLAY button: Switches the information on the display.8. INPUT button: Switches the input to be played.9. RETURN button: Returns to the previous screen.3
Before Start Part Names Install Initial Setup PlaybackSupplementary information Advanced Setup OthersRear Panel EN 90 180 1. AC INLET: Connect the supplied power cord.2. Wireless antenna: Used for Wi-Fi connection. Adjust their angles according to theconnection status.3. USB port: Connect a USB storage device or HDD (hard disk drive) to play music files. Youcan also supply power (maximum 5 V/1 A) to USB devices with a USB cable.4. AUDIO OUTPUT DIGITAL COAXIAL jack: Connect a pre-main amplifier with digitalcoaxial cable.5. ETHERNET jack: Connect to the network with an ethernet cable.6.REMOTE CONTROL jack: Connect an Onkyo product with an RI jack using theincluded RI cable to synchronized with this unit. ( P8)7. AUDIO OUTPUT ANALOG jacks: Connect a pre-main amplifier with the included analogaudio cable.4
Before Start Part Names Install Initial Setup PlaybackSupplementary information Advanced Setup OthersRemote Controller 1.2.3.4.Í button: Turns the unit on or into standby mode.DIMMER button: Switch the display off or adjust the brightness of the display in two steps.INPUT SELECTOR buttons: Switches the input to be played.Play buttons::: Move to the track before the one being played./;: Play or pause play.9: Move to the next track. : Stop playback.0 Depending on the input, the operation may not start.5. REPEAT button: Set repeat play.SHUFFLE button: Set shuffle play.6. CLEAR button: Used when entering text, etc7. TOP MENU button: Move to the top menu of the selected input.8. Cursors, ENTER button: Select the item with the cursors and press ENTER to confirm.9. SETUP button: Displays the setup menu.10.Amplifier control buttonsUse to switch the input, adjust the volume, etc., of an Onkyo pre-main amplifier.0 Operation may not be possible with some amplifiers.11. Í AMP button: Switch an Onkyo pre-main amplifier between on and standby.0 Operation may not be possible with some amplifiers.12.DISPLAY button: Switches the information on the display.13.NOW PLAYING button: When you have changed the display during play, for example, thisbutton returns the display to show information about the file being played.14.button: Returns the display to the previous state.EN0 22 and 11 are not used.Approx. 5 m30 30 5
Before Start Part Names Install Initial Setup PlaybackSupplementary information Advanced Setup OthersDisplay ASb DSD 1. ASb: Lights when "Auto Standby" ( P22) is set to "On".2. DSD: Lights when the audio signal being input is DSD.3. Lights when remote controller cursor operations are possible.4. Displays the play status.5. DIMMER indicator: Lights when you have pressed DIMMER to turn the display off.6. Message display: Displays information about tracks and menus.0 Characters that cannot be displayed on this unit are replaced with asterisks ( * ).0 The following icons are displayed.: Folder: Track title: Playing: Paused: Artist: Album: 1-track repeat: Repeat within a folder: Shuffle0 When DIMMER is pressed to turn off the display, the unit may appear the same as if you6had unplugged the unit from the power outlet, but electricity is still being supplied to theunit. To completely cut the unit off from the power supply, you need to unplug the powerplug (shutoff device) unit from the power outlet.EN
Before Start Part Names Install Initial Setup PlaybackSupplementary information Advanced Setup OthersConnections with an amplifierInstallENNS-61301a12bORa2aIntegrated amplifier, AV receiver, etc.You can play the audio from network features such asinternet radio through speaker systems connected to premain amplifiers or AV receivers. Connect to suit the inputjacks on your amplifier.Connecting with an analog audio cablea Analog audio cable, b Digital coaxial cableThe signal is converted to analog in the D/A converter ofthis unit and then output to the pre-main amplifier. Connectthe LINE IN jacks on a pre-main amplifier with the includedanalog audio cable to the AUDIO OUTPUT ANALOG jackon this unit.Connecting with a digital coaxial cableThe signal is converted to analog in the D/A converter ofthe pre-main amplifier. Connect the COAXIAL IN jacks on apre-main amplifier with a digital coaxial cable to the AUDIO7
Before Start Part Names Install Initial Setup PlaybackSupplementary information Advanced Setup OthersOUTPUT DIGITAL COAXIAL jack on this unit.Connecting with Onkyo RI ComponentsBy connecting an Onkyo component with RI jack to the unitby using an optional RI cable and an analog audio cable,you can link the unit's power and input selection and enableoperation with this unit's remote controller. For details, referto the instruction manual of the component with the RI jack.0 Some components may not support all RI functions.NS-6130aAmplifiera RI cable8EN
Before Start Part Names Install Initial Setup PlaybackSupplementary information Advanced Setup OthersConnecting the power cord, etc.1Power cord connection2aaENThis model includes a removable power cord.The power cord must be connected only after all otherconnections are completed. Make sure you first connect thepower cord to AC INLET terminal of the unit and thenconnect to the outlet. Always disconnect the outlet side firstwhen disconnecting the power cord.Ethernet cable connectionTo connect to the network with an ethernet cable, use theETHERNET jack. When using Wi-Fi connection, makesettings in initial settings ( P10). You can enjoy featuressuch as internet radio and AirPlay by connecting to thenetwork.a Power cord9
Before Start Part Names Install Initial Setup PlaybackSupplementary information Advanced Setup OthersPower On & Initial SetupInitial Setup1Starting up: When you press Í, "Now Initializing." isdisplayed on the display. After this, when "Now Initializing."goes out, you can start operating the unit.2Wi-Fi connection settingsWhen you first turn the power on, the Network Setup screenis displayed automatically, allowing you to easily make Wi-Ficonnection settings.Network SetupNetwork SetupTo set, select the item with the cursors on the remotecontroller and press ENTER to confirm.0 To return to the previous display, press.0 Turn MENU/ENTER on the main unit to the left and rightto select the item, then press the dial to confirm.1. Press ENTER when "Network Setup" is displayed.2. To make Wi-Fi settings, select "Wi-Fi". If you haveconnected with an ethernet cable, select "Wired(Exit)"with / on the remote controller and press ENTER.Wi-FiWired ( Exit )3. If you selected "Wi-Fi", select the setting method with10/EN
Before Start Part Names Install Initial Setup PlaybackSupplementary information Advanced Setup Otherson the remote controller and press ENTER.PasswordiOS devicePush ButtonScan NetworksInput SSID0 To redo the initial settings, press SETUP on the remotecontroller, select "Wi-Fi" in "Network" - "Connection",then select "Wi-Fi Setup". iOS deviceSet by sharing the iOS device's Wi-Fi settings with this unit.1. Connect the iOS device by Wi-Fi.2. Select this device in the "SET UP NEW AIRPLAYSPEAKER." item on the screen of the iOS device andselect "Next".0 This unit is displayed as "Onkyo NS-6130 XXXXXX".3. After "Check Network" is displayed on this unit, when theWi-Fi settings are complete, the display changes. Select"Done" on the screen of the iOS device. Scan NetworksFrom the list of SSID for access points such as wirelessLAN routers, select the required SSID and make thesettings.1. Select the SSID of the access point you want to connectwith / on the remote controller and press ENTER.My SSID2. Select "Password" or "Push Button" with / on theremote controller and press ENTER. If the access pointhas an automatic connection button, by selecting "PushButton" you can connect without entering a password."WEP", "WPA", or "WPA2", enter the password andconfirm.3. After "Check Network" is displayed, the information of thedisplay switches when the Wi-Fi settings are complete.0 If "Retry" appears on the display, press ENTER to retrythe settings.EN3. If you select "Password", enter the password of theaccess point. For details on how to enter text, refer to"Entering text" ( P19).If you select "Push Button", then after pressing andholding the automatic setting button on the access pointfor the required amount of time, press ENTER on theremote controller.4. After "Check Network" is displayed, the information of thedisplay switches when the Wi-Fi settings are complete.0 If "Retry" appears on the display, press ENTER to retrythe settings. Enter SSID of the access pointSet by entering the SSID of the access point you want toconnect.1. Enter the SSID. For details on how to enter text, refer to"Entering text" ( P19).2. Select the authentication method with / on theremote controller and press ENTER.NoneWEPWPAWPA20 If you select "None", proceed to step 3. If you select11
Before Start Part Names Install Initial Setup PlaybackSupplementary information Advanced Setup OthersUSB Storage Device/HDDPlaybackBasic operations1You can play music files by connecting a USB storagedevice or HDD (hard disk drive) to the USB port on the frontor rear of the unit.0 The USB port on the front supports a maximum 5 V/0.5 Apower supply. If the HDD requires more than this,connect to the USB port (maximum 5 V/1 A) on the rearof the unit.1. Turn the unit on.2. Press USB to select "USB (F)" (USB port on the frontpanel) or "USB (R)" (USB port on the rear panel).bca2USB ( F )efd3. Plug your USB storage device or HDD into the USB porton the front or rear.4. Press ENTER (e) after reading is complete.5. Select the folder or music file with / (d) on theremote controller and press ENTER (e) to confirm. Toreturn to the previous display, press(f).6. Use play buttons (b) to stop play or choose tracks to play.0 The display of album name and artist name is supportedwith MP3/WMA/Apple Lossless/FLAC/AAC/DSD (DSFonly) format music files.0 Characters that cannot be displayed by this unit appearas " ".0 The USB port of this unit conforms with the USB 2.0standard. The transfer speed may be insufficient forsome content you play, which may cause someinterruption in sound.Repeat play1. Repeatedly press REPEAT (a) during play to displayoron the display.: Repeat play of the selected individual track.: Repeat play of all tracks within a folder.To cancel repeat play, press REPEAT (a) several times12EN
Before Start Part Names Install Initial Setup PlaybackSupplementary information Advanced Setup Othersuntil the icons disappear.Shuffle play1. Press SHUFFLE (c) during play to displayon thedisplay.: Play tracks in a folder randomly.To cancel shuffle play, press SHUFFLE (c) until the icondisappears.USB Storage / HDD Device Requirements0 Note that operation is not guaranteed with all USBstorage devices or HDD.0 This unit can use USB storage devices that comply withthe USB mass storage device class standard. (However,there are still devices that cannot be played by this uniteven if they comply with the USB mass storage classstandard.)0 The unit is also compatible with USB storage devicesusing the FAT16 or FAT32 file system formats. Otherformats such as exFAT, NTFS, and HFS cannot beplayed by this unit.0 If the USB storage device has been partitioned, eachsection will be treated as an independent device.0 Up to 20,000 tracks per folder can be displayed, andfolders may be nested up to 16 levels deep.0 USB hubs and USB storage devices with hub functionsare not supported. Do not connect these devices to theunit.0 USB storage devices with security function are notsupported on this unit.0 If the USB storage device or HDD comes with an ACadapter, we recommend that you use its AC adapter topower it.0 Media inserted to the USB card reader may not beavailable in this function. Furthermore, depending on theUSB storage device, proper reading of the contents maynot be possible.0 We accept no responsibility whatsoever for the loss ordamage to data stored on a USB storage device whenthat device is used with this unit. We recommend that youback up your important music files beforehand.Supported Audio FormatsFor server playback and playback from a USB storagedevice, this unit supports the following music file formats.Note that sound files that are protected by copyright cannotbe played on this unit.MP3 (.mp3/.MP3):0 Supported formats: MPEG-1/MPEG-2 Audio Layer 30 Supported sampling rates: 44.1 kHz, 48 kHz0 Supported bitrates: Between 8 kbps and 320 kbps andVBR.0 Supported formats: MPEG-2/MPEG-4 Audio0 Supported sampling rates: 44.1 kHz, 48 kHz, 88.2 kHz,96 kHz0 Supported bitrates: Between 8 kbps and 320 kbps andVBR.ENFLAC (.flac/.FLAC):0 Supported sampling rates: 44.1 kHz, 48 kHz, 88.2 kHz,96 kHz, 176.4 kHz, 192 kHz0 Quantization bit: 8 bit, 16 bit, 24 bitApple Lossless (.m4a/.mp4/.M4A/.MP4):0 Supported sampling rates: 44.1 kHz, 48 kHz, 88.2 kHz,96 kHz, 176.4 kHz, 192 kHz0 Quantization bit: 16 bit, 24 bitDSD (.dsf/.dff/.DSF/.DFF):0 Supported formats: DSF/DSDIFF0 Supported sampling rates: 2.8 MHz, 5.6 MHz, 11.2 MHzWMA (.wma/.WMA):0 Supported sampling rates: 44.1 kHz, 48 kHz0 Supported bitrates: Between 5 kbps and 320 kbps andVBR.0 WMA Pro/Voice/WMA Lossless formats are notsupportedWAV (.wav/.WAV):WAV files include uncompressed PCM digital audio.0 Supported sampling rates: 44.1 kHz, 48 kHz, 88.2 kHz,96 kHz, 176.4 kHz, 192 kHz0 Quantization bit: 8 bit, 16 bit, 24 bitAIFF (.aiff/.aif/.aifc/.afc/.AIFF/.AIF/.AIFC/.AFC):AIFF files include uncompressed PCM digital audio.0 Supported sampling rates: 44.1 kHz, 48 kHz, 88.2 kHz,96 kHz, 176.4 kHz, 192 kHz0 Quantization bit: 8 bit, 16 bit, 24 bitAAC ):13
Before Start Part Names Install Initial Setup PlaybackSupplementary information Advanced Setup OthersInternet RadioBasic operations1press ENTER (b).When this unit is connected to a network, you can listen toTuneIn or other preregistered Internet radio services.Depending on the internet radio service, the user may needto register from their computer first.1. Turn the unit on.2. Press NETWORK.3. Select "TuneIn Radio", etc., with / (a) of the remotecontroller and press ENTER (b) to confirm.TuneIn RadiobSpotifyDeezercTIDALa0 If "Connection Error." is displayed, check whether thenetwork is properly connected.4. Select the station, etc., with / (a) on the remotecontroller and press ENTER (b). To return to the previousdisplay, press(c).TuneInYou can register a station you have played as a favorite.1. Press ENTER (b) while playing TuneIn.2. Select "Add to My Presets" with / (a) on the remotecontroller and press ENTER (b).3. To play a favorite, select a registered station in "MyPresets", displayed first when "TuneIn Radio" selectedand press ENTER (b). To delete favorites, press ENTER(b) during play, select "Remove from My Presets" and14EN
Before Start Part Names Install Initial Setup PlaybackSupplementary information Advanced Setup OthersSpotifyBasic Operation1aWi-Fibcd2e3ENSpotify Connect play is possible by connecting this unit tothe same network as a smartphone or tablet. To enableSpotify Connect, install the Spotify application on yoursmartphone or tablet and create a Spotify premium account.1. Connect the smartphone to the network that this unit isconnected to.2. Click the Connect icon in the track play screen of theSpotify app.3. Select this unit.0 This unit is displayed as "Onkyo NS-6130 XXXXXX".4. This unit turns on automatically and the input selectorchanges to NET and streaming of Spotify starts.0 If "Option" - "PWR Setting" - "NET Stby" is set to "Off"in the setup menu, manually turn the unit on and thenpress NETWORK on the remote controller.0 Refer to the following for Spotify settings:www.spotify.com/connect/The Spotify software is subject to third party licensesfound he following remote controller operations are alsopossible.(a) This button plays the previous track.(b) Pressed during play this button pauses
0Functionality may be introduced by firmware updates and service providers may cease services, meaning that some network services and content may become unavailable in the future. 0Specifications and appearance are subject to change without prior notice. Main unit (1) Remote controller (RC-