Transcription
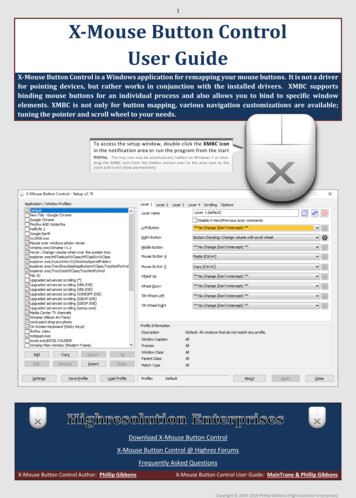
1X-Mouse Button ControlUser GuideX-Mouse Button Control is a Windows application for remapping your mouse buttons. It is not a driverfor pointing devices, but rather works in conjunction with the installed drivers. XMBC supportsbinding mouse buttons for an individual process and also allows you to bind to specific windowelements. XMBC is not only for button mapping, various navigation customizations are available;tuning the pointer and scroll wheel to your needs.To access the setup window, double-click the XMBC iconin the notification area or run the program from the startmenu. The tray icon may be automatically hidden on Windows 7 or later,drag the XMBC icon from the hidden section over to the area next to theclock and it will show permanently.Download X-Mouse Button ControlX-Mouse Button Control @ Highrez ForumsFrequently Asked QuestionsX-Mouse Button Control Author: Phillip GibbonsX-Mouse Button Control User Guide: MainTrane & Phillip GibbonsCopyright 2005-2019 Phillip Gibbons (Highresolution Enterprises)
2Profile List and InformationConfigure applications to suit your individual needsThe Application/Window Profiles list contains all of the profiles you have created and assigned to various applications or windows.From here you can quickly activate or deactivate profiles using the check box to the left of the profile name, rename profiles, create newprofiles, copy an existing profile, edit the selected profile, import and export profiles or remove an unnecessary profile. Profiles can beedited, copied or removed via their respective buttons or from the right-click context menu. If a profile’s text is RED, then it is the activeprofile, in other words it currently has keyboard/mouse focus for sending commands.The Profile Information box displays how XMBC identifies the selected process or windowThe information is identical to what was entered whencreating the profile.Importing and Exporting an Application/Window ProfileThe X-Mouse Button Control registered file type, xmbcs, is used to saveexported profiles.By default, profiles are saved to the current user’s %APPDATA%directory under ‘Highresolution Enterprises’. Save exported profileswherever is suitable; the new save location will be remembered.A batch export is also available for easily backing up the settings ofevery single profile in a single .xmbcs file.An exported file may be opened (double-clicked) to import thecontained profiles into XMBC. If there is a conflict with a current profileyou will be prompted to overwrite the existing one, discard theinserting entry or cancel the entire import process.You can also load and save whole profiles using the Save Profile andLoad Profile buttons. This includes ALL XMBC settings and applicationprofiles.Copyright 2005-2019 Phillip Gibbons (Highresolution Enterprises)
3Creating an Application and/or Window ProfileAdding a Process ProfilePressing the Add or Copy buttons will bring up a dialog box listingall currently running applications.Choose from the list of running applications, browse for anapplication EXE file, manually enter a process name, or opt to usea specific window.The description field is used to give a profile a custom display namein the profile list.NOTE: You can specify multiple processes by separating them withtwo pipe characters ' ' in the application text field.Adding an advanced Window Specific profileThe advanced 'Find Window' allows you to create advanced profilesthat can be triggered when the mouse cursor is over a specific controlor sub-window, based on their internal Windows classes rather thanthe whole application.You can drag the window finderto the required window in orderto select the desired window and populate the process and class fieldsautomatically. You can also do this simply by hovering the mouse overthe target window if you first tick the 'Hover' option. This allows youto select windows that are only visible while the target application hasfocus or that are only shown as a result of clicking a button (forexample, a dropdown list). By turning on CAPS lock, the hoverdetection will be disabled and the process and class names 'locked in'.For more information on Window Classes, see the Microsoft MSDNarticle About Widow ClassesThe 'Only match if there is no parent class' option will force the profileto match, only when the parent class is empty/undefined, forexample, a top-level window that has no parent.You can also enable regular expression text matching of the windowcaption or class names. Regular expressions allow a much morecomplex search to be performed, including wildcards, grouping orBoolean logic. However, this advanced search comes at the cost ofusing more resources and CPU time, so use this option sparingly.NOTE: When not using regular expressions, you can still specify multiple processes or classes by separating them with two pipecharacters ' '.You can use the 'Window Regions' options to restrict the profile to individual quadrants of the window, for example, when the cursoris over the top left of a window, check the top left check box and leave the other three checkboxes unchecked.Alternatively, you can use 'Activate the profile only ' option to specify a custom rectangular region to restrict the profile activationto a specific sub rectangle of the specified window. For example, to create a profile that is only enabled when the mouse is over theapplication's title bar.Copyright 2005-2019 Phillip Gibbons (Highresolution Enterprises)
4Multi-Layered Button MappingProviding up to 10 layers of button mapping for every profileThe list of Mapping Commands, available on each of the 9 controls.The list of commands is subject to change with each version of XMBC.By default, similar actions are grouped together. You can choose tosort the action list alphabetically in the general settings tab.NOTE: Some items are only available on specific operating systems.You can re-configure up to 9 mouse controls (Left Button, Right Button, Middle/Wheel Button, XButton1(Button 4), XButton2 (Button 5), Wheel Up, Wheel Down, Tilt Wheel Left and Tilt Wheel Right) on eachand any of the layers.The orange highlight indicates XMBC is currently receiving a standard Windows message from thatbutton/control, in other words you are currently manipulating it. If no highlight is seen whenmanipulating a control, then its current message/button is not compatible with X-Mouse Button Control.The three buttons in the upper right corner can be used to copy the layer (to another profile or layer),swap the layer with another in this profile or revert/reset all controls on the current layer to default.The gear/cog buttons next to each mouse button drop-down allow you to configure the selected actionfor any action that can be configured (e.g. Simulated keystrokes, Button chording etc.)Up to ten 'layer' tabs are available. By default, only two layers are enabled/displayed. You can changethis to any number between 1 and 10 using the “Number of layers” option in the general settings tab. Tosave screen space, if you have more than 5 layers, only the first tab includes the "Layer" text. Other layertabs are indicated by number only.Any layer (other than Layer 1) can be disabled completely for the selected profile by ticking the 'Disable'checkbox. When a layer is disabled, anything setup on the layer will be ignored and the actions from layer1 (in the current profile) will be performed.An enabled layer can be excluded from the next/previous layer commands (global hotkey or simulatedkeystrokes command). In this case, the layer will be skipped over when cycling through the next/previouslayers.Each layer can be given a custom name on each and every profile. This name will be displayed in a balloonnotification when switching layers (notification is optional).When you configure a layer other than layer 1, you can also instruct XMBC to automatically transition(switch) to another layer (or revert to the previous layer) after a configurable time period.NOTE: Some of the actions listed to the right are operating system specific.NOTE: Only operating systems after Windows XP support standard tilt wheel messages. Tilt Wheel Left& Tilt Wheel Right options will therefore not be available on Windows XP or earlier operating systems.** No Change (Don't intercept) **** Same As Default Profile **Simulated KeysButton ChordingButton HeldActivate Monitor Power SavingActivate ScreensaverALT-TABBackBrightness DownBrightness UpBrowser FavouritesBrowser RefreshBrowser StopChange Movement to ScrollChange Movement to Scroll (Lock Axis)Change Movement to Scroll (Sticky Lock Axis)Change Movement to Scroll (Sticky)Change Movement to Scroll InvertedChange Movement to Scroll Inverted (Lock Axis)Change Movement to Scroll Inverted (Sticky Lock Axis)Change Movement to Scroll Inverted (Sticky)Charms Bar (WIN C)Click Button 4Click Button 5Close (Alt F4)Copy (Ctrl C)Cut (Ctrl X)Cycle mouse cursor speedDisableDouble ClickDouble Click DragDrag to Move WindowDrag to Size WindowEnterEscapeFlip 3D / Task ViewForwardLaunch EMailLayer (Next)Layer (Previous)Layer 1-10Left ClickLock WorkstationMagnifier Toggle On/OffMagnifier Zoom InMagnifier Zoom OutMaximize WindowMedia - Last TrackMedia - MuteMedia - Next TrackMedia - Play/PauseMedia - StopMedia - Volume DownMedia - Volume UpMiddle ClickMinimize WindowMouse Wheel Up/DownMouse Wheel Tilt Left/RightNewNext WindowOpenOpen Control PanelOpen Emoji KeyboardOpen ExplorerOpen Explorer at My ComputerOpen Explorer at My DocumentsOpen Explorer at Network FavouritesOpen Explorer at specified folderOpen HelpOpen RUN CommandOpen SearchOpen Web BrowserPaste (Ctrl V)PC Settings (WIN I)Previous WindowPrint Active WindowPrint ScreenRedo (Ctrl Y)Restore WindowReveal DesktopRight ClickRun ApplicationScroll Window Up/Down/Left/RightSearch Apps (WIN W)Search Charm (WIN Q) / CortanaSearch Files (WIN F)Slow down mouse cursor (while pressed)Slow down mouse cursor (sticky)Show/Hide DesktopSnap Modern UI LeftSnap Modern UI RightSnap Window Up/Down/Left/RightSticky ButtonSystem Menu (WIN X)Undo (Ctrl Z)Virtual Desktop: CloseVirtual Desktop: NewVirtual Desktop: Switch LeftVirtual Desktop: Switch RightWeb Search Selected TextCopyright 2005-2019 Phillip Gibbons (Highresolution Enterprises)
5Per-Profile Based ScrollingThe scrolling tab, provides advanced pointer & scroll wheel adjustments on a per-profile basisNOTE: Prior to XMBC 2.15, the Scrolling and Options tabs were combined in a single 'Scrolling & Navigation' tab.Scrolling Inverting mouse wheel scrolling – Inverts (reverses)the vertical scroll (wheel) direction.Invert mouse horizontal scrolling – Inverts (reverses)the horizontal scroll (tilt) directionWheel scrolls in pages instead of lines – Makes thescroll wheel scroll one page at a time instead of line byline.Lines to scroll using the scroll wheel – Allows you toconfigure how many lines are scrolled when using thescroll wheel.Force Scroll Pages/Lines – Can be used if theapplication does not correctly respond to the twosettings above. Note that this setting can cause adverse side effects in some Windows applications, so only use it if you have to.Advanced Window ScrollingThe advanced window scrolling settings allow you to scroll windows that do not usually respond to the scroll wheel, such as oldWindows applications. There are currently 5 methods from which to choose (as well as the default and disabled options). Usually youwould only use these settings for a specific window profile, for those windows that do not behave as expected when using the scrollwheel, rather than an application profile. 1.2.3.4.5. Default passes through the original uninterrupted message sent by the mouse’ driver.Scroll Message – Send WM HSCROLL or WM VSCROLL directly to the window under the mouse. (works with some windows)Scroll Info – Use the Win32 SetScrollInfo API to set the scroll position of a window. (rarely works, but gives great results when it does)Left/Right Keys – Sends left & right arrow keys (only applies to horizontal scrolling)Wheel Message – Send WM MOUSEWHEEL or WM MOUSEHWHEEL message to the window (most recognizable/reliable)WPF Scroll Message – Send a special scroll message, for use with newer applications built using the Windows Presentation Foundation.None (Disable Scroll) blocks the original message and doesn’t inject anything other messages, thus disabling the scroll wheel.NOTE: You can reverse scrolling by choose a negative increment in the Vertical Lines or Horizontal Characters fields.NOTE: When any of the first three methods fails to register for an application XMBC invokes the ‘Default’ scrolling method and applies thevertical lines or horizontal characters scrolling increments, ‘Method 3’ will resort to ‘Method 1’ for vertical scrolls prior to invoking ‘Default’. Thisway scrolling will not cease if one of these methods isn’t recognized by the window.Copyright 2005-2019 Phillip Gibbons (Highresolution Enterprises)
6Per-Profile Based OptionsThe options tab, provides advanced options that only apply when the selected profile is active.Options Disable Scroll Window Under Cursor – Overrides the globalsetting 'Make scroll window scroll window under cursor'.Override Mouse Speed – Allows you to set the mouse cursorspeed to use when this profile is active.Enhance Pointer Precision – Allows you to override theWindows setting on a per-profile basis. This setting tellsWindows to adjust the sensitivity of the mouse pointe based onhow quickly you are moving the mouse.Activate window on hover – Brings the window to theforeground when the mouse hovers over it.Clip (lock) mouse cursor to active window – Allows you toprevent the cursor from moving outside the current activewindow.Ignore Repeated remapped scroll – The mouse wheel scroll or tilt does not behave like a normal button that sends both a discrete downand an up message. Instead, it sends one or more single scroll message. When remapping horizontal or vertical scroll to an action thatexpects to work with down and up messages (like simulated keystrokes) you may find that the mapped action repeats. You can preventthis repeat by enabling this option and adjusting the time to suit your scenario/device.Switch Primary and Secondary mouse buttons – Allows you to swap left and right buttons on a per-profile basis.Enable axis locking modifier keys – Allows you to enable or disable the axis locking hotkeys (you must enable the global hotkeys or layermodifier keys for Axis Locking for this option to have any effect. Axis locking prevents pointer movement along either the X or Y axis.Disable layer modifier keys for this profile – When layer modifier keys are enabled (globally) this option allows you to disable the layermodifier keys while this profile is active.Disable profile switching on mouse move for this profile – Override the global 'Enable profile switching on mouse move' advanced settingfor this profile, so the profile will stick until you physically select (activate) another application no matter where your mouse cursor wanders.Change mouse cursor when profile is active – Allow you to specify a mouse pointer to use while the profile is active. You can add your owncursor files (*.cur) and animated cursors (*.ani) to the dropdown list by dropping the files into the XMBC settings folder.( ) These options are only available if XMBC is allowed to change the cursor speed (see Global Settings - Pointer).Copyright 2005-2019 Phillip Gibbons (Highresolution Enterprises)
7Button Chording Button MappingThe ability to combine mouse buttons to perform different tasksButton Chording allows you to combine button presses to performdifferent actions. This technique is often known as chording, muchlike playing a chord on a musical instrument. It can also be referredto as shifting, like when you press shift and a key on the keyboard.When you select Button Chording for a particular button, theButton Chording window will be displayed. This screen allows youto select the chord action for each button and also the default (nochord) action for the original button (for when you don’t press anyother buttons before releasing the defined button).Chose actions that other buttons should apply while the initialchord button is held down.For example, you can make the scroll wheel change the volumewhen chorded with the right mouse button!You can choose to block the original button action until a chord is performed or to allow the original button to pass through.When blocked, the 'Default (No Chord)' action will apply once you release the button. You can modify this behavior further using the'Unblock after' and 'Unblock when the cursor moves' options. Unblock after – The chord will be 'released' automatically after the time period (in milliseconds) after the chord button is initially pressed.Unblock when the cursor moves – The chord will be released automatically if the mouse moves by 4 pixels in any direction. This is usefulto allow drag and drop functionality to operate as normal when chording on the right mouse button.Button Held (Time Dependent Actions)The ability to perform different actions depending on how long you press a (hold) button downButton Held option allows you to perform different actions depending on how long you hold a button down for. This allows you to, forexample, to leave the button as normal for a quick press, and do something else if you press and hold the button.You can define up to four actions and assign the timefor each to trigger.When you select Button Held for a particular button,the Button Held Time Dependent Actions window willbe displayed. This screen allows you to select theactions and times at which thy will trigger.You can tell XMBC to hold the last times action downuntil the button is released – this is useful if the lasttimed action is simulated keys or left click, where youwant the keys/button held down until you release thebutton.You can choose to cancel/abort the button held timer if the mouse is moved while holding the button. In this case, the button actionactive at the time the mouse is moved will stay active until you release the mouse button.Copyright 2005-2019 Phillip Gibbons (Highresolution Enterprises)
8Simulated Keystrokes Button MappingSend any custom keystroke, key sequence or mouse action when you press a mouse button .The simulated keystrokes window is displayed when you select 'Simulated Keystrokes' for a particular button mapping. It allows you to assign anykeystrokes, mouse actions and/or hotkeys to your mouse buttons.You can type a single key or a series of keys. You can also make useof special {FUNCTION TAGS} which are described in the text field atthe bottom of the window.Use the { } button to add braces, or, while holding the { } buttondown, press the keys to automatically add the tag to the custom keytext. Alternatively, press the drop down to display a menu ofavailable key tags to insert.There are 9 methods available for sending your assigned keystroke:1.2.3.4.5.6.7.8.9.Pressed – Send the keys when the mouse button is pressed.Released – Send the keys when the mouse button is releasedDuring – Hold the keys while the mouse button is held[like holding down keys on the keyboard, without the repetition]Threaded Press (Same as 1*)Threaded Release (Same as 2*)Repeatedly – Continuously sends the keys while the mouse button is held down.[like holding down a key on the keyboard]Sticky Repeat – A ‘Repeatedly’ toggle[press once to begin repetition, press again to cease]Sticky Hold – A ‘During’ toggle[press once to activate, again to deactivate]Pressed and Released – A combination of pressed and released.[The keys will be sent when the button is pressed and sent again when the button is released]Selecting 'Block original mouse input' will block the source button press. This is usually the desirable outcome. To pass the original button pressas well as the simulated keystrokes through to the window with input focus, clear this
X-Mouse Button Control is a Windows application for remapping your mouse buttons. It is not a driver for pointing devices, but rather works in conjunction with the installed drivers. XMBC supports binding mouse buttons for an individual process and also allows you to bind to specific window elements. XMBC is