Transcription
Mill MouseUser GuideVer. 7.10Author: topolo-Z
ContentsOutlineHow to use Introduction Launch Mill Mouse Features Basic functions System requirements Change click action Guide to click action To change click action frequently Zoom on apps Switch magnifier Switch touch keyboard Perform shortcuts and show next/previous Expand/collapse window Unhide window Exit Mill MouseInstallation Installation2
ContentsSettings of Mill Mouse Open settings dialog Add custom shortcuts Speed adjustments Add custom texts Input method Shortcuts to launch other apps Game controller Separate windows Pause Window display Sound Startup Scroll Click action Zoom and magnifier Keyboard Shortcuts3
ContentsOther functionsTips Calibration of eye tracking To enlarge buttons Vertical window Upgrading Tobii Core Software Task View To use SSML or SAPI TTS XML Action Center To use SwiftKey on Windows 10 User Account Control Camera panning during games Combination with physical mouse Stop eye tracking Hide mouse pointer Mill Mouse specific shortcut keys Supported languagesAppendix High contrast Notices Uninstallation Known issue Restrictions Contacts to authorShortcut keys4
IntroductionThank you for using Mill Mouse.Mill Mouse controls mouse with eye tracking by Tobii Eye Tracker 4C. You can move thepointer to where you arelooking at. You can click when youkeep gazing at the sameplace or close eyes.5
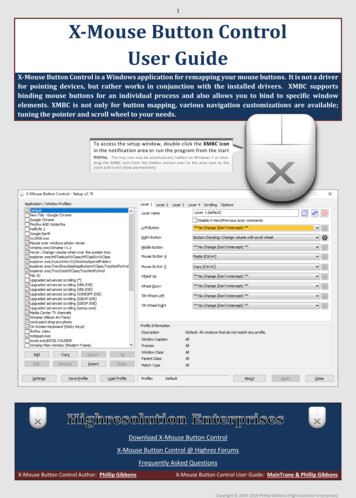
Features Support scroll operationsMill Mouse supports scroll operations on the start menu, Web browsers, etc. You canscroll up by looking at the top of them and scroll down by looking at the bottom. Adjust against the involuntary shaking of eyesMill Mouse controls the mouse pointer not to be protruded from the frames of thebuttons or other objects in order to make it easier to click them.OK6
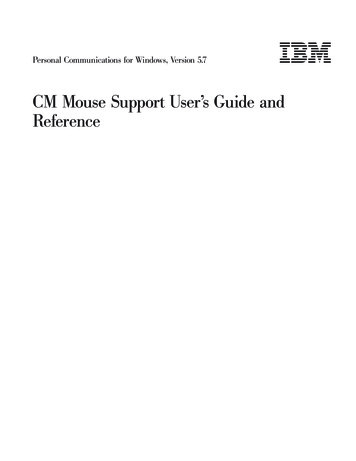
Features Support operations on User Account Control dialogMill Mouse also makes User Account Control dialog clickable by eye tracking, whichappeared when you install apps or run apps as administrator. 7
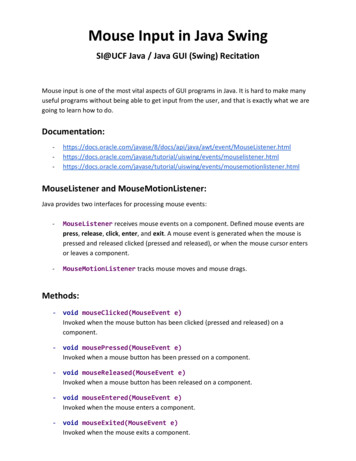
System requirementsThe followings are required to use Mill Mouse.DeviceOSSoftwareTobii Eye Tracker 5Windows 10Tobii ExperienceTobii Eye Tracker 4C,Tobii EyeX,SteelSeries SentryWindows 10,Windows 8.1,Windows 7Tobii Eye Tracking Core SoftwareIrisbond DuoWindows 10,Windows 8.1,Windows 7Irisbond Duo API Libraries8
Guide to click actionYou can select the input method in the settings of Mill Mouse from the followings.1.Click when you keep gazing at the same place2.Click when you close your eyes3.Click when you press button on game controller4.Use head trackingThe default setting is 1. This guide is based on 1.For the usage when selecting 2, please change the description of “keep gazing” to“close eyes” in this guide. When selecting 3, please change the description to“press button on game controller while gazing”. When selecting 4, please changethe description to “change your head pose while gazing”.9
InstallationPlease extract the ZIP file of Mill Mouse anywhere.Mill Mouse folder and the following 2 items will be extracted.Mill Mouse 710.exeInstallerUserGuide.pdfThis file※ .exe or .pdf is not displayed in some cases.10
InstallationRun Mill Mouse 710.exe.If the SmartScreen like following is displayed, click ‘More Info’ and ‘Run anyway’.11※ If you have installed Mill Mouse, Publisher will be displayed as topolo-Z.
InstallationClick Yes on the User Account Control dialog.12※ If you have installed Mill Mouse, Publisher will be displayed as topolo-Z.
InstallationClick Next once or twice.If you have installed Mill Mouse,this screen will be skipped.13
InstallationClick Install and Finish.To complete the installation of Mill Mouse, sign out from Windows once and signin again.14
Installing Tobii ExperienceIf you want to use Tobii Eye Tracker 5 but have not yet installed Tobii Experience,please install it with the following steps.1.Access the following URL.https://gaming.tobii.com/getstarted/2.Click ‘tobii’ as the hardware and select Tobii Eye Tracker 5 as the Device.3.Click ‘please use this offline installer’ to download the installer and run it.4.After installation is complete, connect Tobii Eye Tracker 5 to your PC.5.Click6.In the opened Microsoft Store, click Install to download, then click Launch.7.Follow the instructions on the screen to make the settings.icon in the notification area of the taskbar.15
Installing Tobii Core SoftwareIf you want to use Tobii Eye Tracker 4C, Tobii EyeX, or SteelSeries Sentry but havenot yet installed Tobii Eye Tracking Core Software, please download and install itfrom the following URL.https://gaming.tobii.com/getstarted/?bundle tobii-core&autodownload true※ It is not allowed to install both Tobii Eye Tracking Core Software and Tobii Experience on the same PC.If you already have Tobii Experience installed, please uninstall Tobii Eye Tracking For Windows from‘Programs and Features’ in Control Panel before installing Tobii Eye Tracking Core Software.16
Installing Irisbond Duo API LibrariesIf you want to use Irisbond Duo but have not yet installed Irisbond Duo APILibraries, please access the following URL, click Download of Drivers, and training/download/17
How to use18
Launch Mill MouseConnect Tobii Eye Tracker 4C or other eye tracking device to your PC.From Start menu, click Mill Mouse folder Mill Mouse.Mill Mouse starts up and the window will be appeared at the top left of thedesktop screen.※ The number of buttons on the right side of the window depends on the size of the desktop screen.※ When the task bar is placed to the top or the left, the window will be appeared at the bottom right.19
Basic functionsThe each functions are as follows:12345①Change click action⑤Perform shortcuts and show next/previous②Zoom to apps⑥Expand/collapse window③Switch magnifier④Switch touch keyboard620
Change click actionYou can change the click action performed when you keep gazing at the sameplace. Each time you look at the button on the far left of the window, the actionwill be changed. You can change between seven types of actions by default: Click, Double Click, Drag,Right Click, Tap, Choose, and No Click.You can change the settings of Mill Mouse to use only certain click actions.※ Tap action is not supported on Windows 7.※ If 'Switch primary and secondary buttons' is enabled for the mouse, it will be left click rather thanright click.21
To change click action frequentlyBy changing the click action to Choose, you can select the action each time youkeep gazing at the same place. ①Change to Choose.②When you keep gazing at thesame place, the action panelswill be displayed around.③When you keep gazing atany panel, that action willbe done. If you do not wantto action anything, keepgazing at anywhere otherthan the panels or closeyour eyes.※ If you keep gazing on the touch keyboard or the on-screen keyboard, the click action will be donewithout displaying the action panels.22
Zoom on appsYou can zoom the Web browsers or some other apps by using Stretch or Shrink onthe second from the left of the window. ①Change to Stretch or Shrink. ②If you keep gazing at the sameplace on the Web browser orother apps, the zoom actionwill be done.※ Some apps may not support zoom action.③To stop zooming, switch to theclick action on the left side of the23window of Mill Mouse.
Switch magnifierBy using Magnifier on the third from the left of the window, you can zoom in onthe desktop screen before the click action. ①Look at Magnifier to turn it on. ②If you keep gazing at the same place,its surroundings will be zoomed in.③If you keep gazing at the same place whilezooming, the click action will be done.※ On Windows 7, Magnifier is only available when Windows Aero is enabled.④To turn Magnifier off, look atMagnifier again.24
Switch touch keyboardYou can switch show/hide of the touch keyboard by looking at Keyboard on thefourth from the left of the window. You can also use the on-screen keyboard instead of the touch keyboard bychanging the settings of Mill Mouse.25
Perform shortcutsIf you look at any button on the right side of the window, you can performshortcuts assigned to them, such as Ctrl X, Ctrl V, and so on.You can change the settings of which shortcuts are displayed in the window. 26※ On Windows 8.1 and Windows 7, shortcut icons are not displayed.
Show next/previous shortcutsYou can set up to 20 shortcuts. The window displays some of them to fit on thedesktop screen. By looking at the buttons on the second from the right of thewindow, you can display the rest of them.27
Expand/collapse windowYou can collapse or expand the window by looking at the button on the far rightof the window. 28
Unhide windowBy default, the window will be hidden after a while.To unhide, look at the upper left corner of the desktop screen.If it does not work, try to look at the outer frame of the monitor. ※ Whether or not to automatically hide the window can be changed by settings.※ If the taskbar is located at the top or the left, look at the bottom right corner of the screen.29
Exit Mill MouseTo exit Mill Mouse, look at the X button at the top right of the window. 30
Settings of Mill Mouse31
Settings – Open settings dialogIf the shortcut of ‘Settings of Mill Mouse’ is displayed in the window, you can openthe dialog to change the settings of Mill Mouse by looking at it.If ‘Settings of Mill Mouse’ is not displayed, keep gazing at the title bar of thewindow to display the menu. Then, keep gazing at Settings on the menu. Afterthat, the settings dialog will be opened. 32
Settings – Speed adjustmentsYou can adjust the speeds on the Speed tab of the settings dialog.33
Settings – Input methodYou can change the input method on the Input tab of the settings dialog.※ You can adjust the microphone sensitivity in Control Panel Sound Recording Default Device Properties Levels.※ ‘Use head tracking’ is only available with Tobii Eye Tracker 5 or Tobii Eye Tracker 4C.34
Settings – Input methodDepending on the setting of ‘Input method’ on the Input tab, the meaning of‘Click interval’ on the Speed tab changes as follows:‘Input method’ on Input tabMeaning of ‘Click interval’ on Speed tabIf you select ‘Click when you keep gazing atthe same place’How long time you keep gazing at the sameplace in order to perform the click actionIf you select ‘Click when you close your eyes’How long time you keep closing your eyesin order to perform the click actionIf you select ‘Click when you press button ongame controller’No effectIf you select ‘Click when you speak into amicrophone’How often to perform the click action whenyou continue speakingIf you select ‘Use head tracking’No effect35
Settings – Game controllerOn the Controller tab of the settings dialog, you can map specific click actions tothe 10 buttons on your game controller.For Xbox controllers,‘1’ corresponds to A button,‘2’ corresponds to B button,‘3’ corresponds to X button, and‘4’ corresponds to Y button.36
Settings – PauseOn the Pause tab of the settings dialog, you can change whether to pause the eyetracking when you use the physical mouse.37
Settings – SoundOn the Sound tab of the settings dialog, you can change whether to use clicksound and the voice to read texts aloud.※ To use non-English voice on Windows 7, please install Microsoft Speech Platform Runtime andText-to-Speech engine data additionally.38
Settings – ScrollOn the Scroll tab of the settings dialog, you can change whether to use scrollingfeature and the lines to scroll each time.39
Settings – Click actionYou can change to use only certain click actions on the Click tab of the settingsdialog.Check the actions to use.Uncheck the actions not to use.40
Settings – Zoom and magnifierOn the Subaction tab of the settings dialog, you can change whether to showStretch/Shrink or Magnifier button in the window and the zoom increments of themagnifier.41
Settings – KeyboardOn the Keyboard tab of the settings dialog, you can change whether to showkeyboard button in the window and whether to use the touch keyboard or theon-screen keyboard.42
Settings – ShortcutsYou can change the shortcuts to be displayed in the window from the Shortcutstab of the settings dialog.You can set up to 20 shortcuts.43
Settings – Shortcuts85 types of shortcut keys listed at the end of this guide are available as shortcuts.In addition to the shortcut keys, the following 9 types of shortcuts for Mill Mouseare also available. Settings of Mill Mouse Hide Mill Mouse Calibration Stop Eye Control Move Mill Mouse Hide Pointer Move Mill Mouse Up Exit Mill Mouse Move Mill Mouse Down※ ‘Move Mill Mouse Up’ and ‘Move Mill Mouse Down’ will be changed to ‘Move Mill Mouse Left’ and ‘MoveMill Mouse Right’ when the window of Mill Mouse is displayed vertically.44
Settings – Add custom shortcutsYou can add up to 20 custom shortcut keys.①Press ‘ ’ button.45
Settings – Add custom shortcuts(Continued)③Select the key.②Dialog will be displayed. Setthe name and select ‘Shortcutkey’.※ For Name, set a short string to be displayed in the window as the following ⑥.④Set the color and the iconof the shortcut button onthe View tab and press OK.46
Settings – Add custom shortcuts(Continued)⑤It will be added to ‘Availableshortcuts’. Pressbutton tomove it to ‘Current shortcuts’.47
Settings – Add custom shortcuts(Continued)⑥It will be displayed in the windowand can be performed in the sameway as other shortcuts.⑦If you have checked ‘Hold down keys’ in ③, once youpress the button, the shortcut key will remain pressedand the button color will be reversed.If you press the button again, the keys will be releasedand the button color will be restored.48※ Unlike holding down the physical keys, the keys will not be entered repeatedly.
Settings – Add custom textsYou can also set custom texts for input to the text editors or other apps, orreading aloud.①Press ‘ ’ button.②Dialog will be displayed. Setthe name and select Text.③Enter the customtext, select theaction and press OK.49※ For Name, set a short string to be displayed in the window as the following ⑤.
Settings – Add custom texts(Continued)④It will be added to ‘Availableshortcuts’. Pressbutton tomove it to ‘Current shortcuts’.50
Settings – Add custom texts(Continued)⑤The button will be displayed in the window.If you have checked ‘Input text’ in ③, pressthe button with the text editor open to inputthe text you have set.If you have checked ‘Hear text read aloud’in ③, press the button to read the text youhave set aloud.51
Settings – Shortcuts to launch other appsYou can also add shortcuts to launch other apps.③Set the path of the appto launch in Target andpress OK.①Press ‘ ’ button.②Dialog will be displayed. Setthe name and select App.52※ For Name, set a short string to be displayed in the window as the following ⑤.
Settings – Shortcuts to launch other apps(Continued)④It will be added to ‘Availableshortcuts’. Pressbutton tomove it to ‘Current shortcuts’.53
Settings – Shortcuts to launch other apps(Continued)⑤The button will be displayed in the window.If you press the button, the app set in ③ willlaunch.If you have set the path of image, audio, orvideo file to Target in ③, press the button tolaunch the app associated with the file type.54
Settings – Separate windowsYou can also show the shortcuts in separate windows. You can set up to 20shortcuts.①Select a shortcut from ‘Currentshortcuts’ which you want to showin separate window.②Pressbutton several times to moveit under ‘Separate windows’.55
Settings – Separate windows(Continued)③The shortcut button appears in aseparate window on the desktopscreen.④You can move it on the desktop screenby dragging inside. You can change thesize by dragging the edges.56
Settings – Window displayOn the Window tab of the settings dialog, you can change whether to keep thewindow on top, whether to automatically hide or fade the window, and the colorof the window.If you uncheck ‘Automatically hide thewindow’, the window position next timestarted will be the last end position.57※ If high contrast is enabled, the color can not be changed.
Settings – StartupOn the Startup tab of the settings dialog, you can change whether toautomatically launch Mill Mouse when you sign-in to Windows and whether toterminate Tobii EyeX Interaction in the notification area of the taskbar.58
Other functions59
Others – Calibration of eye trackingYou can open the calibration screen of the eye tracking from Calibration on themenu displayed when you keep gazing at the title bar of the window.※ If you use Tobii Eye Tracker 4C, Tobii EyeX, or SteelSeries Sentry, it takes about 10 seconds from themenu selection until the calibration screen is displayed.60
Others – Vertical windowMove the window of Mill Mouse to the left or right edge on the desktopscreen to display it vertically. Move the vertical window to the upper orlower edge on the desktop screen to revert it to the horizontal window.①Select Move on the menu. ②Keep gazing at the left or rightedge on the desktop screen.③The window of Mill Mouse willbe displayed vertically.61
Others – Task ViewKeep gazing at the middle height of the left edge on the desktop screen to displaythe Task View on Windows 10.If it does not work, try to gaze at the outer frame of the monitor. ※ Keep gazing at there on Windows 8.1, the list of recently used store apps will be displayed.※ On Windows 7, Flip 3D will be used when Windows Aero is enabled.62
Others – Action CenterKeep gazing at the middle height of the right edge on the desktop screen todisplay the Action Center on Windows 10.If it does not work, try to gaze at the outer frame of the monitor. ※ Keep gazing at there on Windows 8.1, the Charm bar will be displayed.※ Nothing special will be happened on Windows 7.63
Others – User Account ControlYou can also click on the User Account Control dialog by eye tracking, whichappeared when you install apps or run apps as administrator.At that time, the window of Mill Mouse will not be displayed. 64
Others – Camera panning during gamesWhile playing a game that you pan the camera by mouse operation, you can panin the direction you are looking at by using Mill Mouse.While playing such a game, Mill Mouse will not click on it even if you keep gazingat the same place. 65
Others – Combination with physical mouseIt is also possible to use in combination with a physical mouse device.If you operate the physical mouse device while using Mill Mouse, the eye trackingwill be paused and the operation by the physical mouse will take precedence.After stopping the operation by the physical mouse and waiting for a few seconds,you will be able to operate the mouse again with eye tracking.In addition to the physical mouse, if you operate the right thumbstick of the Xboxcontroller, the eye tracking will be paused.※ You can change the settings to pause when you operate the physical mouse or the right thumbstick ofthe Xbox controller.66
Others – Stop eye trackingIf you do not need eye tracking for a long time, such as for watching movies, youcan stop eye tracking.To stop eye tracking, look at ‘Stop Eye Control’ shortcut or Stop on the menudisplayed when you keep gazing at the title bar of the window. Then the windowwill be hidden. Unlike the physical mouse operation described above, the stop will not be canceledautomatically. You can cancel the stop by looking at the upper left corner of the desktopscreen and re-displaying the window.67
Others – Stop eye trackingIf you press Alt Shift M, eye tracking will be stopped.The stop will not be canceled automatically.To cancel the stop which was done by the above keys, press Alt Shift M again.68
Others – Hide mouse pointerIf you do not need the mouse pointer but need click action, such as for readinge-boo
Mill Mouse also makes User Account Control dialog clickable by eye tracking, which . ‘3’ corresponds to X button, and ‘4’ corresponds to Y button. 36. Settings –Pause On the Pause tab of the