Transcription
PAX S80 Manual - 1Broad POS &PAX S80Updated: 8/25/2016
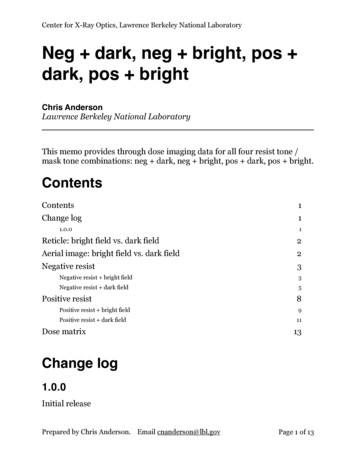
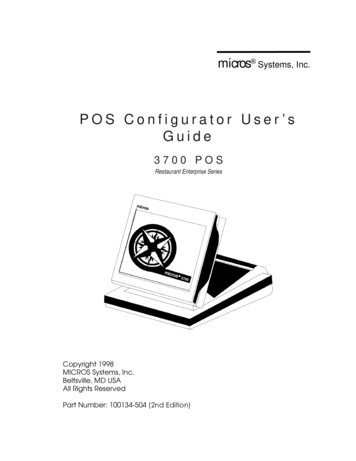
PAX S80 Manual - 2Main Overview1. Go to https://secure.broadpos.com/index.jsp2. Login using ID & PWID: PPSCSPW: Card1234567893. After login, the next image should load as your page4. On the left hand side lists: My Merchants: lists all merchants currently using a PAX Terminal My Terminals: lists all active terminals currently being used My Templates: lists any custom templates created by the user User Management My Profile
PAX S80 Manual - 3Adding A New TerminalPlease follow the steps in order:1. First, flip over the terminal to be used and find the SERIAL NUMBER (S/N)2. Go to "My Terminals" and search for the SERIAL NUMBER (S/N) in the search box TerminalSN/ID3. If the terminal comes up on your search screen, it is currently active*if the terminal does not show up after first search, it is inactive, please proceed to number 8 4. Click on the terminal with SERIAL NUMBER (S/N)5. Click "Inactivate" on the bottom of the screen (4th button from the left)6. After clicking "Inactivate," then "Ok"7. Then click "Delete" 8. Go to "My Terminals" on the left hand menu9. Click "Add Terminal (SN)" on the middle of the page
PAX S80 Manual - 410. At the "Add Terminal" page:A. Input Merchant's NameB. Enter the Terminal S/N (found on the underside of the terminal; e.g. S/N 3L 222354)C. Reenter the Terminal S/N (same as b)D. The Manufacturer Name and Model Name will automatically pop upE. At the next page click "Now"
PAX S80 Manual - 5Restaurant TerminalF. If the terminal is for arestaurant, choose from the following:1. TSYS-TC-RestaurantCutoff time is 9pm, funds will be deposited 2 days2. Omaha-TC-RestaurantCutoff time is 7pm, funds will be deposited 1 daysBut the majority of the time, 2. Omaha-TC-Restaurant, is the one to select.G. Click "Submit"H. Click "Now"
PAX S80 Manual - 6I. Enter "Merchant Number"Note: To get Merchant Number go to www.mxisoagent.com/loginLogin to the website and search for the Merchant Name in the Search BoxThe "Merchant Number" is found under "XMID" on the "mxisoagent.com" websiteJ. Enter "Device ID"Note: Device ID is the last 4 digits of the SERIAL NUMBER (S/N)
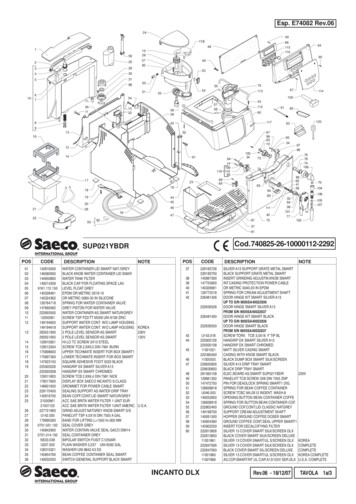
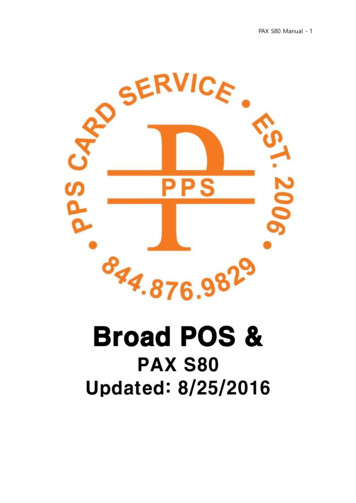
PAX S80 Manual - 7K. Next click "EMV"Ensure ALL the options are the same as the image above, i.e. "Enable EMV Feature: Enabled"
PAX S80 Manual - 8L. Next click "Industry"Ensure ALL the options are the same as the image above.
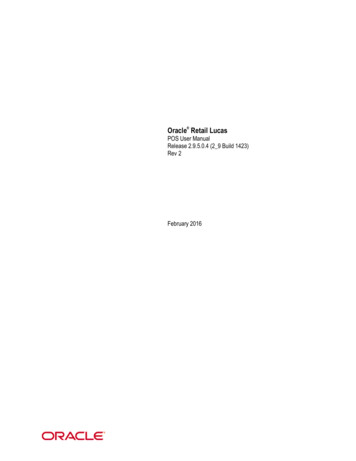
PAX S80 Manual - 9M. Next click "EDC"Only ENABLE "CREDIT EDC Support"N. Click on "Debit Features" (circled) and DISABLE Debit EDC SupportO. Click on "EBT Features" (below circled) and DISABLE EBT EDC SupportP. Click on "Cash Features" and DISABLE Cash EDC Support*some features depend on what the merchant desires
PAX S80 Manual - 10Q. Click on "Receipt" and verify all information is correctNote: If the merchant wants additional wording to appear at the bottom of the receipt, edit/add ithere (Trailer Line 1-5)
PAX S80 Manual - 11R. Click "Tip" For the circled area: If the merchant wants the receipt to suggest tip amounts (example:10%, 15%, 18%) then select Enabled, if the merchant does not want the suggested tipamounts written on the bottom of the receipt select Disabled
PAX S80 Manual - 12S. Select "Tip 1" and delete the #1 (where the arrow is pointing)Disable "Tip 2" and "Tip 3"
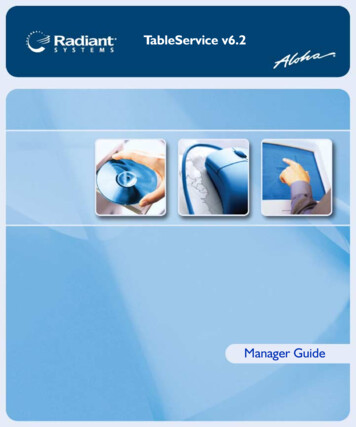
PAX S80 Manual - 13T. Select the options same as the above imageNote: The areas marked with arrows were specifically changedLeave the System Password section BLANK! Then the PW will automatically be "the present date"Example: 08252016.*Please review each section to make sure that it is the same as the image
PAX S80 Manual - 14U. Select "Communication"Primary Comm. TypeIf the merchant will have an Ethernet cable connected to the terminal select "LAN" as the "PrimaryComm. Type."If the merchant will use a Phone line to connect their terminal select "Dial Up" as the "PrimaryComm. Type"Backup Comm. TypeAlways set as "Dial Up"V. Maximum Tries 1Connect Timeout 300Receive Timeout 300W. Leave all else as it is. Input same as image.
PAX S80 Manual - 15X. Select "Card Type" Change the option "Mask" to select "Enabled" (see arrow) For the option "Card Present Mode" change the option to "Always Not Present" Do the above 2 steps for each section (Visa, Master Card, American Express, etc.)
PAX S80 Manual - 16T. Select "Broad POS" and press "Submit"Now you have successfully completed adding a new terminal to Broad POS.
PAX S80 Manual - 17Retail Storeg. If the terminal is for aTSYS-TC-Retail-S80Omaha-HC-Retail-S80retail store, choose from the following:
PAX S80 Manual - 18Firmware Update1. Turn OFF the machine2. Turn ON the machine and HOLD the MENU button3. Press 3 (Remote Download)4. Press 1 (New Download)5. Press 2 (TCP)6. It will say "Remote IP" : Press 50.79.90.190 Enter8. It will say "Remote Port" : Press 8001 Enter10. It will say "Enable DHCP" : Press #1 (YES)11. For Terminal ID: Press 80000003 EnterDone: it will automatically reboot, download, and install.Auto - Download the File to the Terminal1. Connect the Ethernet cable first to the underside of the terminal in the port labeled "LAN"2. Connect the power cord second (underside of terminal in port labeled "Port")3. Power the terminal "ON" (using the red power button on the upper left)*It will automatically download the new file; and the Health Report will show Processing Connecting Downloading and REBOOT If the Health Report says "ERROR" and the terminal does NOT REBOOT-It may be a connection error (check your Ethernet cable)-If it says "Transaction remained in database," Please Clear DatabaseMENU 5 5 Password (date) 2 Enter (green button) 14. Power OFF ON (it should automatically download) or go to MANUAL DOWNLOAD (SEEBELOW)Partial Download1. If the terminal has been used for transactions, first close the batch.FUNC 2 (Batch) 1 (Batch Close)2. Power OFF and Power ON3. The terminal will auto downloadIf it does not auto download, you MUST manual download
PAX S80 Manual - 19Manual DownloadMake sure Batch is Closed (SEE ABOVE), then.Menu 5 8 Password 1. Activate 1. Online 2. (App Update)Shortcut KeysALPHA - Changes the # button to an alpha letterFUNC button is a HOT KEY FUNC CLEAR Batch FUNC CANCEL Current Report FUNC UP ARROW Review Batch FUNC DOWN ARROW Find Transaction FUNC ENTER Last Receipt FUNC Alpha Tip MENU (Restaurant Only)
PAX S80 Manual - 20Press F3 (To change the type of payment)Press F4 (# of times to press F4)0. Sale1. Auth - Preauthorization that does NOT charge the credit card, only reserves the requestedamount and places a hold.2. PostAuth - Only if the merchant has performed an AUTH on the customer's card and NOWneeds to complete a transaction.3. Forced - When AUTH has been obtained before, and NOW need to complete a transaction toreceive payment.4. Return - Return a amount (issue credit) to a customer's card that will be swiped. Returnauthorized and settled transactions.5. V/Sale - Credit Void Sale; void/cancel an approved transaction, one that is authorized but notsettled. CANNOT use for transactions that have been settled (then use Return).6. V/Post - Void a PostAUTH7. V/FRCD - Void a Forced8. V/RTRN - Void a Return
PAX S80 Manual - 21Function Menu (The Default PASSWORD is the present date 08252016)1. Report: Print Report Password (present date)2. Batch: Close Batch3. Review: Review Total Credit, Debit, EBT, Total4. Find: Find a transaction by the last 4 digits of the credit card5. Counter Tip: Print a new receipt to add Tip. Enter the sale amount and a new receipt will printwith a tip line.6. Reprint: Reprint any receipt: a) last customer receipt, b) any receipt by transaction number7. Void: Void any transaction by the transaction #. Void only authorized (but not settled)transactions.8. Return: Return a amount (issue credit) to a customer's card that will be swiped. Returnauthorized and settled transactions.9. Tip Report: Print a tip report by payment type (All, Credit, Debit, EBT)10. Tip Menu: Tip adjustment options, chooseFUNC scroll up to 10 Desired # (from below)1. Scroll Untipped2. By Invoice3. By SRVR/Clerk#4. By Trans.#
PAX S80 Manual - 22Menupw passwordMenu 1. Reports:Menu 1 PW 1. Default ReportMenu 1 PW 2. Current Report4 options will appear: 1. Condensed Report, 2. Short Report, 3. Journal Report, 4. Totals OnlyWhichever option you choose, it will automatically default when merchant FUNC 1Menu 1 3. History ReportMenu 1 4. Display TransMenu 1 5. Tip ReportMenu 1 6. FileSys ReportMenu 2. Merchant SettingsMenu 2 1. Authorization Settings:Menu 2 1 PW 1. Transaction Types 1. Credit 2. Debit 3. EBT 1. AUTH (disabled,1. Return1. Returnalways enabled, pswd2. Withdrawalprotected)3. BalanceMenu 2 1 PW 2. Card Types (1. Disable / 2. Always Enable)1. Visa2. Master Card3. AMEX4. Diners5. Discover6. JCB7. enRoute8. ExtendedMenu 2 1 PW 3. Debit Prompt: (1. Off, 2. On)Menu 2 2 PW 1. User Password: Change PWMenu 2 2 PW 2. Batch 1. Always Enabled / 2. Pswd ProtectedMenu 2 2 PW 3. Secure Card 1. No Security, 2. Last 4 Digits, 3. All DigitsMenu 2 2 PW 4. Card Manual Entry (All, Credit, EBT)Menu 2 3. Edit Header
PAX S80 Manual - 23Menu 2 4. Edit TrailerMenu 2 5. Merchant Fee PWMenu 2 6. Credit Surcharge PW 1. Mode, 2. Flat Fee, 3. Percentage, 4. Surcharge Name,5. Surcharge ConfirmMenu 2 7. Set Batch TimeMenu 2 8. Additional Prompts PW 1. Server ID Mode, 2. Invoice Mode, 3. CashBackPrompt, 4. Tax Prompt, 5. Order No. Prompt, 6. Ticket Prompt, 7. Host Ref Prompt, 8. DebitAccount, 9. GIFT CVD2, 10. GIFT Tender Type, 11. Gift Sale Mode, 12. Table Mode, 13. Guest No.ModeMenu 2 9. Cash EDC Setup PW 1. With Cash, 2. Without CashMenu 2 10. Clerk/Server NameMenu 3. Operation SettingsMenu 3 1. No Paper Mode 1. Off, 2. On, 3. AutoMenu 3 2. Buzzer Setup 1. Buzzer Setup 1. Off, 2. On2. Card Remove Beep 1. No Beep, 2. One Beep, 3. Cont.Menu 3 3 Operation Mode PW 1. Normal Mode, 2. Demo ModeMenu 3 4 Disclaimer Setup PW 1. OFF, 2. ON, 3. Sign Line OnlyMenu 3 5 Halo Setup PW Halo for Sale/RTRN/Cash-Back 1. Off, 2. OnMenu 3 6 Print Setup PW Print all Settings on TerminalMenu 3 7 Receipt Print PW 1. Customer Copy 1. ALL, 2. Credit, 3. Debit, 4. EBT (Onor Off) 3. Font Size 1. Medium, 2. X-Small, 3. Small, 4. LargeMenu 3 8 Store& Forward PW On and OffMenu 3 9 Peripherals PW 1. Ctls. CardRdr, 2. Scanner, 3. Check ReaderMenu 3 10 Language Setting 1. Display 1. English, 2. Chinese2. Print 1. English, 2. ChineseMenu 4. Hosts Setting PWMenu 4 PW 1. Hosts Parameters 1. Merchant ID, 2. Terminal ID, 3. Device ID, 4. TPP ID,5. AUAR, 6. ETC TypeMenu 4 PW 2. Hosts Phones 1. Auth Phones 1. Phone #2. Batch Phones 1. Phone #Menu 4 PW 3. Print EDC SetupMenu 4 PW 4. Hosts URL Parameters 1. Auth URLs, 2. Batch URLsMenu 4 PW 5. Autodial Setup 1. Off 2. OnMenu 4 PW 6. Host Register
PAX S80 Manual - 24Menu 4 PW 7. EMV Param DownloadMenu 5. System SettingsMenu 5 1. Date/Time SetupMenu 5 2. Batch NumberMenu 5 3. Working Mode PW 1. Tip Options [1. EDC Tip, 2. Tip 1 (On/Off)]2. Fraud Control (1. AVS on Swipe, 2. AVS on Card Prsnt, 3.AVS OnCardNotPrsnt, 4. Card Present, 5. V-Code)3. Local DUP Check 1. Off, 2. On4. Split Tender 1. Off, 2. On5. MOTOMenu 5 4. Pre-Dial Call 1. All, 2. Credit, 3. Debit, 4. EBTMenu 5 5. Database PW 1. Post Auth2. Clear Database3. Clear Offline4. Clear Reversal5. Clear Trans.Menu 5 6. Pin Pad Settings PW 1. Internal PIN PAD, 2. External PIN PadMenu 5 7. Keys Injection PW 1. Start, 2. Set BaudRateMenu 5 8. APP Management PW 1. Activate2. App Update3. Configuration4. Terminal SN5. APP InfoMenu 6. Communication PWMenu 6 PW 1. Main Communication 1. LAN, 2. DialMenu 6 PW 2. Backup Communication 1. LAN, 2. Dial, 3. NoneMenu 6 PW 3. Maximum TriesMenu 6 PW 4. Connect TimeoutMenu 6 PW 5. Receive TimeoutMenu 6 PW 6. Dial Parameters 1. Dial Type, 2. Dialing Prefix, 3. Dial Tone CheckMenu 6 PW 7. LAN Parameters 1. LAN Type (DHCP, Static), 2. IP Address, 3. Subnet Mask,4. Gateway IP, 5. DNS IP,6. PING
Aug 25, 2016 · PAX S80 Manual - 3 Adding A New Terminal Please follow the steps in order: 1. First, flip over the terminal to be used and find the SERIAL NUMBER (S/N) 2. Go to "My Terminals" and search for the SERIAL NUMBER (S/N) in the search box Terminal SN/IDFile Size: 1MB