Transcription
LUM-310-PTZIP Surveillance CameraInstallation andQuick Start Guide
310 Series IP PTZ CameraRead this before you go on site!For maximum control and convenience, install your camera with a connection tothe Internet via your NVR or through a local network router. This allows you to useOvrC, a powerful remote maintenance tool. See OvrC.com for details.In addition, your client can use the Luma Surveillance mobile app to check on thecamera from anywhere.For installation using this guide, you must be able to access this camera through apersonal computer. If your surveillance system is not on a network, you’ll have to usethe NVR’s local interface for installation. See the NVR user’s manual for details.Safety Tips}}}}}}}}}}}}}}}}}}2Handle this device with care.Do not strike or shake this device.Protect the power cord from being stepped on or pinched, particularly where itconnects to the device and the power outlet.Do not operate this device beyond its specified power ratings.Do not use this device near any heat sources such as radiators, heat registers,stoves, or other such heat-generating equipment.Temperature affects the performance and lifespan of the camera. For best results,use this device in temperatures ranging from -20 F–140 F.Clean this device with a dry cloth. Do not use strong or abrasive detergentswhen cleaning the device, especially the lens. If dirt is hard to remove, use a milddetergent and wipe gently.Make a note of the configuration settings and save them. This helps when changingthe configuration, when upgrading the device, or with recovery if unexpectedfailure or trouble occurs.Avoid the possibility of a laser striking the camera’s light sensor.
310 Series IP PTZ CameraInspectionEnsure that the device is in good condition and all the assembly parts are included.If the product does not function properly, please contact technical support. Do notdisassemble the camera for repair or maintenance.Box Contents}}}}}}}}CameraMounting plate3 wall anchors with screws (2 sets)Weatherproofing kit for PoE cableRequired EquipmentAside from the contents of this box, you must provide}}}}}}}}}}}}Standard slot-head screwdriverA network connection (and an NVR, if desired)Admin rights to a computer that can access the networkMobile device with Luma Surveillance app (recommended) or CCTV testerPower source: PoE or 12V DCPhillips screwdriver3
310 Series IP PTZ CameraPreparation}}}}}}Ensure that your recorder has the very latest firmware. Use OvrC to update thefirmware, or consult your NVR manual.Keep all equipment powered off during physical installation.Ensure the mounting surface is strong enough to withstand three times the weightof the camera and the mount.Additional ResourcesYou can acquire a PDF of the web interface manual and other materials from theproduct page at SnapAV.com.Overview Before installing, familiarize yourself with the parts of your camera.TailsThe PTZ camera has two leads: a 12V powerlead, and a network jack.The power cable ends in a standardbarrel connector. Attach this to your12V power supply.For outdoor installs, be sure touse the waterproofing kit on yournetwork cable, as shown on thenext page.4t!anImportis toching th ateattaeroBefupda NVR, latestmuLruyotherder tothe reco ! If you don’t,refirmwa atures of your.l feessentia y not functionamcamera
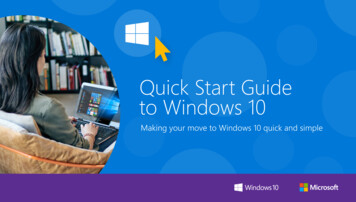
310 Series IP PTZ CameraWeatherproofing the Network CableWe recommend weatherproofing your cable for all outdoor installations, no matterhow shielded your camera may be from the elements. Use the weatherproofing kitprovided with the camera, and an unterminated network cable.1. Before terminating the RJ45 cable , slide it through the lock nut , the thickrubber gasket , and the weatherproof endcap as shown. Be sure the notched sideof the rubber gasket faces toward the endcap, as shown in the diagram below.2. Terminate the RJ45 cable with a network plug .3. Place the O-ring onto the end of the camera’s network interface socket withthe flat side toward the camera. Push it past the locking teeth as far as it easily goes.4. Connect the RJ45 plug to the camera’s network socket .5. Align the teeth on the weatherproof endcap with the gaps on the camera’snetwork interface socket , then insert the socket into the endcap. Twist untilthey click into position (the O-ring gives you a little flexibility while stillweatherproofing the connection).6. Slide the thick rubber gasket into the weatherproof endcap , and secure it byscrewing the lock nut tightly onto the endcap . 5
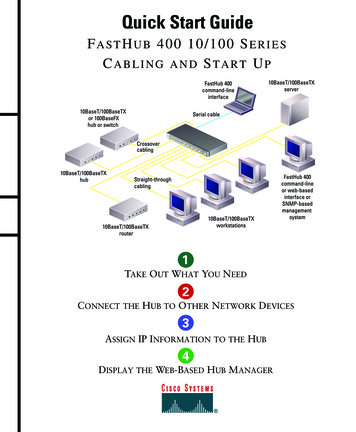
310 Series IP PTZ CameraInstallation: On-CeilingThe cables can be routed either from the top of theextension mount and into the ceiling, or out the side ofthe extension mount to run across the ceiling.Requirements}}}}The ceiling must be strong enough to hold fourtimes the weight of the PTZ camera (and mount).The ceiling tiles should be 5–40mm thick.Steps1. Turn the camera over. Rotate the installation platecounterclockwise to separate it from the camera.LockOpenPENCK2. Place the installation plate in the desired location. Ensure Othefront of theLOplateaims toward the primary viewing area; the camera’s cabling routes out the back.3. Holding the installation plate in place, use a pencil to mark the drilling locationsusing the plate as a guide.4. Drill four holes for mounting screws.6
310 Series IP PTZ Camera5. Flip the base plate over and attach it to the ceilingas shown.6. Route the cables through the cable hole or conduit and connect them to thecamera tails.7. Align the PTZ camera withthe base plate. Insert thePTZ camera and rotateit clockwise into the baseplate until the camera canturn no further (this is theopposite of step 1). Notethe icons on the side of thePTZ to ensure you rotate itproperly.7
310 Series IP PTZ CameraInstall and Run the Luma UtilityUse the Luma Utility to locate your camera and set it up.Visit your product page at SnapAV.com and download the Luma Utilityinstaller from the Support tab. You must use v3.0.0.53 build 20170426 orlater! Earlier versions of the utility will not work!Run the installer. You can click through and accept the defaults.Pre-Installation Camera ConfigurationYou’ll find it easiest to connect the camera directly to your PoE switch, makingmost adjustments to the camera from the convenience of your table (prior tophysical installation), rather than from atop a ladder.Connect the camera to your networked PC. Run the Luma Utility. It searchesfor attached Luma Surveillance devices. If your camera does not appear,check the connection, ensure the camera has power, then click Refresh.Activate the CameraClick on the entryfor your camera toview its details. If thecamera is inactive,use the text boxes atthe lower right of the Luma utility window to activate the camera by creating a newsecure password.}}}}8Passwords cannot be longer than 16 characters. To ensure compatibility withthe local interface, only use numbers, letters, spaces, and the following specialcharacters: . , : - /Use a password that is long and easy to remember. A password like parisinthespringis more secure and easier to remember than a password like D3x-7b.
310 Series IP PTZ CameraEdit the Network SettingsSuggested Best Practices: Ensure the Enable DHCP box isactivated. In your router, reserve an IP address and assign it tothe camera’s MAC address (found on its box). See your router’sdocumentation for details.The HTTP port defaults to 80. It allows you to access yourcamera through a web browser.The server port defaults to 8000. The Luma mobile applicationuses it to access the camera.For security reasons, change your ports and record the newnumbers. Consult your manual for reserved port numbers toavoid.To confirm changes, enter the password that you just createdand then click Save.Complete Port ForwardingPort forwarding allows you to access the camera from the internet for remoteoperations. These settings are entered in your network router, typically in a menucalled Port Forwarding or Applications and Gaming. Refer to your router manual forhelp. Find the settings you need, then log in to the router and enter the new ports.PortDefaultHTTP80New ValueProtocolTCP/UDPServer 8000TCP/UDPRTSPTCP/UDP554Camera IP AddressAdmin Password9
310 Series IP PTZ CameraStart the Web InterfaceOpen your browser and navigate to the camera’s IP address.Below the login area, you may see: “Please click here to downloadand install the plug-in. Close the browser when installing the plugin.” If so, download the plug-in and close all browser windows.Install the LumaWebComponents plug-in, restart your browser and goto your camera’s login window. Log in as admin using the passwordyou created.You might get a pop-up message that asks whether you want to run the Luma WebComponents plug-in. You must allow the plug-in to access your system over the web.Be sure to save your camera’s web page as a favorite in your browser.Check the CameraAfter loggingin, your screenshows the livepage, similar tothe illustrationbelow. If it does notappear, check theconnection to yourNVR or network,and ensure that thecamera is poweredup. Click the Settings icon to access the web interface and finish setup.10SettingsMenuIconPTZIcon
310 Series IP PTZ CameraZoom and FocusThis camera has a motorized varifocal lens.To adjust the focus, return to the live screen (see previous page) and click the PTZ icon. This opens up the PTZ menu on your screen.In the PTZ menu, the buttons circled control the lens.}}}}}}}}The Zoom– button on the top left widens the angle ofvision, providing a more panoramic view.The Zoom button on the top right lowers the angle ofvision, providing a tighter view.The Focus– button on the bottom left focuses on nearobjects.The Focus button on the bottom right focuses on distantones.11
310 Series IP PTZ CameraSet Up PresetsTo set up presets and patrols, go to the live page and click the PTZ iconup the PTZ menu on your screen. This opensSet Up PresetsYou can set up to 300 different presets. To set a preset,click the flag button on the PTZ menu to open thepreset tab. Use the arrow, zoom, and focus buttons tomove your camera to a desired alignment. When youare satisfied, click the preset number you want it tobe, then press the gear button to save the position.To call a preset, press the arrow on the preset’s button.Clicking X deletes the associated preset.Presets 33–45 and 92–105 are reserved for system use. They cannot be overwritten.12
310 Series IP PTZ CameraSet Up Dynamic DNSDDNS allows you to connect to your surveillance system fromanywhere, via the Internet, using a web address that’s easy toremember.Click on the Settings Menu icon (page 12) and navigate to BasicNetwork Settings DDNS.Click Enable DDNS, then choose a type from the DDNS Typedrop-down menu. We recommend WirepathDDNS. Next,choose a server address. We recommend ns2.wirepathdns.com.Enter your desired domain in the Domain box. This creates apersonalized server address, which is shown under Device URL.If someone has already registered your desired domain, thesystem adds two to four digits to your domain.Example: If you choose the domain myhome, yoursystem’s custom URL would become myhome.wirepathdns.com. If someone already had claimedthe myhome URL, then your system’s URL wouldlook like myhome13.wirepathdns.com.If you changed your HTTP port (see page 11),add a colon and the port number to the URL(e.g., myhome.wirepathdns.com:8402).NOTE: All your network devices now use thissame DNS (with appropriate port numbers)!Click Save to finalize the settings.13
310 Series IP PTZ CameraFinal StepsAdd Additional UsersClick on User Management.Click the Add button. Enter the new account’s user name and password. Accountnames can be up to 32 characters long. If you are using an NVR, to ensurecompatibility with the NVR’s local interface, user names should contain numbers andletters only. We recommend that you add accounts by individual users’ names, so thatyou always know which user is involved with any activity.Passwords cannot be longer than 16 characters. To ensure compatibility with the NVR’slocal interface, passwords can only contain numbers, letters, spaces, and the followingspecial characters: . , : - /Choose the account’s level. There are two levels for users: operator and user. The onlydifference is the default permissions they are given. You can customize permissions foreach account individually. See the camera web interface manual (available online onyour camera’s product page) for more details.Calibrate the Camera’s ClockClick on System Settings Time Settings.At the top, choose your time zone.By default, the system uses network time protocol (NTP) to synchronize your systemto Coordinated Universal Time. We strongly recommend using NTP to keep yoursystem well calibrated.If you want to use manual time sync, or if your system is isolated from the Internet, seethe camera web interface manual (available online).If you are in a location that does not observe daylight saving time, click the EnableDST checkbox to deselect it.Click Save to confirm changes.14
310 Series IP PTZ CameraSupportNeed Help? Contact Tech Support!If you need further clarification, please email support@SnapAV.com. For moreinformation, instructional videos, support documentation, or ideas, visit our websiteand view your item’s product page.3-Year Limited WarrantyThis Luma Surveillance product has a 3-Year Limited Warranty. This warrantyincludes parts and labor repairs on all components found to be defective in materialor workmanship under normal conditions of use. This warranty shall not apply toproducts that have been abused, modified or disassembled. Products to be repairedunder this warranty must be returned to a designated service center with an assignedreturn authorization (RA) number. Contact technical support for an RA number.Copyright 2019 by SnapAV. All rights reserved. SnapAV, Luma Surveillance, and allrelated marks and images are trademarks or registered trademarks of SnapAV.Version 191220-1117WARNING: This product can expose you to chemicals including cadmium, which isknown to the State of California to cause cancer. For more information go to www.P65Warnings.ca.gov.15
310 Series IP PTZ Camera16
In addition, your client can use the Luma Surveillance mobile app to check on the camera from anywhere. For installation using this guide, you must be able to access this camera through a personal computer. If your