Transcription
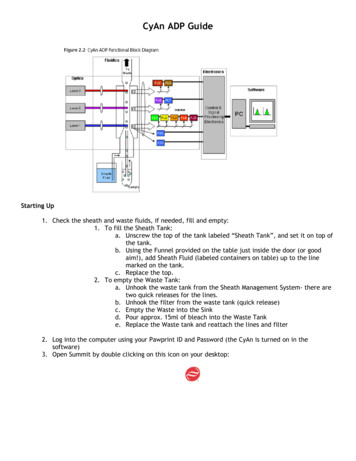
CyAn ADP GuideStarting Up1. Check the sheath and waste fluids, if needed, fill and empty:1. To fill the Sheath Tank:a. Unscrew the top of the tank labeled “Sheath Tank”, and set it on top ofthe tank.b. Using the Funnel provided on the table just inside the door (or goodaim!), add Sheath Fluid (labeled containers on table) up to the linemarked on the tank.c. Replace the top.2. To empty the Waste Tank:a. Unhook the waste tank from the Sheath Management System- there aretwo quick releases for the lines.b. Unhook the filter from the waste tank (quick release)c. Empty the Waste into the Sinkd. Pour approx. 15ml of bleach into the Waste Tanke. Replace the Waste tank and reattach the lines and filter2. Log into the computer using your Pawprint ID and Password (the CyAn is turned on in thesoftware)3. Open Summit by double clicking on this icon on your desktop:
4. This window will appear:5. Select CyAn6. Click “new” to create a new database (or select a previous database). A database is a collection of protocols and data. If you would like to pick up where you leftoff with your protocol and data, open a previous database. This approach is more likely tohave ‘bugs’ and crash, so the CIC recommends running in a new database each time andopening your protocol (which will have your previously made histograms, just not yourpreviously recorded data). If you are making a new database, save it on the Data Drive in your Lab’s folder. If you wouldlike to keep the database, label it with a significant name and store it in your lab’s Protocolfolder. Unless it is saved in the Protocol folder, it will be erased on a monthly basis.7. After making the Database, this screen will pop up:
8. In the Summit Control Panel, Click the Instrument tab. The following window will show belowthe instrument control panel:a.b.c.d.Click Startup and follow the directionsMake sure the required lasers are checked (lasers take 30 min to stabilize)Make sure the laser shutters are closed (click on the ‘opened’ button to close)If you would like to have a separate window for instrument control (comes in handy whenchanging event rate while running), click on the blue box in the upper left corner of thewindow and choose “Detach Floating”.Instrument Setup Open up a protocol If you have a protocol made already: Choose File1. Protocol2. Load
3. Find your protocol:a. My Computerb. Data (D:)c. Customerd. Your folder4. Be sure to Reset your Save Path to a new experimental Folder:a. Double-click the save path row (see #3 below)b. Set the folder (My computer: Data: Customer: Your Folder) If you do not have a protocol, use the following guide to create one: Click the Acquisition tab1. Choose the parameters you want to collect information on in your experiment.a. In the Peak/Area/Log Column, double click the box next to the channelsyou would like to use. For FSc/SSc we generally choose peak and area.For fluorescence channels we generally choose Log. **If you are lookingat Cell Cycle, choose Peak**2. Change the parameter names to customize your experiment (not required)
a. If you would like to change the name of the channels to match yourexperiment, double click on the name, and write in your label3. Set your save patha. Double-click the save path rowb. Set the folder (My computer: Data: Customer: Your Folder) Click the Histogram tab1. To create a histograma. Double-click the x-parameter you wantb. The plot will show up in the blank workspace to the right of the menu2. To create a dot plota. Single-click the x-parameter you wantb. Double-click the y-parameter you wantc. The plot will show up in the blank workspace to the right of the menu
3. Once you’ve created all your dot plots and histograms, you can quicklyorganize them by right clicking in the workspace area and choosing: ArrangeWindows, etc:Acquiring Samples for setup1. Put your negative control sample on the SIP (your samples must be in polypropylene tubes, notthe polystyrene that the BD instruments require)2. Press F2 to start acquiring (adjust the event rate with the speed buttons and scroll bar on theinstrument tab).**If this is a new protocol, and you don’t see any events (maybe a small bundle of events on the axis), thenTHRESHOLD needs to be adjusted. Do the following: Click the Acquisition tabMake sure Threshold is triggering off of FSC. Raise Threshold until you see cells appear onyour plot (make sure you are running at a medium to high rate) this value is usuallybetween 2-3%.
Once cells appear, adjust event rate so cells are running at about 200eps,You may have to lower Threshold to ensure you aren’t cutting off your population ofinterest.3. Adjust the voltage and amp gain values to properly set your negative control:
Your negative control cells should be centered on our FSC/SSC plot and within thefirst decade of your Fluorescence Log Plots:4. Run your other controls to verify the voltage and compensation settings are correct (forcompensation guide see below)5. If you would like to save this protocol for future use, go to File:Protocol: Save As a. My Computer: Data (D:): Customer: YourPI: PROTOCOL FOLDER.b. Be sure to save your protocol in your lab’s specified Protocol Folder.This is the only folder that will not be erased on a monthly basis.
Acquisition for your Experiment:1. Set up Auto Save to ensure you save every sample:2. Label your Sample by double clicking on the Sample Name Row:
A window will pop up, and you can label in the “rules string” area.3. Acquire the sample (F2 or go to Acquisition: Start) Sometimes, the sample doesn’t start properly, and by using the short cut Ctrl Z, you canrefresh the data shown on the histogram so everything is plotted properly.4. If you’ve set limits, allow the run to finish5. If you prefer to run without limits, watch your event count in the window below your histogramplots, and press F2 to stop acquisition (or go to Acquisition: Start which will stop it)6. Save the sample (F3 or if you’ve set up auto save, the save window will pop up automaticallyCompensationSingle-color compensation1. Click the blue button on the plot you would like to compensate Compensate (for manual control) Autocompensate (this will only compensate the x-parameter)Multi-color compensation1. Click the Sample tab Collect and save your single color controls (once you’ve set voltages) Click the blue button on the compensation menu (lower left of screen) Choose “Autocompensate” Set your live gate and enter your control files in the correct parameter Press OK and follow the directionsCyAn Shutdown ProcedureStandby- the following should be done if someone has reserved the instrument within 2 hours of yourappointment (i.e. you are done at 1:00 and someone is reserved for 3:00 or earlier). To check thereservation schedule please go to: http://biotech.missouri.edu/cgi-bin/ureserve.pl1. Click on the “FLUIDICS OFF” button in the Instrument Panel of Summit2. You will be prompted to put a tube of cleaning detergent (Triton-X 100) on the SIP3. You will then be prompted to pull the tube of detergent off, and allow the instrument to backflush.4. After the back flush, the fluidics should be off5. Close the Shutters on the lasers (in the instrument panel of Summit, click on the box that reads“open”. you will hear a clicking noise and the button will then read “closed”6. Close the software (click on the X in the upper right hand corner of the Summit window)7. Log out of your accountShutdown- the following should be done if someone has reserved the instrument within 2 hours of yourappointment (i.e. you are done at 1:00 and no one is signed up until 3:30 or later).1.2.3.4.5.6.Click on the “SHUTDOWN” button in the Instrument Panel of SummitYou will be prompted to put a tube of cleaning detergent on the SIPYou will then be prompted to put a tube of water on the SIPAfter the water runs through, the instrument should shut down completely (no more noise)Close the Software (click on the X in the upper right hand corner of the Summit window)Log out of your account
CyAn ADP Guide Starting Up 1. Check the sheath and waste fluids, if needed, fill and empty: 1. To fill the Sheath Tank: a. Unscrew the top of the tank labeled “Sheath Tank”, and set it on top of the tank. b. Using the Funnel provided on the table just inside the door (or good aim!), add