Transcription
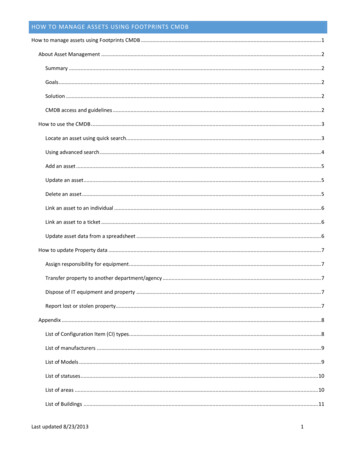
HOW TO MANAGE ASSETS USING FOOTPRINTS CMDBHow to manage assets using Footprints CMDB . 1About Asset Management . 2Summary . 2Goals . 2Solution . 2CMDB access and guidelines . 2How to use the CMDB . 3Locate an asset using quick search. 3Using advanced search . 4Add an asset . 5Update an asset . 5Delete an asset . 5Link an asset to an individual . 6Link an asset to a ticket . 6Update asset data from a spreadsheet . 6How to update Property data . 7Assign responsibility for equipment . 7Transfer property to another department/agency . 7Dispose of IT equipment and property . 7Report lost or stolen property. 7Appendix . 8List of Configuration Item (CI) types. 8List of manufacturers . 9List of Models . 9List of statuses . 10List of areas . 10List of Buildings . 11Last updated 8/23/20131
List of CI attribute fields sorted by source and field name . 12ABOUT ASSET MANAGEMENTSUMMARYUniversity assets of 1,000 or higher are recorded and tracked by the university Property office using an Oracle propertymanagement system (tagged items). Individual campus units track property items that cost less than 1,000 separately(untagged items). Many campus units also track additional property attributes. Reconciling asset location and dispositionrequires considerable effort by Property, administrative, and IT staff.GOALSThe goals of using the Footprints CMDB to help track property assets are: Track all university assets in a single repositoryCategorize critical service IT assets to define dependenciesPrepare reports of assets not at the location the Property database indicatesTrack asset status to ensure equipment is properly surveyed and disposedTrack equipment assigned to individuals by creating relationships between CI items and individuals in the addressbookMaintain location, disposition and assignment of assets at all timesEnter new assets as they are ordered/deliveredMinimize data entrySOLUTIONFootprints provides the framework for a Configuration Management Database (CMDB). This tool allows the campusticketing community to define a set of equipment types (Configuration Items or CIs) that can be connected through a seriesof defined relationships which subsequently provide visual representation of critical service dependencies.Each individual CI contains a data set that can be used by campus areas to track assets. Data items include attributes suchas model, location, assignee, etc. Additionally, the data from Property’s database will be uploaded into the CMDBperiodically. It will then be possible to prepare a large number of reports indicating item locations, item service status,variance in Property and campus data, etc.CMDB ACCESS AND GUIDELINESAll members of the campus community can see items in the CMDB. Only those granted CMDB Agent status can makeadditions and changes to the CIs. To request CMDB Agent status, submit a ticket with the following categorization: Servers Ticketing CMDB.Before access is granted, the Ticketing team will verify authorization (based on how the user’s campus area/department isgranting access), provide basic training, and confirm that the soon-to-be agent agrees to the guidelines for using the CMDBtool. These guidelines include, but are not limited to: not editing data outside of their area (except correcting areainformation), and correctly entering items so that they can be correlated with Property’s data.Last updated 8/23/20132
HOW TO USE THE CMDBLOCATE AN ASSET USIN G QUICK SEARCHQuick search locates assets using their property tag number, CI number and/or current description.1.2.Login to FootprintsClick on the CMDB link (a new window will launch)3.4.Type the tag number or serial number in the CMDB Search box and click SearchSelect the asset from the results list and double-click or select Details for more information5.The details page will open in a new windowa.b.c.d.Select Edit to make any changesSelect the Contact Links tab to see who it is assigned toSelect the History tab to review any changesSelect the Issue Links tab to see any related ticketsLast updated 8/23/20133
USING ADVANCED SEARCHAdvanced search locates assets using any asset attribute including assignee, serial number, and notes.1.2.3.4.Login to FootPrintsClick on the CMDB link (a new window will launch)From the CMDB Home screen click Advanced under the search barLocate the data you want to include in your report. (If you need to get back to this page click Home):a. On the CI Types tab, select the CI Type(s) you wish to include in your report – Use Saved Searches PhysicalAssets if you want to include all Property assetsb.On the Attributes tab, select parameters to limit your searchc.On the Columns Displayed tab, select which columns to include in your reportd.Optional: on the Save tab, enter a name for your search and click Save. The search will be saved eventhough there is no indication that anything has happened. The saved search will be available to all agentsSelect the Results tab to run the search. It may take a moment for data to appearIf you would like to download the results as a spreadsheet, click the CSV buttone.f.Note: When modifying a previously saved search the CSV results may not match the results shown on screen. To remedythis problem, save the modified search before clicking CSV.Last updated 8/23/20134
ADD AN ASSET1.2.3.4.Login to FootPrintsSelect the CMDB link (a new window will launch)Verify that you will not be adding a duplicate item by searching for the tag and/or serial number using theadvanced search. If found, update the item instead of adding (see below).Click New CI5.Select the appropriate CI Type and click Next6.Enter description, area, serial number, tag number and other attributes All entries must have a unique serial number OR tag number Description and Area are required Partial information is acceptable For items that have a Tag Number, enter the Tag Number in the Property Data section so that duplicateitems are not created when Property data is loadedClick Save7.UPDATE AN ASSET1.2.3.4.5.Login to FootprintsSelect the CMDB link (a new window will launch)Search for the asset (see above)Double-click the asset in the results window to open the asset details windowClick Edit6.7.Update the asset information as neededClick SaveDELETE AN ASSET1.2.3.4.5.6.Login to FootPrintsClick on the CMDB link (a new window will launch)Search for the asset (see ‘Locate an asset’ or ‘Create an asset report’ sections above)Double-click the asset in the results window to open the asset details windowChange the CI Status to To Be DeletedClick SaveLast updated 8/23/20135
LINK AN ASSET TO AN INDIVIDUAL1.2.3.4.5.Login to FootPrintsClick on the CMDB link (a new windows will launch)Search for the asset (see ‘Locate an asset’ or ‘Create an asset report’ sections above)Double-click the asset in the results window to open the asset details windowSelect the Contact Links tab6.7.8.Click Add LinkSearch for the individual in the FootPrints address bookSelect the individual’s ID number to be added as a ContactNote: An asset can be linked to multiple individualsLINK AN ASSET TO A TICKETVIA CUSTOMERThis option currently works inconsistently. We are working with BMC to resolve the issue and will update these instructionswhen the issue is fixed.VIA KEYWORD1.2.3.4.Login to FootPrintsOpen the desired ticket or create a new ticketExpand/select the CI Links tab/area (you may need to click on the to expand the section)Click Add Link5.6.7.8.9.Select From Keyword SearchEnter a keyword, ID number, etc. and click SearchSelect the desired item(s) in the results listClick Return SelectionsClick Yes when prompted with ‘Link this issue to Selected CI(s)?UPDATE ASSET DATA FROM A SPREADSHEET1.2.3.4.5.6.7.8.From the CMDB, run the Physical Assets searchSelect your Area as an attribute to limit the search toSave the searchClick CSV on the Results tab to download the results to your computerDo NOT edit any of the column names or formatsUpdate the user defined fields – see list of CI attribute fields for more informationAdd any new records to the bottom of the spreadsheetSave the updated spreadsheetLast updated 8/23/20136
9. Create a ticket with the following categorization Servers Ticketing CMDB and attach the updated file10. The Ticketing team will review your updates and will let you know if any changes are required before updating theCMDBHOW TO UPDATE PROPERTY DATAThe university Property office provides forms for tracking campus assets. Most should be completed and returned to theProperty office so that the official records can be updated. Please be aware that these forms need to be submitted inaddition to updating the CMDB record.ASSIGN RESPONSIBILITY FOR EQUIPMENTCampus employees who will be taking university-owned equipment off site need to complete an Equipment UserAuthorization form. This form should be retained by the employee’s department /forms/pdf/equipment use authorization.pdfTRANSFER PROPERTY TO ANOTHER DEPARTMENT/AGENCYProperty can be transferred between campus departments. The itannounce listserv can be used to notify campusdepartments when usable items are available. Only items that will not create a security issue may be posted to itannounce(e.g., listed computer hardware must be able to run a supported operating system).When property is transferred from one department to another, a Property Transfer Form must be completed and sent tothe Property /forms/pdf/equipment relocation.pdfDISPOSE OF IT EQUIPMENT AND PROPERTYWhen property is beyond its useful life, it should be appropriately disposed of. A Property Survey Request Form must becompleted and sent to the Property office so that the item can be removed from the rm/forms/pdf/surveyrequest.pdfREPORT LOST OR STOLEN PROPERT YTo report lost or stolen property, an Equipment Loss Report must be completed and sent to the Property /forms/pdf/equipment lost report.pdfLast updated 8/23/20137
APPENDIXLIST OF CONFIGURATION ITEM (CI) TYPE SCI eSoundStorageTelecomTransport*UPSExampleAudio visual equipmentCopy machines and MFCMonitorsGeneral, non-IT equipmentFurniture & fixturesMice, keyboards, Wacom tabletsSwitch, wireless access pointOther IT equipmentDesktops, laptops, tabletsPhones and conferencing unitsPrintersRadio, walkie-talkieCard readersDocument scannersServer hardwareLicensed softwareAssisted listening devices (TDD), speakers,headphonesSAN, RAID, hard drive, USB storagePolycom, VOIP equipmentCars, boats, cartsUninterrupted power supply*non IT CI TypesTo request additional CI types, submit a service request with the following categorization: Servers Ticketing CMDB.Last updated 8/23/20138
LIST OF MANUFACTURERS 3MAcerAllied onExtron aCieLanierLeicaLexmarkLGMackie maPioneerRCARicohSachtlerSamsungSanyoSennheiser aZebraZeissManufacturer can be left blank if the manufacturer is not listed in the pull down.To request additional manufacturers, submit a service request with the following categorization: Servers Ticketing CMDB.LIST OF MODELS 3750iBookiMaciMac 17iMac 20iMac 21.5iMac 24iMac 27LatitudeLatitude E6400Latitude E6410Latitude E6420Latitude E6430Last updated 8/23/2013 Latitude E6500Latitude E6510Latitude E6520Latitude E6530Mac CubeMac MiniMacBookMacBook 13MacBook 15MacBook 17MacBook AirMacBook ProMacBook Pro 13 MacBook Pro 15MacBook Pro 17OptiplexOptiplex 9010Optiplex 960Optiplex 980Optiplex 990Optiplex GX620PowerBookPrecisionSatellite L300Tecra M9Vostro9
Model can be left blank if the model is not listed in the pull down.To request additional models, submit a service request with the following categorization: Servers Ticketing CMDB.LIST OF STATUSESTwo separate statuses are provided for items in the CMDB: CI Status (system) and Property Status. The property status isprovided by the Property office and cannot be changed. The CI status has two additional statuses that can be selected thatare not reflected in Property’s data:StatusAsset stateUsed inIn ServiceDeployed and in useCI Status and Property StatusSurplusIn service and not currently in use - has not been retiredCI Status onlyRetiredNot currently in use and has been disposed of appropriatelyCI Status and Property StatusTo Be DeletedItems to be removed from the CMDB (e.g. duplicates or errors)CI Status onlyLIST OF AREASThe area entered in the CMDB for each CI item designates which campus area provides support for the item, not necessarilythe area where the item is in use or stored.Area AcronymArea NameAAAcademic AffairsADVUniversity AdvancementATAcademic TechnologyBUSCollege of BusinessCCSCCesar Chavez Student CenterCELCollege of Extended LearningCOEGraduate College of EducationCOSECollege of Science and EngineeringCPDCCapital Planning, Design and ConstructionDOITDivision of Information TechnologyDPRCDisability Programs and Resource CenterEMTEnrollment Management TechnologyETHSCollege of Ethnic StudiesFiscalFiscal AffairsHRHuman ResourcesHSSHealth and Social SciencesLCACollege of Liberal and Creative ArtsLIBLibraryPPDPhysical Planning and DevelopmentRTCRomberg Tiburon CenterSHSStudent Health ServicesUPDUniversity Police DepartmentLast updated 8/23/201310
LIST OF BUILDINGSBuildingAcronymBuilding NameBuildingAcronymBuilding NameADMAdministrationT-RTemporary Building RBHBurk HallT-STemporary Building SBUSBusinessTCS-AThe Towers at Centennial SquareCPCentral PlantTCS-BThe Towers at Centennial Square (ConferenceCenter)CCSCCesar Chavez Student CenterVCS-AThe Village at Centennial Square - Building ACCMPChildren's CampusVCS-BThe Village at Centennial Square - Building BECECChildren's CenterVCS-CThe Village at Centennial Square - Building CCYCorporation YardUPN-AUniversity Park NorthCOXCox StadiumUPN-BUniversity Park NorthCACreative ArtsUPN-CUniversity Park NorthDTCDowntown CampusUPN-DUniversity Park NorthEPEthnic Studies & PsychologyUPN-EUniversity Park NorthFH1Field House No. 1UPN-FUniversity Park NorthFH2Field House No. 2UPN-GUniversity Park NorthFAFine ArtsUPN-HUniversity Park NorthFLSFFlorence Hale Stephenson FieldUPN-IUniversity Park NorthGH1Greenhouse No. 1UPN-JUniversity Park NorthGH2Greenhouse No. 2UPN-KUniversity Park NorthGYMGymnasiumUPN-LUniversity Park NorthHHHensill HallUPN-MUniversity Park NorthHUMHumanitiesUPN-NUniversity Park NorthHSSHumanities & Social Science BuildingUPS-AUniversity Park SouthLIBJ. Paul Leonard LibraryUPS-BUniversity Park SouthMALMaloney FieldUPS-CUniversity Park SouthTNISMaloney FieldUPS-DUniversity Park SouthMPHMary Park HallUPS-EUniversity Park SouthMWHMary Ward HallUPS-FUniversity Park SouthL20Parking GarageTHThornton HallPRESSPress BoxWH1Warehouse No. 1RDCResidence Dining CenterWH3Warehouse No. 3SCIScienceWMWaste ManagementSFSoftball FieldSNFCSierra Nevada Field CampusSHCStudent Health CenterTIB20Tiburon Building 20Last updated 8/23/201311
SSBStudent Services BuildingTIB36Tiburon Building 36ANX1Temporary Annex 1TIB39Tiburon Building 39ANX2Temporary Annex 2TIB49Tiburon Building 49T-KTemporary Building KTIB50Tiburon Building 50T-NTemporary Building NTIB53Tiburon Building 53T-OTemporary Building OT-PTe
2. Click on the CMDB link (a new window will launch) 3. Type the tag number or serial number in the CMDB Search box and click Search 4. Select the asset from the results list and double-click or select Det