Transcription
USER GUIDEDigital Light MeterModel LT300
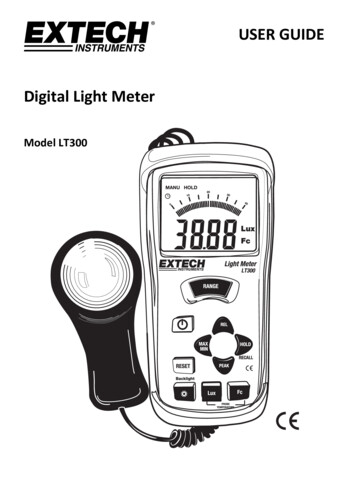
IntroductionCongratulations on your purchase of the Extech LT300 Digital Light Meter. The LT300 measureslight level (illuminance) to 400,000 Lux (40,000 Fc). The LT300 offers a backlit display, MAX/MIN,Data Hold, Relative, Peak, and Reset features. This instrument is shipped fully tested and calibratedand, with proper use, will provide years of reliable service. Please visit our website(www.extech.com) to check for the latest version of this User Guide, Product Updates, andCustomer Support.Meter sor cableAnalog bargraphNumerical displayRANGE buttonON/OFF buttonMAX/MIN buttonRESET buttonLCD Backlight buttonLUX buttonFc foot candle buttonProtective rubber jacketRELATIVE buttonData HOLD buttonPEAK buttonPhoto sensor dome1215341151261371489 10Notes: Protective sensor cap not shown. Battery compartment, Tilt Stand, and Tripod Mountare located on the rear of the instrument. The protective rubber jacket must be removedfrom meter to access battery compartment.2LT300-EU-EN V2.3 2/13
OperationLight sensor1. The light sensor is permanently attached tothe meter by the coiled cable.2. Remove the protective cap by unsnapping itto expose the white domed light sensor.When the sensor’s protective cap is removed, the white domed light sensor lens will begin tocapture light. Replace the cap when the meter is not in use.Turn Power ON or OFFPress thebutton to turn power on or off. If the display does not switch on, check that the 9Vbattery is installed and is fresh.Selecting Lux or Foot candle units of measurePress the LUX button to select lux units or the Fc button to select foot candle units.Measurement Procedure1. Remove the protective cap from the sensor so that the white domed light sensor is exposedto the light. For overhead lighting, the sensor can be placed on a desk or table top. A tripodmount and a tilt stand are located on the rear of the meter for convenience.2. The display will indicate the light level in Fc or Lux.3. Press the RANGE button to select the range that provides the maximum resolution. If the‘OL’ appears the light measurement is out of range. Select another range using the RANGEbutton.4. Press the backlight button to illuminate the LCD display if needed.MAX/MINThe Max/Min function allows for recording and display of the maximum and minimum lightlevels over time.1. Press the MAX/MIN button. The MAX display icon will appear and meter will now displayand hold only the highest reading. The display will update only when a higher reading ismeasured.2. Press MAX/MIN button. The MIN display icon will appear and meter will now display andhold only the lowest reading. The display will update only when a lower reading is measured3. Press MAX/MIN again. The MAX MIN display icons will appear flashing and meter will nowdisplay the current reading, but will continue to record the highest and lowest values.4. Press MAX/MIN again to cycle through MAX and MIN displays.5. To exit the MAX MIN mode, press and hold the MAX/MIN button until the MAX and MINicons completely disappear.Data HoldPress the HOLD button to freeze the displayed reading. The ” MANU HOLD” hold icon will appearon the display. Press the HOLD button again to return to normal operation. When the Data Holdfunction is enabled the analog bar graph will continue to display level changes.3LT300-EU-EN V2.3 2/13
Peak HoldThe Peak Hold feature allows the meter to captures light pulses that rise or fall down to 10µs.1. Press and hold the PEAK button until CAL appears in the display.2. Momentarily press the PEAK button. The ‘PMAX’ icon will appear on the LCD. The meter willthen measure and display any light pulses. The display will hold the results until a higherpulse appears.3. Press the PEAK button again to display the “PMIN” values.4. To exit the Peak Hold mode, press and hold the PEAK button until the ‘PMAX’ or ‘PMIN’ icondisappears.Relative modeMeasurements can be displayed as a difference between the measured light level and a storedreference value. To store a reading as a reference, press the REL button when the desiredreference measurement is on the LCD (the REL icon will switch on). All subsequent displayedreadings will be “relative” to the stored reference value. For example, if the reference value is100 and the actual light level is 125, the meter will display 25. To view the reference value, pressthe REL button again so that the REL icon begins to flash. The displayed value will be thereference value. To exit the Relative mode, press and hold the REL button until the REL icondisappears.RESETPress the RESET button to clear the memory and exit from REL, HOLD, PEAK and MAX/MIN. TheRESET will also reset the auto power off timer.BacklightPress the ““ button to turn the backlight on. Press again to turn it off.4LT300-EU-EN V2.3 2/13
MaintenanceCleaning and storage1. The white plastic sensor dome should be cleaned with a damp cloth when necessary. Useonly a mild soap if needed. Do not use solvents, abrasives, or harsh detergents to clean thedome.2. Store the meter in an area with moderate temperature and humidity (refer to the operatingand storage range in the ‘Specifications’ section).Battery ReplacementWhen the battery power begins to fail the low battery symbol “ ”will appear on the LCD. Replacethe 9V battery by first removing protective jacket that encases the meter. Remove the rear(center) battery compartment screw to access the battery compartment. Ensure that thecompartment cover is securely fastened and that the protective jacket is properly installedbefore using the meter.Never dispose of used batteries or rechargeable batteries in household waste.As consumers, users are legally required to take used batteries to appropriatecollection sites, the retail store where the batteries were purchased, or whereverbatteries are sold.Disposal: Do not dispose of this instrument in household waste. The user isobligated to take end‐of‐life devices to a designated collection point for the disposalof electrical and electronic equipment.Other Battery Safety Reminderso Never dispose of batteries in a fire. Batteries may explode or leak.o Never mix battery types. Always install new batteries of the same type.5LT300-EU-EN V2.3 2/13
SpecificationsRanges and ResolutionAccuracyLux40.00, 400.0, 4000, 40.00k, 400.0kLux (5% Rdg 0.5% Full Scale)Foot candle (Fc)40.00, 400.0, 4000, 40.00kFc (5% Rdg 0.5% Full Scale)General SpecificationsDisplayMulti‐function 3‐3/4 (3999) digit LCD with Bargraph indicatorOver range indicationLCD displays ‘OL’Spectral responseCIE photopic (CIE human eye response curve)Spectral accuracyCIE V function (f1 6%)Measurement Repeatability 2%Temperature coefficiento 0.1% per CSampling rate13.3 times per second (bargraph); 1.3 times per second (digitaldisplay)Photo detectorSilicon photo‐diode with spectral response filterPeak HoldCapture light peaks to 10µSOperating conditionsooTemperature: 0 to 40 C (32 to 104 F); Humidity: 80% RHStorage conditionsooTemperature: ‐10 to 50 C (14 to 140 F); Humidity: 80% RHDimensions165 x 76 x 43mm (6.5 x 3.0 x 1.7")WeightApprox. 403g (14.2 oz.) with battery installedLow battery indication“ ” appears on the LCDPower supply9V batteryCopyright 2013 FLIR Systems, Inc.All rights reserved including the right of reproduction in whole or in part in any formISO‐9001 Certifiedwww.extech.com6LT300-EU-EN V2.3 2/13
AppendixTypical Light ‐200200‐300LuxFootCandlesFactoriesEmergency Stairs, WarehouseExit/Entrance Passages100‐150150‐20010‐1515‐20Packing 50750‐1,50015‐2020‐7575‐150Visual Work: Production LineTypesetting: Inspection WorkElectronic Assembly, DraftingOfficeIndoor Emergency StairsCorridor StairsConference,Reception Room75‐150 Clerical Work150‐2000 Typing, 50‐7575‐1501,500‐3,000150‐300Display StandElevatorShow Window,Packing TableStorefront, Show iesDrawing Room,TableMakeupReading, StudySewingRestaurantCorridor StairsEntrance,Wash RoomCooking Room,Dining TableShow WindowHospitalEmergency StairsStairsSick Room,WarehouseWaiting RoomMedical Exam RoomOperating Room500‐1000 Eye InspectionSpectral SensitivityRelativeResponse10.80.60.40.20 400450500550600650700Wavelength (nm)- - - - - Light Meter ResponseCIE Response7LT300-EU-EN V2.3 2/13
7 LT300-EU-EN V2.3 2/13 Appendix Typical Light Levels Lux Foot Candles Lux Foot Candles Factories Home 20‐75 2‐7 Emergency Stairs, Warehouse 100‐150 10‐15 Washing