Transcription
Intuit Field Service Management ESCorrigo Integration ClientFor QuickBooksSetup Tip Sheeti
This documentation and related computer software program (hereinafter referred to as the “Documentation”) is for the end user'sinformational purposes only and is subject to change or withdrawal by Corrigo Incorporated at any time.THIS DOCUMENTATION MAY NOT BE COPIED, TRANSFERRED, REPRODUCED, DISCLOSED OR DUPLICATED,IN WHOLE OR IN PART, WITHOUT THE PRIOR WRITTEN CONSENT OF CORRIGO. THIS DOCUMENTATION ISPROPRIETARY INFORMATION OF CORRIGO AND PROTECTED BY THE COPYRIGHT LAWS OF THE UNITEDSTATES AND INTERNATIONAL TREATIES.TO THE EXTENT PERMITTED BY APPLICABLE LAW, CORRIGO PROVIDES THIS DOCUMENTATION “AS IS”WITHOUT WARRANTY OF ANY KIND, INCLUDING WITHOUT LIMITATION, ANY IMPLIED WARRANTIES OFMERCHANTABILITY, FITNESS FOR A PARTICULAR PURPOSE OR NONINFRINGEMENT. IN NO EVENTWILLCORRIGO BE LIABLE TO THE END USER OR ANY THIRD PARTY FOR ANY LOSS OR DAMAGE, DIRECT ORINDIRECT, FROM THE USE OF THIS DOCUMENTATION, INCLUDING WITHOUT LIMITATION, LOST PROFITS,BUSINESS INTERRUPTION, GOODWILL OR LOST DATA, EVEN IF CORRIGO IS EXPRESSLY ADVISED OF SUCHLOSS OR DAMAGE.THE USE OF ANY PRODUCT REFERENCED IN THIS DOCUMENTATION AND THIS DOCUMENTATION ISGOVERNED BY THE APPLICABLE END USER'S LICENSE AGREEMENT.The manufacturer of this documentation is Corrigo IncorporatedProvided with “Restricted Rights” as set forth in 48 C.F.R. Section 12.212, 48 C.F.R. Sections 52.227-19(c)(1) and (2) orDFARS Section 252.227.7013(c)(1)(ii) or applicable successor provisions. 2007 - 2009 Corrigo Incorporated, 8245 SW Tualatin Sherwood Rd. Tualatin, OR 97062. All rightsreserved.All product names referenced herein belong to their respective companies.Version 6.5 PJ 1/22/2009 12:08 PMCorrigo Integration Client for QuickBooks – Setup Tip Sheetii
Corrigo Integration Client forQuickBooks -- Setup Tip SheetOverviewThis guide explains how to best setup the Corrigo Integration Client for QuickBooks. The followingassumptions apply to the use of this guide: You utilize QuickBooks as your business accounting software (see System Requirements in UserGuide for additional information)You have a basic understanding of how to access, navigate, and use both QuickBooks and yourIntuit Field Service Management ES product.You have successfully downloaded and installed the Corrigo Integration Client fromSettings Company Integration on the computer where you have your QuickBooks companyfile and in which you are going to run the integrationYour QuickBooks application runs on a computer that has Internet access.You have your QuickBooks company file open and have chosen to sync it with your Field ServiceManagement application.Note: Please refer Corrigo Integration Client for QuickBooks User Guide if you need additionalinformation on downloading and installing the Integration Client.How to best configure your Integration SettingsThis section will help you to best setup the Corrigo Integration Client for QuickBooks. Most of thesettings will have a default value and you can choose to leave them as it is. This document describes themain configurations items which you need to look out for.Note: Please refer Corrigo Integration Client for QuickBooks User Guide if you need additionalinformation.Corrigo Integration Client for QuickBooks – Setup Tip Sheetiii
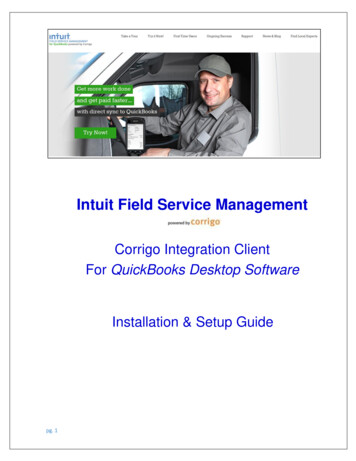
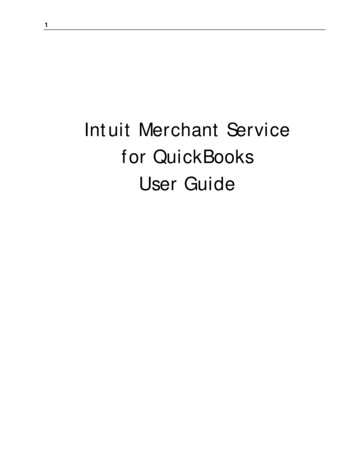
General SettingsFigure 1:General Settings screen of the Initial Synchronization Setup WizardNote: The term WorkTrack in the above screen refers to Field Service Management application.Appropriate brand name will be displayed only after the authentication code and company name isprovided in the next step.Item to ConfigureHow to set this up?Why?General SettingsSet it to QuickBooksWinsIf you are using QuickBooks for accounting,you must have all your customers in QB. Forall your customers to get sync’d up with FieldIf updates have been madeCorrigo Integration Client for QuickBooks – Setup Tip Sheet4
Item to ConfigureHow to set this up?to the same item in bothField Service Managementand QuickBooks then duringsynchronization, whichsystem should win?Why?Service Management and also for all yourfuture edits to get sync’d up you should selectQuickBooks wins.Example: Say you have a customer ‘Pizza Hut’in QB. You add a phone number to thecustomer record in QB. Your dispatcher whoadds in a phone number to that samecustomer in Field Service Management. Sinceyou selected QuickBooks wins, your change inQB will overwrite the change made in FieldService Management.Backup SettingsYou don’t have to makeany changes here.Default settings shouldbe good.On-Demand Sync SettingsSelect ‘Yes’When you add or edit a customer or item inQuickBooks those changes will automaticallybe applied in Field Service Management. Youneed not explicitly run the sync process fromwithin QuickBooks.This will make sure that customer and iteminformation is always up-to-date for yourdispatchers and techs. Youraccounting/bookkeeping person will have fullcontrol over what gets into QuickBooks.When should you select ‘No’?If you have multiple service areas in differenttime zonesOrIf you have several price list categoriesdefined in Field Service Management and youwant to send service items from QB into thosedifferent categories.Note: On-Demand sync can only sendcustomers to one service area and serviceitems to one price list category.Corrigo Integration Client for QuickBooks – Setup Tip Sheet5
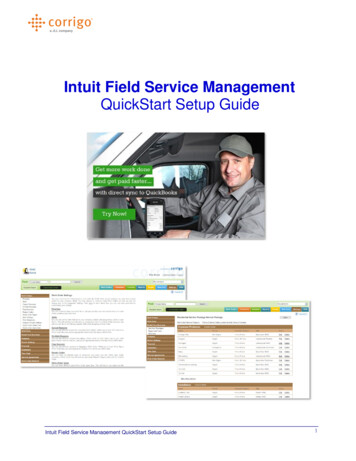
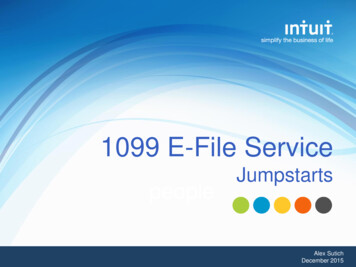
Field Service Management Login SettingsOn the next screen, enter the Authentication code and Field Service Management company name.Figure 2:Enter the login information you use to access the Field Service Management webapplicationNote: The term WorkTrack in the above screen refers to Field Service Management application.Appropriate brand name will be displayed only after the authentication code and company name isprovided in this step.Corrigo Integration Client for QuickBooks – Setup Tip Sheet6
Item to ConfigureHow to set this up?Why?WorkTrackauthentication codeYou can get the authentication code and companyname by logging into your Field ServiceManagement application and navigating toSettings Company Integration Settings.This is required to connectyour QuickBooks companyfile to your Field ServiceManagement.WorkTrack companynameYou can get the company name by logging intoyour Field Service Management application andnavigating to Settings Company IntegrationSettings. Your company name will be displayedthere.“Customer Synchronization SettingsOn this screen, you will decide how customer records will synchronize.Corrigo Integration Client for QuickBooks – Setup Tip Sheet7
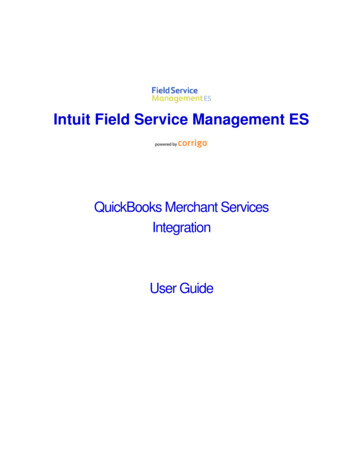
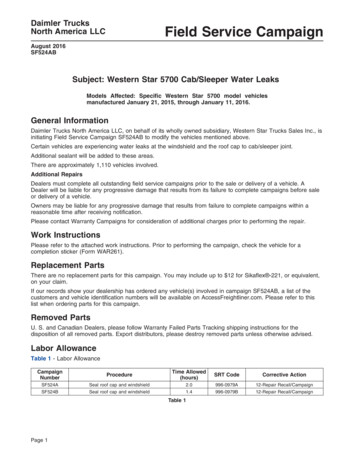
Figure 3:Customer Synchronization SettingsItem to ConfigureHow to set this up?Why?Default Field ServiceManagement customer typeSelect Commercial if majorityof your customers arecommercial customers.When customers are imported fromQuickBooks, they by default will get the‘type’ you select here.Select Residential if majority ofyour customers are residentialCustomer type will come in handy inreporting.Usually there will be only oneservice package to select from,Field Service Management ServicePackage holds the knowledge base ofWhen adding customers toField Service ManagementCorrigo Integration Client for QuickBooks – Setup Tip Sheet8
from QuickBooks the defaultservice package should bethis is normal simply pick thatone.problem categories and services whichare offered in your industry.When importing customers fromQuickBooks we need to know to whichservice package customers should beassociated in Field Service Management.QuickBooks customer typemapped to “Commercial”Select one from the dropdownthat best describes aCommercial customerField Service Management has only 2customer types whereas QuickBookscan have several. When customers areimported from QuickBooks we need toknow how you would like to map yourQuickBooks customer type to FieldService Management.Note: It doesn’t really matter for theintegration what you pick here.QuickBooks customer typemapped to “Residential”Select one from the dropdownthat best describes aResidential customer“Select how you want yourcustomer list synchronizedSelect ‘Customers and alllevels of jobs’ if you want toimport all levels of jobs as sites(locations) into Field ServiceManagement.Please refer to the User Guide if youneed additional details on how data willbe imported.Note: We recommend you toskip a job level if you haveactual jobs (equivalent to awork order) listed in that levelbecause Field ServiceManagement only needscustomers and sites on whichyou’ll create work orders.Corrigo Integration Client for QuickBooks – Setup Tip Sheet9
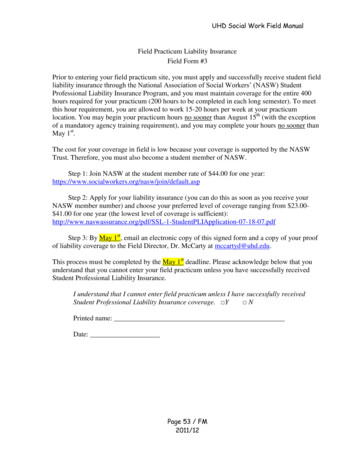
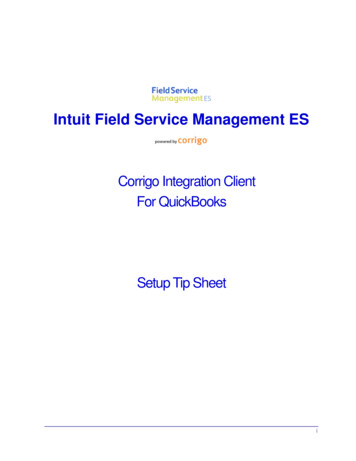
Item Synchronization SettingsFigure 4:Item synchronization settings exampleItem to ConfigureHow to set this up?Why?When adding service itemsto QuickBooks the defaultSelect the income account you wouldusually pick when you are creating aField Service Management doesnot keep track of accounts forCorrigo Integration Client for QuickBooks – Setup Tip Sheet10
Item to ConfigureHow to set this up?Why?account should beservice item in QuickBooks here.items created. So if you create aprice list item in Field ServiceManagement, we need to knowto what account that item shouldbe associated with, whencreating that item in QuickBooksvia integration.The account you select here willbe used as a default account forall the items that will be createdin QuickBooks.Note: We recommend that youalways create your items inQuickBooks. So this settingdoesn’t really matter if you arenever going to create items inField Service Management.When adding service itemsto QuickBooks the defaulttax code should beSelect a Tax type depending onwhether you charge tax or not foryour services.The tax type you select here willbe used as default tax value forall the items that will be createdin QuickBooks.When adding non-inventorypart items to QuickBooks thedefault account should beSelect the income account you wouldusually pick when you are creating anon-inventory part item inQuickBooks here.Same reason as mentioned abovefor service items.When adding non-inventorypart items to QuickBooks thedefault tax code should beSelect a Tax type depending onwhether you charge tax or not foryour non-inventory part.Same reason as mentioned abovefor service items.Associate QuickBooksservice items with theseField Service Managementprice list categoriesIf you don’t see any checkboxes in thewhite box, click on ‘Add price listcategory ’ button on the right. Entercategory name as ‘Services’ and clickon ok. Check the Services checkbox.Field Service Management willimport all service items inQuickBooks into a Price listcategory, which is what youselect here.If you already see some categorieslisted, select the one which you wantto map to service items.Note: We recommend that youcreate one category each forService, Non-Inventory andInventory (if you are usingInventory in QB) itemsrespectively and select theCorrigo Integration Client for QuickBooks – Setup Tip Sheet11
Item to ConfigureHow to set this up?Why?appropriate category, for each ofthe item type in QuickBooks.You can have multiple Price Listcategories defined in FieldService Management. But thenyou will have to manually selectthe categories for different itemsin the reconcile grid duringsynchronization. Please refer theIntegration User Guide for moredetails on how to map if youhave multiple categories.Associate QuickBooks NonInventory part items withthese Field ServiceManagement price listcategoriesIf you don’t see any checkboxes in thewhite box, click on ‘Add price listcategory ’ button on the right. Entercategory name as ‘Non-Inventory’and click on ok. Check the NonInventory checkbox.Field Service Management willimport all non-inventory partitems in QuickBooks into a Pricelist category, which is what youselect here.If you already see some categorieslisted, select the one which you wantto map to Non-Inventory items.Associate QuickBooksInventory part items withthese Field ServiceManagement price listcategoriesIf you don’t see any checkboxes in thewhite box, click on ‘Add price listcategory ’ button on the right. Entercategory name as ‘Inventory’ andclick on ok. Check the Non-Inventorycheckbox.If you already see some categorieslisted, select the one which you wantto map to Inventory items.When adding sales tax itemsto QuickBooks the defaulttax agency should beSelect a tax agency that you wouldlike to associate the sales tax itemswhich you create in Field ServiceManagement.Field Service Management willimport all inventory part items inQuickBooks into a Price listcategory, which is what youselect here.Note: This setting will appearonly of you have Inventoryturned on in your QuickBookscompany file.The tax agency you select herewill be used as default taxagency for all the sales tax itemswhich will be created inQuickBooks via integration.Note: We recommend that youalways create your sales taxitems in QuickBooks. So thissetting doesn’t really matter ifCorrigo Integration Client for QuickBooks – Setup Tip Sheet12
Item to ConfigureHow to set this up?Why?you are never going to createitems in Field ServiceManagement.Corrigo Integration Client for QuickBooks – Setup Tip Sheet13
Invoice Export SettingsThis screen allows you to select how invoices created in the web application are exported to QuickBooks.Follow prompts to complete fields.Figure 5:Invoice export settings screenCorrigo Integration Client for QuickBooks – Setup Tip Sheet14
Item to ConfigureHow to set this up?Why?Invoice to be printedCheck this if you always mark allyour invoices ‘To be printed’ inQuickBooks.Checking this field will check ‘Tobe printed’ checkbox in all theinvoices that are exported toQuickBooks.Leave this unchecked if youdon’t print all your invoices inQuickBooks.Invoice to be e-mailedCheck this if you always mark allyour invoices ‘To be e-mailed’ inQuickBooks.Leave this unchecked if youdon’t email all your invoices inQuickBooks.Do you want to see the workdone description in the invoice?Select Yes if you normally wouldinclude description on what yourtech did on that job. This is thedescription entered in thecompletion section of the workorder, with by the Tech orsomeone in the office. You canstill edit this in QuickBooks afterthe invoice is posted there.Where do you want to see thework done description in theinvoice?Select Top (first line item) if youwant the work done descriptionto appear as the first thing in theinvoice.Note: If a customer somehowcomes through without anaddress the synchronization willthrow an error if this option wasselected.Checking this field will check ‘Tobe e-mailed’ checkbox in all theinvoices that are exported toQuickBooks.Note: If you check Invoice to beemailed, your customer contactrecords must include a validemail address or invoicesynchronization will fail. Wegenerally recommend againstchoosing this setting.You get to choose where youwant the data to be displayed inthe invoice per your businesspractice.Select Bottom (last line item) ifyou want the work donedescription to appear as the lastthing in the invoice after theitems with values.Corrigo Integration Client for QuickBooks – Setup Tip Sheet15
Item to ConfigureHow to set this up?Why?When creating invoice use theinvoice templateSelect the template that you usefor your invoices in QuickBooksThe template you select here willbe selected by default in theinvoices that are exported toQuickBooks. The same templatewill be applied to all invoicesimported from Field ServiceManagement.Generic subtotal itemSelect the subtotal item that youwish to associate the subtotals inField Service Managementinvoice to QuickBooks invoice.In Field Service Management youcannot have multiple sub-totalitems like you can have inQuickBooks. So it becomesimportant for the integration toknow which subtotal item tomap to when exporting invoicesto QuickBooks.You may have to create one ifyou don’t have a subtotal item inQuickBooks. Here’s how . Open QuickBooks Click on Lists Item Lists Click on Item button at thebottom and click on New Select ‘Subtotal’ in the Typedropdown box Give it a name anddescription and click on OkGeneric discount itemSelect the discount item that youwish to associate the discount inField Service Managementinvoice to QuickBooks invoiceYou may have to create one ifyou don’t have a discount item inQuickBooks. Here’s how . Open QuickBooks Click on Lists Item Lists Click on Item button at thebottom and click on New Select ‘Discount’ in the Typedropdown box Give it a name, description,discount rate Select an appropriate incomeaccount you want to trackdiscounts that you give toCorrigo Integration Client for QuickBooks – Setup Tip SheetIn Field Service Management youcannot have multiple discountitems like you can have inQuickBooks. So it becomesimportant for the integration toknow which discount item tomap to when exporting invoicesto QuickBooks.16
Item to ConfigureHow to set this up? Why?your customersclick on OkPlease ask your accountant if youare not sure which account toselect.Generic labor itemSelect a corresponding othercharge item for generic labor orclick on icon to create a newone to map to.Apart from the price list items,Field Service Management has 3generic items: Labor, Parts andMisc.Generic parts itemSelect a corresponding othercharge item for generic parts orclick on icon to create a newone to map to.Generic miscellaneous itemSelect a corresponding othercharge item for miscellaneous orclick on icon to create a newone to map to.If you already have some ‘othercharge’ item in QuickBooks, youcan select it. If not please click onicon, enter Generic labor, picka corresponding account andclick on ok.Corrigo Integration Client for QuickBooks – Setup Tip SheetNote: These settings don’t reallymatter if you have always usedField Service Management withQuickBooks integration enabled.It’s just that there should be somevalue selected for each of theseitems.17
Time Card SettingsThis section applies to companies using the Field Service Management Time Card module:Figure 6:Time Card synchronization settings screenCorrigo Integration Client for QuickBooks – Setup Tip Sheet18
Item to ConfigureHow to set this up?Why?RegularSelect a payroll item you haveconfigured for regular time inQuickBooks.Regular, Overtime andDoubletime hours calculated inField Service Management willbe posted against the regular,overtime and doubletime payrollitem you select here respectively.Enter a regular hour rate that youpay for most of your employeesin the rate boxOvertimeSelect a payroll item you haveconfigured for overtime inQuickBooks.Enter a overtime rate that youpay for most of your employeesin the rate boxDoubletimeSelect a payroll item you haveconfigured for double-time inQuickBooks.So when times are exported toweekly timesheet in QuickBooksthe payroll items you select herewill be used.Note: Time Card Payroll ItemSettings will be used only when anew employee has to be createdin QuickBooks duringsynchronization. Thesynchronization will not changethe values that are already set foremployees in QuickBooks.Enter a double-time rate that youpay for most of your employeesin the rate boxIf you don’t have payroll items set up in QuickBooks, follow these steps to create payroll items:1.Open QuickBooks and click on Edit Preferences2.Click on Payroll and Employees and Company tab3.Click on Employee defaults button4.Click under Item Name (the empty area), click on the dropdown control and click on AddNew 5.Select Hourly Wages and click on Next6.Steps for creating Regular Payroll Itema.Select Regular Pay and click on Nextb.Give a name for the regular payroll item and click Nextc.Select Payroll Expense AccountCorrigo Integration Client for QuickBooks – Setup Tip Sheet19
d. Click on Finish.7.Steps for creating Overtime Payroll Itema.Repeat steps 4 and 5b.Select Overtime Pay and click on Nextc.Give a name for the overtime payroll item and click Nextd. Select Time-and-a-half or enter a custom value and click Ne
Intuit Field Service Management ES product. . On the next screen, enter the Authentication code and Field Service Management company name. Figure 2: Enter the login information you use to access the Field Service Management web application Note: The term WorkTrack in the above s