Transcription
TMTM1/10 Element 3900kV Brushless System
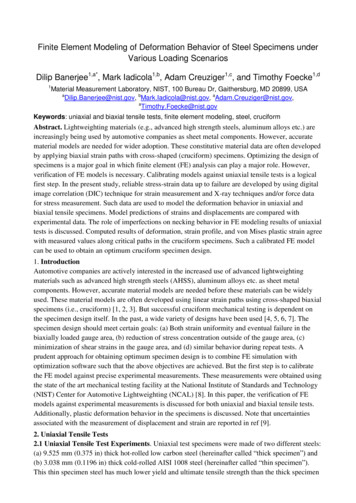
Element 3900kV Brushless SystemThe 1/10th Scale Element 3900kV brushless systemis designed specifically for use in lightweight 2WDoff-road applications, making it the ideal choice forbuggies, trucks and short course vehicles. The 1/10thElement 3900kV system is installation-ready makingit an easy upgrade from brushed or stock brushlesssystems. After installation into the vehicle a quickthrottle setup is all that is required to get started!Many adjustable features allow the option of finetuning the ESC to enhance the performance evenmore. The motor features a 4-pole design providingbetter efficiency and more torque which meet thedemands of today’s off-road vehicles.2
SpecificationsESCVoltage Input: 2–3S LiPo [7.4V–11.1V]BEC Max: 3 Amps @ 2S inputCurrent Rating: Up to 100ADimensions: 1.81 1.38 0.79" [46 35 20mm]Weight: 2.0oz [56.5g]Motor Wires: 13AWG 5.31" [135mm] Length, 4mm female bullet connectorsBattery Wires: 13AWG 4.72" [120mm] Length, Deans Ultra Plug Receiver Lead: 11.02" [280mm] Length, Universal radio connectorMotor Limit: On 2S: 4200kV MaxOn 3S: 2800kV age Input Max:Poles:Shaft Dimensions:39001.42 1.85" [36 47mm]6.54oz [185.4g]13AWG 6.89" [175mm] Length, 4mm male bullet connectors2S LiPo [7.4V]40.125" [3.175mm] diameter 0.71" [18mm] length3
WarningsPlease read thoroughly before installation andoperation.4 Disconnect the battery from the ESC immediatelyif the ESC or battery becomes hot!! Allow theESC or battery to cool down before reconnecting NEVER use more than the specified voltage onthe ESC’s input. ALWAYS mount the ESC in a position where freeair can flow through the heat sink during operation. ALWAYS turn on the transmitter before connectingthe battery to the ESC. ALWAYS disconnect the battery from the ESCwhen not in use. Make sure the input battery is fully charged beforeconnecting to the ESC. DO NOT attempt to use with brushed motors. Use heat-shrink tubing to insulate any bare wiresbetween the motor battery and ESC, and fromthe ESC to the motor, to prevent a short circuit. Allow the ESC to cool before touching. DO NOT run the car near water! Never allowwater, moisture, or any foreign material onto theESC’s PC board.
Do not allow metal/conductive materials toaccidentally make contact across any or all motor/battery posts. Never power up the ESC before plugging it intothe RX and switching on the transmitter (TX). Keep out of reach of children. DuraTrax is not responsible for incidental damageor personal injury as a result of misuse of thisproduct.Optional Programming EquipmentThe 1/10th Element 3900kV system is directlycompatible with the Castle Creations Quick FieldProgrammer and Castle Link USB programmingkit. The Castle Quick Field Programmer makes forquick parameter adjustments at home or at the trackwithout having the need for a computer. The CastleLink USB interface can be used to more finely tune theElement ESC by opening up more tuning options andallowing for a full customization of settings. The USBinterface also enables ESC software updates throughthe internet. Both the Quick Field Programmer andUSB programming kit are sold separately at retailersthroughout the U.S.A.5
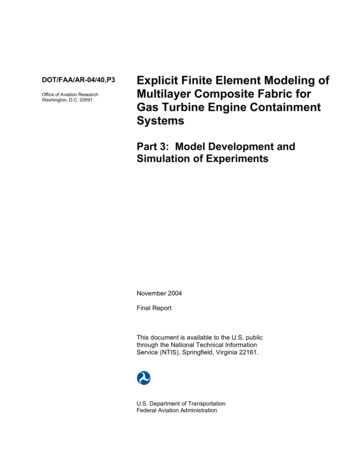
ConnectionsBrushlessMotorBattery PackSteeringServoUse a high qualityconnector onlyConnect ESCand motorSteering servo: CH1ESC: CH2ReceiverTMQuick SetupIt is recommended to remove your pinion gearprior to programming.61. Mount the ESC and motor into the vehicle. Mountthe ESC in a position where air can flow throughthe heat sink. This will allow the ESC to performat maximum efficiency and minimize the chanceof overheating.
2. Connect the three motor wires to the ESC wires.3. Plug in the ESC to receiver cable to Channel 2(throttle) of your receiver.4. With your transmitter on and holding full throttle,plug the battery into the ESC.A. Once the battery is connected, four rings ina row will sound and the ESC will display ared LED.B. Hold full brake (trigger forward) until multipletones sound and the yellow LED is displayed.C. Release the trigger to neutral. Shortly after,multiple tones will sound and all the LEDs willlight up.D. A few seconds later, the ESC will arm and adouble tone will sound. The system is ready.*Note: If using a Futaba transmitter , you will needto reverse the throttle channel.* If the motor runs in reverse after setup, simply swapany two of the motor wires and try again. There isno polarity on the motor to ESC wires and does notmatter which two wires are changed.7
Manual SetupThe Element ESC is extremely flexible when it comesto adjustable features and may be programmed tomatch any level of experience. The following sectionexplains each programmable feature and how it willaffect the drive ability of your vehicle. Follow thesesteps to change settings on your Element ESCwithout having to use a computer.STEP 1: Turn the transmitter on.STEP 2: While holding full throttle on the transmitter,plug the battery into the ESC. After a few seconds,four rings in a row will signal full throttle calibration.Continue to hold full throttle until a second group offour rings is heard. Then, relax the throttle to neutral.The ESC will beep twice, pause and beep two moretimes, signaling that the ESC has now entered theprogramming mode.STEP 3: Programming is always presented insequential order and always starts with the first setting(Reverse Lockout) within the first section (ReverseType). The first beep(s) signifies which adjustablefeature you are on and the second beep(s) signifieswhich setting is waiting for a “yes” or “no” answer.8As you go through each option, you will need toanswer “yes” by holding full throttle, or answer “no”
by holding full brake until the ESC accepts youranswer by beeping rapidly. Once an answer hasbeen accepted, relax the throttle back to neutral forthe next question. After a “no” answer is accepted,the ESC will then go to the next “setting” option inthat section. After a “yes” answer is accepted, theESC will skip to the first option in the next section.BRAKE/REVERSE TYPE: Sets whether reverse isenabled or not and how it can be accessed.Setting 1❯ Reverse Lockout (Default): Usuallynot allowed in racing. This will enable the reversefunction after the ESC senses two seconds ofneutral throttle.Setting 2❯ Forward/Brake Only: Disables reverse.Commonly used for racing events.Setting 3❯ Forward/Brake/Reverse: All functionsare accessible once the ESC brakes to zeromotor RPM (if the vehicle is moving).BRAKE AMOUNT: Sets what percentage ofavailable braking power is applied with full brake.Setting 1❯ 25% Power: Allows only 25% ofavailable braking power at full brake.Setting 2❯ 50% Power (Default): Allows only50% of available braking power at full brake.9
Setting 3❯ 75% Power: Allows only 75% ofavailable braking power at full brake.Setting 4❯ 100% Power: Allows all availablebraking power at full brake.REVERSE AMOUNT: Reverse must be enabledfor this function to work. Sets the amount of powerapplied in the reverse direction.Setting 1❯ 25% Power: Allows only 25% powerin reverse.Setting 2❯ 50% Power (Default): Allows only50% power in reverse.Setting 3❯ 75% Power: Allows only 75% powerin reverse.Setting 4❯ 100% Power: Allows 100% powerin reverse.10PUNCH/TRACTION CONTROL: This smoothes highpower starts and limits punch somewhat. For fullpower use a very low or disabled setting. For softerstarts or for low traction surfaces, use a higher setting.Setting 1❯ High: Very limited acceleration. Goodfor 2WD vehicles on hard dirt or for generalbashing when you want to be gentle on thetransmission.Setting 2❯ Medium: Medium accelerationlimiting. Good for 2WD vehicles on soft dirt.Setting 3❯ Low: Light acceleration limiting.
Setting 4❯ Lowest: Very light accelerationlimiting. Good for most situations.Setting 5❯ Disabled (Default): Acceleration isonly limited by battery ability.DRAG BRAKE: Also known as “auto brake”. Thistransforms the speed control’s dead band into brakeswith a pre-determined frequency and value. Thismeans anytime the transmitter trigger is returnedto the neutral position (dead band), the brakes willbe applied at the specified percentage.Setting 1❯ Off (Default): Vehicle will coast withalmost no resistance from the motor at neutral.Setting 2❯ 10%: Low amount of braking effectfrom the motor at neutral throttle.Setting 3❯ 20%: More braking effect from themotor at neutral.Setting 4❯ 30%: Fairly high braking effect fromthe motor at neutral.Setting 5❯ 40%: High braking effect at neutral.DEAD BAND: Adjusts the neutral width of thetransmitter. Smaller values make the controller enterforward or brake/reverse with a smaller movement ofthe throttle trigger for finer control. If your ESC will notrespond to Neutral throttle, make this setting larger.Setting 1❯ Large: 0.1500msSetting 2❯ Normal: 0.1000ms (Default)11
Setting 3❯ Small: 0.0750msSetting 4❯ Very Small: 0.0500msSetting 5❯ Smallest: 0.0250msCUTOFF VOLTAGE: Sets the voltage at which theESC removes power to the motor in order to keepthe battery at a safe minimum voltage (LiPo) or theradio system working reliably (NiCd/NiMH).12Setting 1❯ None: Does not cut off or limit themotor due to low voltage. DO NOT use withany Lithium Polymer batteries! USE ONLY withNiCd/NiMH packs. With continued use, the radiosystem may eventually cease to deliver pulsesto the servo and ESC and the vehicle will notbe controllable.Setting 2❯ Auto-LiPo (Default): RECOMMENDED– This setting automatically detects the numberof LiPo cells you have plugged in. It willautomatically set the cut-off voltage to 3 voltsper cell. The ESC will beep the number of cellsin your LiPo pack between the initialization tonesand the arming tones on the initial power upof the controller.Setting 3❯ 5V: Cuts off/limits the motor speed/acceleration when the pack gets down to 5volts. A good setting for racing or bashing inany vehicle using 8-12 cell NiMH or NiCd packs.
Setting 4❯ 6V: Cuts off/limits acceleration whenthe pack gets down to 6 volts. Use this settingfor 2 cell (7.4V)LiPo packs. You will irreversiblydamage your packs using a lower cutoff voltage!Setting 5❯ 9V: Cuts off/limits acceleration whenthe pack gets down to 9 volts. Use this settingfor 3 cell (11.1V) LiPo packs. You will irreversiblydamage your packs using a lower cutoff voltage!Setting 6❯ 12V: Cuts off/limits accelerationwhen the pack gets down to 12 volts. This isa setting for 4 cell (14.8V) LiPo packs. You willirreversibly damage your packs using a lowercutoff voltage! However, use of a 4S LiPo packis not covered under warranty for the 1/10thscale Element ESC.MOTOR TIMING: Lowering the timing advance willreduce the current draw, increase run time, reducemotor/battery temperatures and may slightly reducetop speed and punch. Increasing the timing advancewill do just the opposite.Setting 1❯ Lowest: A maximum efficiencysetting giving long runtimes and cooler motortemperatures. Very useful with high kV (lowturn) motors to increase motor life and reducemotor/battery temperatures.13
Setting 2❯ Normal (Default): The best mix ofspeed, punch and efficiency for all motors.Setting 3❯ Highest: Increases amp draw,reduces runtimes, increases motor/batterytemperatures and may increase top speed/punch slightly.TroubleshootingIf you’re still having difficulties with your DuraTraxElement ESC after trying the suggestions offered here,please contact Hobby Services technical support atthe e-mail or phone number in the next section.PROBLEMMy ESC may or may not arm, but it will notcalibrate to my transmitter.1. Make sure you have both your throttle and brakeendpoints (called EPA or ATV on your radio) onthe throttle channel between 100% to 120%.2. Make sure if you have a Futaba or Futaba madetransmitter to have the throttle channel set to thereversed position.PROBLEMMy ESC calibrates for the full throttle and fullbrake positions but won’t calibrate to the neutralthrottle position (yellow LED keeps flashing).141. Try moving the throttle trim one way, then the other(usually towards the throttle side is best).
2. If your transmitter has a 50/50 or 70/30 setting forthe throttle, set it for 50/50 and retry calibration.3. If you have changed the dead band to a narrowerband, you may want to try going back to the“normal” setting.My vehicle has poor acceleration/punch for thefirst few feet or yards, and then it “kicks in”.1. Make sure you’re using high quality batteries anda battery connector capable of high amp flow (40100 amps). This behavior is very typical of a batterypack that is having difficulty providing the poweryour vehicle/system requires for top performance.2. If using NiCd/NiMH packs, use copper bars toconnect cells rather than welded tabs. Copperbars have a much lower resistance.PROBLEMMy battery pack is plugged into the ESC andnothing is working – no steering or throttle.1. Make sure the ESC’s receiver plug is plugged intoChannel 2 on the receiver and that it’s pluggedin correctly.2. Double check your solder connections on thebattery plug and make sure the battery is showinggood voltage.PROBLEMOverheated motor or hot power plugs.1. The motor is geared too high. Change to a lowergear setup.PROBLEM15
2. Check for binding in the vehicle’s drive train andthat nothing is interfering with the drive-train.3. Check the motor for shorts, faulty motorconnections and replace if necessary.PROBLEMMotor runs properly, then motor goes dead.1. The built-in thermal protection may be automaticallyshutting down power to the ESC due to overheatingconditions.2. Check for binding drive train, bad motor or incorrectgear ratio for track conditions. Check gear mesh,replace motor or change gear ratio. Let the ESCcool down and operation can be reattempted.PROBLEMMotor and Rx do not work.Make sure the motor battery is fully charged andthat good contact is being made between the motorbattery and ESC and from the ESC to the receiver.Try powering the receiver directly from a separateRx battery if the receiver now works, the problemmay be the ESC and require servicing.16
Notes17
Service ProceduresESCs that operate normally when received by HobbyServices will be charged a minimum service fee andreturn shipping charges. Before sending your ESCin for service, it is important that you review the“Troubleshooting Guide” on this instruction sheet. TheESC may appear to have failed when other problemsexist in the system – such as a defective transmitter,receiver or servo, or incorrect adjustments/installation. Hobby dealers are not authorized to replace ESCsthought to be defective. Do not cut the input wires of the ESC before sendingit for service. A fee will be charged for cut wireswhich must be replaced for testing.180-Day Limited Warranty - USA & Canada Only18DuraTrax warrants this product to be free from defectsin materials and workmanship for a period of 180 daysfrom the date of purchase. During that period, we willrepair or replace, at our option, any product that doesnot meet these standards. You will be required to provideproof of purchase date (receipt or invoice). If, duringthe warranty period, your ESC shows defects causedby abuse, misuse or accident, it will be repaired orreplaced at our option, at a service charge not greaterthan 50% of the current retail list price. Be sure to include
your daytime telephone number in case we need tocontact you about your repair. This warranty does notcover components worn by use, application or reversevoltage, cross connections, poor installation, subjectionof components to foreign materials, any alterations towires or tampering. In no case shall our liability exceedthe original cost of the product.Your warranty is voided if: You apply reverse voltage to the ESC by connectingthe motor battery backwards. You allow any wires to become frayed which couldcause a short. You use more than the rated number of cells in themotor battery. You tamper with any of the electronic components. You allow water, moisture or any other foreignmaterial onto the PC board.Under no circumstances will the purchaser be entitledto consequential or incidental damages. This warrantygives you specific legal rights, and you may also haveother rights which vary from state to state. If youattempt to disassemble or repair this unit yourselfit may void the warranty.19
For service to your Element ESC or motor, either inor out of warranty, send it post paid and insured to:Hobby Services3002 N. Apollo Dr. Suite 1Champaign, IL 61822(217) 0 2011 Hobbico , Inc.All rights reserved.Manufactured in the USA, China and/or MexicoDTXC3122Mnl
without having the need for a computer. The Castle Link USB interface can be used to more fi nely tune the Element ESC by opening up more tuning options and allowing for a full customization of settings. The USB interface also enables ESC software updates through the internet. Both the Quick Field Programmer and