Transcription
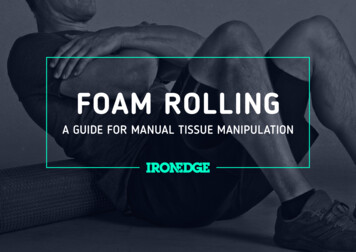
FOAM ROLLINGA GUIDE FOR MANUAL TISSUE MANIPULATION
CONTENTSIntroduction 03Foam Rolling Exercises 11›› Training 04›› Lower Leg - Calves 12›› The Missing Links to Training 04›› Lower Leg – Shin 13›› Fascia, Myofascial Release andSMR (Self Myofascial Release) 04›› Upper Leg – Hamstrings 14›› Key benefits to SMR 04›› Upper Leg – Hip Flexors, Quadsand Adductors 16Foam Rolling 06›› Foam Rolling Technique 07›› 5 Steps to Effective Rolling 08›› Step 1 - Placement 08›› Step 2 - Positioning 08›› Step 3 - Breathing 09›› Step 4 - Rolling (Hunting) 09›› Step 5 - Relaxation 10›› Basic Guidelines for Foam Rolling 10›› Upper Leg – Glutes and Abductors 15›› Trunk – Middle Back 17›› Trunk – Rear Shoulder 18›› Trunk – Front of the Shoulder 19›› Trunk and Head – Traps and Neck 19›› Arms – Front, Back and Forearms 20References 21
INTRODUCTIONFoam Rolling has almost become synonymouswith training and performance these days,where more often than not, athletes and gymgoers are seen either spending time on thefloor rolling around, or carrying coloured logsaround with them where ever they go. The realquestions become of course, what are thesecoloured foam logs? What are the benefitsof utilising these pieces of equipment? Andwhat is the best way to use these tools?03 / FOAM ROLLING
INTRODUCTIONFOAM ROLLING: A Guide for Manual Tissue Manipulation aims toanswer these questions, hoping to clarify all of the key points andbenefits to Foam Rolling, as well as some integral exercises andtechniques for getting the absolute most from your Foam Rollingsessions. By integrating some or all of the information in this book,you can gain some key strategies for not only helping mobility, rangeof motion and wellbeing but some great methods for preparing forexercise and training, and recovering optimally from those toughand challenging sessions. Rolling and Self Myofascial Release (SMR)strategies are handy tools that anyone can utilise and can be boththerapeutic and performance enhancing in nature.TRAININGTo quote the world renowned author and strength and conditioningcoach, Mark Rippetoe, “Training is physical activity performed forpurposes of satisfying a long term performance goal, and is therefore about the process instead of the constituent workouts of theprocess”1. In a nut shell, Mark Rippetoe highlights the importance oftraining being more than the crazy workout you lay down in the gymor sporting field, but involves a specific process that leads towards aspecific goal. After all it is this process that leads us towards why weare in the gym in the first place, which is why we follow particularprograms designed to meet our individual needs.04 / FOAM ROLLINGTHE MISSING LINKS TO TRAININGOptimal growth and development in fitness and training requiresa few different and key elements. Naturally you need a program toprogressively push the body and to make it stronger, whilst matching it with an adequate hydration and diet to fuel the energy anddevelopment.We all know how this works. However recovery and generalreadiness are components often forgotten in any fitness regime,easily lost in the hustle and bustle and excitement of goal seekingand performance development. But the real kicker in this scenariois, if the body isn’t allowed or is restricted from recovering from thetraining stresses that we place on it, then all of our hard work inthe gym, sporting field or other functional activities will be limitedor just end up stunted. Optimal growth and development is notjust dependant on how hard or how frequent the training is, it allbalances on the knife edge of recovery and readiness.Recovery being: How well the muscles and energy systems developand adapt to the stresses of the session. How well rested, fuelled andhydrated the body is, and how much our lifestyle or working life hasimpacted or hindered this process.Readiness being: Has the body been adequately prepared for thetraining stress to come? Are muscles and joints free to move? Is therelimiting factors or weaknesses in the body that may prevent certainactivities being performed?The simple point to this is, if the body hasn’t recovered sufficientlyenough before the next training load, then the body cannot performto its fullest capacity. Operating in a fatigued or sub-maximal statemeans the body can only train with an intensity that is below what it’scapable, potentially limiting overall development. Or worse, if there isunderlying damage that hasn’t yet fully recovered, then the potentialfor injury may increase greatly.Secondly, if quality of movement is not present or if the body isrestricted from reaching a desired range of motion needed forperforming certain movements, then those movements will onlyoffer partial benefits. For example, if we want to strengthen thebody with full range squats, and only a fraction of the range can beachieved, then only a fraction of the squat benefit will be achieved.Much like driving a car with a rev limiter set to prevent any real speedfrom being achieved.Also, if muscles are tight, stiff or contain trigger points, then they willbe limited in their ability to contract and generate movement. If this isthe case, movement quality and potential for developing strength willalso be limited.Safety at this point is always a major consideration too. If the bodyis restricted from moving into a complete range, the body mayforce other areas to move in compensation, potentially overloadingsensitive areas and leading to an increase chance of injury.
FASCIA, MYOFASCIAL RELEASE AND SMR(SELF MYOFASCIAL RELEASE)A step in the right training directionalways starts with an appropriatetraining program, a healthy balanceddiet, coupled with a good recoveryand readiness strategy. And a greatway assist in recovery and readinessis to incorporate myofascial releasemethods into the overall plan.Fascia “is the soft tissue component of theconnective tissue system that interpenetratesand surrounds muscles, bones, organs, nerves,blood vessels and other structures. Fascia is anuninterrupted three dimensional web of tissue thatextends from head to toe, from front to back andfrom interior to exterior”2. Essentially, fascia is theinterconnected matrix that makes and binds ourevery aspect of our being, creating the scaffoldingthat gives us form, shape and function.So it stands to reason, if there are problems ortightness in the web that holds us together, issuescan present up and down the body, potentiallyeffecting how we move and operate.05 / FOAM ROLLINGBecause muscles are a part of this interconnectedpuzzle, then problems not only localise to aspecific area, but refer issues to other parts of thebody as well.Myofascial Trigger Points or MTPs, are an exampleof painful problems that can occur in the fascialnetwork, and can be defined as “exquisitely tenderspots in discrete, taut bands of hardened musclethat produce local and referred pain, amongother symptoms”3. To put this in relative terms,a trigger point that develops in a muscle, not onlyinhibits that muscles overall ability to contract, butbecause that muscle is part of the greater network,problems can work their way up and down theconnective chain throughout this network. Thiscan be likened to pulling on a tent rope. Becausethe tent rope is connected to the top of thetent, not only does the tent move, but tensionis transmitted along the other ropes that alsosupport the tent. Pull on that rope hard enough,and another rope may work loose or pull out ofthe ground, adding to the overall destabilisation ofthe tent. The body works in a very similar way. Leftuntreated, MTP’s can cause lingering problems andlead to chronic pain and restriction.Myofascial Release is considered a technique formanually manipulating the fascia of the body, toimprove soft tissue quality and function, whichhas been sown to do so, without a subsequentdecrease in muscle activation or force output4.Of course by improving the quality and functionof fascia, you can release tension, deactivatemyofascial trigger points, improve range of motionand mobility, as well as increase blood flow, allof which can relate to improved recovery andperformance.SMR simply refers to the same techniques ofmanual tissue manipulation, except you don’thave to pay someone or see a practitioner, thisis something you can achieve very effectively, byyourself. You can in fact consider this as a formof routine self-maintenance, to keep the humanmachine running in tip top condition.The key take away from these simple definitions,highlights how SMR can be a great tool thatyou can use to maintain your body, help it torecover and ready it for activity, simply, safelyand effectively.KEY BENEFITS TO SMR: Improved blood flow and circulation to fasciaand muscles. Actively stretches muscles and improves rangeof motion around joints. Helps to break up scar tissue and adhesions. Helps to deactivate myofascial trigger points. Improves overall tissue quality. Helps relieve stiffness and soreness. Helps to flush out metabolic waist productsin muscles. Improves an overall sense of wellbeing.
FOAM ROLLINGFoam Rolling5 Steps to Effective RollingStep 1 - PositioningStep 2 - PlacementStep 3 - RollingStep 4 - RelaxationStep 5 - BreathingBasic Guidelines for Foam Rolling06 / FOAM ROLLING
FOAM ROLLINGThe Foam Roller is one of the most common andpopular forms of SMR, namely because of its light,portable and easy to use design. Rollers come ina variety of different sizes too, allowing for thetreatment and manipulation of larger areas andmuscles of the body.This of course is due to the large surface area that the Rollerpresents, that effectively flatten out larger sections of soft tissue,covering more ground and more muscle groups in less time.Rollers come in a wide variety of compounds and shapes as well,that can offer more of a cushioned and comfortable approachto painful areas, or be quite brutal and unrelenting due to hardconfigurations and additional nodules, bumps and ribbing. Butwhether you have a soft and pliable or rock hard spiked roller, it allcomes down to the individual, and the ability to have full controlover the SMR process.Essentially it is the application one’s own body weight thateffectively provides the treatment, which can be adjusted andchanged as the user feels sees fit. This is what makes the rollerso handy and easy to use, you simply place it on the floor, or wall,position yourself in a way to target a specific area, and use asmuch body weight as you need to hit those troublesome areas.Full control is completely in the users own hands, meaning anyoneand everyone can use and gain benefit from Rolling, after all it isyou that controls the treatment.07 / FOAM ROLLINGFOAM ROLLING TECHNIQUEFoam Rolling can be performed on just about any part of thebody, so long as a few major points are taken care of. Just like anyexercise or drill, these certain techniques will yield greater results.However, one particular rule stands out that will make a difference inimproving overall tissue quality. Relaxation is an absolute must, andwill ultimately seal the deal when it comes to effective SMR work.Pain and stress can do some very interesting things to the body,and can negate all of the hard work and attention that we aretrying to pay via the SMR strategies, making relaxation almostimpossible. Essentially, these kinds of triggers, especially whenrolling becomes uncomfortable and painful, can stimulate thesympathetic nervous system, or the body’s auto regulatory “fightor flight” response. This can cause the heart rate to increase,breathing to become shallow and muscles to tighten up. Leftunchecked or not letting the body relax, will only result in rollingon muscles that are locked up and trying to protect themselves,preventing any kind tissue improvement.What we need to focus on is a way to relax and favour theparasympathetic nervous system, the system responsible for the“rest and digest” functions, so muscles can release and tissues canbecome malleable. This really highlights the need for Relaxationmethods to be used throughout the rolling process, and constantattention paid to how the body feels and how it is reacting.The type of Roller that you ultimately chose can also dictate thelevel of relaxation that you can achieve. Although the temptation isto try and grab the hardest and craziest roller out there, rememberbeing able to relax a muscle or muscle group is the ultimate key.Even for the elite strength trainer or athlete, harder Rollers don’talways mean improved results. Aim to find something that allowsthe freedom to roll whilst being able to maintain loose and supplemuscles and posture.
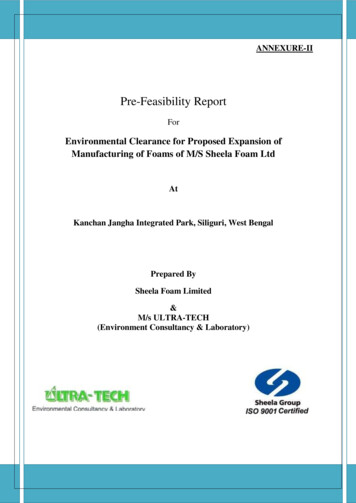
5 STEPS TO EFFECTIVE ROLLING08AC: FLOOR PLACEMENT08ABTo simplify the whole process, and to create a system foreffective foam rolling, a simple 5 step process can be used.This system covers all of the key points for Self MyofascialRelease, and creates a technique structure or template thatcan always be returned to or practised for maximum resultor benefit.This system is as follows: Placement Positioning Breathing Rolling (Hunting) RelaxationThis system can be applied to just about any muscle ormuscle group in the body, allowing the user to customisetheir very own Foam Rolling session. Included in this bookare some detailed exercises for Foam Rolling different areasof the body, but understand, once you identify the problemareas, attention can be made to these specific spots, andRolling can be tailored to one’s own needs.08 / FOAM ROLLING08AD: WALL PLACEMENT09AE: POSITIONINGSTEP 1 – PLACEMENT (08AC AND 08AD)STEP 2 – POSITIONING (09AE)This may sound fundamental, but the actual placement of theroller can really make all of the difference in how much you canactually relax. Get this right from the start, and being able to relaxwill become very easy.Once you have found a good spot that is free and open, you need toposition yourself in a way to apply pressure to the body. By choosingeither the floor or the wall, you can really control the overall amountof pressure that you can apply. The wall means light to mediumamounts of pressure, and the floor mean medium to hard amountsof pressure.Ideally, rollers can be placed on the ground, or on a wall, alldepending on how comfortable you can become and how muchpressure you actually need. Remember Foam Rolling isn’t just abouthow hard you can press or how much pressure you can achieve, buthow much pressure you can use to allow muscles to release. If youare unsure, start out on the wall. If you find that the wall doesn’t giveyou enough pressure, move the roller down to the floor.Aim for a large flat surface, free from obstacles and equipment,so the Roller can be free to move. This goes for both the groundand the wall, you want freedom for movement, without having tointerrupt the process. Don’t be afraid to give yourself plenty of space.You can also align the Roller according to the area you want totarget, so don’t be afraid to move around to find the best spot orposition to be in. Start out light, and slowly lean into the roller if itis on the wall, or prop yourself up on the ground, and slowly loweryour bodyweight onto the targeted area. Aim to start easy andstay relaxed.Always adopt a position that doesn’t require sustained effort to hold.Effort will result in fatigue, which will ultimately lead to tension andstress. Once you find a position, aim to find a way to limit effortand minimise tension as much as possible. For example, you maybe seated on the ground, with the roller under your calves havingto push your body off the ground with your arms to get pressure.Although this may work initially, because you are almost performinga dip, there will be a lot of energy used to maintain position.Try sitting and crossing one leg over the other, aiming to hit onecalf at a time instead. This will reduce tension and allow for morerelaxation.
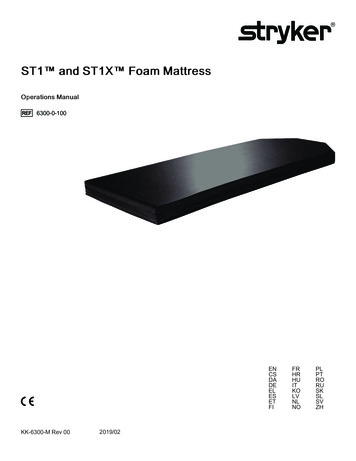
5 STEPS TO EFFECTIVE ROLLINGSTEP 3 – BREATHING (09AF)Now that you are applying pressure, either leaningor lying on the Foam Roller, you need to regulateyour breathing, because breathing will be your linkto maintaining a certain level of relaxation as youroll. This can be achieved by using diaphragmaticbreathing technique.Diaphragmatic breathing, also referred to as bellybreathing, is a basic stress management technique5where one attempts to engage in deep, rhythmicbreathing in a relaxed and natural manner6, aimingto draw air in and expand the lungs by utilising thediaphragm correctly. Physiologically, this form ofbreathing has a major influence on heart rate andmuscle tension due to feedback mechanisms thatlink the respiratory and cardiac control centre inthe brain stem7.The key to making this work on the roller, is tosimply draw your attention away from breathingthrough the chest, and open up and relax theabdominals. Feel your belly expand, filling up likea balloon with each breath in, and collapsing anddeflating with each breath out, aiming for 3 to 6seconds in and 3 to 6 seconds out on each breath.As tense as you may feel, especially being on theroller, engage this style of breathing, and allowyour muscles to release and loose tension witheach and every breath.To help this technique, place a hand on yourabdomen, and feel it rising and falling with eachbreath. Couple diaphragmatic breathing with aposition that doesn’t require too much tension tohold yourself in on the roller, and you will have thegreatest effect over your soft tissue manipulation.09 / FOAM ROLLINGSTEP 4 – ROLLING (HUNTING)(10AG AND 10AH)Rolling is the method of seeking out or looking forthe troubled areas or trigger points of the body,hence the word hunting in brackets in the title.Really this is a chance to move the body aroundon the Roller, Rolling it along the muscles and softtissues and hunting for tightness and painful areas.This hunting process can be used as a gentleforwards or backwards motion along the length ofparticular muscles. Take your time, and don’t rush,really listen or feel what is going on beneath thesurface of the skin. If you move over what feels likea tight, hard, or ropey area of muscle or if the areais painful or sore, pause and concentrate pressureinto that area for 15 to 30 seconds.As you hold the position, relax as much aspossible, breath and try to unclench or relax thatparticular muscle. If after 30 seconds you can’t feelany change, lessen the applied pressure and useanother 15 to 30 seconds. Also, once you identifya particular area, move laterally or sideways acrossthe muscle. This will hit the area from a differentangle and increase the overall effect you will haveover it. Remember muscles are 3 dimensional, somoving forwards and backwards, and from side toside will be increasingly effective.Aim to spend about 2 minutes on different areas,spending more time if you so desire. Because rolling is an individually experience, don’t be afraid toplay with different time frames to see what elicitsthe best results. Just avoid rushing and rolling fast,take your time and listen to your body, only usingas much pressure or bodyweight as you need.09AF-1: BREATHING OUT09AF-2: BREATHING IN10AG-1: ROLL BACKWARDS10AG-2: ROLL FORWARDS10AH-1: ROLL TO THE SIDE10AH-2: ROLL TO THE OTHER SIDE
5 STEPS TO EFFECTIVE ROLLINGBASIC GUIDELINES FOR FOAM ROLLING:10AI: RELAX5 – RELAXATION (10AI)Step 5 is really a reminder. No matter what position you are in, orarea you are trying to target, always aim to relax as much as possible.Keep your face nice and relaxed, loose and almost slack jawed,because it can be amazing how much tension you can create in thebody, by pulling a face or clenching your teeth together when youencounter pain or tension. Breathe in through your nose, and blowthe air out throw loose cheeks, all the while using the belly breathingtechnique. Minimise the effort you need to maintain position for anygiven area, and think slow and steady as you roll. Stick to this and youwill see some amazing changes in tissue quality.10 / FOAM ROLLING Use the 5 step process to help establish structure and technique to your Foam Rolling sessions. Find open flat areas either on the ground or on a wall to work in, that allow for the freedomof movement and position. Aim to start on the wall, then progress to the floor if you require additional pressure. Position yourself on or lean into the roller only with as much pressure as you need. Always position yourself in a way to minimise muscle activation when supporting your weighton the roller. Less tension in the body equals more relaxation. Hunt out the stiff and sore spots in muscles, by rolling the length of muscles and muscle groups. Hover on affected areas for 15 to 30 seconds before moving laterally, forwards or backwards again. Aim to relax as much as possible whilst employing diaphragmatic breathing techniques. Diaphragmatic breathing or deep belly breathing helps to regulate and engage the parasympatheticnervous system, adding to the overall effectiveness of the SMR drill. Remember muscles are 3 dimensional, aim to roll forwards and backwards and from side to sidelaterals, try to hit the muscle from all angles. Aim for about 2 minutes of rolling for particular areas, aiming to hit problem andtroublesome areas. Aim to Roll for about 5 to 10 minutes in total. Rolling can be performed daily or as required, and wont impact training sessions or hinderstrength development.
FOAM ROLLINGEXERCISESThe following section highlights particular Foam Rollerexercises that you can use to target various areas ofthe body. Detailed set up and execution of each exercise is included, as well as the particular muscles thatyou will target in these areas. Remember to follow theguidelines for SMR and Foam Rolling, and only useas much pressure as you need to allow the muscleor targeted group to release and relax.Take your time, and remember to breathe.LOWER BODYLower Leg - CalvesLower Leg - ShinUpper Leg - HamstringsUpper Leg - Glutes and AbductorsUpper Leg - Hip Flexors, Quads and AdductorsUPPER BODYTrunk - Middle BackTrunk - Rear ShoulderTrunk - Front of the ShoulderTrunk and Head - Traps and NeckARMSArms - Front, Back and Forearms11 / FOAM ROLLING
LOWER BODYLOWER LEG - CALVESMuscles Targeted: Soleus & GastrocnemiusExecution of the Exercise Find a flat, level area on the floor, free from obstructions Place the roller on the floor Take a seat on the ground, so you can extend your legs out,perpendicular toward the roller Line the roller up so it sits in the middle of your calves Maintain your seated position, while bending and extending yourknees to roll the roller up and down the back of your calves. When you locate a particular tight or sore spot, roll or tilt thelegs from side to side, to roll across the muscle as well.12AJ: CALF SET-UPProgression Tips To increase the pressure, lift your body off the ground as youroll up and down the calves. Be mindful of the tension thatholding your body up can create. Cross one leg over the other, and roll one leg at a time, thiswill place more of your bodyweight more directly into the calf.12AL: LEG CROSSOVER12 / FOAM ROLLING12AK: BODY LIFT
LOWER BODYLOWER LEG - SHINMuscles Targeted: Tibialis Anterior & PeronealsExecution of the Exercise Find a flat, level area on the floor, free from obstructions. Place yourself in a 6 point quadruped position. (13AM) Lift one leg and place the roller, perpendicular to the lateralanterior shin, away from the bone of the Tibia. Maintain position, push as much bodyweight onto the rollerwhilst moving your knee forwards and back. Readjust your initial start position to find the problem areas.13AM: 6 POINT QUADRUPEDProgression Tips Cross one leg over the other, and rolling with the legs crossedover will increase the overall pressure.13AO: LEG CROSS PROGRESSION13 / FOAM ROLLING13AN: SHIN ROLL
LOWER BODYUPPER LEG - HAMSTRINGSMuscles Targeted: Bicep Femoris, Semitendinosus,Semimembranosus, Vatstus Lateralis and Adductor Magnus.Execution of the Exercise Find a flat, level area on the floor, free from obstructions Place the roller on the floor. Take a seat on the floor so that your backside is on the floor,the roller is sitting in the middle of your hamstrings with bentknees with your feet flat on the floor. (14AP) Lean back and place both hands behind you. Lift yourself up by extending your elbows. Gently roll backwards and forwards over your hamstrings,moving laterally from side to side, looking for sore or stiff spots. Go as far as from behind your knee, all the way up to yourbackside. If you move far enough from left to right, you can hit the insideof your thigh, and the outside of your leg.14AP: SEATED SET-UP14AQ: HAMSTRING ROLL14AR: BLOCK SUPPORTED ROLL14AS: SINGLE HAMSTRINGProgression Tips Take a seat on a block to minimise the stress and avoid havingto lift your bodyweight up. In the seated position, place one leg over the other, and focuson rolling one leg at a time.14 / FOAM ROLLING
LOWER BODYUPPER LEG - GLUTES AND ABDUCTORSMuscles Targeted: Gluteus Maximus, Gluteus Medius, GluteusMinimus, Piriformis and the top of the Hamstrings.Execution of the Exercise Find a flat, level area on the floor, or on a wall, free fromobstructions For the wall set up, simply place the roller horizontally onthe wall, position it in the middle of your backside and raiseand lower yourself over the roller. Alternatively place the roller on the floor. Take a seat on the roller so that your legs run perpendicularto the roller. Bend your knees so your feet move toward the roller andare flat on the ground. Lean back and place both hands behind you. Gently roll backwards and forwards over your glutes, movinglaterally on to one side and then the other, looking for soreor stiff spots. Go as far as the top of your hamstrings, and up top of yourbackside.15AT: SET-UP15AU: SINGLE GLUTE15AV: TRIANGLE SET-UP15AW: WALL SET-UPProgression Tips Move on to one side to increase the pressure into one glute.Keep on moving to the side so you can roll into the side ofyour hip.In the seated position, place one foot on you opposite kneeto create a triangle. Aim to roll on the side opposite side ofthe foot on the floor.15 / FOAM ROLLING
LOWER BODYUPPER LEG - HIP FLEXORS, QUADS AND ADDUCTORSMuscles Targeted: Tensor Fasciae Latae (TFL), Rectus Femoris,Sartorius, Iliopsoas, Vastus Medialis, Vastus Intermedius, VastusLateralis, Adductor Longus, Gracilis.Execution of the Exercise Find a flat, level area on the floor, free from obstructions. Place the roller on the floor. Move toward one end of the roller, and lie on top of it, so thatthe roller sits in your hip crease. Tilt your body and hips, aiming to focus on one hip at a time. Position your other leg in a way to minimise pressure andmaximise support. Push yourself forwards and back, gently applying as muchpressure as you need. You can roll from the very top of the hip,all the way down the leg to the knee. Tilt your body to one side, so you can reach the TFL or the outerside of your hip and leg, and medially or the other way to insideof the thigh. To hit the inside of your thigh more effectively, place the rolleron an angle, bringing your target leg up so it sits inside the leg. Be mindful of the IT band, you can effectively roll through the TFL,but the IT is a very dense band of fascia. This can be very painful,and won’t gain much benefit from actually rolling on and over it. Breathe and relax as much as possible.Progression Tips To minimise pressure on the quads, you can roll bothlegs at once. You can also use a wall to minimise pressure, by placing the rolleron the wall and leaning into it for the hip flexors and quads.16 / FOAM ROLLING16AX: HIP FLEXOR SET-UP16AY: ADDUCTOR SET-UP16AZ: DOUBLE QUAD ROLL16BA: WALL SET-UP
UPPER BODYTRUNK - MIDDLE BACKMuscles Targeted: Erector Spinae, Middle and Lower Trapezius,Rhomboid Major, Latissimus Dorsi.Execution of the Exercise Find a flat, level area on the floor, free from obstructions. Place the roller on the floor. Take a seat in front of the roller, so that the roller lines upperpendicular to the spine and lay back so it sits just above thelumbar spine. Position your feet, and bend your knees in a way so you can liftyour hips off the ground, so you are supported by the roller andyour feet. Cross your arms across the chest, and roll up and down thethoracic region. Lean onto one side and the other as you roll, focusing ontoone side if you wish. Use as much pressure as you need.17BB: MIDDLE BACK SET-UP17BC: LEANING FROM SIDE TO SIDE17BD: WALL SET-UP17BE: OVERHEAD POSITIONProgression Tips You can use a wall for this exercise, by placing the Rollerhorizontally on a wall, and leaning your back into the Roller.Raise and lower your body to roll the roller along the upper back. Try positioning the roller in the middle of your upper back, raiseyour hips so your body is parallel to the floor and extend yourarms straight over head. This will help mobilise all of thoseoverhead exercises in the gym.17 / FOAM ROLLING
UPPER BODYTRUNK - REAR SHOULDERMuscles Targeted: Deltoid, Upper and Middle Trapezius, TeresMajor and Minor, Latissimus Dorsi, Triceps Brachii, Rhomboids,Infraspinatus, Supraspinatus, Levator Scapulae.Execution of the Exercise Find a flat, level area on the floor, free from obstructions. Place the roller on th
fore about the process instead of the constituent workouts of the process"1 In a nut shell, Mark Rippetoe highlights the importance of training being more than the crazy workout you lay down in the gym or sporting field, but involves a specific process that leads towards a