Transcription
User’s manualTR1909Trimline telephonewith caller ID/call waiting
Congratulationson purchasing yournew AT&T product.Before using this AT&T product, pleaseread the Important product informationon pages 29-30 of this manual.Please thoroughly read the user’smanual for all the feature operationsand troubleshooting information necessary to installand operate your newAT&T product. You can also visit ourwebsite at www.telephones.att.comor call 1 (800) 222-3111.In Canada, dial 1 (866) 288-4268.Model #:Product name:Serial #:TR1909Trimline telephone with caller ID/call waiting(found on the bottom of the telephone base)Purchase date:Place of purchase: 2009 Advanced American Telephones. All rights reserved.AT&T and the AT&T logo are trademarks of AT&T Intellectual Property II, L.P. d/b/aAT&T Intellectual Property licensed to Advanced American Telephones, San Antonio, TX 78219.Trimline is a registered trademark of Advanced American Telephones.
Getting startedParts checklistSave your sales receipt and original packaging in the event warranty service isnecessary.Your telephone contains the following items:User’s manualTelephone base with mountingbracket attached for tabletopposition (telephone line cordinstalled)Mounting bracket(attached)Quick start guideHandsetCoiled handset cordDirectory card(stuck on the cover of thebattery compartment)
User’s manualTR1909Trimline telephone withcaller ID/call waitingTable of contentsGetting startedone-touch. 18To dial a number in one-touch. 18Memory operation (two-touch) . 19To store a number intwo-touch. 19To review a number intwo-touch. 19To dial a number in two-touch. 19Directory card . 19Product overview . 1Handset layout . 2Screen display messages . 3Screen icons. 3Screen display messages. 3Installation preparation. 4Battery installation . 5Telephone installation . 6Installation options. 7Wall installation . 7Tabletop installation . 8Caller ID operationCaller ID overview. 20About caller ID. 20How caller ID works. 21Caller ID special messages. 22How call log works. 22Reviewing the call log . 23To review the call log. 23To dial the displayed number. 23Deleting call log entries . 24To delete a call log entry. 24To delete all call log entries. 24Copying a call log entryinto memory. 25Telephone settingsAbout the feature menu . 10Feature summary. 10Contrast . 11Home area code . 11Local area code. 12Time and date. 13Call waiting . 14Language. 15Tone/pulse. 15Telephone operationAppendixBasic telephone operation . 16Make and answer a call . 16Last number redial. 16Adjust ringer volume . 16Adjust listening volume. 16Options while on calls. 17Flash. 17Mute . 17Temporary tone dialing . 17Troubleshooting . 26Maintenance. 28Important product information. 29Safety information. 29Especially about cordedtelephones . 30Especially about telephonesanswering systems. 30FCC and ACTA information. 31Part 15 of FCC rules . 33Limited warranty. 34Technical specifications . 37Index. 38Telephone memoryMemory operation (one-touch) . 18To store a number inone-touch. 18To review a number ini
Getting startedProduct overviewThis AT&T TR1909 trimline with caller ID/call waiting can be used either intabletop or wall installation position, and requires four AA alkaline batteries(not included) for battery-powered functions. The telephone can still operatewith limited features when there are no batteries installed.The TR1909 also features a 13-number memory for fast dialing and has a calllog which can store up to 80 additional numbers with names. This telephonehas a caller ID feature which supports caller ID with call waiting service.(Caller ID services are subscriber services available from your local telephonecompanies for a fee.)This user’s manual contains detailed instructions for installing and operatingyour AT&T TR1909 trimline with caller ID/call waiting. Please follow theinstructions carefully.
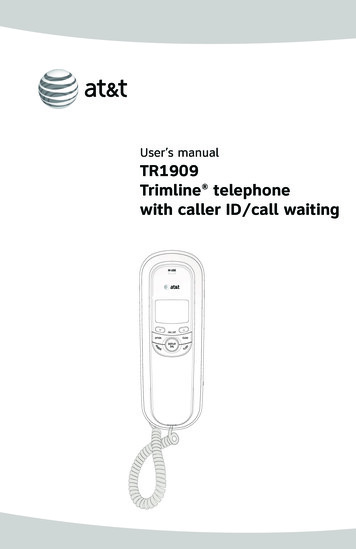
Getting startedHandset layoutCALL LISTIN USE/When the telephone is in idlemode, press to display caller IDinformation (page 23).Flashes quickly when there is anincoming call.Flashes slowly when thetelephone line cord is notplugged into a wall jack oranother telephone at the sameline is in use.CLEARPress to exit dialing, to exit storinga number in memory, to exit thecall log, or to return to the idlescreen anytime without saving thechanges.DISPLAY DIALOPTIONPress to display the settingoptions.While in the option menu, pressto save the selection and moveto the next feature (page 10).Press to dial the number currentlydisplayed (page 23).FLASHREMOVEWhen there is a call waiting signal,press FLASH to put the current callon hold and connect to the newcall. Press FLASH again to returnto the original call. Also, pressFLASH to activate other telephonecompany subscriber services suchas three-way calling (page 17).While viewing the call log,press to delete entry currentlydisplayed, press and hold toremove all entries (page 24).M1, M2, M3Press to dial a one-touchnumber from the memory(page 18).Switch hookWhen held, the telephone is inidle mode.When released, the telephone isready to make a call.Listening volumeAdjust the handset listeningvolume to LO, MED, or HI(page 16).PAUSE/REDIALWhen the handset is lifted, pressto redial the last number dialed(page 16).When storing a number in thememory, press to insert a 3second pause in the dialingsequence.MEMORYPress to access telephonenumbers stored in thememory (page 19).MUTEPROGPress and hold MUTE to silencethe microphone to prevent theother party from hearing you,but you will still be able to hearthe other party. Release MUTEto return to the original two-wayconversation (page 17).Press to store a telephonenumber in the memory (page 18).2
Getting startedScreen display messagesScreen iconsLOW10 : 03AM 12/01CALL#NEWREPCALL#Call number in the call log.NEWNew (unreviewed) call.REPRepeat call from the same number. The telephone line cord is not plugged into the walljack.01800-222-3111TOTAL 12 NEW 01 The telephone or another telephone on the same line isin use.LOWThe battery power is low.Screen display messagesREMOVE ALL?Remove all call log entries.END OF LISTYou have reached the end of the call logentries.ProProgram a one-touch or two-touch memory.LIFT RECEIVERA caller ID entry is ready to be dialed bylifting the handset.TOTAL XX NEW XXThe total and new (unreviewed) calls in thecall log.3
Getting startedInstallation preparationMake sure to install fourAA alkaline batteries (notincluded) before using thetelephone.STOP!See page 5 for easyinstructions.If you subscribe to high-speed Internet service (digital subscriber line - DSL)through your telephone lines, you must install a DSL filter between thetelephone line cord and the telephone wall jack. The filter prevents noise andcaller ID problems caused by DSL interference. Please contact your DSL serviceprovider for more information about DSL filters.Your product may be shipped with a protective sticker covering the handset ortelephone base display - remove it before use.For customer service or product information, visit our website atwww.telephones.att.com or call 1 (800) 222-3111. In Canada, dial1 (866) 288-4268.CAUTION: To reduce the risk of fire or injury to persons or damage tothe telephone, read and follow these instructions carefully: Use only AA alkaline batteries (not included). Observe proper polarity orientation between the battery and metalliccontacts. Do not disassemble your telephone. There are no user serviceable partsinside. Refer to qualified service personnel for servicing.4
Getting startedBattery installationBefore using the telephone, you should install four good AA alkaline batteries(not included) to provide memory backup and enable the use of some features.The four AA batteries are required for caller ID features and the IN USE light towork. If good batteries are not installed, the display only works when you liftthe handset.If you unplug the telephone from the wall jack, or you lose telephone servicefor over 10 minutes, and good batteries are not installed, the followinginformation is lost: call list, numbers stored in one- and two-touch memory,redial list, and all settings in the feature menu. It is recommended that youinitially install new batteries and change the batteries soon after the lowbattery icon appears.1. Press on the tab to open the cover of the battery compartment.2. Install four new AA batteries (not included) in the battery compartmentaccording to the label and - engraved in the compartment.3. Close the battery compartment cover. Make sure it clicks into place.Step 2Step 1Step 3Press thistab toopen.NOTES: Do not mix old and new batteries and do not mix alkaline and standard(carbon-zinc) batteries. When the batteries are installed, the screen will show 12:00 and the clockwill begin to run. It will reset to the correct time when the first caller IDdata is received. Always disconnect all telephone lines from the wall outlets before replacingbatteries. Install new batteries every six months to maintain the call log andtelephone memory.
Getting startedTelephone installationIf you subscribe to high-speed Internet service (digital subscriber line - DSL)through your telephone lines, you must install a DSL filter between thetelephone line cord and the telephone wall jack. The filter prevents noise andcaller ID problems caused by DSL interference. Please contact your DSL serviceprovider for more information about DSL filters. Install the telephone as shownbelow.1. Plug one end of the coiledhandset cord into the handsetjack on the left side of thetelephone base. Plug the otherend into the handset.2. One end of the telephone linecord has been plugged into thetelephone jack on the bottomof the telephone base. Doublecheck that it is plugged in firmly.3. Thread the cord through thechannel and out of the mountingarea as shown.4. Plug the other end of thetelephone line cord into atelephone wall jack.5. Put the handset on thetelephone base.DSL filter(not included)6
Getting startedInstallation optionsYour telephone base is ready for tabletop use. If you want to mount yourtelephone on a wall, use the provided wall mount bracket to connect witha standard dual-stud telephone wall mounting plate. If you do not have thismounting plate, you can purchase one from many hardware or consumerelectronic retailers. You might need a professional to install the mountingplate.Wall installationTo install the telephone base in the wall mount position, make sure that youfirst unplug all cords connected to the telephone base.1. Lift the handset and place it aside. On the telephone base, pull out thehandset tab and rotate it 180 degrees. Replace the handset tab back to thegrooves until it clicks into position.3. Rotate the bracket to the wallinstallation position, push thebracket upwards as shown belowuntil it clicks into place.2. Remove the bracket from thebase, hold the telephone basewith both hands, slide thebracket upwards as the arrowsindicate.7
Getting startedInstallation options4. Route the telephone line cord throughthe slot as shown below and plug theother end of the telephone line cordinto a telephone wall jack. To mountthe telephone on the wall, positionthe mounting holes A and B overthe telephone outlet mounting studs.Slide the bracket down firmly so thetelephone is held securely on thetelephone outlet mounting studs.5. Place the handset back on thetelephone base.ABDSL filter(not included)Tabletop installationTo return the bracket from the wall installation to tabletop use, follow theinstructions below.1. Remove the telephone base from the wall mounting plate. Unplug thetelephone line cord from the telephone wall jack and remove the cord fromthe slots under the telephone base.2. Lift the handset and place it aside. On the telephone base, pull out thehandset tab and rotate it 180 degrees. Replace the handset tab back to thegrooves until it clicks into position.8
Getting startedInstallation options4. Rotate the bracket to the tabletopinstallation position, push thebracket down as shown belowuntil it clicks into place.3. Remove the bracket fromthe base, hold the telephonebase firmly, slide the bracketdownwards as the arrowsindicate.5. Route the telephone line cord throughthe slot as shown below. Plug theother end of the telephone line cordinto the telephone wall jack.96. Place the handset back onthe telephone base.
Telephone settingsAbout the feature menuNOTE: Press OPTIONwithin ten seconds afterchoosing a setting to saveand advance to the nextfeature.The table below provides a summary of thefeature menu. Use the instructions below tochange a feature in the menu:1. When the telephone is in idle mode,press OPTION repeatedly until the screendisplays the desired feature.2. Press or until the screen displays thedesired setting.3. Press OPTION to save your selection andmove to the next feature.-ORPress CLEAR to exit without saving yourselection and return to idle mode.-ORWait 10 seconds, the telephone returns toidle mode automatically.Feature summaryDefault settings are indicated by an asterisk (*).Screen displayFunctionOptionsSET CONTRASTAdjust the screen brightness to a comfortablelevel, from 1 (lightest) to 5 (darkest). The contrastmay be different for table setting and for wallmounting.HOME AREA CODE?Set the telephone to recognize calls from the homeHAC -area code.1, 2, 3*, 4, 5Program up to four area codes which may notLOCAL AREA CODE?require dialing 1 before them.LACLACLACLAC1-2-3-4-SET TIME/DATESet the time and date on the handset.12:00AM, 1/01CALL WAITING?Choose to allow the telephone to show the callerID information of call-waiting calls and store themin the call log.ON*, OFFSET TONE/PULSESet whether the telephone should be tone dial orpulse dial.TONE*PULSESET LANGUAGEChoose the screen display language.ENGLISH*,FRANCAISESPANOLNOTE: The features are listed in the order they appear after the initialsetup. When you first install batteries, the orders are: SET LANGUAGE, SETCONTRAST, HOME AREA CODE, LOCAL AREA CODE, SET TIME/DATE, CALLWAITING, SET TONE/PULSE.10
Telephone settingsContrastThis feature allows you to adjust the screencontrast level for different lighting conditions.1. Press OPTION repeatedly until the screendisplays SET CONTRAST.2. Press or to select the desired screencontrast level from 1 (lightest) to 5 (darkest).3. Press OPTION to save your selection andmove to the next feature.- OR Press CLEAR to exit without saving yourselection and return to idle mode.3SET CONTRASTHome area codeHome area code is the area code associated withyour telephone number. It is necessary to programa home area code so the telephone can properlydisplay incoming calls and dial the telephonenumbers from the call log.1. Press OPTION repeatedly until you seeHOME AREA CODE?2. Press the or to enter the first digit of thehome area code. Use or to decrease orincrease the number.3. Press DISPLAY DIAL to save the digit andadvance to the next digit.4. Repeat steps 2 and 3 for the second and thirddigits of your home area code.5. Press OPTION to save the home area codeand continue to set the local area code.HAC -HOME AREA CODE?For calls within your area codes:DialEnter in step 2:7 digits(phone number, no area code)Your area code10 digits(area code phone number)00011 digits(1 area code phone number)00011
Telephone settingsLocal area codesLAC 1 -LOCAL AREA CODE?LAC 2 -LOCAL AREA CODE?LAC 3 -LOCAL AREA CODE?LAC 4 -LOCAL AREA CODE?Local area codes are area codes associatedwith other telephone numbers for which youmust dial the area code, but do not need todial 1. This includes your own area code if youmust dial the area code but not 1 to makecalls in your own area code.Up to four local area codes can beprogrammed. Do not program area codes forwhich you must dial a 1.1. Press OPTION until you see LOCALAREA CODE?2. Press the or to enter the first digit ofthe local area code in LAC 1. Use orto decrease or increase the number.3. Press DISPLAY DIAL to move to nextdigit of the local area code and repeatstep 2.4. Press OPTION to save your selection andmove to next local area code (LAC 2,LAC 3 or LAC 4).5. Press OPTION to save your selection andmove to the next feature when you havefinished entering local area codes.- OR Press CLEAR to exit without saving yourselection and return to idle mode.For calls outside your area codes:For:Dial:All calls outside your area code11 digits(1 area code telephone number)Some calls outside your areacode10 digits(area code telephone number)If you dial 10 digits (area code phone number) for calls within yourown area code, include your area code as a local area code.12
Telephone settingsTime and date10:12 AM1/01SET TIME/DATE10:12 AM12/03SET TIME/DATE8:00 PM12/03SET TIME/DATEThis feature allows you to set the time anddate when the telephone is in idle mode. If yousubscribe to caller ID service, the time and dateare set automatically by the incoming caller IDinformation.1. Press OPTION repeatedly until the screendisplays SET TIME/DATE.2. When the hour is flashing, use the andkeys to scroll through the list of numbersfrom 1 to 12 to select the right number forthe hour and AM or PM. Press DISPLAY DIALto save the entry and advance to the nextsetting.3. When the minutes are flashing, use the andkeys to scroll through the list of numbersfrom 00 to 59 to select the right number forthe minutes. Press DISPLAY DIAL to save theentry and advance to the next setting.4. When the month is flashing, use the andkeys to scroll through the list of numbersfrom 1 to 12 to select the right number forthe month. Press DISPLAY DIAL to save theentry and advance to the next setting.5. When the day is flashing, use the andkeys to scroll through the list of numbersfrom 1 to 31 to select the right number forthe date. Press DISPLAY DIAL to return tostep 2 above to make any corrections.- OR Press OPTION to save the entry and advanceto CALL WAITING?- OR Press CLEAR to exit without saving yourselection and return to idle mode.NOTE: When entering the hours, after 11AMis 12PM, and after 11PM is 12AM.13
Telephone settingsCall waitingCALL WAITING?ONIf you subscribe t
ready to make a call. OPTION Press to display the setting options. While in the option menu, press to save the selection and move to the next feature (page 10). FLASH When there is a call waiting signal, press FLASH to put the current call on hold and connect to the new call. Press FLASH again to return to the original call. Also, press