Transcription
Access Manager Plus - Best Practices GuideBestPracticesGuide1
Access Manager Plus - Best Practices GuideTABLE OFCONTENTS579Overview1.1 About Access Manager Plus1.2 About the guideRecommended system configuration2.1 Minimum system requirementsInstallation3.1 Windows vs. Linux3.2 Backend database3.3 Secure the master key3.4 Take control of the database credentials13Server and environmental settings4.1 Server hardening4.2 Use a dedicated service account4.3 Configure a bound IP address for the webserver4.4 Restrict webserver access by blacklisting orwhitelisting IP addresses2
Access Manager Plus - Best Practices Guide16User onboarding and management5.1 Leverage AD/LDAP/Azure AD integration forauthentication and provisioning5.2 Disable local authentication5.3 Use two-factor authentication5.4 Assign user roles based on job responsibilities5.5 Create user groups5.6 Remove the default user accounts20Data population and management6.1 Adding connections: Choose a convenientmethod6.2 Remove unmanaged, unwanted, and unknownprivileged accounts6.3 Leverage the power of connection groups23Granular access controls7.1 Make use of access control workflows7.2 Require users to provide reason for retrievingpasswords7.3 Integrate Access Manager Plus with enterpriseticketing systems25Secure remote access8.1 Enable users to automatically log on to remotesystems without revealing passwords in plaintext8.2 Configure gateway settings8.3 Leverage advanced settings for connections8.4 Discover and configure RemoteApp for Windowsservers29Privileged access to third parties9.1 Manage third-party access to corporate systems3
Access Manager Plus - Best Practices Guide3133Data center remote access10.1 Avoid circulating jump server credentialsSession management andmonitoring11.1 Monitor critical sessions in real time11.2 Record every privileged session11.3 Regularly purge recorded sessions36Auditing12.1 Facilitate regular internal audits12.2 Keep a tab on select activities with instant alerts12.3 Opt for daily digest emails to avoid inbox clutter12.4 Send syslog messages and SNMP traps to yourevent and network management systems12.5 Purge audit records4042Data redundancy and recovery13.1 Set up disaster recoveryMaintenance14.1 Keep your installation updated14.2 Choose your maintenance window wisely14.3 Look for security advisories14.4 Moving the Access Manager Plus installationfrom one machine to another4
Access Manager Plus - Best Practices Guide01Overview5
Access Manager Plus - Best Practices Guide1.1 About Access Manager PlusManageEngine Access Manager Plus is a web-based privileged session managementsoftware that regulates access to remote systems through secure channels from a unifiedconsole. With comprehensive auditing capabilities, it offers total visibility into all privilegedaccess usage, and lets enterprises manage privileged user sessions in real time, shutting thedoor on access misuse. It also helps prove compliance with regulations like PCI DSS, GDPR,NERC CIP, and SOX.1.2 About the guideThis guide describes the best practices for getting started with Access Manager Plus in anenterprise network. Coming from our experience of helping organizations around the worlddeploy the software successfully, this guide offers instructions to IT security administrators toset up an efficient and streamlined privileged session management software. These bestpractices can be adopted during all stages—product installation, configuration, deployment,and maintenance—and they are explained below with special focus on data security,scalability, and performance.6
Access Manager Plus - Best Practices Guide02Recommended systemconfiguration7
Access Manager Plus - Best Practices Guide2.1 Minimum system requirementsBefore installing Access Manager Plus, you need to evaluate the system configuration. Theminimum system requirements to run Access Manager Plus can be found here.In general, the performance and scalability depends on the following factors: Number of users and groupsNumber of active connectionsFrequency of remote connectionsNumber of scheduled tasksStorage space (free disk space available in hard drive)Based on the above factors, the following system settings are recommended for small,medium, and large enterprises:Hardware RequirementsOrganization SizeProcessorRAMHard DiskSmall( 1000 servers, 500 keysand 500 user)Dual Core / Core2 Duoor above.4 GB 200 MB for product10 GB for databaseMedium( 5000 servers, 1000 keysand 1000 users)Quad Core or above.8 GB 500 MB for product20 GB for databaseLarge( 5000 servers, 1000 keysand 1000 users)Octa Core or above16 GB 1 GB for product30 GB for databaseNote:We also recommend that you install Access Manager Plus on a dedicated, hardened, high-endserver for superior performance and security.8
Access Manager Plus - Best Practices Guide03Installation9
Access Manager Plus - Best Practices Guide3.1 Windows vs. LinuxAccess Manager Plus can be installed on either Windows or Linux. Although the softwareruns equally on both the platforms, installing on Windows provides an inherent advantage onActive Directory integration:Active Directory (AD) integration:A Windows installation of Access Manager Plus can be directly integrated with AD/Azure ADto import users and groups. Moreover, users who have logged into their Windows systemusing the domain account credentials can leverage single sign-on (SSO) using the Windowssecurity protocol NT LAN Manager (NTLM) to automatically log in to Access Manager Plus3.2 Backend databaseAccess Manager Plus provides backend support for PostgreSQL database and MS SQL server.By default, the product comes bundled with PostgreSQL database, which is ideal for smalland medium-sized businesses. Meanwhile, for large businesses, we highly recommend youuse MS SQL server as your backend for better scalability, performance, clustering, and disaster recovery.If you are using MS SQL server as your backend, we suggest you follow these practices: Access Manager Plus can communicate with the MS SQL server only over SSL, with a validcertificate configuration. Therefore, we recommend that you have a dedicated SQL instance for Access Manager Plus to avoid any conflicts or disruptions with existing databases.While using the MS SQL server as your backend, a unique key is auto-generated fordatabase-level encryption and, by default, this key will be stored in the directory, in a filenamed masterkey.key . We recommend that you move the key file to a different locationto protect it from unauthorized access.Use Windows authentication while configuring MS SQL server as your backend rather thanusing an SQL local account.We recommend you use the same domain account to run both Access Manager Plusserver and MS SQL server, so that you can run SQL service and SQL agent services.The force encryption option should be enabled to allow all clients to connect to this SQLinstance. When this is done, all client-to-server communication will be encrypted andclients that cannot support encryption will be denied access.Disable all protocols other than TCP/IP in the machine where MS SQL server is running.Hide this SQL instance to prevent it from being enumerated by other tools and disableaccess to this database for all other users except Access Manager Plus’s service account.Set up firewall rules to allow access only for the required ports in the machine where theMS SQL server is running.10
Access Manager Plus - Best Practices Guide3.3 Secure the master keyAccess Manager Plus uses AES-256 encryption to secure passwords and other sensitive information. The key used for encryption (amp key.key) is auto-generated and unique for every installation. By default, this key will be stored in the AMP HOME/conf directory, in a filenamed amp key.key . The path of this key needs to be configured in the manage key.conffile present in the AMP Installation Folder /conf directory. Access Manager Plus requires thisfolder to be accessible with necessary permission to read the amp key.key file when it startsup every time. After a successful start-up, it does not need access to the file anymore and sothe device with the file can be taken offline. We highly recommend you move this key to adifferent secure location and lock it down by providing read access only to Access ManagerPlus’s service account. Also, update this remote path in the manage key.conf file so that theproduct can read the encryption key during start up. You can also secure this key by storingit in a USB drive or a disk drive. For extreme security, create script files to copy this key into areadable location and then destroy the copy upon service start up.3.4 Take control of the database credentialApart from AES encryption, the Access Manager Plus database is secured through a separatepassword, which is auto-generated and unique for every installation. This database passwordcan be securely stored in Access Manager Plus itself. However, we recommend you storethe password in some other secure location accessible to the product server. By default, thedatabase information, such as the JDBC URL, log in credentials, and other parameters, will bestored in a file named database params.conf, which is present in the directory. Although thedatabase is configured to not accept any remote connections, we recommend you move thisfile to a secure location, restrict access, and make it available only for Access Manager Plus’sservice account. However, you will have to copy the file back to the original location (i.e., to AMP Installation Folder /conf ) while performing the application upgrade. If you place thedatabase params.conf file outside the Access Manager Plus installation folder, you need tospecify the location along with the filename in \conf\’’wrapper.conf’’ file (for Windows) or \conf\’’wrapper lin.conf’’ file (for Linux). Note that the service cannot be started if the entire locationis not specified here. The path of this file is configured in the “wrapper.conf” file present in the directory. Edit thisfile and look for the linewrapper.java.additional.9 -Ddatabaseparams.file. If you are using a Linux installation, then you will have to edit the file“wrapper lin.conf” present in the directory.The default path will be configured as ././conf/database params.conf. Move the “databaseparams.conf” file to a secure location and specify its path in the above file. For example,11
Access Manager Plus - Best Practices Guidewrapper.java.additional.9 -Ddatabaseparams.file \\remoteserver1\tapedrive\sharedfiles\database params.conf. Save the file and restart Access Manager Plus for the change to take effect.Note:The above steps are applicable only for PostgreSQL and MySQL. If you are using MS SQLserver as your backend, refer to section 3.2.12
Access Manager Plus - Best Practices Guide04Server andenvironmental settings13
Access Manager Plus - Best Practices Guide4.1 Server hardeningBy default, all components required for Access Manager Plus to function are stored in theinstallation directory (ManageEngine/AMP). Therefore, we highly recommend you harden theserver where Access Manager Plus is installed. Some of the basic steps you should carry outare as follows: Disable remote access to this server for all regular domain users in your organization usingdomain group policies. Restrict read permissions for all regular administrators, and providewrite permissions to Access Manager Plus drive or directories for only one or two domainadministrators.Set up inbound and outbound firewalls to protect against incoming and outgoing traffic, respectively. Using this setting, you can also specify which server ports must be opened andused to conduct various session management operations such as remote access.4.2 Use a dedicated service accountCreate a separate service account for Access Manager Plus in your domain controller. Tobegin using this service account, go to the service console (services.msc) in the server whereAccess Manager Plus is installed, and review the properties. Replace the configured local system account with the service account created. This same service account can also be used forimporting users and resources from AD.4.3 Configure a bound IP address for the webserverBy default, Access Manager Plus’s webserver will bind to all available IP addresses of theserver in which the application is installed. Due to this, Access Manager Plus will be reachableon any or all IP addresses with the configured port (9292). To restrict this, we recommend youconfigure the web server to bind to a single IP address and receive incoming communicationsfrom that IP address alone. The following steps can be used to configure the bound IP: Stop Access Manager Plus if it is running.Open the “server.xml” file present in the \conf folder.Search for this code snippet: Connector SSLEnabled ”true” URIEncoding ”UTF-8”acceptCount ”100” ciphers ”TLS RSA WITH AES 256 CBC SHA,TLSRSA WITH AES 256 CBC SHA256” clientAuth ”false” debug ”0”disableUploadTimeout ”true” enableLookups ”false” keystoreFile ”conf/server.keystore” keystorePass ”passtrix” maxHttpHeaderSize ”32768” maxSpareThreads ”75”maxThreads ”150”minSpareThreads ”25” port ”9292” scheme ”https” secure ”true” server ”PMP” sslProtocol ”TLS” truststoreFile ”jre/lib/security/cacerts” truststorePass ”changeit” truststoreType ”JKS” useBodyEncodingForURI ”true”/ 14
Access Manager Plus - Best Practices GuideIn the above snippet, next to the value port ”9292”, add the attribute address ”127.0.0.1”.Replace 127.0.0.1 with the actual IP address of the server that you want to use for binding.4.4 Restrict webserver access by blacklisting or whitelisting IP addressesAccess Manager Plus can be accessed from any client system, as long as there is connectivity.We recommend you restrict and provision only a limited number of client systems with accessto Access Manager Plus. To configure IP-based restrictions, navigate to Admin IPRestrictions Web Access. The IP restrictions can be set at various levels and combinations,such as defined IP ranges or individual IP addresses. You can choose to allow web accessto specific IP ranges and addresses or alternatively, restrict access by adding them to theblocked IP addresses field.15
Access Manager Plus - Best Practices Guide05User onboardingand management16
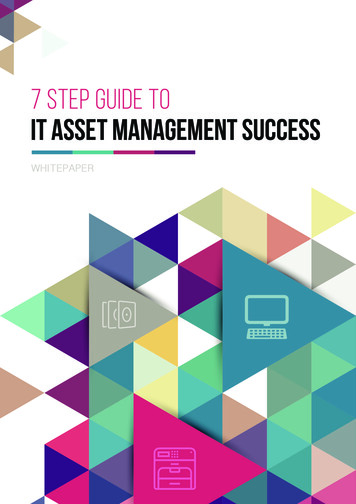
Access Manager Plus - Best Practices Guide5.1 Leverage AD/LDAP/Azure AD integration for authentication andprovisioningIntegrating Access Manager Plus with AD, Azure AD, or any LDAP-compliant directory can bevery useful, as it provides the following benefits:User provisioning or deprovisioning:With AD/LDAP/Azure AD integration, adding a user in Access Manager Plus is quick and easy.Once integrated, you can directly import the user profiles and groups or organizational units(OUs) from your directory to Access Manager Plus. Moreover, user account provisioning in theproduct becomes a simple process. For instance, if you import an existing OU of “DatabaseAdministrators” from your directory to Access Manager Plus, you can easily allocate thedatabase passwords to that imported group. On top of this, you can enable synchronizationwhile integrating Access Manager Plus with your directory so that any change, such as a usernewly added or moved around between OUs in your directory, will automatically reflect inAccess Manager Plus. Synchronizing Access Manager Plus with your directory will also keepyou notified when a user is permanently deleted from the corresponding user directory.Access Manager Plus disables and locks such user accounts, and notifies you of the samethrough an email and alert notification, upon which you can chose to either delete thoseaccounts or reactivate them.5.1 Configuring AD settings for user onboarding and authentication.17
Access Manager Plus - Best Practices GuideAD authentication:Another benefit is that you can leverage your directory’s respective authentication mechanismand provide your users with single sign-on (SSO) options. Once you activate this option, userswill be automatically authenticated into Access Manager Plus (using NTLM-basedauthentication) as long as they have already logged in to the system with their directorycredentials. Using AD credentials for Access Manager Plus authentication ensures that loginpasswords are not stored locally in Access Manager Plus, since users will be directlyauthenticated from the directory.Note:Apart from AD/Azure AD/ LDAP authentication, Access Manager Plus also supports: Any RADIUS (Remote Authentication Dial-In User Service)-based authenticationSmart card public key infrastructure (PKI)/certificate authenticationSecurity Assertion Markup Language (SAML)-based SSO (including Okta, Azure AD, andActive Directory Federation Services (ADFS))5.2 Disable local authenticationAfter integrating Access Manager Plus with your AD/Azure AD/LDAP-compliant directory, weadvise you disable local authentication and let users log on to Access Manager Plus usingtheir AD/LDAP/Azure AD credentials. To disable local authentication, navigate to Admin Server Settings General Settings User Management, and enable the checkbox Disablelocal authentication. However, if you have configured a local Access Manager Plus accountfor break-glass purposes, you cannot disable local authentication. In such cases, if you stillwant to have only AD/LDAP/Azure AD authentication, we recommend you disable the “ForgotPassword” option in the same section (option used to reset the local authentication passwordfor all users in Access Manager Plus). Disabling this option will ensure users can log in toAccess Manager Plus using only their AD/LDAP/Azure AD credentials, even if localauthentication is enabled.5.3 Use two-factor authenticationAn additional protective layer of user authentication ensures that only the right people haveaccess to sensitive resources. Access Manager Plus provides multiple options for configuringa second level of authentication before providing access to the product’s web interface. Thesecond factor options are: PhoneFactor, RSA SecurID tokens, Duo Security, GoogleAuthenticator, unique passwords through email, any RADIUS-compliant authentication,Microsoft Authenticator, Okta Verify, and YubiKey. It is highly recommended that you configuretwo-factor authentication for your users.18
Access Manager Plus - Best Practices Guide5.4 Assign user roles based on job responsibilitiesAfter adding users, assign them proper roles. Access Manager Plus has two predefined userroles: Administrator and Standard User. The administrator role should be restricted only to thehandful of people who need to perform user onboarding and management. Apart from thedefault roles, Access Manager Plus also enables you to add custom roles from the scratch.Click here to learn more about custom roles. For additional security, a new custom role addedby an administrator has to be approved by another administrator.5.5 Create user groupsOrganize your users into specific groups—for example, Windows administrators, Linuxadministrators, technicians, etc. User grouping helps improve efficiency when sharingresources and delegating passwords. If you’ve integrated Access Manager Plus with AD/LDAP/Azure AD, you can import user groups directly from the directory, and use the samehierarchical structure.5.6 Remove the default user accountsFor security reasons, we highly recommend that you delete the default user accounts like theadmin and guest accounts in Access Manager Plus, after you have added one or more userswith the administrator role.19
Access Manager Plus - Best Practices Guide06Data population andmanagement20
Access Manager Plus - Best Practices Guide6.1 Adding connections: Choose a convenient methodThe first step to getting started with access management in Access Manager Plus is to addremote target systems in as “Connections” to launch secure remote connections. The quickest and most conven
ManageEngine Access Manager Plus is a web-based privileged session management software that regulates access to remote systems through secure channels from a unified console. With comprehensive auditing capabilities, it off