Transcription
PRACTICE CSBilling WalkThroughversion 2014.x.x
TL 280495/30/14Copyright InformationText copyright 2004 – 2014 by Thomson Reuters. All rights reserved.Video display images copyright 2004 – 2014 by Thomson Reuters. All rights reserved.Thomson Reuters hereby grants licensee of CS Professional Suite software the right to reprint this document solely for theirinternal use.Trademark InformationThe trademarks used herein are trademarks and registered trademarks used under license.All other brand and product names mentioned in this guide are trademarks or registered trademarks of their respective holders.
ContentsIntroduction. 1Opening the sample database . 1Backing up the sample database . 2Walkthrough Exercises. 5User preferences for billing . 5Setting up user preferences for billing . 5Other billing preferences . 7Firm preferences for billing . 7Enabling the approval process for billing . 7Other firm billing preferences . 8Using the Billing Worksheet . 9Using the Billing screen . 12Selecting the WIP to bill. 12Standard Bill . 14Quick Bill . 15Zero Bill . 17Detail billing . 18Overview of the Summary tab . 18Entering billing information in the Summary tab. 19Overview of the Time & Expense Entry tab . 21Editing a transaction in the Time & Expense tab . 22Smart Bill . 24Allocating an adjustment to a different staff member . 26Adding an adjustment entry . 27Progress billing . 29Creating a progress bill – Summary tab . 29Clearing a progress bill . 32Creating a progress bill – Time & Expense tab . 33Relieving nonbillable time and expenses . 35Composing an invoice . 36Previewing an invoice . 39Practice CS Billing WalkThroughiii
ContentsApproving and posting an invoice . 39Editing invoices . 41Unbilling an invoice . 42Viewing the Journal . 44Recurring bills . 44Creating a recurring bill description . 45Setting up a recurring bill for the client’s engagement . 45Generating a recurring bill . 46Previewing and printing invoices . 47Previewing an invoice . 48Printing an invoice . 49Printing an invoice to NetClient CS. 50Custom invoice formats . 55Setting up a custom invoice format using the Format Wizard . 55Customizing invoice and statement formats . 61Toolbars and menus . 61The Properties pane . 62Restoring the sample database. 63ivPractice CS Billing WalkThrough
IntroductionThis walkthrough introduces you to the process of billing your clients in Practice CS.After you have completed the walkthrough, you will have a good understanding ofthe various methods of billing available in Practice CS. You will also learn aboutproducing invoices and creating custom invoice formats.Note: This walkthrough assumes you are familiar with using Practice CS or that youhave read chapter 3, Program Overview, in the Practice CS Getting Started guide.Opening the sample databaseTo perform the exercises in this walkthrough, you will start Practice CS and log in tothe Sample database as staff CAT. To log in, follow these steps.1. Start Practice CS.2. In the login dialog, select Sample in the Open Firm field.3. In the Staff ID field, select CAT.Note: If you previously marked the Remember login information checkbox, holddown the SHIFT key when you double-click the Practice CS icon and continueto hold down the SHIFT key until the login dialog appears.Practice CS Billing WalkThrough1
Introduction4. Click OK.Backing up the sample databaseData that you enter while performing the exercises in this walkthrough will affect theSample database. Therefore, we recommend that you make a backup of theSample database before you begin so that it is available for use in otherPractice CS walkthroughs.Note: If you are running Practice CS through the Virtual Office CS module, theBackup menu command is not available. We recommend that you install a localcopy of Practice CS so that you can back up the Sample database. For instructionson installing the application, please see chapter 2, Installation Instructions, in thePractice CS Getting Started guide.To back up the Sample database, follow these steps.1. In Practice CS, choose File Backup.2Practice CS Billing WalkThrough
Introduction2. In the Backup File field, enter the path and file name for the backup, or click thebutton and navigate to the backup file location. The backup file willbrowsehave a file extension of BDF.Note: The backup file will be created on the computer where the data resides.The path specified here must be a valid path on that computer.3. Click OK.4. When prompted that the backup is complete, click OK.Note: After you complete this walkthrough, you can restore the sample database.For instructions, see “Restoring the sample database” on page 63.Practice CS Billing WalkThrough3
Introduction4Practice CS Billing WalkThrough
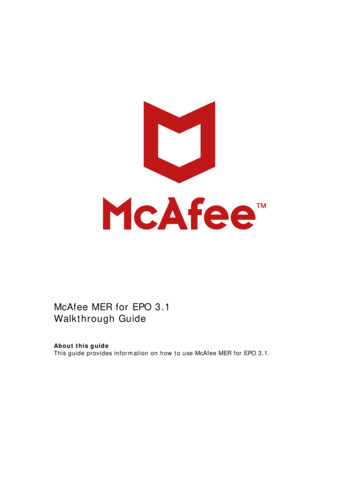
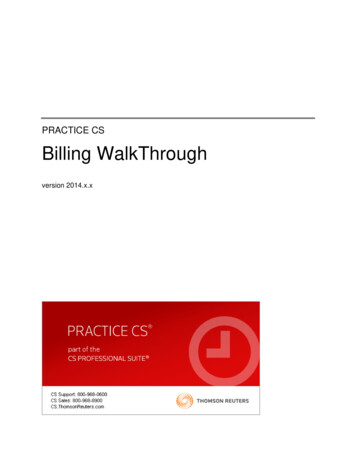
Walkthrough ExercisesPractice CS offers a wide variety of billing methods to bill for your firm’s services,and provides custom formatting options for producing professional invoices andstatements. The following exercises will illustrate how to use the available billingmethods and how to work with invoice formats in Practice CS.User preferences for billingPractice CS user preferences (Setup User Preferences) allow you to customizecertain areas of the application so that you can perform your work more easily andefficiently. User preferences are available for Time & Expense Entry, Billing, Receipt& Adjustment Entry, and for the overall application (System). User preferences arespecific to each staff member.Use the Billing tab to select whether to bill by client or by engagement, whether todisplay work-in-process (WIP) during billing, and to specify rounding methods forbilling. You can also choose a default invoice date, and which tab of the Billingscreen you would like to see at startup. You can change these settings at any time.Setting up user preferences for billingIn this exercise, you will explore the various user preferences available for billing inPractice CS.1. Choose Setup User Preferences, and then click the Billing tab.2. The date you choose in the Default invoice date field will be the invoice date foreach client displayed in Detail Billing. You can choose Today's date, Period enddate, or Last date used. For this walkthrough, choose Period end date.3. In the Default Wip through field, select Invoice date. This date serves as a WIPcut-off date. Only WIP dated on or before this date will be available for billing.Note: If the WIP through date falls after the invoice date, the invoice dateserves as the WIP cut-off date.4. Verify that the Implied decimal on amounts checkbox is marked. When thischeckbox is marked, the application enters .00 after amounts that you enter.Practice CS Billing WalkThrough5
Walkthrough ExercisesWhen it is not marked, the application inserts a decimal two places to the left ofthe number that you enter.5. Mark zero invoices as printed: For this walkthrough, clear this checkbox.Marking this checkbox toggles the Printed column in the Print Invoices &Statements screen to “Yes” for invoices with zero bill amounts, enabling you toexclude them from your selection when printing invoices.6. In the Bill by field, select Engagements from the drop-down list. Your selectionhere determines whether the Billing screen contains client engagements orclients only.Note: If your firm is licensed for the Practice CS Project Management module,you can also choose to bill by project.7. Verify that the Show WIP when selecting clients to bill checkbox is marked.When this checkbox is marked, the Billing screen includes a column showingthe WIP balances available for billing.8. Use the Start-up tab field to select the tab you would like to be active wheneveryou open Detail Billing, either Summary or Time & Expenses. Verify thatSummary is selected from the drop-down list.9. You can choose to roundyour billing amounts whenbilling at standard. Selectthe Standard roundingoption.10. When you choose to roundbilling amounts, you mustenter a roundingincrement. The defaultincrement is 1 dollar. Forthis exercise, leave thedefault.11. Review all other settings tomake sure they match theillustration.12. Click OK to save yourpreferences and close thedialog.6Practice CS Billing WalkThrough
Walkthrough ExercisesOther billing preferencesAutomatically apply open credits — If you mark this checkbox, the applicationautomatically applies open credit amounts (receipts, credit memos, or write-offs) toa client's invoice when you save the invoice. For this walkthrough, do not mark thecheckbox.Automatically display Apply Open Credits dialog — When this checkbox is marked,the Apply Open Credits dialog opens automatically when you save an invoice for aclient with open credits. In this dialog, you can either manually enter the amounts toapply, or have the application auto apply the credits.Automatically select subsidiary Clients when selecting parent Clients — When thischeckbox is marked, subsidiary clients (that is, clients that have a parent clientselected in Setup Clients Billing and A/R tab) will be automatically selectedwhen you select the parent client in billing.Time & Expense Descriptions — You can mark checkboxes for each item that youwant to include in billing grids. For this walkthrough, verify that the Comment andBiller Note checkboxes are marked.Firm preferences for billingIn addition to user preferences, your firm may wish to establish some firm-widesetup decisions for billing, approving and posting, security, and so on. Your firm’sadministrator, or another staff member with security permission to make firm-widesettings in the application, can enable the approval and posting process for billing.Enabling the approval process for billing1. Choose Setup Firm, and then click the Preferences tab.Practice CS Billing WalkThrough7
Walkthrough Exercises2. Under Approval/Posting process, verify that the Required for Billing checkbox ismarked. When this checkbox is marked, a staff member with the authority toreview invoices must approve an invoice on review before it can be posted.3. If necessary, click Enter to save your changes.You can also enable the approval process for Time & Expense Entry and forReceipt & Adjustment Entry. For this walkthrough, do not mark these checkboxes.Other firm billing preferencesIf you want Practice CS to accept data via integration with other CS ProfessionalSuite applications, mark the Integrate this Firm with other solutions checkbox.Note: This checkbox can only be marked for one firm database at a time.For this walkthrough, do not mark the checkbox.8Practice CS Billing WalkThrough
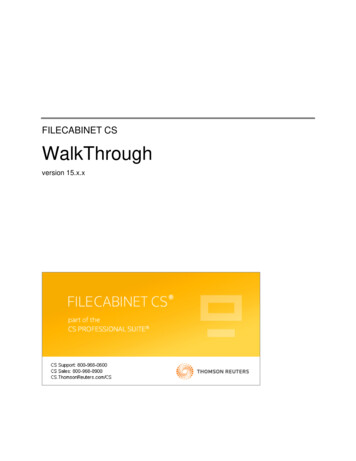
Walkthrough ExercisesUsing the Billing WorksheetIf your firm prefers to make billing decisions on paper, you can print the BillingWorksheet to assist you.1. Choose File Print Reports.Note: You can also click the Firm button in the navigation pane, then click thePrint Reports action icon.2. Highlight the Billing Worksheet report, and then click the Select button.Note: You can also double-click a report to select it.3. In the Selection tab of the Report Options section, you can specify the reportdate (Today’s Date, Period End Date, Prior Period End Date, or Custom). Verifythat Period End Date is selected in the Report date field.4. Click the Layout tab.Use the Layout tab to sort and group the data on the report. Here you canselect a level of detail for the report and choose an item to sort by. You can alsochoose up to three levels of grouping for this report. Each grouping level on theprinted report will have a header and a footer, with the footer containingsubtotals.Practice CS Billing WalkThrough9
Walkthrough Exercises5. Verify that the following settings are selected. Group Clients by: Client Office Group Detail by: Engagement6. Click the Preview Selected button.10Practice CS Billing WalkThrough
Walkthrough Exercises7. To exit the preview, click the Back button on the toolbar.Notes You can also print the Billing Worksheet directly from the Billing screen. Markthe checkbox for each client or engagement you want to select, right-click, andchoose Preview Billing Worksheet for Selected from the context menu. You can select any custom report that is based on the Billing Worksheet reportby choosing Preview Billing Worksheet For Selected Select Report. You canalso set report options for the selected report.Practice CS Billing WalkThrough11
Walkthrough ExercisesUsing the Billing screenWith Practice CS you can bill your clients on screen, using a variety of billingmethods to accommodate your firm’s arrangements with individual clients. You canbill using as much or as little detail as you need.In the Billing screen you can bill by clients or engagements, review and approveinvoices (if your firm uses an approval process), and generate recurring bills.Note: If you are licensed for UltraTax CS, you can also use the Billing screen toaccept or reject invoices forwarded from UltraTax CS. See the topic Working withintegrated invoices in the Help & How-To Center for more information.Selecting the WIP to billBefore you begin billing, you must select the clients or engagements that you wantto bill. Use the Bill Engagements tab of the Billing screen to make your selections.Note: The default name for this tab is Bill Engagements. The name of the tabchanges depending on whether you have set your user preferences to bill byengagements or by clients. If you are licensed for the Practice CS ProjectManagement module, you can also choose to bill by project.1. Open the Billing screen (Actions Billing).Tip: You can also open the Billing screen by clicking the Clients button in thenavigation pane and then clicking the Billing action icon, or by pressingCTRL B.2. Mark the Positive Wip checkbox to display only clients or engagements with apositive WIP balance.12Practice CS Billing WalkThrough
Walkthrough ExercisesNotes If you want to further narrow down the list of clients or engagements, clickbutton at the top of the screen and select an item (forthe show filterexample, Client ID) from the Filter field to filter the screen by that item. Seethe topic Filtering your data in the Help & How-To Center for moreinformation about creating and using filters. To improve performance in Practice CS wherever large lists of items aredisplayed, results are limited to a pre-determined maximum size. When adrop-down list displays results that are limited, the message “Resultslimited” appears at the end of the list.If the data you are looking for is not included in the limited results, refineyour sort order, search criteria, and/or filter to narrow down the datadisplayed in the list. To display more items in the drop-down list, click theGet More Items button.3. When you are satisfied with the client list, mark the checkbox for each client orengagement that you want to bill. For this exercise, select the following clientsand engagements.ClientEngagementACEADVERTAce AdvertisingCONSULTINGBINGSSally BingINDIVTAXCRAWFORDCrawford Steak HousePAYROLLNotes To quickly select multiple clients, click the Select All button at the top of thescreen, or right-click the list and choose Select All from the context menu.You can also press ALT A or CTRL A on your keyboard to select all. To deselect all, click the Deselect All button, or right-click and chooseDeselect All from the context menu. You can also press ALT E on yourkeyboard.Practice CS Billing WalkThrough13
Walkthrough Exercises4. The Billing Selection pane displays the client engagements you selected forbilling. When this list is unsorted, the engagements appear in the list in theorder in which they were selected. When you open the engagements to billthem, they will open in the order in which they are li
Practice CS offers a wide variety of billing methods to bill for your firm’s services, . Note: If your firm is licensed for the Practice CS Project Management module, you can also choose to bill by project. 7. Verify that the Show WIP when selecting clients to bill checkbox is marked.