Transcription
Administrator User GuideOfficeSuite UC PUTTING ALL YOUR OFFICESUITE FEATURES TO USE TO BE MORE EFFICIENTCONTACT et.comhttp://community.broadviewnet.com
Table of ContentsManaging Features Through the MyOfficeSuite Portal . . . . . . . . . . . . . . . . . . . . . . . . . . . . . . . . . . . . . . . . . . . . . . . . . . . . . . . . . . . . . . . . . . . . . . . . . . 3Installing Your Phone . . . . . . . . . . . . . . . . . . . . . . . . . . . . . . . . . . . . . . . . . . . . . . . . . . . . . . . . . . . . . . . . . . . . . . . . . . . . . . . . . . . . . . . . . . . . . . . . . . . . . . . . . . . . . . . . . 3Administering and using the system from the MyOfficeSuite Portal . . . . . . . . . . . . . . . . . . . . . . . . . . . . . . . . . . . . . . . . . . . . . . . . . . . . . . . . . . . . . . . . . . . 4Administering the System . . . . . . . . . . . . . . . . . . . . . . . . . . . . . . . . . . . . . . . . . . . . . . . . . . . . . . . . . . . . . . . . . . . . . . . . . . . . . . . . . . . . . . . . . . . . . . . . . . . . . . . . . 6Setting Up How Calls Come Into Your Business. . . . . . . . . . . . . . . . . . . . . . . . . . . . . . . . . . . . . . . . . . . . . . . . . . . . . . . . . . . . . . . . . . . . . . . . . . . . . . . . . . . 6Setting Up Users . . . . . . . . . . . . . . . . . . . . . . . . . . . . . . . . . . . . . . . . . . . . . . . . . . . . . . . . . . . . . . . . . . . . . . . . . . . . . . . . . . . . . . . . . . . . . . . . . . . . . . . . . . . . . . . . . 7Setting Up and Changing Call Permission Profiles. . . . . . . . . . . . . . . . . . . . . . . . . . . . . . . . . . . . . . . . . . . . . . . . . . . . . . . . . . . . . . . . . . . . . . . . . . . . . . . . . 8Creating Call Groups . . . . . . . . . . . . . . . . . . . . . . . . . . . . . . . . . . . . . . . . . . . . . . . . . . . . . . . . . . . . . . . . . . . . . . . . . . . . . . . . . . . . . . . . . . . . . . . . . . . . . . . . . . . . . 9Setting Up Your Business Hours . . . . . . . . . . . . . . . . . . . . . . . . . . . . . . . . . . . . . . . . . . . . . . . . . . . . . . . . . . . . . . . . . . . . . . . . . . . . . . . . . . . . . . . . . . . . . . . . . 10Creating Auto Attendants. . . . . . . . . . . . . . . . . . . . . . . . . . . . . . . . . . . . . . . . . . . . . . . . . . . . . . . . . . . . . . . . . . . . . . . . . . . . . . . . . . . . . . . . . . . . . . . . . . . . . . . 11Setting up Call Routing . . . . . . . . . . . . . . . . . . . . . . . . . . . . . . . . . . . . . . . . . . . . . . . . . . . . . . . . . . . . . . . . . . . . . . . . . . . . . . . . . . . . . . . . . . . . . . . . . . . . . . . . . 12Managing Licenses and Services . . . . . . . . . . . . . . . . . . . . . . . . . . . . . . . . . . . . . . . . . . . . . . . . . . . . . . . . . . . . . . . . . . . . . . . . . . . . . . . . . . . . . . . . . . . . . . . . 13Using the System . . . . . . . . . . . . . . . . . . . . . . . . . . . . . . . . . . . . . . . . . . . . . . . . . . . . . . . . . . . . . . . . . . . . . . . . . . . . . . . . . . . . . . . . . . . . . . . . . . . . . . . . . . . . . . . . . .14Listening to Voicemail. . . . . . . . . . . . . . . . . . . . . . . . . . . . . . . . . . . . . . . . . . . . . . . . . . . . . . . . . . . . . . . . . . . . . . . . . . . . . . . . . . . . . . . . . . . . . . . . . . . . . . . . . . . 14Setting Up Speed Dials. . . . . . . . . . . . . . . . . . . . . . . . . . . . . . . . . . . . . . . . . . . . . . . . . . . . . . . . . . . . . . . . . . . . . . . . . . . . . . . . . . . . . . . . . . . . . . . . . . . . . . . . . . 15Forwarding Calls. . . . . . . . . . . . . . . . . . . . . . . . . . . . . . . . . . . . . . . . . . . . . . . . . . . . . . . . . . . . . . . . . . . . . . . . . . . . . . . . . . . . . . . . . . . . . . . . . . . . . . . . . . . . . . . . 15Setting Up Music on Hold. . . . . . . . . . . . . . . . . . . . . . . . . . . . . . . . . . . . . . . . . . . . . . . . . . . . . . . . . . . . . . . . . . . . . . . . . . . . . . . . . . . . . . . . . . . . . . . . . . . . . . . 17Using Company-wide Chat. . . . . . . . . . . . . . . . . . . . . . . . . . . . . . . . . . . . . . . . . . . . . . . . . . . . . . . . . . . . . . . . . . . . . . . . . . . . . . . . . . . . . . . . . . . . . . . . . . . . . . 18Phones and Accessories . . . . . . . . . . . . . . . . . . . . . . . . . . . . . . . . . . . . . . . . . . . . . . . . . . . . . . . . . . . . . . . . . . . . . . . . . . . . . . . . . . . . . . . . . . . . . . . . . . . . . . . . . . . . . 20Optional Features and Services . . . . . . . . . . . . . . . . . . . . . . . . . . . . . . . . . . . . . . . . . . . . . . . . . . . . . . . . . . . . . . . . . . . . . . . . . . . . . . . . . . . . . . . . . . . . . . . . . . . . . . 22Optional Integrations . . . . . . . . . . . . . . . . . . . . . . . . . . . . . . . . . . . . . . . . . . . . . . . . . . . . . . . . . . . . . . . . . . . . . . . . . . . . . . . . . . . . . . . . . . . . . . . . . . . . . . . . . . . . . . . 23Getting Help . . . . . . . . . . . . . . . . . . . . . . . . . . . . . . . . . . . . . . . . . . . . . . . . . . . . . . . . . . . . . . . . . . . . . . . . . . . . . . . . . . . . . . . . . . . . . . . . . . . . . . . . . . . . . . . . . . . . . . . . 24Troubleshooting Your System. . . . . . . . . . . . . . . . . . . . . . . . . . . . . . . . . . . . . . . . . . . . . . . . . . . . . . . . . . . . . . . . . . . . . . . . . . . . . . . . . . . . . . . . . . . . . . . . . . . . . . . . 25FCC Notice to U.S. Customers . . . . . . . . . . . . . . . . . . . . . . . . . . . . . . . . . . . . . . . . . . . . . . . . . . . . . . . . . . . . . . . . . . . . . . . . . . . . . . . . . . . . . . . . . . . . . . . . . . . . . . . 26Index2. . . . . . . . . . . . . . . . . . . . . . . . . . . . . . . . . . . . . . . . . . . . . . . . . . . . . . . . . . . . . . . . . . . . . . . . . . . . . . . . . . . . . . . . . . . . . . . . . . . . . . . . . . . . . . . . . . . . . . . . . . . . 27
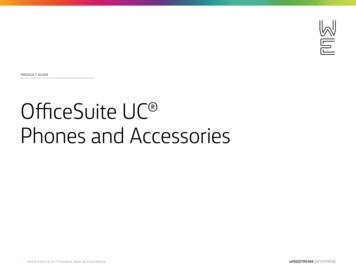
BROADVIEW PHONESInstalling Your PhoneWithout Power Over Ethernet1A: CONNECT YOUR PHONE TO THE LOCALAREA NETWORKConnect one of the provided Ethernet cables intoyour existing local area network (LAN) and into theport on the power adapter. Next, connect anotherEthernet cable into theport on your poweradapter and into theport on the back ofyour OfficeSuite phone.Proceed to STEP 2{OR}POLYCOM PHONESFor VVX Phones Only.Installing Your Phone WithPower Over EthernetInstalling Your PhoneWithout Power Over Ethernet1B: CONNECT YOUR PHONE TO THE LOCALAREA NETWORKIf your network is Power over Ethernet enabled, youdo not need the power adapter and should simplyconnect an Ethernet cable into your existing localarea network and into theport on the back of your OfficeSuite phone.1A: CONNECT POWER TO YOUR PHONEIf your network is not Power over Ethernet enabled,use the optional power adapter. Connect it toand plug the other end in to a 120V AC outlet.Proceed to STEP 1B{OR}Installing Your Phone WithPower Over Ethernet1B: CONNECT YOUR PHONE TO THE LOCALAREA NETWORKIf your network is Power over Ethernet enabled, youdo not need the power adapter and should simplyconnect an Ethernet cable into your existing localarea network and into theport on the back ofyour OfficeSuite phone.2: CONNECT YOUR PHONE HANDSETConnect your phone handset into the port next toon the back of your OfficeSuite phone. You mayalso connect a headset into the port next toonthe back of your OfficeSuite phone.2: CONNECT YOUR PHONE HANDSETConnect your phone handset into the port next toon the back of your OfficeSuite phone. You mayalso connect a headset into the port next toonthe back of your OfficeSuite phone.3: CONNECT YOUR PC TO YOUR PHONE(OPTIONAL)OfficeSuite can utilize an integrated Ethernetswitch that allows you to connect to your computerwithout requiring an Ethernet Port.3: CONNECT YOUR PC TO YOUR PHONE(OPTIONAL)OfficeSuite can utilize an integrated Ethernetswitch that allows you to connect to your computerwithout requiring an Ethernet Port.To do this, connect one of the provided Ethernetcables to your computer and into the PC porton the back of your OfficeSuite phone.To do this, connect one of the provided Ethernetcables to your computer and into the PC porton the back of your OfficeSuite phone.Power HeadsetLANPC/LaptopHandset(optional)For helpful videos, guides and other tools, visit: www.broadviewnet.com/supportFor a list of recommended headsets, go to www.broadviewnet.com/ready3
Administering and Using the System from the MyOfficeSuite Portalhttp://MyOfficeSuite.broadviewnet.com4
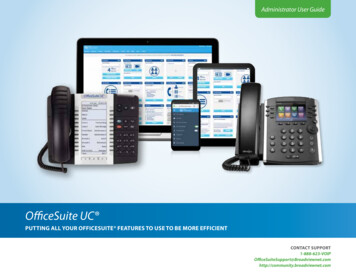
Administering and Using the System from the MyOfficeSuite PortalThe MyOfficeSuite portal is arevolutionary customer portal thatenables you and your team to manageall the preferences and features of yourOfficeSuite system, including: email, fax,HD meeting and your toll-free service.You can quickly and easily set up youremployees as users of the system bygoing to the Extension Manager underthe Phone tab. Here, you will see an alertthat says you have extensions withoutuser names assigned. Click on the link toCreate MyOfficeSuite User Accountsand a table will appear that shows allof the extensions in your organizationthat are not yet assigned usernamesfor the MyOfficeSuite portal. To createusernames, you may edit each rowindividually or you may elect to makechanges in bulk by exporting the file,making changes off-line, and importingit later. Most customers use the person’semail address as the username for easeof management.Once logged in, you are presented with the MyOfficeSuite Dashboard from which youmanage the entire system and all of your services. Across the top of the Dashboard is aseries of tabs with different functions and in the center of the Dashboard are widgetsfrom which you can make changes to the system and services. Each widget has a videoicon and informationicon describing its function to help illustrate how to usethe widget.When ready to create users, check theappropriate rows and press the CreateMyOfficeSuite User Account(s) button.You can save changes as you work bypressing Save for Later.Video HelpOnce established, you will receive awelcome email instructing you and yourusers to activate your accounts and setyour password and profile.InformationMYOFFICESUITE APPSDownload the MyOfficeSuite app to use on your mobile device and desktop.STAY IN COMPLETE CONTROL AND NEVER LOSETOUCH WITH YOUR OFFICE OR CUSTOMERSONE CLICK TO CALL ANY OTHER EMPLOYEEOR ANY FAVORITE CONTACTLISTEN TO VOICEMAIL MESSAGES, EVEN FIND ANDFORWARD IMPORTANT MESSAGES TO ANYONE1234 - Jones, RobertGET NOTIFIED OF IMPORTANT MESSAGESAND RESPOND IN REAL TIME“Hi Bob. We wonthe deal. Tell thewhole team!”Beaver, ChristyBlakely, JeffreyAngela Smith: Chat Messa.Smith, RyanFreight, EricGonzalez, AndrewKlein, CynthiaMicheals, BrianMcDonald, KristenThomas, Amy55
Administering the SystemAs the Administrator, you have the ability to manage and access all aspects of your Officesuite system. This section covers the functions and features you have the ability to manageand control for your company, from anywhere.SETTING UP HOW CALLS COMEINTO YOUR BUSINESSAll incoming phone calls are sent to aspecific phone number in the system.Calls can be sent to individual phones,to an auto attendant, or to a call group.The first step is to make sure that yourphones and phone numbers are set upthe way you wish. To set up or changethe incoming call routing for any phonenumber, click the Configure buttonon the Incoming Call Routing widget.On the left, you will see a list of all thephone numbers on your system. Toadd or update the call routing, simplyclick on the arrow on the left of thephone number listed. Next, assign thatphone number a name, like main phonenumber or sales department and selectthe appropriate business hours profile.These profiles can be set or updated inthe Business Hours widget (See pg.10 forBusiness Hours).Now, simply move through the page todetermine where you’d like the calls togo when that particular phone numberis called throughout the day. You canhave different call routes for when youare open for business, closed for the dayor during lunch breaks or other specialhours.6* Emergency override allows you tore-route your calls to a pre-determinedbusiness location, for example: mobilephones, other branch locations or adesignated emergency override numberto ensure that you do not experience anydown time in the event of an emergencylike a flood, storm or fire. Please makesure to complete the Emergency OverrideRouting for each phone number listed.Doing so will give you the ability to reroute calls with the single click of a buttonwhen it matters most.YOUR PHONE NUMBERSA list of your phone numbers and anytemporary phone numbers assignedwhile your phone numbers are movingto your new phone system can befound by clicking Phone Numbers,and selecting Porting Status underthe Phone System tab. The processof moving phone numbers from yourprevious telecommunication providerto us is called porting and can take upto two weeks to complete. You can addadditional phone numbers on this pageby clicking on Get New Number.
Administering the SystemSETTING UP USERS IN THE PORTALDashboard profiles allow you as an adminto set up what employees see and haveaccess to on their own Dashboards.There are two standard profiles thatcome with your OfficeSuite account,an Administrator profile and a StandardUser profile. You also have the ability tocustomize your own user profiles as well,as you may have users who you wantto have access to certain settings andpermissions based off of their role andlevel of authority. To create new userprofiles, go to User Manager optionunder the Settings tab and click CreateNew User Profile. Here, you can namethe profile, for example, customer serviceor sales and then select the widgetoptions that you would like them to haveaccess to, be sure to click Save. Only theitems selected will appear on their ownDashboard. After creating the new profile,you can assign it to select users via thedrop-down list next to the user’s name.Adding a New UserTo get started, you first need to createa new user through the MyOfficeSuiteportal. To do this, go to the Settings tabon top of the Dashboard and click onUser Manager in the drop-down menu.Then, click on Create New User andenter their information.Creating a New ExtensionOnce you have created a new user forthe MyOfficeSuite portal, you will thenneed to create a new extension. To dothis, go to the Extension Managerunder the Phone System tab andclick Add Extension. Enter the newemployee’s information and assign themto the appropriate extension and phonenumber from the drop-down menu andclick Save.RESETTING EXTENSION PINSAND PORTAL PASSWORDSTo reset a PIN or Password, simply clickon the Signed in As drop-down on thetop right of your dashboard and selectthe My Account Settings option. Hereyou can reset your portal password orphone pin.7
Administering the SystemCREATING NEW CALLINGPERMISSION PROFILESYou can create custom calling permissionprofiles for your team, just click onProfiles then Call Permission Profilesunder the Phone System tab. Then, clickon Create New Profile. Here you canselect the types of calls you would likethis employee or group to be able tomake. Then, drag and drop employeesbelow to add them to this profile, oncecomplete, be sure to click Save.SETTING CALL PERMISSIONSFOR MULTIPLE USERSTo easily set permissions for more thanone of your users at one time, go to theExtension Manager under the PhoneSystems tab. Here a list of all of yourusers will appear. On the right handcolumn, you will see Call Permissions,click on the field and a drop-down ofoptions will appear, select the permissionsetting you’d like for each user, thenclick Save.8
Administering the SystemCREATING GROUPS OF EXTENSIONSOR CALL GROUPSSetting up a Call Group is easy withMyOfficeSuite. Simply click the Managebutton on the Call Groups widget. Next,from the Add drop-down menu, selectthe type of call group you would like tocreate.OfficeSuite allows you to create severaldifferent types of Call Groups:Broadcast groups – Calls are routed toall members of this group simultaneously;all phones can ring or only those that arenot in use.Call Pickup groups – Calls to any member of the group can be picked upby any other member of the group.Hunt groups – Calls to a linear hunt group are routed to each group member in turn,and always start with the first member listed; calls to a circular hunt group are routedin the same way, but the starting member role rotates among members.Monitor groups – Members (secondary) can monitor the status of the phone andanswer calls of another member (primary).First, you need to define the membership of the group via Call Groups under the PhoneSystems tab. Click the hyperlink called, click here for Classic view, in the lower lefthand corner of the Call Groups page. A Call Groups window will then pop up. ChooseAdd Page Group from the Add drop-down list. Type in a name for the page group andchoose an extension. Next, press the sign across from each members name from theavailable box you wish to add to the page group. This will move the member’s nameto the selected box. Then, click Save. Once defined, you can instruct your users toprogram a Page Group Key on his or her phone to page only members of this group.To do this, have them click on Configure in the My Phones widget. Then, select anykey labeled Unassigned and use the Feature drop-down menu to select Page. In theDetails section, they will use the drop-down menu to select
BROADVIEW PHONES POLYCOM PHONES 1B: CONNECT YOUR PHONE TO THE LOCAL AREA NETWORK If your network is Power over Ethernet enabled, you . to your new phone system can be found by clicking Phone Numbers, and selecting Porting Status under the Phone System tab .