Transcription
TB200/400User ManualVersion 18.18.0.2Yeastar Information Technology Co. Ltd.
TB200/400 User ManualContentsIntroduction. 4Application Description. 5Configuration Guide . 81. Login . 82. Status . 92.1 System Status. 92.1.1 IP Trunk Status . 92.1.2 BRI Status. 102.1.3 Network Status . 102.1.4 System Info . 102.2 Reports . 112.2.1 Call Logs . 112.2.2 System Logs . 113. System . 133.1 Network Preferences . 133.1.1 LAN Settings . 133.1.2 DDNS Settings . 143.1.3 Static Route . 143.2 Security Center . 153.2.1 Certificates . 153.2.2 Firewall Rules. 163.2.3 IP Blocklist . 173.3 System Preferences . 183.3.1 Password Settings . 193.3.2 Date and Time . 193.3.3 Backup and Restore . 193.3.4 Reset and Reboot . 203.3.5 Firmware Update . 214. Gateway . 224.1 Physical Trunk . 224.1.1 Module List . 224.2 VoIP Settings . 264.2.1 VoIP Trunk . 264.2.2 SIP Settings . 284.2.3 Trunk Group . 334.2.4 General Preferences. 344.3 Route Settings . 344.3.1 Route List. 342/38
TB200/400 User Manual4.3.2 Blocklist . 374.4 Audio Settings . 374.4.1 Custom Prompts. 375.Logout . 383/38
TB200/400 User ManualIntroductionYeastar TB200/400 is a compact and reliable standalone VoIP BRI gateway(BRI-VoIP/VoIP-BRI) offering 2 or 4 BRI ports for companies using ISDN BRI lines aneasy, cost-effective and flexible integration into any VoIP system or enabling any IPPBX to be connected to the public ISDN network.Features 2 or 4 BRI ports Programmable NT/TE modes Type of connection: Point to Point, Point to Multipoint T.38 FAX Flexible number manipulation Least cost routing SIP Registrar for IP phones Simple Web-based management Trace and debug tools for diagnosticsFor more information, please eway-TB200-&-TB400Yeastar TB200/400 BRI Gateway features 2 or 4 BRI interfaces for connection of BRIprovidersone 10/100 Mbps LAN port.For more information about the TB200/400 hardware specification and how to installthe TB200/400, please refer to the document below:http://www.yeastar.com/download/Yeastar TB BRI VoIP Gateways Installation Guide en.pdf4/38
TB200/400 User ManualApplication DescriptionTB200/400 BRI VoIP Gateway supports up to 4 or 8 simultaneous phone calls fromSIP to ISDN BRI or from BRI to SIP. TB200/400 is interoperable with most IP PBXand Unified Communication vendors such as MyPBX, Elastix, Asterisk, 3CX, Skypeetc.Three modes are available for you to connect your SIP server and TB200/400gateway. We call them SIP Account Mode, VoIP Mode and SPS (Service Provider SIP)Mode. You can choose any one of the 3 modes to connect your SIP server andTB200/400. SPS Mode is recommended.Account Mode:Create one SIP account on TB200/400, and take the SIP account to register one SIPtrunk on your SIP server. Then TB400 and your SIP server are connected by theaccount. Calls from SIP to BRI1) Create one outbound route on your SIP sever, and select the SIP trunk youhave registered just now.2) Configure a route on TB200/400, choose the SIP account in the field “CallComes in From”, and choose BRI trunk in the field “Send calls Through”.3) Make a call from your SIP Server and the call should match the outboundroute dial rules. Calls from BRI to SIP1) Create an inbound route on your SIP server, and select the SIP trunk youhave registered just now.2) Configure another route on TB200/400, choose BRI trunks in the field “CallComes in From”, and choose the SIP account in the filed “Send CallsThrough”.3) When a call comes to BRI trunk on TB200/400, the call will be routed to thedestination of the SIP server inbound route. Register SIP account on IP phoneWith account mode, you can directly take the SIP account to register on your SIPphone or softphone; then make calls from softphone though BRI trunk onTB200/400 and receive incoming calls on your SIP phone or softphone. In thisway, you don’t have to set up any SIP server.VoIP ModeTake a SIP account from your SIP server, and register it on TB200/400 as a VoIP trunk.In this way, TB200/400 and your SIP server are connected.5/38
TB200/400 User Manual Calls from SIP to BRI1) Configure a route on TB200/400; choose the VoIP trunk in the field “CallComes in From”, and choose BRI trunk in the field “Send callsThrough”.Enable Two-stage Dialing on the route.2) Make a call from your SIP server, dial the SIP account number which isregistered on TB200/400. You will hear a dial tone or two-stage dialing prompt,then dial the external number out through BRI trunk.Calls from BRI to SIP1) Configure another route on TB200/400, choose BRI trunks in the field “CallComes in From”, and choose the SIP trunk in the filed “Send Calls Through”.Enable Two-stage Dialing on the route.2) When an incoming call reaches BRI trunk on TB200/400, you will hear a dialtone or two-stage dialing prompt, then dial an extension number of the SIPserver.SPS Mode(Recommended)Create a Service Provider SIP trunk on TB200/400 to connect to your SIP server. Addanother Service Provider SIP trunk on your SIP server, connecting to TB200/400. Calls from SIP to BRI1) Create one outbound route on your SIP sever, and select the SIP trunk youhave created just now.2) Configure a route on TB200/400, choose the SPS trunk in the field “CallComes in From”, and choose BRI trunk in the field “Send calls Through”.3) Make a call from your SIP Server and the call should match the outboundroute dial rules. Calls from BRI to SIP1) Configure another route on TB200/400, choose BRI trunks in the field “CallComes in From”, and choose the SPS trunk in the filed “Send Calls Through”.2) Create one inbound route on your SIP server and select the SIP trunk createdjust now.3) When an incoming call reaches BRI trunk on TB200/400, it will be routed tothe destination of the SIP server inbound route.Note:if you want the call to go directly to the destination number of your SIPserver, you don’t have to create an inbound route on SIP server, instead set aHotline number on TB200/400 route.Typical Application6/38
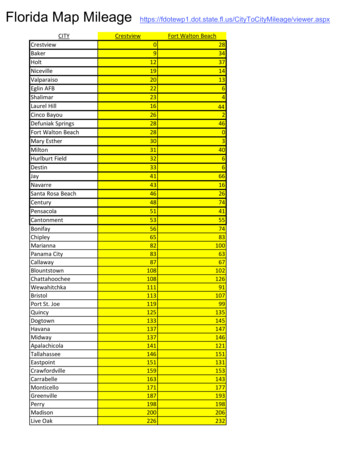
TB200/400 User ManualTypical Application7/38
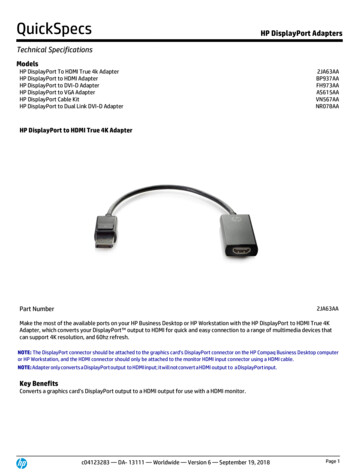
TB200/400 User ManualConfiguration Guide1. LoginTB200/400 provides web-based configuration interface for administrator. The usercan manage the device by logging in the web interface. Check the factory defaultsbelow:IP address: http://192.168.5.150User Name: adminDefault Password: passwordIn this guide, the IP address of TB200/400 is http://192.168.6.125.1. Start the browser on PC. In the address bar, enter the IP address, click “Enter”button and then you can see the Web Configuration Panel login page (see Figure1-1).2. Enter the Admin User Name and Password to log in.Figure 1-1 Web Configuration Panel Login Page8/38
TB200/400 User Manual2. StatusClickto check the status of TB200/400, including the system status and thedetailed reports.2.1 System StatusIn this page, we can check the status of the system, including trunk status, networkstatus and system information.2.1.1 IP Trunk StatusStatus of all the SIP trunks and SIP accounts are displayed on this page.SIP TypeTable 2-1 Description of SIP Trunk StatusStatusDescriptionRegisteredSuccessful registration, trunk is ready for use.UnregisteredTrunk registration failed.Request SentRegistering.Waiting for AuthenticationWrong password.SP-SIP TypeTable 2-2 Description of SP-SIP Trunk StatusStatusDescriptionOKSuccessful registration, trunk is ready for use.UnreachableThe trunk is unreachable.FailedTrunk registration failed.SIP AccountTable 2-3 Description of SIP Account StatusStatusDescriptionRegisteredThe account is registered successfully on the SIP server.UnregisteredTrunk registration failed.9/38
TB200/400 User Manual2.1.2 BRI StatusOn this page, you can check the status of BRI trunks. If there is no BRI moduleinserted on TB400, you cannot see any BRI trunk here.Table 2-4 Description of SIP Account StatusStatusOKDisconnectedDescriptionThe BRI trunk is connected and configured correctly, trunk isready to use.The BRI trunk is not connected or configured wrong.2.1.3 Network StatusIn this page, the IP address of LAN port will appear with their status.If your VLAN orVPN are configured, you can check the status in this page also.Figure 2-1Network Status2.1.4 System InfoIn this page, you can check the hardware/firmware version, or the disk usage ofTB200/400.Figure 2-2System Info10/38
TB200/400 User Manual2.2 ReportsIn this page, you can check the call detailed log, system log, and use the packet toolto debug the system when needed.2.2.1 Call LogsThe call log captures all call details, including call time, caller number, callee number,call type, call duration,etc. An administrator can search and filter call data by call date,caller/callee, trunk, duration, billing duration, status, or communication type.Figure 2-3Call Logs2.2.2 System LogsYou can download and delete the system logs of TB200/400.Figure 2-4 System Logs Enable Hardware LogSave the information of hardware; (up to 4 log files) Enable Normal LogSave the prompt information; (up to 16 log files)Enable Web Log 11/38
TB200/400 User ManualSave the history of web operations (up to 2 log files) Enable Debug LogSave debug information (up to 2 log files)Packet ToolTB200/400 provides a tool to capture packets for technician. Packet capture tool“Wireshark” is integrated in TB200/400.Users also could specify the destination IP address and port to get the packets.Figure 2-5 Packet Tool12/38
TB200/400 User Manual3. SystemClickto access. In this page, we can configure the network settings, securitysettings and some system preferences.3.1 Network Preferences3.1.1 LAN SettingsFigure 3-1LAN SettingsTable 3-1 Description of LAN SettingsItemsDescriptionIf this option is set as yes, TB200/400 will act as DHCP client to get anDHCPavailable IP address from your local network. We don’t recommendenabling this, as without the right IP address you cannot accessTB200/400.By using SSH, you can log in to TB200/400 and run commands. It’sEnable SSHdisabled by default. We don’t recommend enabling it if not needed.The default port for SSH is 8022;HostnameSet the host name for TB200/400.IP AddressSet the IP Address for TB200/400.Subnet MaskSet the subnet mask for TB200/400.GatewaySet the gateway for TB200/400.Primary DNSSet the primary DNS for TB200/400.Secondary DNSSet the secondary DNS for TB200/400.IP Address2Set the second IP Address for TB200/400.Subnet Mask2Set the second subnet mask for TB200/400.13/38
TB200/400 User Manual3.1.2 DDNS SettingsDDNS (Dynamic DNS) is a method/protocol/network service that provides thecapability for a networked device, such as a router or computer system using theInternet Protocol Suite, to notify a Domain Name System (DNS) name server tochange, in real time, the active DNS configuration of its configured hostnames,addresses or other information.Figure 3-2 DDNS SettingsTable 3-2 Description of DDNS SettingsItemsDescriptionDDNS ServerSelect the DDNS server you sign up for service.User NameUser name the DDNS server provides you.PasswordUser account’s password.Host NameThe host name you have got from the DDNS serverNote: DDNS allows you to access your network using domain names instead of IPaddress. The service manages changing IP address and updates your domaininformation dynamically. You must sign up for service through dyndns.org,freedns.afraid.org, www.no-ip.com, www.zoneedit.com.3.1.3 Static RouteTB200/400 will have more than one Internet connection in some situations but it hasonly one default gateway. You will need to set some Static Route for TB200/400 toforce it to go out through different gateway when accessing to different internet.The default gateway priority of TB200/400 from high to low is VPN/VLAN LAN port.14/38
TB200/400 User ManualFigure 3-3Static Route1) Route TableThe current route rules of TB200/400.2) Static Route RulesYou can add new static route rules here.Table 3-3 Description of Static RouteItemsDescriptionDestinationThe destination network to be accessed to by TB200/400.Subnet MaskSpecify the destination network portion.GatewayDefine which gateway TB200/400 will go through when accessing thedestination network.The cost of a route is calculated by using what are called routing metric.MetricRouting metrics are assigned to routes by routing protocols to providemeasurable statistic which can be used to judge how useful (how lowcost) a route is.InterfaceDefine which internet port to go through.3.2 Security Center3.2.1 CertificatesTB200/400 can support TLS trunk. Before you register TLS trunk to TB200/400, youshould upload certificates first.Figure 3-4 Certificates15/38
TB200/400 User Manual Trusted CertificateThis certificate is a CA certificate. When selecting “TLS Verify Client” as “Yes”,you should upload a CA. The relevant IPPBX should also have this certificate. Gateway CertificateThis certificate is server certificate. No matter selecting “TLS Verify Client”as “Yes” or “No”, you should upload this certificate to TB200/400. If IPPBXenables “TLS Verify server”, you should also upload this certificate on IPPBX.3.2.2 Firewall RulesFigure 3-5 Firewall Rules1) General SettingsTable 3-4 Description of Firewall General SettingsItemsEnable FirewallDisable PingDescriptionEnable the firewall to protect the device. You should reboot the deviceto make the firewall run.Enable this item to drop net ping from remote hosts.When you enable “Drop All” feature, the system will drop all packets orconnection from other hosts if there are no other rules defined. To avoidDrop Alllocking the devices, at least one “TCP” accept common rule must becreated for port used for SSH access, port used for HTTP access andport sued for CGI access.16/38
TB200/400 User Manual2) Common RulesThere is no default rule; you can create oneas required.Figure 3-6 Common RulesTable 3-5 Description of Common RulesItemsDescriptionNameA name for this rule, e.g. “HTTP”.DescriptionProtocolPortSimple description for this rule. E.g. accept the specific host to accessthe Web interface for configuration.The protocols for this rule.Initial port should be on the left and end port should be on the right. Theend port must be equal to or greater than start port.The IP address for this rule. The format of IP address is: IP/maskIPE.g. 192.168.5.100/255.255.255.255 for IP m192.168.5.0to192.168.5.255.MAC AddressThe format of MAC Address is XX:XX:XX:XX:XX:XX, X means 0 9 orA F in hex, the A F are not case sensitive.Accept: Accept the access from remote hosts.ActionDrop: Drop the access from remote hosts.Ignore: Ignore the access.Note: the MAC address will be changed when it’s a remote device, so it will not beworking to filter using MAC for remote devices.3.2.3 IP BlocklistYou can set some packets accept speed rules here. When an IP address which hasn’tbeen accepted in common rules sends packets faster than the allowed speed, it will17/38
TB200/400 User Manualbe set as a blocked IP address and be blocked automatically.Figure 3-7 IP Blocklist1) Blocklist rulesWe can add the rules for IP Blocklist rate as demanded.Figure 3-8 Auto Blocklist RuleTable 3-6 Description of Auto Blocklist RulesItemsDescriptionPortAuto defense portProtocolAuto defense protocol. TCP or UDP.IP PacketsAllowed IP packets number in the specific time interval.Time intervalThe time interval to receive IP packets. For example, IP packets 90,time interval 60 means 90 IP packets are allowed in 60 seconds.2) IP BlocklistThe blocked IP address will display here, you can edit or delete it as you wish.3.3 System PreferencesIn this page, we can set other system preferences, like the password for adminaccount, system date and time, firmware update, backup and restore, reset and18/38
TB200/400 User Manualreboot.3.3.1 Password SettingsThe default password is “password”. To change the password, enter the newpassword and click “Save”. The system will then prompt you to re-login using yournew password.Figure 3-9 Password Settings3.3.2 Date and TimeSet the date and time for TB200/400.Figure 3-10 Date and TimeTable 3-7 Description of Date and Time SettingsItemsDescriptionTime ZoneYou can choose your time zone here.Daylight Saving TimeSet the mode to Automatic or disabled.Automatically SynchronizeInput the NTP server so that TB200/400 will update the timeWith an Internet Time Serverautomatically.Set Date & Time ManuallyYou can set the time to your local time manually here.3.3.3 Backup and RestoreWe can back up the configurations before resetting TB200/400 to factory defaults,and then restore it on this package.19/38
TB200/400 User ManualFigure 3-11 Backup and RestoreNotes:1. Only configurations, custom prompts will be backed up.2. If you have updated the firmware, it’s not recommended to restore using oldpackage.3.3.4 Reset and RebootWe can reset or reboot TB200/400 directly on this page.Figure 3-12 Restore and Reboot Reboot SystemWarning: rebooting the system will terminate all active calls! Reset to Factory DefaultsWarning: a factory reset will erase all configuration data on the system.Please do not turn off the system until the RUN light begins blinking. Anypower interruption during this time could cause damage to the system.20/38
TB200/400 User Manual3.3.5 Firmware UpdateFirmware upgrading is possible through the Administrator Web interface using aTFTP Server or an HTTP URL.Enter your TFTP Server IP address and firmware file location, then click “Start” toupdate the firmwareNotes:1. If “Reset configuration to Factory Defaults” is enabled, the system will restore tofactory default settings.2. When updating the firmware, please don’t turn off the power. Or the system will getdamaged.Figure 3-13 Firmware Update21/38
TB200/400 User Manual4. GatewayClickto access the gateway configuration page. We can configure the detailsof BRI ports, VoIP settings, gateway settings and advanced settings.4.1 Physical Trunk4.1.1 Module ListAll the BRI trunks are listed here. You can edit each BRI trunk by clicking “Edit”button.Before configure anything, please make sure the cable is OK, and you havegot enough information from the ISDN provider.Figure 4-1 Module List1) General SettingsFigure 4-2 General Settings of BRI TrunkTable 4-1 Description of BRI General SettingsItemsDescriptionTrunk NameDefine a name for this trunk.Choose the signaling of BRI. TB400 supports the following signaling:SignalingSwitch Type BRI-NET BRI-NET-PTMP BRI CPE BRI-CPE-PTMPChoose the switch type of BRI. national: National ISDN type2 (common in the US)22/38
TB200/400 User Manual ni1: National ISDN type 1 dms100: Nortel DMS100 4ess: AT&T 4ESS 5ess: Lucent 5ESS euroisdn: EuroISDN qsig: Minimalistic protocol to build a "network" with two or morePBX of different vendorsDefine whether TB400 can dial this switch using overlap digits. If youOverlap Dialneed Direct Dial-in (DDI; in German "Durchwahl") you should changethis to yes, then TB400 will wait after the last digit it receives.Setthe time in seconds between restart of unused channels. SomePBXs don't like channel restarts. So set the interval to a very longinterval e.g. 100000000 or "never" to disable entirely. If you are inReset IntervalIsrael, the following is important. As Bezeq in Israel doesn't like theB-Channel resets happening on the lines, it is best to set the resetinterval to 'never' when installing a box in Israel. Our past experiencealso shows that this parameter may also cause issues on localswitches in the UK and China.Tells how Device should indicate Busy () and Congestion() to theswitch/user. Accepted values are: PRI Indicationinband: Device plays indication tones without answering; notavailable on all PRI/BRI subscription lines . Outof Band: Device disconnects with busy/congestion informationcode so the switch will play the indication tones to the caller.Busy() will now do same as setting PRI CAUSE 17 andHangup().Enable FacilityTo enable transmission of facility-based ISDN supplementary services(such as caller name from CPE over facility).Used with AT&T PRIs. If outbound calls are being rejected due toNsf"Mandatory information element missing" and the missing IE is 0x20,then you need this setting.EchoThis disables or enables echo cancellation, it is recommended not toCancellationturn this off.Hide Caller IDWhether to hide Caller ID.Choose the codec:Codec alaw ulaw2) Call Duration SettingsFigure 4-3 Call Duration Settings23/38
TB200/400 User ManualTable 4-2 Description of Call Duration SettingsItemsMax Call Duration (min)DescriptionDefine the maximum call duration within a month throughthis BRI trunk. (0 means unlimited)Set the day in a month on which the statistics data on Max.Clear StatCall Duration are deleted. This parameter is ignored if set to0.3) Caller ID PrefixFigure 4-4 Caller ID PrefixTable 4-3 Description of Caller ID PrefixItemsDescriptionWhether theDialplan Settings are set to make the caller IDISDN Dialplanprefix work according to information sent from the BRIprovider.When there are international calls coming in via this BRIInternational Prefixtrunk, the International Prefix you have set here will be addedbefore the CID. So you can know this is an international callbefore you answer it.When there are national calls coming in via this BRI trunk, theNational PrefixNational Prefix you have set here will be added before theCID. So you can know this is a national call before youanswer it.When there are Local calls coming in via this BRI trunk, theLocal PrefixLocal Prefix you have set here will be added before the CID.So you can know this is a local call before you answer it.When there are Private calls coming in via this BRI trunk, thePrivate PrefixPrivate Prefix you have set here will be added before the CID.So you can know this is a Private call before you answer it.When there are calls with unknown number coming via thisUnknown PrefixBRI trunk, the Unknown Prefix you set here will be shown asthe caller ID.24/38
TB200/400 User Manual4) DialplanFigure 4-5 DialplanTable 4-4 Description of DialplanItemsDescriptionRemote DialplanCalled number typeRemote Number TypeCalled number identificationLocation DialplanCalling number typeLocation Number TypeCalling number identification5) DOD SettingsDOD (Direct Outward Dialing) means the caller ID displayed when dialingout.Before configure this, please make sure the provider supports this feature.You can set Global DOD for the BRI trunk.Also, you can set different DOD numbers for different extensions.Figure 4-6 DOD SettingsNote:If you want to set continuous associated numbers to show continuous DODnumbers,you can choose the count of DOD number and associated number first, andthen input starting number respectively.The count of the DOD number must be only one or equal to the count of theassociated number.25/38
TB200/400 User Manual4.2 VoIP SettingsIn this page, we can create VoIP trunk, trunk group for routing, and SIP settings.4.2.1 VoIP TrunkThere are 3 types of trunks listed in this page, Account, Trunk and Service Provider.Figure 4-7 VoIP Trunk1) AccountIt’s an SIP account created in TB400 so that the other devices can register SIPtrunk at their side using these information.Figure 4-8 AccountTable 4-5 Description of Account SettingsItemsDescriptionTrunk TypeChoose the type of trunk, “Account”.NameDefine the name.AccountDefine the Account number.PasswordSet a password for this account.2) VoIP TrunkIt’s a SIP trunk configured in TB400 to register to the SIP provider, please makesure this trunk works properly in advance with provider before configuring TB400.26/38
TB200/400 User ManualFigure 4-9 VoIP Trunk SettingsTable 4-6 Description of VoIP Trunk SettingsItemsDescriptionTrunk TypeChoose the type of trunk, “VoIP Trunk”.Provider NameA unique label to help you identify this trunk when listed inoutbound rules, incoming rules etc. E.g. “yeastar”.Service provider’s hostname or IP address.Hostname/IPNote:5060 is the standard port number used by SIPprotocol. Don’t change this part if it is not required.DomainUser NameAuthorization NamePasswordVoIP provider’s server domain name or IP address.User name of SIP account provided from the SIP Serverprovider.Authorization Name of SIP account provided from the SIPServer provider.Password of the SIP account.3) Service ProviderThis is service provider trunk (peer to peer mode) which authorized using IPaddress only.Figure 4-10 Service Provider Trunk Settings27/38
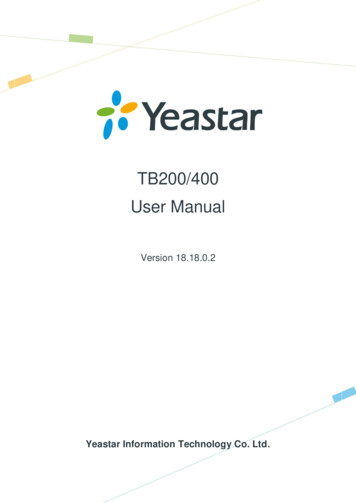
TB200/400 User ManualTable 4-7 Description of Service Provider Trunk SettingsItemsDescriptionTrunk TypeChoose the type of trunk, “Service Provider”.Provider NameA unique label to help you identify this trunk when listed inoutbound rules, incoming rules etc. E.g. “yeastar”.Service provider’s hostname or IP address.Hostname/IPNote:5060 is the standard port number used by SIPprotocol. Don’t change this part if it is not required.4.2.2 SIP SettingsThis is the SIP settings in TB200/400, including General settings, NAT, Codecs, QoS,Response Code, T.38, and advanced settings.1) GeneralFigure 4-11 SIP General SettingsTable 4-8 Description of SIP General SettingsItemsDescriptionUDP PortPort used for SIP registrations.Thedefaultis 5060.TCP PortPort used for SIP registrations. The default is 5060.TLS PortPort used for SIP registrations. The default is 5061.TLS Verify ServerWhen using TB200/400 as a TLS client, whether or not toverify server’s certificate. It is “No” by default.28/38
TB200/400 User ManualTLS Verify ClientTLS Ignore Common NameWhen using TB200/400 as a TLS server, whether or not toverify client’s certificate. It is “No” by default.Set this parameter as “No”, then common name must be thesame with IP or domain name.When using TB200/400 as TLS client, specify the protocolTLS Client Methodfor outbound TLS connections. You can select it as tlsv1,sslv2 or sslv3.RTP Port StartBeginning of the RTP port range.RTP Port EndEnd of the RTP port range.DTMF ModeSet the default mode for sending DTMF. The default setting:rfc2833MaxRegistration/Maximum duration (in seconds) of a SIP registration. TheSubscription Timedefault is 3600 seconds.Min Registration/Minimum duration (in seconds) of a SIP registration. TheSubscription Timedefault is 60 seconds.Default Incoming/OutgoingDefault Incoming/Outgoing Registration Time: the defaultRegistrati
TB200/400 BRI VoIP Gateway supports up to 4 or 8 simultaneous phone calls from SIP to ISDN BRI or from BRI to SIP. TB200/400 is interoperable with most IP PBX and Unified Communication vendors such as MyPBX, Elastix, Asterisk, 3CX, Skype etc. Three modes are available for you to connect your SIP server and TB200/400 . TB200/400 User Manual 13 .