Transcription
Earn BISSELL Rewards!Register yourproduct today!See details onback pageUSER'S GUIDE81L2 SERIES2Thank You3Safety Instructions4Product View5Assembly5Operations6-89Maintenance and CareTroubleshooting10Replacement Parts11Warranty12Product Registration12Consumer Services
Thanks for buying a BISSELL PowerEdge Hard Floor VacuumWe’re glad you purchased a BISSELL PowerEdge vacuum. Everythingwe know about floor care went into the design and construction ofthis complete, high-tech home cleaning system.Your BISSELL PowerEdge vacuum is well made, and we back itwith a limited one year warranty. We also stand behind it witha knowledgeable, dedicated Consumer Services department, so,should you ever have a problem, you’ll receive fast, considerateassistance.My great-grandfather invented the floor sweeper in 1876. Today,BISSELL is a global leader in the design, manufacture, andservice of high quality homecare products like your BISSELLPowerEdge vacuum.Thanks again, from all of us at BISSELL.Mark J. BissellChairman, President & CEO2www.bissell.com800.237.7691
IMPORTANT SAFETY INSTRUCTIONSWhen using an electrical appliance, basicprecautions should be observed, includingthe following: Keep hair, loose clothing, fingers, and allRead allinstructionsbefore using yourVACUUM. reduce the risk of fire,electric shock, or injury: WARNING: To Do not modify the polarized plug to fit a non-polarized outlet or extension cord. Do not leave vacuum cleaner unattendedwhen it is plugged in. Unplug from outlet when not in use andbefore servicing. Do not use outdoors or on wet surfaces. Do not allow children to operate vacuumcleaner or use as a toy. Close attention is necessary when usedby or near children. Do not use for any purpose other thandescribed in this User’s Guide. Use only manufacturer’s recommendedattachments. Do not use with damaged cord or plug. If appliance is not working as it should,has been dropped, damaged, left outdoors, or dropped into water, have itrepaired at an authorized service center. Do not pull or carry by cord, use cord as ahandle, close a door on cord, or pull cordaround sharp edges or corners. Do notrun appliance over cord. Keep cord awayfrom heated surfaces. Do not unplug by pulling on cord. Tounplug, grasp the plug, not the cord. Do not handle vacuum cleaner or plug withwet hands. Do not put any object into opening. Do not use with any opening blocked. Keep openings free of dust, lint, hair andanything that may reduce airflow. parts of body away from openings andmoving parts.Turn off all controls before plugging orunplugging vacuum cleaner.Use extra care when cleaning stairs.Do not pick up flammable materials(lighter fluid, gasoline, kerosene, etc.) oruse in the presence of explosive liquidsor vapors.Do not pick up toxic material (chlorinebleach, ammonia, drain cleaner, etc.).Do not use vacuum cleaner in anenclosed space filled with vapors givenoff by oil base paint, paint thinner, somemoth proofing substances,flammable dust, or other explosive ortoxic vapors.Do not pick up hard or sharp objectssuch as glass, nails, screws, coins, etc.Do not pick up anything that is burningor smoking, such as cigarettes, matches, orhot ashes.Do not use without filters in place.Use only on dry, indoor surfaces.Keep appliance on a level surface.SAVE THESEINSTRUCTIONSFOR FUTURE USETHIS APPLIANCEHAS A POLARIZEDPLUG.To reduce the risk of electric shock, thisappliance has a polarized plug (one bladeis wider than the other). This plug will fit ina polarized outlet only one way. If the plugdoes not fit fully in the outlet, reverse theplug. If it still does not fit, contact a qualifiedelectrician to install a proper outlet. Do notchange the plug in any way.This model is for household use only.www.bissell.com800.237.76913
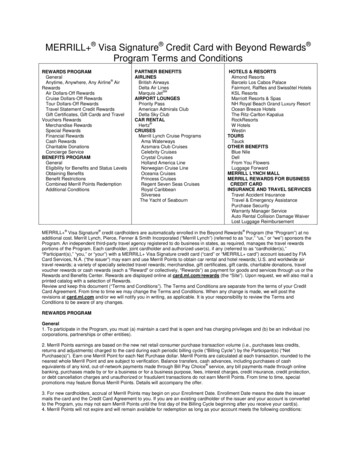
Product viewCord ClipHandle GripUpper HandleCarry HandleQuick ReleaseCord WrapPower SwitchUpper TankSeparator GrillLong PowerCordDirt ContainerDirt Cup ReleaseFilterFoot ReleaseLatchEdgeCleaningPathSwivel Headcaution:Do not plug in your vacuumLarge SuctionPaths4www.bissell.comcleaner until you are familiar with all instructions andoperating procedures.800.237.7691
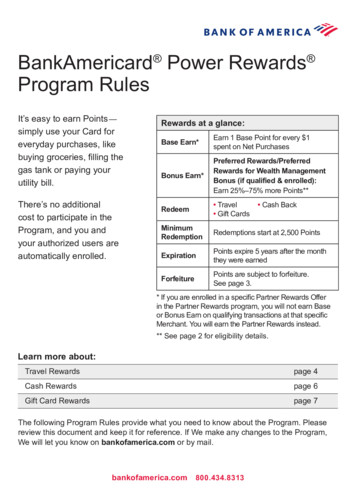
AssemblyThe PowerEdge is shipped in three pieces:Upper handle, Body, FootNo tools are required for assembly.1. Slide upper handle into body and pushin firmly until handle locks into place.2.Slide foot onto body of unit until footlocks into place.3.Wrap power cord on back of unit.1.2.3.OperationsTransporting unitPlace unit in upright position and tipback to roll on rear wheels.PowerSwitchPower switchThe power switch is located on the topof the body of unit.Push switch ON (l) to vacuum and OFF(O) when cleaning is complete.How to use your hard floor vacuum1. Turn quick release cord wrap to removepower cord; plug into electrical outlet.1.2.2. Lightly press the foot of the vacuum andpull handle back to detent.3. Turn power switch to ON (I) position4. Clean your hard floors, under cabinets,and easily maneuver around furniture.To clean along edges, align the endsuction points along the areas you wantto clean.4.5. When finished cleaning, turn powerswitch to OFF (O) position.6. To store the unit, return handle to uprightposition.www.bissell.com800.237.76915
Maintenance and careTo maintain maximum cleaning performance, the following maintenance stepsmust be performed:WARNING:To reduce the risk of electric shock,turn power switch OFF and disconnect polarized plug from electricaloutlet before performing maintenance or troubleshooting checks.Emptying the dirt containerDirt container should be emptied beforedebris reaches the FULL line.1. Turn power OFF (O). Unplug unit fromelectrical outlet.2. Grasp the two release buttons on the frontof the dirt container, depress both at sametime and pull container straight out toremove from vacuum.3. Empty dirt into garbage can.Full Line2.NOTE: The dirt container may bewashed in warm water with milddetergent. Make sure it is completelydry before replacing. DO NOT PUTIN DISHWASHER.4. Replace dirt container back in vacuumuntil it snaps firmly into place.4.NOTE: To ensure full suctionpower, make sure dirt container isthoroughly positioned and lockedinto place.Cleaning the separator grill1. Unplug unit from electrical outlet.2.2. Separator grill can be reached byremoving the dirt container, reaching intoupper tank and turning rim of separatorgrill counter-clockwise to unlock. Pullstraight down to remove.3. Separator grill may be wiped clean witha damp cloth. Air-dry thoroughly beforereplacing.4.4. Replace separator grill by inserting intoupper tank and turning clockwise until it issecured in place .6www.bissell.com800.237.7691
Maintenance and careCleaning or Replacing the filtersUse only genuine BISSELL model number54A2 replacement filters in your BISSELLvacuum. To purchase visit:WWW.BISSELL.COM orcall 1-800-237-7691.1. Turn power OFF (O). Unplug unit fromelectrical outlet.WARNING:To reduce the risk of injuryfrom moving parts and/orelectrical shock, turn PowerSwitch OFF and disconnectpolarized plug from electricaloutlet before performingtroubleshooting checks.2. Remove the dirt container as previouslydirected on page 6 and set aside.3. Grasp the filter cup and lift up and out.4Rotate top of filter cup to theposition and remove.3.unlock5. Remove filter assembly from cup.Separate the foam filter from the innerpleated filter.6. Foam filter may be washed in warmwater. Mild detergent may be used ifdesired. Rinse well and let air drythoroughly before replacing.7. Pleated filter should be tapped firmlyagainst the inside of a trash can,removing any visible dirt.Do not wash the pleated filter.5.8.9.8. Before replacing filters back into unit, besure they are dry and nested back together.9 . Place filters back into filter cup, replacecover and twist to lock position, makingsure the dots are aligned.Replace filter cup back into machine,insert dirt container and snap firmly intoplace.www.bissell.comcaution:Never operate your PowerEdgevacuum without the filter in place.Doing so may damage the motorand void the warranty.800.237.76917
Maintenance and careClearing ClogsLow suction or poor pickup may be dueto a clog in the dirt container. If thisoccurs, follow these steps to check forand clear clog.1. Turn power OFF (O). Unplug unit fromelectrical outlet.2. Remove and empty dirt container as previously directed on page 6. While dirt container is out check upper tank for build upof clogs.3. Remove separator grill as instructed onpage 6 and check suction inlet for clog.4. Check foot for clog in air path.Brush and wiper maintenanceRegularly check rear angle brush andfront wipers on the underside of theunit and wipe any debris that hasaccumulated with a damp cloth.Thermal motor protectionAn internal thermal protector has beendesigned into your cleaner to protect itfrom overheating. When the thermalprotector activates, the main vacuummotor will stop operating. If thishappens, proceed as follows.1. Turn the cleaner OFF and unplug fromelectrical outlet.82.Check the cleaner for the source of overheating problem (i.e. full dirt cup, dirtyfilters or clog).3.Fix the problem by following the steps inthe maintenance section of the user guide.4.When the motor cools for approximately30 minutes, the thermal protector automatically resets and cleaning may continue.If the cleaner will not turn on or the thermal protector continues to activate, yourcleaner may need servicing. Call BISSELLConsumer Services or visit the website.www.bissell.com800.237.7691
TroubleshootingWARNING:To reduce the risk of electricshock, turn power OFF anddisconnect polarized plug fromelectrical outlet before performingmaintenance or troubleshooting.Vacuum cleaner won’t turn onPossible causesRemedies1.Power cord not plugged in1. Check electrical plug2.Blown fuse/tripped breaker2. Check/replace fuse or reset breakerVacuum cleaner has low suctionPossible causesRemedies1.Dirt container is full1. Empty dirt container2.Dirt container is not installed properly2. Position container correctly and snap firmly into place3.Separator grill is not installed properly3. Position separator grill in upper tank and twist firmly intoplace4.Clog in vacuum4. Follow instructions on page 8 to clear clog5.Separator grill is clogged with debris5. Remove and wipe separator grill of all debris6.Foot is loose6. Make sure foot is fully inserted into body of unit7.Filters need replacing7. Visit www.bissell.com or call 1-800-237-7691 to orderreplacement filters.Visible dirt escaping from vacuumPossible causesRemedies1.Dirt container is full of debris1. Empty dirt container2.Filter is missing or installed incorrectly2. Check filter for correct installation3.Dirt container installed incorrectly3. Position container correctly and snap firmly into place4.Separator grill is missing or installed incorrectly4. Position separator grill in upper tank and twist firmlyinto placeOther maintenance or service not included in the manual should beperformed by an authorized service representative.Thank you for selecting a BISSELL product.Please do not return this product to the store.For any questions or concerns, BISSELL is happy to be ofservice. Contact us directly at 1-800-237-7691.www.bissell.com800.237.76919
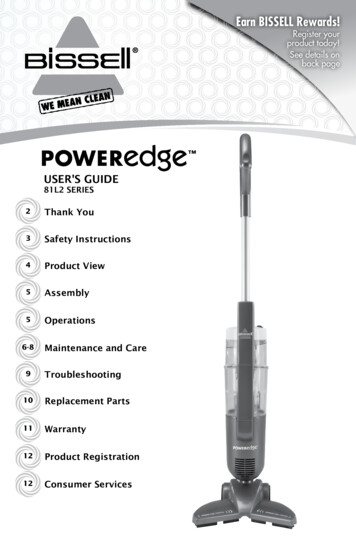
Replacement parts - BISSELL vacuumYou may purchase parts by calling BISSELL Consumer Services or byvisiting our website. Below is a list of common replacement parts.Item1234567Part -0257Part NameHandle assemblyDirt containerSeparator grillPleated filter/Foam filter assemblyPre-motor mesh filterFilter cup assemblyCord wrap12356710www.bissell.com4800.237.7691
Warranty - BISSELL PowerEdge Hard Floor VacuumThis warranty gives you specific legal rights, and you may also have other rights which mayvary from state to state. If you need additional instruction regarding this warranty or havequestions regarding what it may cover, please contact BISSELL Consumer Services by E-mail,telephone, or regular mail as described below.Limited One Year WarrantySubject to the *EXCEPTIONS AND EXCLUSIONS identified below, upon receipt of the productBISSELL Homecare, Inc. will repair or replace (with new or remanufactured components orproducts), at BISSELL’s option, free of charge from the date of purchase by the originalpurchaser, for one year any defective or malfunctioning part.See information below on "If your BISSELL product should require service".This warranty applies to product used for personal, and not commercial or rental service. Thiswarranty does not apply to fans or routine maintenance components such as filters, belts, orbrushes. Damage or malfunction caused by negligence, abuse, neglect, unauthorized repair, or anyother use not in accordance with the User's Guide is not covered.If your BISSELL product should require service:Contact BISSELL Consumer Services to locate a BISSELL Authorized Service Center in yourarea.If you need information about repairs or replacement parts, or if you have questions aboutyour warranty, contact BISSELL Consumer Services.Website or E-mail:www.bissell.comUse the “Customer Support” tab.Or Call:BISSELL Consumer Services1-800-237-7691Monday - Friday 8 a.m. - 10 p.m. ETSaturday 9 a.m. - 8 p.m. ETOr Write:BISSELL Homecare, Inc.PO Box 3606Grand Rapids, MI 49501ATTN: Consumer ServicesBISSELL HOMECARE, INC. IS NOT LIABLE FOR INCIDENTAL OR CONSEQUENTIAL DAMAGESOF ANY NATURE ASSOCIATED WITH THE USE OF THIS PRODUCT. BISSELL’S LIABILITY WILL NOTEXCEED THE PURCHASE PRICE OF THE PRODUCT.Some states do not allow the exclusion or limitation of incidental or consequentialdamages, so the above limitation or exclusion may not apply to you.*EXCEPTIONS AND EXCLUSIONS FROM THE TERMS OF THE LIMITED WARRANTYTHIS WARRANTY IS EXCLUSIVE AND IN LIEU OF ANY OTHER WARRANTIES EITHER ORAL ORWRITTEN. ANY IMPLIED WARRANTIES WHICH MAY ARISE BY OPERATION OF LAW, INCLUDINGTHE IMPLIED WARRANTIES OF MERCHANTABILITY AND FITNESS FOR A PARTICULAR PURPOSE,ARE LIMITED TO THE ONE YEAR DURATION FROM THE DATE OF PURCHASE AS DESCRIBEDABOVE.Some states do not allow limitations on how long an implied warranty last so theabove limitation may not apply to you.www.bissell.com800.237.769111
Don't forget to register your product!Registering is quick, easy and offers you benefits over the lifetime of your product.You’ll receive:BISSELL Rewards PointsAutomatically earn points for discounts and free shipping on future purchases.Faster ServiceSupplying your information now saves you time should you need to contact us withquestions regarding your product.Product Support Reminders and AlertsWe’ll contact you with any important product maintenance reminders and alerts.Special PromotionsOptional: Register your email to receive notice of offers, contests, cleaning tips and more!Visit www.bissell.com/registration now!BISSELL consumer servicesFor information about repairs or replacement parts, or questions about your warranty, call:BISSELL Consumer Services1-800-237-7691Monday - FridaySaturday8 a.m. — 10 p.m. ET9 a.m. — 8 p.m. ETOr write:BISSELL Homecare, Inc.PO Box 3606Grand Rapids MI 49501ATTN: Consumer ServicesOr visit the BISSELL website - www.bissell.comWhen contacting BISSELL, have model number of cleaner available.Please record your Model Number:Please record your Purchase Date:NOTE: Please keep your original sales receipt. Itprovides proof of purchase date in the event of awarranty claim. See Warranty on page 11 for details.12 2010 BISSELL Homecare, IncGrand Rapids, MichiganAll rights reserved. Printed in ChinaPart Number 110-4250Rev 6/10Visit our website at:www.bissell.comwww.bissell.com800.237.7691
dirt container should be emptied before debris reaches the full line. 1. Turn power OFF (o). Unplug unit from electrical outlet. 2. Grasp the two release buttons on the front of the dirt container, depress both at same time and pull container straight out to remove from vacuum. 3. Empty dirt into garbage can. note: the dirt container may be