Transcription
Configuring Mitel 5000 forSpitfire SIP TrunksThis document is a guideline for configuring Spitfire SIP trunks onto Mitel 5000 and includes the settingsrequired for Inbound DDI routing and Outbound CLI presentation. The settings contained within havebeen tested and are known to work at the time of testing.SIP trunk details such as account number and password will be provided separately.Provisioning a SIP trunk:Page 2Inbound Routing – Reference only:Page 9Outbound Routing – Reference only:Page 10Outgoing CLI – Reference only:Page 11
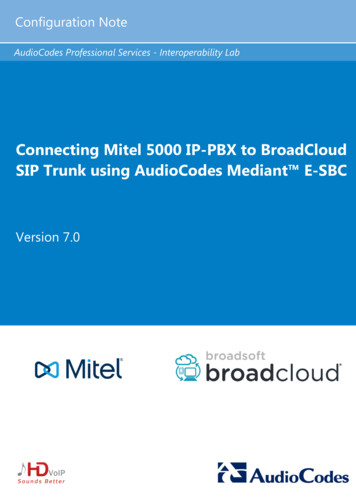
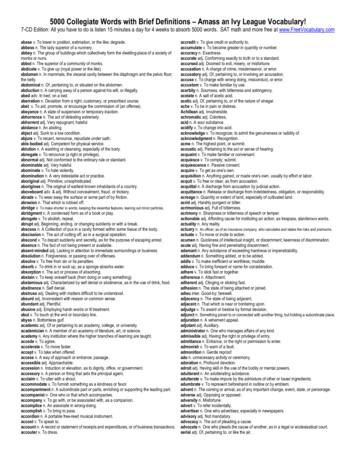
Provisioning a SIP TrunkLog into Mitel system administrationGo to View & select On-Line MonitorGo to System è Devices & Feature Codes è SIP Peers è SIP Trunk GroupsRight click in the right window pane & select Create SIP Trunk Group2
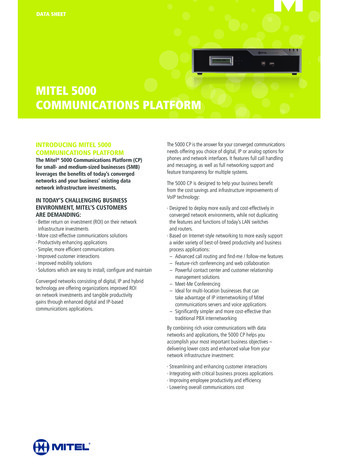
Provisioning a SIP Trunk continued:Enter the Starting Extension (here I am using 19102 that I have already created)3
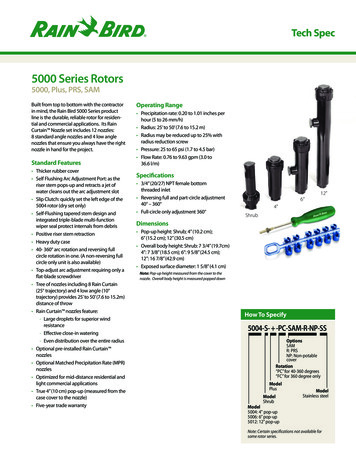
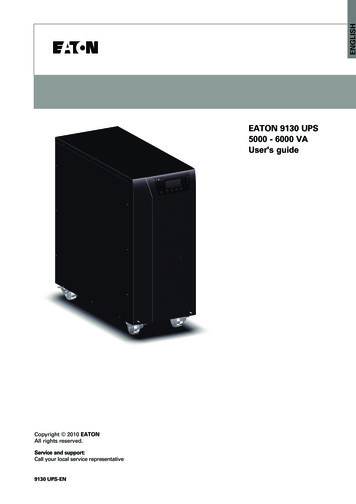
Provisioning a SIP Trunk continued:Open up the newly created SIP Trunk Group & click on Configuration. Enter the settings as shown below.Please pay particular attention to “Route Call Using To Header”, which must be set to Yes. If this setting is notavailable check that you have On-Line Monitor checked to view this field. If On-Line Monitor is checked and it isstill not available you will need to upgrade the Mitel to a minimum of 5.1The IP Address is Spitfire SIP trunk gateway: 83.218.143.164
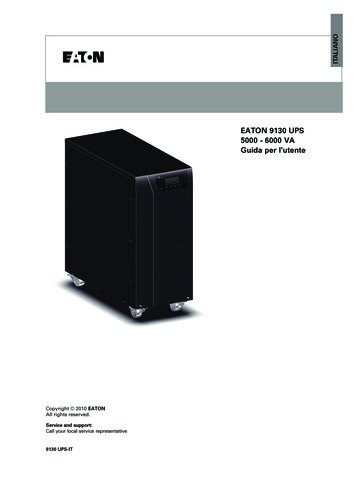
Provisioning a SIP Trunk continued:Open up Configuration & select RegistrarEnter the details as below.The Registrar IP address is Spitfires SIP trunk gateway: 83.218.143.16The Registration Refresh Interval can be a minimum of 300 to a maximum of 36005
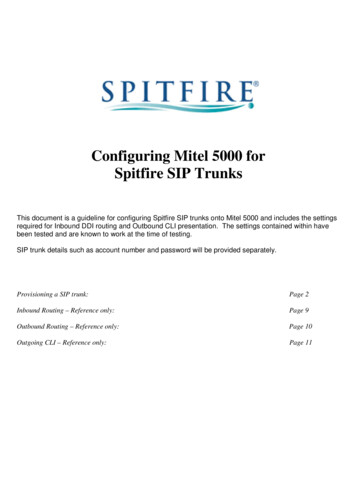
Provisioning a SIP Trunk continued:Select AuthenticationEnter the details as shown below. Please note that the Out-bound Username and password will be supplied bySpitfire in the SIP trunk details once a SIP trunk has been provisioned.When entering the Username for Authentication it should NOT include the @spitfiretsp.net6
Provisioning a SIP Trunk continued:In the newly created SIP Trunk Group click on Trunk Group ConfigurationEnter the calling party number. This will be the Username supplied by Spitfire in the SIP trunk details, and againdoes NOT include @spitfiretsp.net7
Provisioning a SIP Trunk continued:Open Trunk Group Configuration and click on TrunksAdd the number of trunks provided by Spitfire i.e. below I have added 5 trunks (for 5 simultaneous calls)8
Inbound DDI Routing – Reference onlyIn my Trunk Group Configuration (page 7) I had set “Day” & “Night Ring in Type” to “Call Routing Table 1”.The DDI’s are therefore added to Call Routing Table 1. Here the DDI’s are added WITH the leading 44 and routedto a single destination as in the below example.There are obviously various different ways to route calls, but it is important to remember that the DDI will bepresented to the PBX WITH the leading 44 i.e. 4428913779509
Outbound Routing – Reference onlyAs there are many different ways to implement outbound routing this will be up to the discretion of the installer.Below we simply associated the outgoing extension of the SIP trunk to the extension of the handset dialing out.10
Outgoing CLI – Reference onlyIn order to present individual outbound CLI you need to program one of the valid Spitfire DDI’s on the handset.This number should be programmed WITHOUT the leading 44 as in the example below:11
This document is a guideline for configuring Spitfire SIP trunks onto Mitel 5000 and includes the settings . The settings contained within have been tested and are known to work at the time of testing. SIP trunk details such as account number and password will be provided separately. Provisioning a SIP trunk: Page 2 Inbound Routing .