Transcription
Beaded Ornaments:5 FREEProjects Using Beadsto Make Ornaments
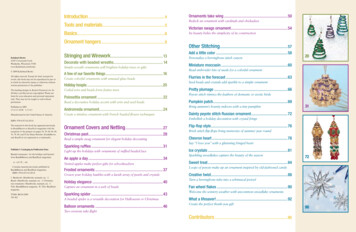
Beaded Ornaments:5 Free Projects Using Beadsto Make OrnamentsBEADED SNOWFLAKE EARRINGSFLEUR RUSSEDOUBLE MINT SPIRALby JEAN CAMPBELL p. 1by DUSTIN WEDEKIND p. 3by DUSTIN WEDEKIND p. 4STAR TOPPED MAGIC WANDSNOWFLAKE ORNAMENTby SYLVIA BECKER p. 5by ROBIN COWART p. 8 F W MEDIA, INC. ALL RIGHTS RESERVED. F W MEDIA GRANTS PERMISSION FOR ANY OR ALL PAGES IN THIS ISSUE TO BE COPIED FOR PERSONAL USE. BEADINGDAILY.COMpage ii
Beaded Ornaments:5 Free Projects using Beadsto Make OrnamentsFor as long as I can remember, beaded ornaments havebeen part of our holiday traditions. I started out by addingbeaded embellishments and sequins to little stuffed felt ornaments, and then as I developed more of an interest in beadweaving, I started learning how to stitch fabulous beadednetting as ornament covers for colorful glass balls. Fromthere, I started to explore more beading techniques for creating beaded ornaments—I learned how to make candy canesout of beaded ropes like spiral rope, and then once I got bit bythe geometric beadwork bug, I learned how to make beadedstars out of shaped peyote stitch!Beaded ornaments are the perfect addition to any Christmas tree, and I love adding them to my holiday table andother household decorations. And don’t forget about decorating yourself this holiday season – beaded snowflakes areclassic holiday jewelry for any party, and you can wear themlong after Christmas and New Year’s have come and gone.Really, the ideas and beading techniques that can be usedto adorn your holiday season are endless, so we’ve collected alittle sampling of beaded ornaments projects here for you. French beaded flowers are perfect for making holiday Poinsettias, and Dustin Wedekind’s Fleur Russe would make abeautiful present decoration, beaded holiday pendant, orholiday brooch to brighten up a dark winter night. Who needs the calories and sugar of regular candy canes?Dustin Wedekind’s Double Mint Spiral uses spiral rope tocreate fun candy canes that won’t add too many inches toyour waistline and can grace a pretty holiday table. I can totally get behind snowflakes that you don’t have toshovel – so we included Jean Campbell’s Beaded SnowflakeEarrings, and Robin Cowart’s Snowflake Ornament. Whetheryou want to decorate your Christmas tree or yourself withsparkling beaded snowflakes, you’ll find plenty to love aboutthese free holiday beaded ornaments. Use your skills in stitching geometric beadwork to make amagical beaded star with the Star Topped Magic Wand bySylvia Becker. Instead of making a magic wand, you can use itto add a beaded ornament to the top of a miniature Christmas tree, or get creative and hang them by silk ribbons fromyour windows during the holiday season. (They also makegreat holiday pendants!)Make some time to deck the halls with lots of fun beadedornaments this holiday season. Whether you want to makeunique beaded holiday jewelry, beaded ornaments for yourChristmas tree, decorations for your holiday table or home, orunique package decorations for your holiday gifts, you’ll lovestitching up these holiday beading patterns.Bead Happy,Jennifer VanBenschoten, Beading Daily editorBeaded Ornaments: 5 Free Projects Using Beads to Make Ornamentseditor, beadingdaily JENNIFER VANBENSCHOTENproduction designer JANICE TAPIA / photography JOE COCA, ANN SWANSONProjects and information are for inspiration and personal use only. BeadingDaily, Beadwork, and Stringing do not recommend, approve, or endorse any of theadvertisers, products, services, or views advertised in this publication. Nor do BeadingDaily, Beadwork, or Stringing evaluate the advertisers’ claims in any way. Youshould, therefore, use your own judgment in evaluating the advertisers, products, services, and views advertised in BeadingDaily, Beadwork, and Stringing. F W MEDIA, INC. ALL RIGHTS RESERVED. F W MEDIA GRANTS PERMISSION FOR ANY OR ALL PAGES IN THIS ISSUE TO BE COPIED FOR PERSONAL USE. BEADINGDAILY.COMpage iii
Stitch Pro:Stitch a Pairof BeadedSnowflakeEarringsJean CampbellTHE SNOW IS FALLING AS I LOOK OUT THE WINDOW TODAY. I can smell the turkey roasting, and thepumpkin and apple pies I made last night are lined up on the counter, reminding me that meals are usually betterwhen dessert comes first. I’m excited to spend this Thanksgiving with family and close friends, sharing my abundantbounty with those I love. In the spirit of the season of giving (and in the spirit of that white stuff that’s coming downand that I will soon be shoveling), I’ve designed a snowflake component that I’d like to share with you! F W MEDIA, INC. ALL RIGHTS RESERVED. F W MEDIA GRANTS PERMISSION FOR ANY OR ALL PAGES IN THIS ISSUE TO BE COPIED FOR PERSONAL USE. BEADINGDAILY.COMpage 1
Here’s how they are done:Round 1: Use 3’ of thread to string 6 seedbeads, leaving a short tail. Tie a squareknot with the working and tail threads toform a tight circle, then pass through thebeads again, exiting through the first beadstrung.Round 2: String 1 bead and pass throughthe next bead of Round 1; repeat six times.Step up through the first bead added inthis round.Round 3: String 2 beads and pass throughthe next bead of Round 2: repeat six times.Step up through the first bead added inthis round.Round 4: String 2 beads, pass through thenext bead of Round 3, the nearest Round 2bead, and up through the following Round3 bead; repeat six times. Step up throughthe first bead added in this round.Round 1Round 5: String 5 beads and pass backthrough the first 2 beads just added toform a fringe, then pass through the following Round 4 bead and weave throughbeads to exit up through the next Round 4bead; repeat six times.Round 2For an earring: Add a jump ring to one ofthe picots added in Round 5; add an earwire to the jump ring. Note: I used mychain-nose pliers to firmly turn the orientation of my ear wire loop so my snowflakewould hang properly.Since I’m a low-key jewelry-wearer, I likethese snowflakes as low-key holiday wear,but if you really like to deck the halls, make abunch of them to hang from a chain braceletor necklace. Or REALLY deck the halls bymaking lots, stitching them together, andusing the garland to decorate your tree!Round 3Round 4Round 5 F W MEDIA, INC. ALL RIGHTS RESERVED. F W MEDIA GRANTS PERMISSION FOR ANY OR ALL PAGES IN THIS ISSUE TO BE COPIED FOR PERSONAL USE. BEADINGDAILY.COMpage 2
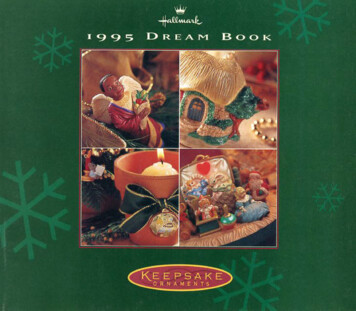
Fleur RusseDustin WedekindThis flower combines a French beadedwire technique with a Russian beading pattern.Peace on earth, yo.MATERIALSSize 6 seed beads in red, gold,and green24” of 26-gauge craft wire1” pin backTOOLSWire cuttersNeedle-nose pliers1: String 1 red to the centerof the wire. Use both endsof the wire to string 1 red.Pull snug so that the secondbead holds the first beadtightly in place at the tipof the wire. String 6 red oneach end of the wire. Useone end to string 1 goldand pass the other end backthrough it. Pull each end inopposite directions to snugthe beads, forming the firstpetal (Figure 1).2: Use one end of the wireto string 1 gold and 8 red.Slide the beads down tothe work and hold themin place as you pass backthrough the second-to-lastbead just strung (Figure2). String 6 red and passthrough the 1 gold again;pull snug (Figure 3).3: Repeat Step 2 to make athird petal with the sameFigure 1Figure 2end of the wire, then usethe other end of the wireto work three petals. Passeach end of the wire backthrough 1 gold of the opposite end and pull tight tosnug the gold beads into acircle (Figure 4).Figure 4Figure 3Figure 54: Use one end of the wire tostring 10 green; pass backthrough the second-to-lastbead. String 8 green andpass through the gold beadthat the wire is exiting fromto form a leaf behind thered petals. Repeat once tomake a second leaf, thenrepeat once more with theother end of the wire for atotal of 3 leaves (Figure 5).5: Pass one end of the wirethrough 3 gold and pulltight to snug the beads.Use the wire to attach apin back and tuck the endsunder to secure. FDustin Wedekind was senior editorof Beadwork magazine. F W MEDIA, INC. ALL RIGHTS RESERVED. F W MEDIA GRANTS PERMISSION FOR ANY OR ALL PAGES IN THIS ISSUE TO BE COPIED FOR PERSONAL USE. BEADINGDAILY.COMpage 3
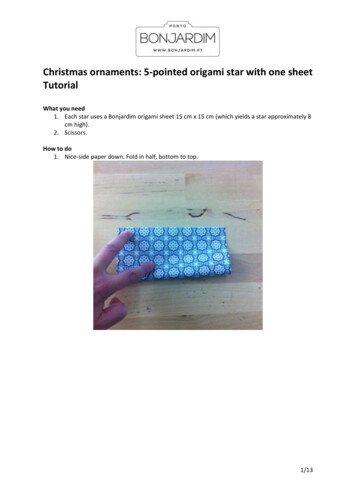
Double Mint SpiralDustin WedekindThe beaded spiral rope lets you easily mixbead materials and shapes, play with complexcolor patterns, even work it single-, double-, or triplespiraled for any length you like. The stitch is simple—loops ofbeads surrounding a single core. Practice the double-spiral technique described here, then use it to create abeaded candy cane.MATERIALSSize 11 seed beads for spiralloops (A and B)Size 8 seed beads for core (C)5" of 26- to 28-gauge wireBeading threadSize 10 beading needleFigure 1double spiral1: Start loops. Use 5' ofthread to string 3C and4A, holding onto an 8"tail; pass through the3C again to form a loop.(The 4A should arclike a D; if not, string5A; depending on thewidth of the core beads,you may need to string5 beads for each loophere and after.) String4B and pass up throughthe 3C again (Figure 1).2: Spiral. Hold the A loopto the left, under yourthumb, with the B loopto the right. String 1Cand 4A; pass up throughthe top 2C between theloops, pull snug, andFigure 2Figure 3covering the loops to theleft with your thumb, thenuse the length of the needle to push the oppositeloops down and to theright while passing thetip up through the 2 or 3core beads (Figure 4).pass through the 1C juststrung (Figure 2). Turnthe work so that the Bloop is to the left. String4B and pass through thetop 3C again betweenthe loops (Figure 3).3: Repeat Step 2 for thelength of the cord,keeping the followingin mind:Core: Each A loop begins with1C and shifts up by 1 corebead, followed by a B loopover the same 3 core beads.Swirl: Keep the work turning so that each new loopcovers the previous loopof the same color to theleft of the core.Spread: Tease the loopsapart to expose the core,4: Ends. Without stringing a core bead, string3A and pass throughthe last 2C; repeatwith 3B. String 2A andpass through the last1C; repeat with 2B.Weave back through afew loops, tying knotsbetween beads to secure.Repeat with the tailthread (reverse the spiralby working B, then A).Figure 4candy caneWork 4" of double spiraland weave the tail threadsthrough loops to secure,avoiding passing throughthe core beads; trim. Gently thread the core beadsonto the wire. Shape therope into a cane, twistingto enhance the spiral. Trimwire ends to ½" and tuckthem into the beadwork. FAs a technical editor, illustrator, anddesigner of all things beady, DustinWedekind continuously seeks thesimple structures within complexconfigurations. Find such things inhis book, Getting Started with SeedBeads (Interweave Press, 2007), or onhis website, www.bedesman.com. F W MEDIA, INC. ALL RIGHTS RESERVED. F W MEDIA GRANTS PERMISSION FOR ANY OR ALL PAGES IN THIS ISSUE TO BE COPIED FOR PERSONAL USE. BEADINGDAILY.COMpage 4
Star Topped Magic WandWhat could be morehandy than a magicwand to whisk away abad day? Even thoughthese beaded starscan’t guarantee results,they are certain tobring a smile.The pattern can be usedas a starting point fora range of possibilities.With a little ingenuityit can be reworkedto make flowers,Christmas ornaments,or hat pins.The star is shapedfrom the outside in,decreasing at thepoints, increasing atthe inverted points.Work the back side of the star directly off the front. Leave an opening at one of thestar’s inverted points so you can add a glittery dowel for the handle.I grade seed beads by sorting them by width. To make a flat star, use the slightlynarrower beads for the points and the wider beads for the inverted points. If youuse wider beads in the points, you can make a 3-D star. F W MEDIA, INC. ALL RIGHTS RESERVED. F W MEDIA GRANTS PERMISSION FOR ANY OR ALL PAGES IN THIS ISSUE TO BE COPIED FOR PERSONAL USE. BEADINGDAILY.COMpage 5Joe Cocaby Sylvia Becker
Make dec. Work 3 gold in one-drop. Work purple beads together in a two-drop. Rep from *four times. PT the first bead of Rnd .MaTerialS: oz. each size Japanese seed beads in purpleluster and metallic goldPurple Nymo “B” thread 6” wooden dowel (3 6” width)Nail polish—purple enamel and gold glitter-fleckedToolS:Size beading needleScissorsFine-toothed wood saw# 0 sandpaperPencil sharpenerTechniqueS:rnd 4:PT first bead of Rnd 3. *Work gold in one-drop.Make dec. Work 3 gold in one-drop. PT firstbead in next two-drop made in Rnd 3. String purple. PT second bead of two-drop. Work goldin one-drop. Rep from * four times. PT first beadof Rnd 3.rnd 5:PT first bead of Rnd 4. Work purple in one-drop.*Make dec. Work purple in one-drop. Work gold in one-drop. Work purple in one-drop. Repfrom * four times. End working purple in onedrop. PT first bead of Rnd 4.rnd 6:PT first beads of Rnd 5 to make a dec. *Work purple in one-drop. Work gold in two-drop.Work purple in one-drop. Make dec. Rep from* four times. End working purple in one-drop.PT first beads of Rnd 5.rnd 7:PT first bead of Rnd 6. *Work purple in onedrop. PT first bead in next two-drop made in Rnd6. String gold. PT second bead of two-drop.Work purple in one-drop. Make dec. Rep from* four times. PT first bead of Rnd 6.rnd 8:PT first bead of Rnd 7. *Work 4 purple in onedrop. Make dec. Rep from * four times. PT firstbead of Rnd 7.rnd 9:PT first bead of Rnd 8. *Work purple in onedrop. Work purple in two-drop. Work purplein one-drop. Make dec. Rep from * four times.PT first bead of Rnd 8.Peyote StitchNOTE:Make a two-drop decrease by passing the threadfrom one bead through the next without addinga bead at the “gap,” then in the next round work a onedrop peyote over the two-drop. Keep the thread taut toavoid holes.Make a two-drop increase, work a two-drop peyoteover a one-drop in one round, and then in the next roundwork a one-drop peyote between the two-drop. For asmooth increase, use very narrow beads for both thetwo-drop and the one-drop between.abbreviations used:rep: RepeatDec: DecreasePT:Pass throughrnd: RoundFront sidernd 1:rnd 2:Using wider beads without cutting bobbin thread,string 90 purple on ½ yards waxed Nymo. PTthe first bead strung to make a circle. Leavesome slack in the circled thread.Work in one-drop peyote alternating with dec inthis pattern: *Work 4 purple. Make dec. Work 4purple. Rep from * four times. PT the first beadof Rnd .rnd 3: From this round on, keep thread taut. PT firstbead of Rnd . *Work 3 gold in one-drop.rnd 10: PT first bead of Rnd 9. *Work purple in one-drop.PT first bead of the next two-drop made in Rnd 9.String gold. PT second bead of two-drop. Work purple in one- drop. Make dec. Rep from *four times. PT first bead of Rnd 9.rnd 11: PT first bead of Rnd 0. *Work purple in onedrop. Make dec. Rep from * four times. PT firstbead of Rnd 0.rnd 12: PT first bead of Rnd . *Work gold in one-drop.Make dec. Rep from * four times. PT first beadof Rnd .rnd 13: PT first bead of Rnd . Work 5 gold in one-drop.PT first bead of Rnd . F W MEDIA, INC. ALL RIGHTS RESERVED. F W MEDIA GRANTS PERMISSION FOR ANY OR ALL PAGES IN THIS ISSUE TO BE COPIED FOR PERSONAL USE. BEADINGDAILY.COMpage 6
rnd 14: PT first bead of Rnd 3. String gold. PT thirdthen fourth beads of Rnd 3. PBT the bead addedin this round. PBT second and first beads of Rnd 3. Weave thread through several beads to secureand trim close to work.Back sideTo work other side of the star, cut bobbin thread to ½yards. Rnd from the front side serves as the first rnd ofthis side. PT last bead added in Rnd from the front side.Remember to use good ventilation. If the star does not fitsnugly on the wand, you can use a bit of glue or build upthe wand with a few more layers of nail polish. RPattern chartrnd 2, back side: Work 6 purple in one-drop peyotestitch. String 5 purple. PT the sixteenth bead of Rnd . Work 6 purple in one-drop. PT last bead added inRnd , front side.rnd 3–14, back side: Work the front side’s pattern begwith Rnd 3. Be sure to work the 5 beads strung inRnd , second side, rather than use those from thefront side (this will give you the gap in which toinsert your dowel). When done, weave thread throughseveral beads to secure and trim close to work. Insertdecorated dowel into gap.Round by round working chartSide 1,Rounds 1–14WandSelect the rough end of your dowel and sharpen it to a dullpoint with a pencil sharpener. Curl the sandpaper and sandthe length of the dowel. Smooth the point and the buttend of the dowel by holding the sandpaper still and movingthe dowel. Wipe the dust off the dowel and apply a thincoat of nail polish to all but the sharp end and tip it upto dry throroughly. Paint the tip when you do the secondcoat. (I used two coats of enamel and one coat of glitter.)Side 2,Rounds 45678910111213141516171819202122232425262728SYlVia BecKer teaches beadworking classes andexhibits her work nationally. F W MEDIA, INC. ALL RIGHTS RESERVED. F W MEDIA GRANTS PERMISSION FOR ANY OR ALL PAGES IN THIS ISSUE TO BE COPIED FOR PERSONAL USE. BEADINGDAILY.COMpage 7
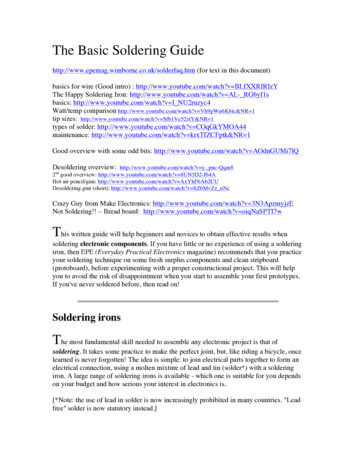
technique nettingSnowflake OrnamentRobin CowartThis festive snowflake has many uses: decorate your holiday packages with it, dangle iton a small suction cup with a hook in a window, or hang it on a holiday tree. F W MEDIA, INC. ALL RIGHTS RESERVED. F W MEDIA GRANTS PERMISSION FOR ANY OR ALL PAGES IN THIS ISSUE TO BE COPIED FOR PERSONAL USE. BEADINGDAILY.COMpage 8
FINISHED SIZE: 2"MaterialsTools1 g silver metallic size 11 Japaneseseed beadsSize 12 beading needleScissors16 white 3mm fire-polished rounds (A)32 white 4mm fire-polished rounds (B)Crystal FireLine beading threadG-S Hypo CementFire-polished rounds and silver seed beads arejoined with circular netting stitches to create an8-point snowflake.1: Snowflake. Use 6' of thread to string4 seed beads, leaving a 3" tail. Tie a knot toform a circle, pass through all beads again, andexit between 2 seed beads (Figure 1).rounded spoke. Continue around the nextspoke by passing through 1B, 3 seed beads,1B, and 1 seed bead to exit on the other sideof the spoke. Repeat to complete the round(Figure 3). Pass through the second seedbead added in Round 1 and continue to passthrough the spoke beads to exit the center beadat the tip of the spoke to position the thread forRound 3.plete the round. Pass through 2 seed beads,1B, and 1 seed bead to position the threadfor Round 4.Round 4: String 5 seed beads. Skip 1B onRound 3 and pass through 1 seed bead, 1B,and 2 seed beads. String 2 seed beads. Skipthe center seed bead from Round 1 and passthrough the next 2 seed beads, 1B, and1 seed bead of Round 3. Repeat to completethe round (Figure 5). Pass through 2 seedbeads, 1B, and 3 seed beads to position thethread for Round 5.Figure 1Round 1: String 1 seed bead, 1B, 1 seed bead,1B, 3 seed beads, 1B, 1 seed bead, 1B, and1 seed bead. Pass through the next seed beadin the circle. Repeat, completing 4 roundedspokes around the circle (Figure 2). Passthrough the first seed bead in the circle againand continue into the first spoke to passthrough 1 seed bead, 1B, 1 seed bead, 1B,3 seed beads, 1B, and 1 seed bead. Thethread is now in position for Round 2.Figure 5Figure 3Round 3: String 2 seed beads, 1B, 1 seed bead,1B, 1 seed bead, 1B, and 2 seed beads. Passthrough only the center seed bead at the tipof the next spoke (Figure 4). Repeat to com-Round 5: String 1A, 3 seed beads, and 1A. Skipthe center seed bead of the previous roundand continue through 3 seed beads, 1B, and3 seed beads. String 1A, 3 seed beads, 1A.Skip the center seed bead of previous roundand pass through 3 seed beads, 1B, and3 seed beads (Figure 6). Repeat to completethe round.Figure 2Round 2: String 1B, and pass through the1 seed bead between the 2B on the nextFigure 6Figure 4 F W MEDIA, INC. ALL RIGHTS RESERVED. F W MEDIA GRANTS PERMISSION FOR ANY OR ALL PAGES IN THIS ISSUE TO BE COPIED FOR PERSONAL USE. BEADINGDAILY.COMpage 9
2: Finishing. Pass through Round 5 beadsto exit the middle seed bead on the tip of aspoke. String 40 seed beads and pass throughthe middle seed bead again to form a circle.Pass through all the seed beads again to secure (Figure 7). Tie a knot, weave the thread endinto several beads, and trim the thread closeto the work. FFigure 7With each new project, Robin Cowart strives to push andchallenge her beading skills in original ways. Robin ownsWe Got The Bead, a bead store in Dubuque, Iowa.RESOURCESCheck your local bead shop or contact: All beads andfindings: We Got the Bead, (563) 584-0305, www.wegotthebead.com. F W MEDIA, INC. ALL RIGHTS RESERVED. F W MEDIA GRANTS PERMISSION FOR ANY OR ALL PAGES IN THIS ISSUE TO BE COPIED FOR PERSONAL USE. BEADINGDAILY.COMpage 10
More Resources:eBookeBookclick hereclick hereclick om/beadingdaily F W MEDIA, INC. ALL RIGHTS RESERVED. F W MEDIA GRANTS PERMISSION FOR ANY OR ALL PAGES IN THIS ISSUE TO BE COPIED FOR PERSONAL USE. BEADINGDAILY.COMpage 11
the next bead of Round 2: repeat six times. Step up through the first bead added in this round. Round 4: String 2 beads, pass through the next bead of Round 3, the nearest Round 2 bead, and up through the following Round 3 bead; repeat six times. Step up through the first bead a