Transcription
Software Manual Template ProceduresFormatting Specifications and Style GuideXXXXXXX
Software Manual Template ProceduresFormatting Specifications and Style GuideXXXXXXXSoftware Manual, February 2013EPRI Project ManagerC. HandyELECTRIC POWER RESEARCH INSTITUTE3420 Hillview Avenue, Palo Alto, California 94304-1338 PO Box 10412, Palo Alto, California 94303-0813 USA800.313.3774 650.855.2121 askepri@epri.com www.epri.com
DISCLAIMER OF WARRANTIES AND LIMITATION OF LIABILITIESELECTRIC POWER RESEARCH INSTITUTE, INC. (“EPRI”) RESERVES ALL RIGHTS IN THE PROGRAMAS DELIVERED. THE PROGRAM OR ANY PORTION THEREOF MAY NOT BE REPRODUCED IN ANYFORM WHATSOEVER EXCEPT AS PROVIDED BY LICENSE, WITHOUT THE CONSENT OF EPRI.A LICENSE UNDER EPRI'S RIGHTS IN THE PROGRAM CAN BE OBTAINED DIRECTLY FROM EPRI.THE EMBODIMENTS OF THIS PROGRAM AND SUPPORTING MATERIALS MAY BE INDEPENDENTLYAVAILABLE FROM ELECTRIC POWER SOFTWARE CENTER (EPSC) FOR AN APPROPRIATEDISTRIBUTION FEE.ELECTRIC POWER SOFTWARE CENTER (EPSC)9625 RESEARCH DRIVECHARLOTTE, NC 28262THIS NOTICE MAY NOT BE REMOVED FROM THE PROGRAM BY ANY USER THEREOF.NEITHER EPRI, ANY MEMBER OF EPRI, THE ORGANIZATION(S) BELOW, NOR ANY PERSON ACTINGON BEHALF OF ANY OF THEM:1.MAKES ANY WARRANTY OR REPRESENTATION WHATSOEVER, EXPRESS OR IMPLIED,INCLUDING ANY WARRANTY OF MERCHANTABILITY OR FITNESS OF ANY PURPOSE WITHRESPECT TO THE PROGRAM ; OR2.ASSUMES ANY LIABILITY WHATSOEVER WITH RESPECT TO ANY USE OF THE PROGRAM ORANY PORTION THEREOF OR WITH RESPECT TO ANY DAMAGES WHICH MAY RESULT FROMSUCH USE.RESTRICTED RIGHTS LEGEND: USE, DUPLICATION, OR DISCLOSURE BY THE GOVERNMENT ISSUBJECT TO RESTRICTION AS SET FORTH IN PARAGRAPH (G) (3) (I), WITH THE EXCEPTION OFPARAGRAPH (G) (3) (I) (B) (5), OF THE RIGHTS IN TECHNICAL DATA AND COMPUTER SOFTWARECLAUSE IN FAR 52.227-14, ALTERNATE III.Reference herein to any specific commercial product, process, or service by its trade name, trademark,manufacturer, or otherwise, does not necessarily constitute or imply its endorsement, recommendation, orfavoring by EPRI.The following organization(s), under contract to EPRI, prepared this report:EPRITHE TECHNICAL CONTENTS OF THIS DOCUMENT WERE NOT PREPARED IN ACCORDANCE WITHTHE EPRI NUCLEAR QUALITY ASSURANCE PROGRAM MANUAL THAT FULFILLS THEREQUIREMENTS OF 10 CFR 50, APPENDIX B AND 10 CFR PART 21, ANSI N45.2-1977 AND/OR THEINTENT OF ISO-9001 (1994). USE OF THE CONTENTS OF THIS DOCUMENT IN NUCLEAR SAFETY ORNUCLEAR QUALITY APPLICATIONS REQUIRES ADDITIONAL ACTIONS BY USER PURSUANT TOTHEIR INTERNAL PROCEDURES.NOTEFor further information about EPRI, call the EPRI Customer Assistance Center at 800.313.3774 ore-mail askepri@epri.com.Electric Power Research Institute, EPRI, and TOGETHER SHAPING THE FUTURE OF ELECTRICITY areregistered service marks of the Electric Power Research Institute, Inc.Copyright 2013 Electric Power Research Institute, Inc. All rights reserved.
ACKNOWLEDGMENTSThe following organization, under contract to the Electric Power Research Institute (EPRI),prepared this report:EPRI3420 Hillview AvenuePalo Alto, CA94304Principal InvestigatorC. TillinghastThis report describes research sponsored by EPRI.This publication is a corporate document that should be cited in the literature in the followingmanner:Software Manual Template Procedures: Formatting Specifications and Style Guide. EPRI, PaloAlto, CA: 2013. XXXXXXX.iii
SOFTWARE DESCRIPTIONWrite the one-line introduction here. This is a single sentence describing what the software does.(e.g. “The ABC software version xx ”)DescriptionThis is one paragraph providing a summary description of the software. Also note if customerswill incur additional expenses to utilize the software such as customization, training, purchasinga supporting program, user group fees, license fees, etc.Benefits and ValueWrite the Benefits and Values here. Please provide two or three bullet points highlighting theBenefits and Value provided by the software. (e.g.“Value and benefits provided by the ABCsoftware are: ”)Platform RequirementsWrite the Platform Requirements here. As a minimum, list the supported Windows operatingsystems such as Windows 2000, Windows XP, and Windows Vista.KeywordsList the keywords here.v
CONTENTS1 FEATURES INCLUDED IN THE TEMPLATE . 1-12 INSTALLING THE SOFTWARE MANUAL TEMPLATE . 2-1To Determine Where to Save the Template. 2-13 FRONT MATTER . 3-1Enter the Cover Page Information. 3-1Enter the Title Page Information . 3-4Enter the Disclaimer Page Information . 3-5Enter the Acknowledgments Page Information . 3-6Enter the Software Description Information . 3-6Enter the Mandatory Software Installation Information . 3-6Enter Additional Front Matter Section Information . 3-6Update the Contents, List of Figures, and List of Tables . 3-64 CHAPTERS AND APPENDICES . 4-1Setting Up Chapters and Appendices . 4-1Add Text to a Chapter and Appendix . 4-1Add a New Chapter or Appendix . 4-1Inserting Figures into the Template. 4-2Insert a Figure . 4-3Inserting Tables into the Template . 4-3Insert a Table . 4-5Inserting Equations into the Template. 4-6Insert an Equation . 4-6Inserting Captions . 4-6Insert a Figure or Table Caption in a Chapter or Appendix . 4-6Insert an Equation Number . 4-7Insert a Caption in the Front Matter . 4-7Inserting Different Types of Pages . 4-7Insert Landscape Pages . 4-8Insert Foldout Pages . 4-9Closing Documents . 4-95 FORMATTING SPECIFICATIONS AND STYLES . 5-1Required Fonts. 5-1Formatting Specifications . 5-1Formatting Figures . 5-1To Make a Floating Figure in Line with Text . 5-1To Change a Figure with Free Floating Components into a Single Picture . 5-1vii
Formatting Tables . 5-2Built in Template Styles. 5-3A USING AUTO TEXT . A-1How to Insert an AutoText Entry . A-1Saved AutoText Entries . A-2B REFERENCES AND BIBLIOGRAPHIES . B-1References . B-1Bibliography . B-1Glossaries and Indexes. B-2Glossaries . B-2Indexes . B-2C TROUBLESHOOTING . C-1Attaching the EPRI Template . C-1Captions . C-1Closing Documents . C-1Section Breaks . C-1Numbered Lists . C-2TOC/Lists . C-2viii
LIST OF FIGURESFigure 2-1 Determining Where to Save the Template . 2-1Figure 3-1 Auto Text List of EPRI Cover Page Licensed and Licensed/Controlled Logos . 3-2Figure 3-2 EPRI Cover Page Licensed Logo . 3-2Figure 3-3 EPRI Cover Page Licensed/Controlled Logo . 3-3Figure 3-4 EPRI Cover Page NQA Logo . 3-3Figure 3-5 EPRI Cover Page Licensed Notice . 3-3Figure 3-6 Auto Text List of EPRI Title Page NQA/Non-NQA Wording . 3-4Figure 3-7 Appropriate Wording for Non-Nuclear Reports (EPRI Title Page Auto Text Entry) . 3-4Figure 3-8 Appropriate Wording for Non-NQA Reports (EPRI Title Page Nuclear Non-NQAAuto Text Entry) . 3-5Figure 3-9 Appropriate Wording for NQA Reports (EPRI Title Page Nuclear NQA Auto TextEntry) . 3-5Figure 3-10 Update Field . 3-7Figure 3-11 Update Table of Contents Box . 3-7Figure 4-1 Insert Figure . 4-3Figure 4-2 Table Properties . 4-4Figure 4-3 Insert Table Options . 4-5Figure 4-4 Caption Options . 4-6Figure 4-5 Sample Figure Caption . 4-7Figure 4-6 Section Break Box . 4-8Figure 5-1 Sample Figure . 5-2Figure A-1 Auto Text from Insert Menu . A-1Figure A-2 Auto Text Button on Toolbar . A-1Figure C-1 Caption Numbering . C-1ix
LIST OF TABLESTable 4-1 Sample Table . 4-5Table 5-1 EPRI Sample Table . 5-2Table 5-2 Template Styles . 5-3xi
MANDATORY SOFTWARE INSTALLATIONINFORMATIONBoth software statements below (and their titles) need to be inserted into the Installation sectionof the software manual.Installation of EPRI Software at Client SiteEPRI develops software using a number of third party software products and tools that run onvarious operating systems and server platforms. Reports from the software industry suggest thereare known security issues with some products and systems. EPRI recommends that, if usingEPRI software, review its use with your Information Technology (IT) department and theiroverall strategy to ensure that all recommended security updates and patches are installed asneeded in your corporation. If you have any concerns please call the EPRI Customer AssistanceCenter (CAC) at 1-800-313-3774 (or email askepri@epri.com).Difficulties Accessing the ApplicationIf difficulties occur accessing the application after standard installation on Windows 2000,Windows XP, or Windows Vista, please consult IT department personnel to have proper accesspermissions setup for use. If the problem can not be resolved, please call the EPRI CustomerAssistance Center (CAC) at 1-800-313-3774 (or email askepri@epri.com).xiii
1FEATURES INCLUDED IN THE TEMPLATEThe Software Manual template is comprised of the following: Built in Microsoft Word Type styles. Auto Text for inserting Cover, Title page, and Disclaimer information, as well as headers andfooters. Pre-set front matter sections, chapter sections, and appendix sections.The template is designed to facilitate and standardize software manual formatting through theuse of Word styles. The template is a Microsoft Word template and operates on machines usingOffice 98 software or higher.1-1
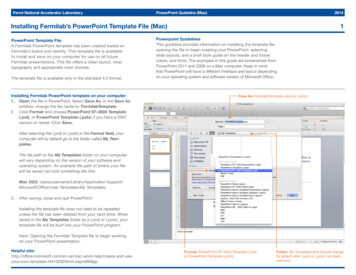
2INSTALLING THE SOFTWARE MANUAL TEMPLATESave the Software Manual template file in the appropriate directory for Microsoft Word torecognize it as an active template.To Determine Where to Save the Template1.2.3.4.Open a blank Word document.Click the Office Button in the upper left hand corner and select Word Options.Select Advanced.Scroll to the bottom of the window and click File Locations.Figure 2-1Determining Where to Save the Template5.6.7.8.From the list of File types, highlight User templates.Click Modify to view the entire directory.Make a note of this directory and close any open Word windows.From the desktop, copy the Software Manual template file to said directory2-1
9. Open Word and go to Office Button New My Templates. Software Manual Templateshould appear as a choice of templates.2-2
3FRONT MATTERThe front matter pages of a Software Manual consist of the following. The Cover page includes the title, subtitle, and Product ID number. Also on this page thelicensed logo, export control logo, and NQA wording appear if appropriate. The Title page includes the title, subtitle, Product ID number, report type and date, the EPRIproject manager’s name, and the EPRI address. Also the NQA/Non-NQA wording shouldappear if appropriate at the bottom of the page. The Disclaimer page contains legal information, the names of the organizations that preparedthe report, and ordering information. The Acknowledgments page states the research contractor’s name, address, and principalinvestigator, as well as citation information. The Software Description page provides a description of the software, including its benefitsand value, platform requirements, and an optional screen shot illustration. The Mandatory Software Installation Information page includes a description of theinstallation of EPRI software at a client site as well as IT information for issues relating toinstallation. The Additional Front Matter Section page provides another section for optional information. The Contents, List of Figures, and List of Tables pages provide hyperlinks to the variousparts of the manual.Enter the Cover Page Information1. Type the correct title, subtitle, and Product ID number where indicated.2. Determine if the manual is a copyright, executable, or executable controlled report. If it isexecutable or executable controlled, use Auto Text to insert the appropriate logo asshown in Figures 3-1, 3-2, and 3-3.Note: See Appendix A for instructions on how to use Auto Text.3-1
Figure 3-1Auto Text List of EPRI Cover Page Licensed and Licensed/Controlled LogosFigure 3-2EPRI Cover Page Licensed Logo3-2
Figure 3-3EPRI Cover Page Licensed/Controlled Logo3. Determine if the manual is an NQA report. If it is, use Auto Text to insert the appropriateNQA logo as shown in Figure 3-4.Figure 3-4EPRI Cover Page NQA Logo4. Determine if the manual is an executable report. If it is, use Auto Text to insert theappropriate executable wording in the footer as shown in Figure 3-5.Figure 3-5EPRI Cover Page Licensed Notice3-3
Enter the Title Page Information1. Type the correct title, subtitle, Product ID number, and Month where indicated.2. Determine whether the manual is an NQA, Non-NQA, or not a nuclear report. Based onthat determination, choose the correct Auto Text entry for the Title Page footer as shownin Figures 3-6, 3-7, 3-8, and 3-9.Figure 3-6Auto Text List of EPRI Title Page NQA/Non-NQA WordingFigure 3-7Appropriate Wording for Non-Nuclear Reports (EPRI Title Page Auto Text Entry)3-4
Figure 3-8Appropriate Wording for Non-NQA Reports (EPRI Title Page Nuclear Non-NQA Auto Text Entry)Figure 3-9Appropriate Wording for NQA Reports (EPRI Title Page Nuclear NQA Auto Text Entry)3. Enter the Project Manager’s first initial and last name where indicated in the footer.Enter the Disclaimer Page Information1. Use the Auto Text list to insert the appropriate disclaimer information by choosing fromthe following list. EPRI Disclaimer Copyright Non-NQA EPRI Disclaimer Copyright NQA3-5
EPRI Disclaimer Executable Non-NQA EPRI Disclaimer Executable NQA EPRI Disclaimer Copyright (not nuclear) EPRI Disclaimer Executable (not nuclear)2. Enter the Research Contractor company name where indicated.Enter the Acknowledgments Page Information1. Enter the Research Contractor company name, address, and principal investigator whereindicated.2. Enter additional acknowledgments if necessary where indicated.3. Use the footer to enter the appropriate citations information: title, subtitle, year, andProduct ID number.Enter the Software Description InformationComplete the Software Description page as indicated in the Software Manual template.Enter the Mandatory Software Installation InformationComplete the Mandatory Software Installation Information page as indicated in the SoftwareManual template.Enter Additional Front Matter Section InformationComplete the Additional Front Matter Section if necessary.Update the Contents, List of Figures, and List of TablesThe Contents, List of Figures, and List of Tables have already been generated in the SoftwareManual template. Update the Contents, List of Figures, and List of Tables after the rest of themanual is inserted and styled.1.2.3.4.Highlight the area to update.Click the right mouse button.Choose Update Field. (see Figure 3-10)If the Update Table of Contents box appears, click Update entire table. (see Figure3-11)5. These steps should be taken separately for the Contents, List of Figures, and List ofTables.3-6
Figure 3-10Update FieldFigure 3-11Update Table of Contents Box3-7
4CHAPTERS AND APPENDICESThis chapter explains how to insert information from the original document to the template aswell as how to incorporate landscape and foldout pages.Setting Up Chapters and AppendicesAdd Text to a Chapter and Appendix1. In the template, click once on the form field entitled “Type Chapter Title Here.” (Or clickonce on the form field entitled “APPENDIX (Heading Level 6)” to add text to theAppendix.)2. Type in or paste the Chapter/Appendix title.3. Position the cursor on the line below the title and type in or paste the appropriate text.Delete any instructional text already in the template.4. Style the text appropriately using the built in styles. See Chapter 5 for a list of the built instyles.Add a New Chapter or Appendix1.2.3.4.Insert an Odd Section Break at the end of the last chapter or appendix.Position the cursor in the new section.Style it Heading 1, Chapter Level, or Heading 6, Appendix Level, appropriately.Type a soft return (Shift Enter) after the chapter or appendix number, and type in orpaste the title.Notes: View all the hidden formatting when working in the document. Click on the Microsoft OfficeButton, click on Word Options, .click on Customize, click on Popular Commands, click onthe Paragraph mark and press Add.4-1
Figure 4-1Adding the paragraph option to your toolbar Do not add even blank pages to the end of each chapter. The template will automaticallyaccount for the blank pages at the end of chapters.Inserting Figures into the Template EPRI formatting standards do not permit wrapping text around graphics. The template does not accommodate multiple qualifiers for one number. (For example,“Figure 1-1a,” and “Figure 1-1b”). However, a single figure may have multiple “parts” thatare designated by a lower case letter. (See Figure 5-1) Link images if the document continuously crashes, or is too unstable due to the fact that theimages are making the file too large to manage. Extract images to edit them and the original is unavailable. Under no circumstances should graphics files be linked across main directories, disk drives,or over networks.4-2
Insert a Figure1. From the menu bar, go to Insert Picture From File.Figure 4-2Insert Figure2. Select the graphic to insert and click Insert.3. Style the graphic as EPRI Figure.Inserting Tables into the TemplateTables should be formatted as consistently as possible in any given report. Table 4-1 shows themost basic table set up. Note the following characteristics: The table caption appears above the table in initial caps. Borders are used for all the cells. Column titles are styled using the EPRI Table Header style. Cells are styled using the EPRI Table Text or EPRI Table Test Left styles. Table is formatted as 95% Preferred width, and Centered.4-3
Figure 4-3Table Properties If a table flows to the next page, repeat header rows and type in a manual table caption. Forexample:Table 6-1 (continued)EPRI TableNote: Do not use Word to automatically repeat the header rows when a table breaks across apage because it will not allow the caption to repeat. Instead, manually break the table, type thecaption, and copy and paste the header rows at the top of the table.4-4
Insert a Table1. From the menu bar, go to Table Insert and choose the number of columns and rowsdesired.Figure 4-4Insert Table Options2. Select the Table Properties settings shown in Figure 4-3.3. Style the cells using EPRI Table Header, EPRI Table Text, and EPRI Table Text Leftaccordingly.Table 4-1Sample TableTable HeadTable HeadTable Text LeftTable TextTable Text LeftTable TextTable Text LeftTable TextNote: The template does not accommodate multiple qualifiers for one number (for example,Table 1-1a, and Table 1-1b).4-5
Inserting Equations into the TemplateEPRI prefers equations to be formatted as shown:A B CEquation 4-1Insert an Equation1. Place the cursor in the position to insert the equation.2. Go to Insert Object Microsoft Equation 3.0. Equation Editor will create an equationfield and open the equation toolbar.3. Type in the equation.Inserting CaptionsInsert a Figure or Table Caption in a Chapter or AppendixNote: A figure caption should appear below the figure. A table caption should appear above thetable.1. From the menu bar, go to Insert Reference Caption.2. Select Figure or Table from the Label section of the Caption box. There should be twochoices for each: Select the first Figure or Table option if working in a chapter. Select the second Figure or Table option if working in an Appendix.Figure 4-5Caption Options3. Click on OK.4. Position the cursor after the caption and enter a soft return.4-6
5. Type in or paste the caption text. Use initial caps consistently throughout the document.Figure 4-6Sample Figure CaptionNote: For Appendix captions, manually remove the extra space between the label (Figure,Caption, or Equation) and number.Insert an Equation Number1. Position the cursor after the equation (make sure the equation is on its own line) and pressTab.2. From the menu bar, go to Insert Reference Caption.3. Choose Equation from the Label section of the Caption box. There should be twochoices: Select the first Equation option if working in a chapter. Select the second Equation option if working in an Appendix.4. Click OK.Note: If the equation was not created with Equation Editor or Mathtype, it will change toHelvetica Bold.Insert a Caption in the Front MatterTo insert a front matter caption, manually type “Figure,” the appropriate number (Figure 1,Figure 2, Figure 3, etc.), a soft return, and the appropriate caption. Then, select this text and styleit using the Caption, Figure and Table style. Figures and tables in the front matter are not listedin the List of Figures and List of Tables.Inserting Different Types of PagesThere are times when a manual will have landscape or foldout pages. To insert these pages, use“Next page” section breaks, then manually correct the page numbers if necessary. The followingprocedures explain how to insert these types of pages.4-7
Insert Landscape Pages1. Insert a “Next page” section break at the appropriate place. Select Page Layout Breaks.2. In the Break drop down, select Next page under Section break types.Figure 4-7Section Break Box3. From the Page Layout ribbon, click on Orientation. Click on Landscape in the drop down.4. From the Insert ribbon, click on Page Number Format Page Number.5. Select Include chapter number, Continue from previous section.4-8
6. Insert the Figure or Table that should appear on the landscape page.7. Insert a “Next page” section break.8. From the Page Layout ribbon, click on Orientation. Click on Portrait.9. Update page numbering10. Continue inserting text into the report.Insert Foldout PagesUse the same steps as for inserting landscape pages, but select Tabloid (11”x17”) in the Papersection of File Page Setup.Note: Foldouts must start on an odd page. They must be followed by an odd page break even if itmeans leaving the opposite side of the foldout blank.Closing DocumentsWhen closing a document, Word may ask to save changes to the template. Click No.4-9
5FORMATTING SPECIFICATIONS AND STYLESRequired FontsFor consistency, only the PostScript fonts Helvetica and Times should be used in the template.These fonts are available with any standard PostScript printer. On rare occasions additional fontswill be needed to accommodate mathematical symbols and other nonstandard characters. Timesdoes not support many Times New Roman symbols and these symbols may drop out when areport is copied into the template. Symbol PS is the preferred choice for these situations.TrueType fonts do not PostScript and therefore will not enable EPRI to accurately print thereports in a commercial printing environment.Formatting Specifications Page size: 8.5” x 11” or 11” x 17” Margins: 1 inch on all edges Fonts: Helvetica and Times PostScript fonts (see above) Headers and Footers: Header from edge of paper: 0.5” Footer from edge of paper: 0.5”Formatting FiguresAll figures should be in line with text and should also be single picture objects. They should notbe pictures with text free floating text boxes over them.To Make a Floating Figure in Line with Text1. Right click on the figure and select Format Picture.2. On
EPRI Project Manager C. Handy ELECTRIC POWER RESEARCH INSTITUTE 3420 Hillview Avenue, Palo Alto, California 94304-1338 PO Box 10412, Palo Alto, California 94303-0813 USA 800.313.3774 650.855.2121 askepri@epri.com www.epri.com Software Manual Template Procedures