Transcription
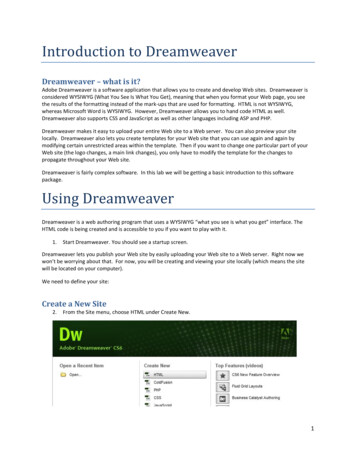
Dreamweaver MX 2004This tutorial will introduce you to building and managing e-Portfolios in Blackboard. For further instructionand/or assistance, however, you are encouraged to take advantage of our Faculty Technology Curriculum (FTC)series of workshops and/or to contact one of our Academic Technologists, who are here to work with you.For more about our FTC workshops, please go to: http://www.wpunj.edu/irt/ftcFor more Academic Technologist availability info, please go to: http://www.wpunj.edu/irt/atcalendarWhat is Dreamweaver MX?Dreamweaver MX is a professional web editing application for building and managingwebsites. Dreamweaver MX makes developing professional and personal web pages that arecompatible with a variety of platforms such as Macintosh and PC’s, as well as web browserssuch as Internet Explorer, Netscape, Firefox, and Safari. Dreamweaver MX is often referredto as a What You See Is What You Get (WYSIWYG) software application. This is a termused to describe web-developing software, like Dreamweaver MX, that writes HyperText Mark-Up Language (HTML) code based on the text, images and layout produced ina document.Getting Started:Opening Dreamweaver MX and Configuring Workspace LayoutDreamweaver MX has two workspace layouts options to choose from: Designer or Codermode. Select, Designer mode.Selecting a Workspace Layout1. Click the Start button on the taskbar, point to All Programs, point to Macromedia,and then click Dreamweaver MX 2004.2. Click Edit on the menu bar, and then click Preferences.3. Make sure General is selected in the Category list, and then click the changeWorkspace button.4. Click the Designer option button, and then click OK. This mode is the standardworkspace environment. This workspace environment consists of several windows,toolbars and panels that are strategically organized in a way that makes them moreaccessible to locate.5. Click File on the menu bar, and then click Exit to exit Dreamweaver. Then re-launchDreamweaver.-1-
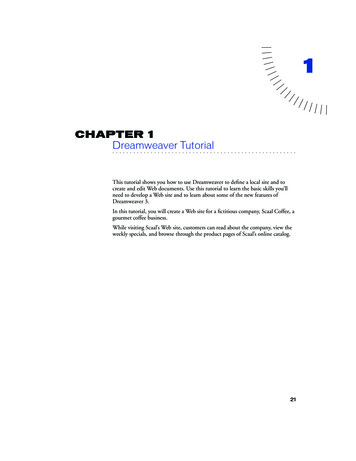
Exploring the Dreamweaver MX EnvironmentDreamweaver MX’s workspace consists of four basic elements. These elements are theDocument Window, Insert Bar, Properties Bar, and Panel Group. Let us take a look ateach of these elements more in depth.Document WindowThe Document Window is the main workspace where web pages are created and editedusing the panels and toolbars. Imbedded within is the document toolbar that includes threemain viewing options: Code, Split, and Design. These three viewing options help you viewand manipulate your web pages.Code ViewThis option allows you toview your web page’s entireHTML coding as it isgenerated by DreamweaverMX. Many designersuse this option in order toenter or edit the HTML code.Split ViewThis viewing option dividesboth the Design and Codeview to allow you to see theHTML coding as you layoutyour website. The upperpane displays your HTMLcode while the lower paneshows you the page as it willappear in the web browser.This view allows a designerexcellent mobility betweenthe hard coding and thelayout. It is also best usedwhen you want to debug ortroubleshoot a web page.-2-Design ViewThis option is the primaryview that allows you to viewyour web page the way it willappear in your web browser.Take note that when you areviewing your web page inthis view, all of your HTMLcoding is hidden. The finishproduct should look the wayit does in this viewing option.
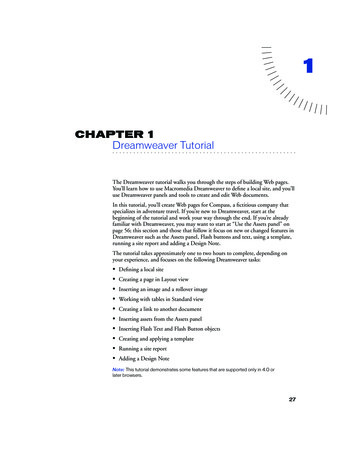
What is the Status Bar? What can it do for you?The Status bar is small panel located at the bottom of your Document Window. The Statusbar in Dreamweaver consists of three things: the Tag Selector, Window Size menu, andDocument Size/Estimated Download Time.Tag SelectorWindow Size menuShows your entire HTMLtags as located and selectedin your Document Window.You can also quickly selectany HTML tag by simplyclicking on any of the tagsymbols. This is best whenweb pages become moredynamic and elaborate, youcan keep track of all of yourHTML tags.This allows you to view yourDocument Window’s currentdimensions in pixels (i.e.1058 x 700). Thesenumbers can change whenyou resize your DocumentWindow or you can set aspecific dimension bymanually resizing thewindow or by selecting adimension from its dropdown menu.Document size /Estimated Download TimeShows your web page’scurrent size in kilobytes (K)and the approximate amountof time in seconds it wouldtake to download the pageover a 28-Kbps modem. (i.e.4K/1sec).Property InspectorThe Property Inspector is a toolbar located beneath your Document Window, this toolbarthat contains a series of buttons for examining and editing attributes of any page elementthat is currently selected on your web page. Take note that your Property Inspector buttonsand options may change to reflect any attributes of any selected element.Insert BarThis toolbar allows you to create any new objects,which in Dreamweaver is anything that is manuallyinserted onto your Document Window. The buttonsfound in this toolbar are organized into categories.When a category is selected, it appears at the top ofthe Category list and the buttons in that category aredisplayed on the Insert bar.Common - creates and inserts objects like images, templates, media elements, and tables.Layout – draws and inserts tables, layers, div tags, and frames as well as switch betweenStandard view, Layout View, and Expanded Table View.Forms – Creates and insert form elements in pages that include interactive forms.Text – Insert text and list formatting tags such as bold b , unordered list ul , andparagraph p or open the Font Tag EditorApplication – Inserts dynamic elements, such as recordsets and repeated regions.Flash Elements – Inserts Flash elements.Favorites –Helps you organize the most commonly used elements from the Insert Bar. Thisis helpful for designers who constantly use specific features in the Insert bar.-3-
Panel GroupThis panel group consists of four collapsible panels andeach of these panels holds a variety of options.These panels are: Design, Code, Application and TagInspector. Let’s take a look at these panels individually.Design Panel – Contains the following tabs:o CSS Styleo HTML Styleo BehaviorsCode Panel – Contains the following tabs:o Snippetso ReferenceApplication Panel – Contains the following tabs:o Databaseso Bindingso Server Behaviorso ComponentsTag Inspector – Contains the following tabs:o Attributeso Behaviorso Relevant CSSCreating Site DefinitionsIn order to create a new web site in Dreamweaver MX you will have to set up the sitedefinition for the site. The site definition contains two sections: Local Info and RemoteInfo.Local Site Definition1. Click Site on the menu bar, and then click Manage Sites. The Manage Sites dialogshould open.2. Click on the New button, and then click Site. The Site Definition for Unnamed Site 1dialogue box opens.3. Click the Advanced tab, if necessary, and then click Local Info in the Category list,if necessary.4. Select the text in the Site Name text box, if necessary, and then type [Name ofYour Website] (do not type space between words).Note: Filenames, folder names, and paths are often case-sensitive. Make sure youtype the names exactly as shown in the steps.-4-
5. Click the Browse button next to the Local Root Folder text box to open the ChooseLocal Root Folder for Site [name of website] dialog box, and then navigate to thelocation where you will store your Web site files.6. Click the Create New Folder button in the Choose Local Root Folder for Site[name of website] dialogue box, type [name of website] as the folder name, andthen press the Enter key. Your web site folder is now created7. Click Select button to set the path for the local root folder. You can also type thepath to the local root folder in the Local Root Folder text box.8. Click the Refresh Local File List Automatically check box to check it, if necessary.9. Click the Browse button next to the Default Images Folder text box to open theChoose Local Images Folder for [name of site], navigate to your local root folder,click the Create New Folder button, type images as the folder name, press theEnter key, click the Open button, and then click the Select button to set the pathfor the default images folder. You can also type the path to the Graphics folder in theDefault Images Folder text box.10. Click the Enable Cache check box to check it, if necessary. The information for thelocal site definition is complete.Creating a Remote Site Definition for FTP AccessThe Remote Site Definition is the information that is stored on your computerthat you are using. This information tells Dreamweaver where the remote server islocated and how to connect to it. Creating a remote site definition enables you toput the website on a Web Server so that it can then be seen on the Web.-5-
Dreamweaver’s FTP SettingsBefore we create a remote site definition let’s first examine Dreamweaver’s FTP optionssettings.FTP Host – The full name of the FTP host, which is what you will use to access the Webserver where the public version of your Web site will be stored. For example, an FTPhost might be www.domainname.com or ftp.domainname.com.Note: Do not include a protocol such as http:// or ftp://.Host Directory – The location where your Web site files are located on the Web server.A host directory is available from your hosting provider.Login – Your assigned login name. Be careful when typing your login name as moreoften than not, it is case-sensitive.Password – Your assigned password. Like your Login name, your password may alsobe case-sensitive.Use Passive FTP – A server parameter. This information is available from your hostingprovider. If you cannot obtain this information, leave the check box checked. If you havedifficulties when you preview the site on the Web, reopen the Site Definition dialog boxand uncheck the Use Passive FTP check box.Use Firewall – This option is relevant only if your computer includes firewall thatprevents outbound connections.Use Secure FTP (SFTP) – This option is only relevant if you are using secure FTP. Thisinformation is available from your hosting provider. If you cannot obtain this information,leave the check box unchecked.Automatically Upload Files – This option automatically uploads files to the remoteserver when you save a page. Do not check this check box.Check In/Check Out – An option that enables multiple users to access files on theWeb site.-6-
Creating the Remote Site Definition1. Click Remote Info in the Category list in the Site Definition for your Web Site.2. Click Access list arrow, and then click FTP. Additional options appear in the dialogbox.3. Click in the FTP Host text box and then type the address to the FTP Host, whichenables you to connect to the server where the public version of your Web Site willbe hosted.4. Press the Tab key to move the insertion point to the Host Directory text box, andthen type the host directory name.5. Pres the Tab key to move the insertion point to the Login text box, and then typeyour login or user name. Remember that on many systems, the login ID is casesensitive.6. Press the Tab key to move the insertion point to the Password text box, and thentype your password. Remember that on many systems, the password is casesensitive.7. Click the Test button. Dreamweaver tests your connecton to ensure that you canconnect to the remote server.8. Click on Save check box to check it, if necessary. Dreamweaver will remember yourpassword. If you are working on a public computer, remember to uncheck the Savecheck box before you end your work session.9. Click the OK button. The Site Definition for your Web site dialog box closes andthe site definition is saved.Formatting HTML Using Dreamweaver MX 2004Text is inputted into Dreamweaver by either typing directly onto the Document Window orinserting the text right onto the hard coding using the Code view. Once this text is in theDocument Window you can format it very similarly to using most word processors. Thefollowing are some of the most important formatting tools found in Dreamweaver.Inserting Paragraph Breaks1. Insert a paragraph text into your Document Window. This text should beformatted in paragraph form.2. Press Return (Enter) and a blank line of white space is inserted below theparagraph. Pressing this key inserts a single paragraph break (one line of blankspace between paragraphs).Note: Dreamweaver always assumes that any inserted text is one completeparagraph. This is unless you apply a proper format, then your text found within the p /p tag pair will appear as one complete paragraph.Inserting Line BreaksThe use of white space is important in the design and readability of any website. InDreamweaver, when you press Return (Enter) key, a new p is inserted. Follow thesetwo simple steps in order to insert a line break:1. Position your cursor within the text where you want to enter a line break.2. Select Insert, Special Characters, and then Line Break from the menu, or pressShift Return or Shift Enter.Note: Dreamweaver will also assign a new HTML paragraph for non-breaking space entity between the opening and end tags. If you type on this new line, thenon-breaking space is replaced with your content. However, if you leave it blank,-7-
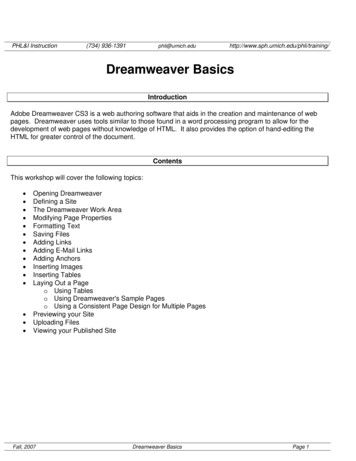
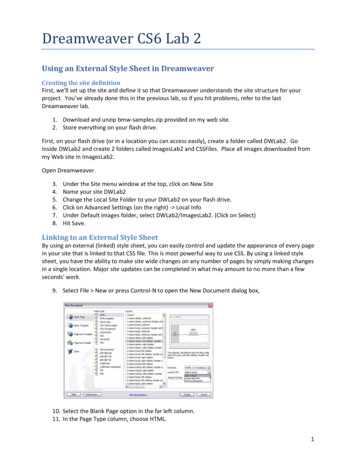
that non-breaking space will remain there. Because the tag is not empty, webbrowsers automatically interpret this paragraph as a blank line.Text AlignmentAs previously explained, the formatting tools found in Dreamweaver are very similar tothose of a Microsoft Word. These paragraph alignments are: Left Justify, Center, andRight Justify. To change the alignments on your text follow these steps:1. Select the text you want to align and highlight it. You can also insert your cursor atthe beginning of your text.2. Click Left Justify, Center, or Right Justify on the property inspector or you canselect your alignment from the Text menu.Text FormatDreamweaver contains three basic paragraphstyles: paragraph, heading, and preformatting.They are applied using the Format drop-down listin the Property Inspector panel. Paragraph - This format ignores white space,so sequential spaces within the paragraph appearas only one space when viewed in a browser. Thisparagraph inserts the HTML code p /p which indicates the text will automatically wrap.Heading - Headings are used to identify differentsections of content on a page. They range fromlargest and boldest h1 to smallest h6 . Headings are applied to the entireparagraph, so you can't mix heading styles within the same line of text.Preformatted - The preformatted format enables you to space text exactly as youwant, including using white space and line breaks. Text doesn't automatically wordwrap, so you must press Enter to end a line.Text SizeFont sizes are relative rather than precise point sizes unlessyour Web site uses CSS, which allows you to have bettercontrol of your font sizes. You can select your font and the sizeusing the Property inspector. Note that sizes 4-7 appear largerthan the default, while sizes 1-2 are smaller. Also, keep in mindthat there are differences in the way your Web sites look onWindows and Macintosh computers. The standard resolutionfor text on Mac is 72 dpi, whereas the standard for Windows is96 dpi. Text formatted to look good on Mac might look toolarge on a Windows platform.To set the font size, do the following:1. Select the text to be sized. If no text is selected, the sizechange will be applied to subsequent text.2. In the Property Inspector, click the Size drop-down list.3. Select a size from the list.-8-
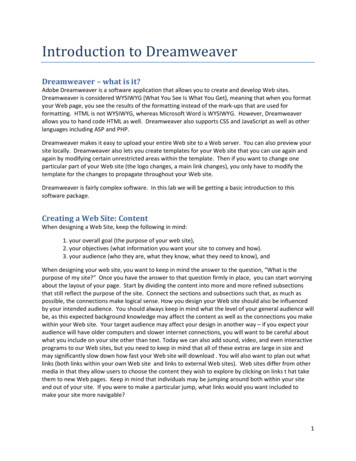
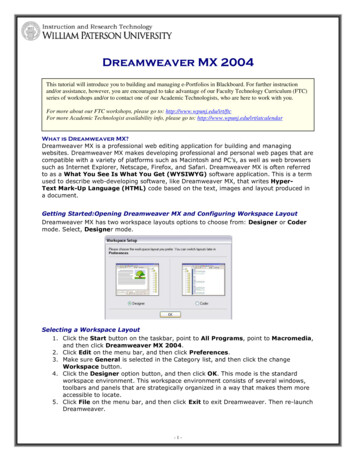
Text ColorThe default text color in Dreamweaver isblack (#000000), but the text color canbe modified in the page properties panel.Follow these steps to change the textcolor on your text:1. Select the text that will change color. Inthe Properties Inspector, click the PageProperties button. The Page Propertiesdialog box will open.2. Select the Color Box titled Text Color and a Color Picker window will appear. Youcan now select from a variety of colors such as web safe, hexadecimal, and systemcolors.3. To return text to the default text color, click the Color Picker and then click thewhite square with the red strikethrough button.4. You can also change the text color by simply selecting the Color Box located adjacentto the Text Size drop down menu.FontsFonts styles such as bold, italics, strong, and emphasis can be formatted usingthe Property Inspector. You choose additional font styles by selecting Text thenStyle from the menu bar. The following are the four most used font styles; Bold & Italics - Bold and Italics are the most typical font styles used on Web Pages.These styles can be identified by their b /b and i /i tag pairs. Strong & Emphasis – Strong makes selected text and numbers appear bold.Emphasis makes the selected text and numbers appear bold. These styles can beidentified by their strong /strong and em /em tag pairs.Check SpellingThis key combination (Shift F7) will launch the spell checker to assess the spelling of thecurrent document. The Check Spelling command ignores HTML tag and attributes values.It can also be accessed through the menu bar, Text Check Spelling. Add to Personal - The Add to Personalbutton is located in the Check Spellingdialog box. Use this option to addunrecognized words such as first or lastnames of people to a personal spelling book.Ignore - This option button overlooks asingle instance of the unrecognized word.Ignore All - This option button overlooksall instances of the unrecognized word inthe current document.Change - This option button replaces thisinstance of the unrecognized word with textthat you type in the Change to box or with the selection in the Suggestions list.Change All - This option button replaces all instances of the unrecognized word inthe current document.-9-
Adding Special CharactersThere are times when your text may contain special characters and diacritical marks.Dreamweaver MX provides most of these special characters such as the copyright symbol( ), trademark ( ), registered ( ), or an Em dash (—). The follow are simple steps toadd these special characters to your text:1. Position your cursor where you want these special characters on your DocumentWindow.2. Then click on Insert, HTML, and Special Characters in the menu bar. You will bepresented with a list of special characters and diacritical marks to insert in your text.Inserting Date/Time StampsMost Web pages include date/time stamps in their Web pages. Dreamweaver can you helpyou include both of these objects. Here are a few steps on how to insert these onto yourWeb pages:1. Place your cursor into the area where you would like to have your date stamp shown.Usually this is located at the bottom of your Web site.2. Type “Updated on:” or “Created on:”3. In the Common Group of the Insert Panel, click the Insert Date button.4. An Insert Date dialog box will appear. In this dialog box, choose the formatDreamweaver will use to display the date and time. Check the option for "Updateautomatically on save". This means that each time you edit this file and save,Dreamweaver will automatically update this date and time.5. Click OK.Creating Lists in Dreamweaver MX 2004Creating an ordered list provides structure and organization to your Web site. It is difficultfor large blocks of text to be read on screen. Lists break your information into manageablehighlights. Lists items are formatted in li /li tag pairs for each item. Dreamweaverhas two forms of lists: Unordered and Ordered Lists.Unordered ListsAn Unordered List is used when the sequence of the items isn'timportant. Bulleted lists can be created from text you've alreadyentered, or the list can be created as you type the text. If you look atthe Code view, the unordered list is contained within a ul . /ul tag pair. Here's how to make an unordered list:- 10 -
1. To configure the list and then type the list items, position the cursor where you wantto start the list. If you're converting existing text into a list, select the text.2. In the Property inspector, click the Unordered List button. You can also selectText, List, Unordered List.3. Type in the text of your list.4. To end the list after you enter all the items, press (Return) [Enter] twice or clickthe Unordered List button in the Property inspector.Ordered ListsOrdered Lists are used when items should be followed sequentially.Create these lists in the same manner as unordered lists, but simplyclick the Ordered List button instead. Examining the code, you'll seethat ordered lists are defined by the ol . /ol tag pair. Here ishow to set up an ordered list:1. To configure the list and then type the list items, position the cursor where you wantto start the list. If you're converting existing text into a list, select the text.2. In the Property inspector, click the Unordered List button. You can also selectText, List, Unordered List.3. Type in the text of your list.4. To end the list after you enter all the items, press (Return) [Enter] twice or clickthe Unordered List button in the Property inspector.Adding Indentations (to lists)This allows you to organize your information very similarly to a standardoutline. Dreamweaver allows you to add two more indentations. Theseindentations are: Indent and Outdent. An indent adds a blockqoute /blockqoute tag pair onto your selected text. Anoutdent removes this indent tag from the selected text. Here are stepsto add indentations to your lists:1. Select either your ordered or unordered list.2. In the Property inspector, click either the indent or outdent button. You can alsoselect Text, Indent or Outdent. This will add indentations to your lists.Create/Save a New FileThe following are simple steps in creating a new document file in Dreamweaver:1. Select File New. This will open the New Document dialog box, which lets youchoose a template for your new document.2. Make sure the Basic page category is selected and then choose HTML under theBasic page section. This tells Dreamweaver MX 2004 that you want to create anHTML page. Click Create.3. Click the Code button in the Document toolbar to change the view of the page toCode view. (If your Document toolbar isn't visible, select View Toolbars Document to make it visible.)4. Click the Design button in the Document toolbar to return to the default Designview of your page.5. In the Document toolbar's Title text field, type [name of your website]. PressEnter (Windows) or Return (Mac). This will define the page title for this page. Thepage title appears at the top of the browser when the page is being viewed and isthe name used by browsers and Web pages when this page is bookmarked.Note: Before you continue, it is very important that you save your file first! You don’twant to unexpectedly lose your work. Save the file as index.html.- 11 -
Creating Hyperlinks using Images and TextThe capability to link to pages and sites is what makes the Web dynamic. You can createtext or image hyperlinks using the Property Inspector to associate the text with a specificfile or web page. The following are steps on how to create hyperlinks using text or images.Creating an Image Link1. Select an image that you want to become a hyperlink.2. Click the Browse for File icon, next to the Link option, in the PropertiesInspector. Select an HTML page from your web site. Click OK. This image is nowlinked to an HTML page within your Web Site.3. You have just created your first Relative Link. Why is it relative? It is relativesimply because it linked to a document within this site, not to an external Web site.Note: If your Properties Inspector panel is smaller than what is shown here, click thearrow in the lower-right corner to expand it.Creating a Text LinkThe process is almost identical, except you will be selecting text instead of images.1. Select the text that you want to become a hyperlink.2. Click the Browse for File icon in the Properties inspector. Select an HTML pagefrom your web site. Click OK. This text is now linked to an HTML page within yourWeb Site.Note: As you create the text links, you will notice the color of the text change. Thishappens because you set the Links color option in the Page Properties to red, andDreamweaver MX 2004 is previewing that setting for you.3. You can also create an Absolute Link to an external website by simply typing theURL, such as http://www.stedwards.edu into the Link option in the Propertiesinspector and press Enter (Windows) or Return (Mac).4. Congratulations, you just created your first Absolute Link. It's an absolute linkbecause it begins with an http header and includes the full address.5. If you want to preview all of your links, press F12 to launch a browser and try themout.Creating an Email LinkAside from creating links to pages, you can create email links that send you correspondencedirectly to any email account. Creating an email link is easy; first type the text that youwant to appear as a hyperlink. When users click on this text, the user’s default emailapplication (Eudora, Outlook, etc) will automatically launch a new email message with youremail already addressed in the To: field. The following steps are ways to create an emaillink:1. Drag-select the text Email. This will highlight the text.2. Click Insert on the Menu bar and select the Email Link command. This will removethe text.3. Drag-select the text in the email field and press the Delete key.4. Type your email address (i.e. smithj@wpunj.edu) in the email field.5. Click OK.Note: You can also type “mailto: smithj@wpunj.edu” in the Link field of the Propertyinspector.- 12 -
Dreamweaver MX is a professional web editing application for building and managing websites. Dreamweaver MX makes developing professional and personal web pages that are compatible with a variety of platforms such as Macintosh and PC's, as well as web browsers such as Internet Explorer, Netscape, Firefox, and Safari. Dreamweaver MX is often refe.