Transcription
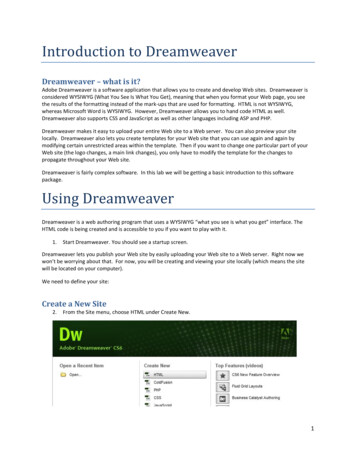
Introduction to DreamweaverDreamweaver – what is it?Adobe Dreamweaver is a software application that allows you to create and develop Web sites. Dreamweaver isconsidered WYSIWYG (What You See Is What You Get), meaning that when you format your Web page, you seethe results of the formatting instead of the mark-ups that are used for formatting. HTML is not WYSIWYG,whereas Microsoft Word is WYSIWYG. However, Dreamweaver allows you to hand code HTML as well.Dreamweaver also supports CSS and JavaScript as well as other languages including ASP and PHP.Dreamweaver makes it easy to upload your entire Web site to a Web server. You can also preview your sitelocally. Dreamweaver also lets you create templates for your Web site that you can use again and again bymodifying certain unrestricted areas within the template. Then if you want to change one particular part of yourWeb site (the logo changes, a main link changes), you only have to modify the template for the changes topropagate throughout your Web site.Dreamweaver is fairly complex software. In this lab we will be getting a basic introduction to this softwarepackage.Using DreamweaverDreamweaver is a web authoring program that uses a WYSIWYG “what you see is what you get” interface. TheHTML code is being created and is accessible to you if you want to play with it.1.Start Dreamweaver. You should see a startup screen.Dreamweaver lets you publish your Web site by easily uploading your Web site to a Web server. Right now wewon’t be worrying about that. For now, you will be creating and viewing your site locally (which means the sitewill be located on your computer).We need to define your site:Create a New Site2.From the Site menu, choose HTML under Create New.1
Making your first Web Page:3.You should now see a blank Web page in the Document Window.4.Under the File Menu (top left of Dreamweaver work area), choose Save.5.In the Save As box, find your Web site folder and save your file as index.html6.Click Save. Congratulations! You’ve created your first Web page using Dreamweaver. Unfortunately, it’spretty boring at the moment.RULES OF THUMB for naming web files: Do not use spaces or special characters, such as those found above the number keys on the keyboard, inyour file names. You can use dashes and underscores. (e.g., my page.html) Always use a 3- or 4-character file extension for every file you use on the Web. In the case of a regularWeb page, always use .htm or .html. Be very specific about capitalizing because most Web servers are case-sensitive.Give your Web Page a TitleIn the document toolbar, find the Title box.7.On the document toolbar (across top of Dreamweaver work area), locate the Title field.8.Type in a title for your page. Feel free to be creative (but not indecent). Hit Enter.9.The title doesn’t show up on the page, but will appear in tabs and across the top of browsers.Adding Some Content Add Content to the Page10. If you’ve got Split selected (right above the work area but below the top menus), you should have a splitscreen – the left half will be your html code and the right half will be a blank document window. You canalways elect to click on the code button to just view code, or the design button to just see what yourdesign will look like. For now, work on the right side in the document window. In this right documentwindow, type in a good head title. This one will be the head title at the top of your Web page. If you can’tthink of anything, you can always use, “Aardvark Adoption Society of Delaware”.11. Add a subtitle below it. Again, it can be anything you want. If you’d prefer, it could be, “We speak forAardvarks who can’t speak for themselves.”12. If you still have split screen, notice how Dreamweaver automatically puts html tags around the text we’vetyped in. It’s not what we want – we’ll change that shortly.13. Now that you’ve got a good title, add some content. Logically, it should go with the title. Type one or twolines now for now. We’ll add more later. If you like, I’ve included some content on my web site aboutAardvark adoption that you can use. If you copy and paste the content, again, notice that Dreamweaverautomatically puts html tags around the text we’ve copied and pasted. We will be changing most of thosetags below.2
Now let’s format the content:14. In the document window, highlight the header title.15. In the Property Inspector (usually at the bottom), click on the Format drop down arrow, and chooseHeading 1.Note: If you do not see the Property Inspector, in the menu across the top choose Window Properties.16. In the document window, highlight “We speak for aardvarks ”.17. From the Format menu on the Property Inspector, choose Heading 2.Note: When formatting your text, keep in mind that text sizes in HTML are relative sizes. This means that, whenyour page is viewed in a browser, the text size will depend on the default text size settings on each user’s computer.Relative sizes give users the ability to adjust the text size to suit their individual needs. This option is especiallyimportant for people with visual impairments, but it means that the appearance of your pages may vary fromcomputer to computer.Playing with Font Properties18. Highlight the Subtitle (We speak for Aardvarks ).19. Make sure the CSS is selected in the properties pane Change the font size to 24.20. You’ll get a window telling you to create a New CSS Rule. Under Selector Type choose Tag (redefines anHTML element)3
21. Hit OK(If you still have your code window pane open on the left, you can see the style added in the head sectionof your html code).22. With “We speak for Aardvarks ” still highlighted, click the Bold icon (Inspector. The selected word appears bold.) in the Property23. Click the gray square to the right of the Size popup menu in the Property Inspector. A grid of coloredsquares appears, and the cursor changes to an eye dropper.24. Click the eyedropper on the desired color. The field to the right of the color swatch reflects the code Webbrowsers need to correctly display the color you’ve chosen.(Note – if the CSS pop-up box appears again, just select Tag again)25. Click anywhere on the page to deselect the text. The previously selected text appears in the new color.4
Alignment26. With “We Speak for Aardvarks ” selected on the page, click on Align Center button on the PropertyInspector. The subtitle (h2) should now be centered on your page.27. Select the head title (“Aardvark Adoption Society of Delaware) and choose Align Center. You’ll get theNew CSS Rule pop-up window. Make sure Tag is selected (the tag should be h1) and click OK. You shouldnow have 2 rules in the head section of your html code. Feel free to play with color and size of h1 as well.Creating Lists28. First we need to add a list.29. Type in a title for your list and then type in a list of items. Make sure there are at least 3 items in your list.Make sure you hit return after each item. (Feel free to use a list from the aardvark content if you can’tthink of your own. I used the list titled “Specifically, we need ”30. Highlight the list title and choose Heading 3 from the Format menu on the Property Inspector (Make sureHTML is selected, not CSS).31. Highlight the list items and click the Unordered List button on the Property Inspector.32. The items appear as a bulleted list.33. Now type in another List title and another list of items, or use the one within the content on the webpage. (I used the one titled, “Please note the following rules”).34. Highlight the title and select Heading 3 (Note: if using copied code, you may need to put the title on aseparate line by hitting the enter button)35. Highlight the rest of the items and click the Ordered List button on the Property inspector (next to theordered list button). The items should now appear in a numbered list.36. Save your work. Get into the habit of saving your work regularly.Page PropertiesIn this section you will learn how to set your page’s background color, as well as the default text and link colors.These settings differ from what you’ve done so far on the Property Inspector because they’ll apply to all the textand links on the page—not just a selected piece of text.37. From the Modify menu at the top of the workspace, choose Page Properties.5
38. Change the text color by clicking the bottom right corner of the text color box.39. Using the eyedropper, choose a color by clicking on any of the color swatches.40. Similarly, Change the background color for the page using the Background color setting.You can also change the color of links, active links, and visited links. An active link is a link just when the userclicks it. A color change lets the user know that s/he clicked on a link. A visited link is one that the user hasalready clicked on and visited. A color change lets the user know s/he’s already visited that link.41. Select “Links (CSS)” from the Category menu at left, then make your selections for link, visited link, andactive link colors as you did above.Note that if you click on Headings from the Category menu on the left, you will see the basic modificationsyou’ve made to h1 and h2.42. Click the Apply button to see how your color choices look on the index page. The Page Properties dialogbox will remain on the screen.43. When you’re satisfied with the colors you’ve picked, click OK.Note: You can add a background image if you want. With Appearance (CSS) selected, locate Background image: Tothe right, Browse to find an image by the background image. See what it looks like. Now you know that’s anoption. We’ll talk about this option more later. For now, go back to a solid color background.Note: If you changed the color for any text using the Property Inspector, those changes will override general pagecolor choices.Web Page PreviewAs you create a page in Dreamweaver, the page may not look exactly like it would in a browser. To preview thepage in a browser:44. Choose File Preview in Browser Firefox or press the F12 key (F12 brings up the page in your defaultbrowser). A web browser, such as Firefox, opens and loads the web page.45. Take a look at your page to see how it will appear on the Web.6
46. When finished, close the browser and switch back to Dreamweaver.NOTE: Colored or underlined text can be mistaken for links.Adding ImagesNote: Any editing or resizing of an image should be completed before it is added to a web page. Browsers aren’tdesigned to resize images, and they do a poor job of it.47. First you need an image. Feel free to find one on your own that suits the theme of your web page, or usethe Aardvark images I’ve included on my web page.48. Save the files to the same place where you are saving the index.html page you are creating inDreamweaver.49. Next, add it to your Web page.50. Place your cursor below the h2 (“We speak for Aardvarks ”) in your document and press Enter twice.51. From the menu panel across the top, choose Insert Image. The Select Image Source dialog box willappear.52. Using the dialog box, locate and select an image, then click OK.53. You will first encounter a prompt to add accessibility attributes:54. Type a brief description of the image in the Alternate text box, then click OK.55. If you’re trying to use a file that lies outside your root folder (mywebsite), you may receive the followingmessage:a.Click Yes. The Copy File As dialog box will appear.b.Click the Save button to place a copy of the image file inside your my website folder.7
56. The image will appear on your web page.57. Make sure your files panel is visible. The files panel is located in the lower right corner. If you don’t see it,click on the files tab at the very bottom of the right sidebar. It holds a menu of the files you are currentlyworking on and all files in that directory.Delete an Image58. In the Document window, click on the image to select the image.59. Press the Delete key. The image disappears.60. To reverse the deletion, use the Undo command. From the Edit menu in the top menu panel, chooseUndo. The image should re-appear on the page.Create a Second PageNext, you will create a second page for your Web site.61. From the File menu, choose New The New page dialog box appears.62. Make sure Blank Page - HTML - none is selected.63. Under DocType, select HTML 564. Click the Create button. The new file will appear in the document window.65. Save your new page in the mywebsite folder as Page2.html66. In the Title field, type an appropriate title for this page. We’ll eventually make it into a Calendar of EventsPage, if that helps you decide on a title.67. Save your work.Page NavigationNow that we have two pages, you can link them together. We’ll link the index.html page to the Page2.html andvice versa. It’s easy in Dreamweaver!68. Use the tabs on the Document toolbar to toggle back to the index page.69. On the index page, type some descriptive text that describes your Page2.html.70. Highlight the text you want to make a link.8
71. In the Property Inspector, click on the Browse for File icon to the right of the link box. A Select File dialogbox appears.72. Using the dialog box, locate and select the file Page2.html.73. Click the OK button. Cool! You just made a link!74. The selected linked text is underlined and appears in the link color you chose. In the Property Inspector,the Link field reads: “Page2.html75. Save your work and preview the page in a browser.76. Test the link. When finished, return to Dreamweaver.77. Now, try linking Page2.html back to the index page.78. Save your work and test the new link in a browser.Next let’s add an absolute (external) link. By that I mean let’s link to a Web page that is located somewhereon the World Wide Web. We’ll need to use the full (absolute) URL to link to this page.79. Go to the bottom of your index.html page and type “Links”. (or use the copied text)80. Highlight the text you just typed.81. In the Link box in the Property Inspector, type http://en.wikipedia.org/wiki/Aardvark/ and press Enter.82. The text you selected should now link to Wikipedia’s web page on Aardvarks. To make sure the link worksproperly, preview the page in a browser.83. Switch back to Dreamweaver to continue editing your page.9
Add an E-mail LinkNow you’ll make your e-mail address a link so that visitors can send you questions and comments via email.84. At the bottom of your page, type “Send us an email” and highlight the word email.85. From the Insert menu across the top, choose Email Link. A pop-up box should appear.86. Place your cursor in the E-mail box and type your email address:87. Hit OK. Your e-mail address appears as a link.88. Save your work. Please note that the email link will try to open a desktop email program if you have oneon your computer. However, if the computer you’re working on doesn’t have an email program set up,testing this link won’t work.Creating a Link within a PageCreate the Target of the link89. Place your cursor at the top of your index.html page90. Choose Insert Named Anchor. The Named Anchor dialog box will appear.91. In the Anchor Name box, type a name for the anchor. This should describe the content in that section ofthe page.92. Click OK. A yellow anchor will appear just before the text.(If the yellow anchor symbol does not appear, then choose View Visual Aids Invisible Elements.)Create a link to the anchor93. At the bottom of the page, type “Back to Top”. Highlight this text.94. On the Property Inspector, click on the point-to-fileicon to the right of the Link field. When clicking,hold down the mouse and drag it to the schedule anchor symbol. (Just click on it and, without releasingthe mouse, drag it over the anchor symbol in your Web page. It may give you a bunch of black boxes.Ignore them).10
As the arrowhead moves over the anchor, the anchor name preceded by the pound sign (#) will appear in the linkfield. The selected text is now a link, and is underlined with a different text color.The form that this type of link uses is different from a standard link. In the link field, a pound sign appears followedby the name of the anchor. The # (pound sign) indicates that the link is to an anchor on the Web page.CSS to Paragraphs:Let’s make this look a bit better:1.Make sure CSS is selected in the bottom properties window.2.In Targeted rule, select New CSS Rule3.4.Click Edit RuleIn the pop-up window, under Selector Type, choose Tag, and under Selector name choose Bod (we’remodifying the style for the entire page.)Select OK. The CSS Rule Definition pop-up box should pop up.Under font-size, use the drop-down menu to choose medium.Under line-height, choose 120, and then %Choose OK5.6.7.8.Try playing around with the CSS style for other content on the web page. Note that if you apply a style to one lineand it affects all the lines above or below, you should first undo the change you made (under edit). Then go to theline you want to modify, and place your cursor before it. Hit Enter. Then place your cursor after it and hit enteragain. This forces Dreamweaver to make that line a separate paragraph item. You can now highlight it and changeits tag and style.11
Page Layout with TablesWe can use Tables to lay out the format of text and images. A table may be used for layout in a number of ways,including placing text or images side by side on a page. In this section, you’ll make a table that shows the Calendardates and events for an Aardvark Sanctuary. a Table95. Click on the Page2.html tab at the top of the Dreamweaver work space.96. Place your cursor at the top of Page2.html after the text. Now, you’ll insert a table with 3 rows and 2columns.97. From the Insert menu, choose Table. The Table dialog box appears.98. Under Table size, adjust the settings as follows:Rows 3Columns 2Table width 75 %Border thickness 199. Click OK. The table will appear on your page.100. Place your cursor in the upper-left cell of the table and type: “Schedule of Events”101.On the second row, in the left-hand cell type: Date102. Press the [Tab] key to move to the next cell in the table.103. Type: Event104. Press the [Tab] key again to move to the next row.105. Type in a date. Move to the next cell, and type in a description of an event. As you type in a longparagraph, the words wrap within a cell.12
106. Press the TAB key, and a new row is automatically added to the table. Enter the date and eventdescription in the fourth row.Merge CellsWe want the Schedule of Events to be centered across the entire table. To do that, we first need to merge the twotop cells in the table.107. Click and drag your cursor from left to right across row 1. You’ll now merge those two cells into one.108. Choose Modify Table Merge Cells. Now, in row 1, you should see one large cell.Insert an Image109. Place your cursor in the right-hand cell of the last row. Press the [Tab] key to add a new row.110. Place your cursor in the right-hand cell of that new row. Choose Insert Image. The Select Image Sourcedialog box appears.111. Navigate to an image – either one you’ve downloaded or one from my Web site that you can download.112. Click OK. The image you chose will appear in the table cell.Add a new row to the table.After you have created a table, you may need to add information in the middle of the table. You can add rows orcolumns to expand the table.113. Click in the third row of your table.114. Choose Modify Table Insert Row.A new row appears in the table.115. Click in the second column of the new row and insert another image (your choice). The image appears inthe cell.116. Click in the cell to the left of the image and type some relevant information in the cell.Delete a rowThe table can also be adjusted by removing unnecessary rows or columns.117. Click in the second row of your table.118. From the Modify menu, choose Table, and then choose Delete Row. The row and its contents are delete.Resize columns and rowsDepending on the content you add to your table you might find that columns are too wide or narrow. You canadjust the column width to better fit the content in your table.119. Place the cursor over the line dividing the columns. The cursor turns into a two-headed arrow.120. Click and drag the two-headed arrow toward the right to the middle of the table. The columns are resized. (Note – if your images are too big, you may be unable to reposition the column widths.121. Place the cursor over the right side of the table. Click and drag the two-headed arrow to re-size the tableagain.13
122. Save and preview the page.Try changing the size of the browser window. Notice that the table size changes as the browser window sizechanges – why? The reason the table size is not constant is because the width of the table is expressed as apercentage of the total width of the browser window, in this case, 75%. If you wish to lock the table to a specificsize, you have to express the table dimensions differently.Table dimensions can also be expressed as fixed using “pixels”. Screens are divided into thousands (or millions) ofpixels, arranged in rows and columns. On a Web page, a recommended pixel size for a table’s width would be nohigher than 800. (Assuming a screen width of 1024 to be safe).When your table is selected, you can view and change the table width on the Property Inspector (as shown below).Experiment with cell color and other options123. To add background shading to a cell or row, select the cell(s) and click on the bottom corner of the Bgcolor box on the Property Inspector124. Click on a swatch with the eyedropper to choose a color.125. Try various formatting options for the rest of the table using the Property Inspector. Change the width,color or cellPadding and CellSpacing and Border, and try the Align options.126. Save your work and preview.Congratulations. You have completed your introduction to Dreamweaver CS5. Of course, as usual,we’ve barely touched the potential of Dreamweaver.To turn in: Upload a folder containing:o The two html pages you created.o The images you included in your Web Site.14
Using Dreamweaver Dreamweaver is a web authoring program that uses a WYSIWYG "what you see is what you get" interface. The HTML code is being created and is accessible to you if you want to play with it. 1. Start Dreamweaver. You should see a startup screen. Dreamweaver lets you publish your Web site by easily uploading your Web site to a .