Transcription
rrrr-electronic6250.‘PFAFF20eiectroInstruction book
IIFor easier understanding of this instruction bookplease fold this page open when reading it.-ILLI:Safety rulesFor the United Kingdom onlyThe leads must definitely not be connected to the safety-lead terminal I nor to aplug with three pins.IThe wires in the mains lead are coloured according to the following code:Blue:NeutralBrown: LiveIAs the colours of the wires in the mains lead of this appliance may not correspondwith the colour coding of the terminals in your plug, proceed as follows:IThe wire which is coloured blue must be connected to the terminal which ismarked with the lettter N or coloured blackiIThe wire which is coloured brown must be connected to the terminal which ismarked with the letter L or coloured red.Cut-oft mains plugs are definitely not to be used, but disposed of immediately.Defective mains leads must be replaced complete.Only 3 A spare fuses must be used as approved by ASTA according to BS 1362and the fuse cover must be marked 3 A or with the corresponding colour code.The plug must never be used without fuse cover. Spare fuse covers are availablefroiii electrical suppliers or the PFAFF agencies.Please also observe the general safety notes on page 2.Contents on pages 4 and 5---IIIIiIIIIII
Important safety instructionsFor the United States onlyLiLiuse an electricactured for HOUSEHOLD use only When youThis sewing machine is designed and manufsfollowastodadherebeappliance, basic safety precautions should alwayse.machinsewingthisusingbeforeRead all instructionsDANGERTo reduce the risk of electric shock:ce fromded when plugged. Always unplug this applianThe sewing machine should never be left unattenbefore cleaning.the electnc outlet irrirriediately after usiiig ande bulb with same type rated 1 5 Watts.2. Always unplug before relamping. Replacfallen into water Unplug immediately.3. Do not reach for a sewing machine that hasDo not place init can fall or be pulled into a tub or sink.4. Do not place or stoie a sewing machine whereor drop into water or other liquid.L1ILILLIUk1ULLIto personsTo reduce the risk of burns, tire, electric shock, or injuryornecessary when this sewing machine is used byDo not allow to be used as a toy. Close attention isnear children.described ii tIns manual. Use oilli attachmentsUse this sewing machine only for its intended use asmanual.thisinedcontainasrecommended by the manufactureror plug, it it is not working pioperly, if it hascordeddamagaNever operate this sewing machine if it hasthe appliance to the nearest authorized dealerbeen dropped or damaged, or dropped into water, Returnadjustment.irncalmnechoralor service center for examinatron. repair. electricKeep ventilatmon openings of thed.blockegsNever operate the sewing machine with any air openinlint,dust and loose clothofulationaccumthefromfreelcontrosewing machine and footNever drop or mnsett any object into any opening.AIARNING12.3.456 Do not use out of doors.used or where oxygen is being administered.7. Do not operate where aerosol (spray products are beingn, then remove plug horn outlet8 To disconnect turn all controls to off (“0”) positioor couch where the air openings may be blocked.9 Never operate on a soft suttace such as a bedthe pIng, not the cord.l 0. Dv riot unplug by pulling on cord. To unplug, graspis required around the sewing machine needlecarel11. Keep lingers away from all rnovmnq patts Speciacan cause the needle to break.1 2. Always use the proper needle plate. The wrong plateended by the nianufacturer only.1 3. Do not use bent or blunt needles Use needles recommthe needle, causing it to break1 4 Do not pull or push fabric while stitching. It niay deflectany adjustments in the needle area, such as threading15. Switch the sewing machine of[(”O’ when makingng presser foot, etc.needle, changing needle, threading bobbin, or changiwhen removing covers, lubricating, or when1 6 Always unplug sewing machine from the electric outletin the instruction manual.nedmentiomaking any othei user servicing adjustmentsto whip when rewinding.plugallow1 7. Hold plug when rewinding into cord reel. Do notPlease also observe the general safety notes on page 2.SAVE THESE INSTRUcTIONS
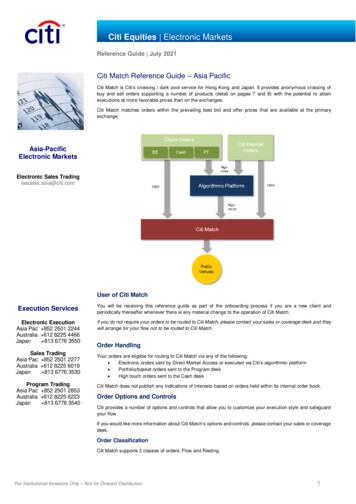
1 2345227‘i—1012PFAFF,ertronic 625014—1524I98J !i23p;166F16262527372629V4I 301WPFAFF38-electro cc 6250
Parts of the sewing machine(1) Key for “slow sewing”(2) Key for “needle up/down position”(3) Key for “tacking/buttonhole/single pattern”(4) Key for “reverse sewing”(5) Twin needle indicator(6) Stitch width slide key/needle positions(7) Stitch length slide key/buttonhole length(8) Balance slide key/pattern length(9) Carrying handle(10) Hand wheel(11) Handwheel release disk(12) Program keys 0 to 7/0 to 9(13) Liquid crystal display(14) Clear key “beginning of pattern”(15) Main switch(16) Accessory box(17) Sewing foot holder with sewing foot(18) Needle threader(19) Thread guide(20) Threading slot(21) Needle thread tension(22) Takeup lever(23) Presser bar lifter(24) Needle holder with fixing screw(25) Thread guide for bobbin winding(26) Program table(27) Reel holder with unwinding disk(28) Second spare reel holder(29) Bobbin winder(30) Connection socket “mains cord”(31) Connection socket “foot control”(32) Base plate(33) Hook cover(34) Free arm(35) Sewing lamp(36) Thread trimmer(37) Top cover(38) Dual feed (top feed)(39) Needle plate
/I.Notes on safetyNotes on safety for domestic sewingmachines according to DIN 57 700,Section 28 or IEC 335, Section 281. The user must exercise adequate cautionwith regard to the up- and down movingneedle and constantly observe the sewingarea during work2. When leaving the machine, duringmaintenance work or when changingmechanical parts or accessories, alwaysdisconnect the machine from the mainsby pulling out the mains plug.3. The maximum permissible wattage for thesewing lamp is 1 5 Watts.4. The tension of the drive belt must only beadjusted by a Ptaff mechanic.5 The machine must be put into operationaccording to the indications on thespecification plate.6. Do not place any objects in openings onthe machine7. Do not use the sewing machit te if:there is visible damage,its function is disturbed,it is wet, e.g. with condensation.8 Do not pull the mains plug out of thesocket by its cord.9. If this appliance is used for anotherpurpose than that intended or if it iswrongly operated, we will not accept anyliability for any damage caused.1 0. To avoid the risk of electric shock, do notopen the machine. There are rio partsinside the machine which the user canrepair, This is solely the responsibility ofour qulified service staff.11. Be sure to use only original PFAFF parts.———EnvironmentThe recommended environn ient is.Ambient temperature 1 0 C to 40 CHumidity 20% to 80%This sewing machine is a high-qualityelectronicmechanical appliance; it is a machinefor supervised use in the home. It should beoperated in such a way that it is not subjectedto: dust, severe dampness, direct sunlight,static electricity, heat-producing objects,corrosive chemicals or liquids.rhe machine must be used on a free surface,for ventilation purposes, which is both firm andeven.TreatmentAlways protect the machine against damage byhitting or dropping.CleaningH onsi ii g:To clean the housing, use a dry, clean and softcloth which is free of fluff To remove anystubborn dirt, use a soft cloth with alcohol orparaffin.Please Note!Do not use any insecticides or chemicalproducts such as petrol (gas) or thin cheniicalsfor cleaning the housing.
Modern,uncomplicatedSewing by touch-keycontrol——Congratulations! You have bought ahigh-quality product that offers uniqueadvantages. Your new sewing machinecan take any material in its stride andwill sew through thick and thin for you.It features the ver’ latest in desgin andtechnology, and this instruction book isjust as uncomplicated as your PFAFFsewing machine.If you now take time enough to studythe instruction book, nothing can gowrong.After all, this is the only way to learn allthe things the machine can do, and tomake full use of them.If you have any further questions, that isno problem! Your PFAFF dealer will beat your service with any help or adviceyou need.So now you can get started! We wishyou many enjoyable hours of creatingyour fashion ideas.
ContentsAccessory compartmentAdjusting ,lide keysApplique footAutomatic dirningBalanceBalance slide keyBasting stitchBias tape binderBlind stitchBobbin caseBobbin threadBobbin thread tensionBobbin windingBordersSuspenders Ibraces)Buttonhole balanceButtonhole/tacking/single patternButtonholesChanging a sewing footChanging the needleChanging the needle plateCleaning and oilingClear keyClosed overlock stitchClosed overlock stitch with edge threadCordingfootCovering stitchesCross stitchDarningDarning tearsDarning with elastic stitchDarning with straight stitchDecorative stitchesDetachable work supportDual fabric feedElastic stitchElastic stitchesElectrical connectionElectronicsEmbroidery techniquesEyelet embroideryEyeletsFagoting stitchFancy eldstic stitchFancy stitch tableFaultsFoot controlFree armFringe footFunction keysGathering footGathering with elastic threadsGathering with straight stitchGeneral notes on sewingHand wheel relcise disk.Heni with the twin needle.HemstitchingHoneycomb stitchInserting patchesInserting the bobbinInserting zippersKnit-edge footLace workLap-fellerLarge-area embroideryLeather eribroidery.,.,.95 10735—3710148 8261 653745104472024211 7—196670613959—62252811211 2345455102 10556—5857 6881 838382, 838163—111626, 2/5351 —581 4, 1 534 -4089—93915056578114,11515161 0538, 39103797876, 711 77792, 9353832184, 851 03861 016869.
aIaaaaaaIIIIaIUaILeft needle positionLight—kiit nending stitchLinen butiunhole with ginip threadLinen buttonhole, progran i mableLinen embroideryLowering the feed dogMaintenance and sewing faultsMonogramsNeedle chartNeedie pcsitionsNeedle thredd tensionNeedle threaderNeedle up/down positionNon elastic stitchesOilingOpen Ovui luck stitchOverlock stitchesPattern IuigthPattern sldfl fclcar key)Pattern widthPlain stcni stitchPractical sewingPresser bar lifterProgiam keysPullover stitchQuiltingReverse sewingRichelieuRight needle positionRoll hemmingSaddle stitchSafety notesSemi automatic (buttonhole)Semiautomatic sewing of second tackSerging with the ovuriock footSerging with zigzag stitchSewing and emhroidenngSewing chartSewing taults and their remediesSewing feet (special accessorieslSewing feet (stdnddrd occessones)Sewing LimpSewing on buttonsShell edgingSingle patternSlow sewingSmockingSpecial accessory tableStitch densityStitch length slide keyStitch width slide keyStraight stitchStretch buttonholeStretch triple straight stitchStretch triple zigzag stitchTackingTechnical sectionThread reelFhread tensionThread trimmerThreadingThreading the needle threarhThreading the sewing machineTop feedTopstitchingTrouble shootingTwin needleTwin needle indicatorUtility anrl fancy stitchesUtility stitch tableWinding from a second reel holderZigzag stitch .35 .8648.‘.aaaa1125454.5537 643435 65.606046 54,467144114,1110098, 99113.883938801003636645 6545.523911 2918.IaaaaIaI.42.lb.Il41I94t,
Utility stitch table1213i1411III//IIIIIIIIHIIIi/‘ IProgramNo.15Bll l l ii :DescriptionApplication00Straight stitchMiddle needle positionFor all straight-stitch and lockstitch sewing job,6 mm stitch length.01Straight stitchLeft needle positionFor all sewing and top-stitching workrequiring left needle position.02Straight stitch with1 3 needle positionsFor sewing jobs requiring other needlepositions, e. g. zipper insertion,and especially top-stitching.03Grass stitchBoth top-stitching and fancy stitching.04Plain stem stitchDurable elastic seam, e. g. for sewingleggins, and for embroidery work.05Triple stem stitchOrnamental utility stitch.06Stretch triple straight stitch,stitch length 1 .5 to 4.5 mmFor highly durable seams, a g. forinseams, sportswear and workwear,and for fancy stitching.Widthup tomm————3——07Stretch triple straight stitch,stitch length 3 to 6 mm08Basting stitchFor basting your sewing cuttings.—09Darning programFor reinforcing damaged places or darningsmall holes.610Zigzag stitchFor sewing and appliqué work61 1Zigzag stitch,needle position changeablefrom right to leftFor eyelet embroidery and cording.6—-——--—---12Zigzag stitch,needle position changeablefrom left to toight13Elastic stitchFor sewing on elastic, darning tearsand inserting patches.614Blind stitchFor securing seams invisibly.615Elastic blind stitchFor sewing seams invisibly and sergingan edge at the same time.Also for stretch materials.(3
Utility stitch table:1617181920 217071ApplicationDescription16Shell-eding stitch17Blind stitchNeedle position changeable to the right.18Fancy elastic stitchFor over stitching two butt joined pliesof fabric,19Stretch triple zigzag stitchFor sewing elastic tape onto elasticmaterials.20Open overlock stitchFor closing and simultaneously sergingmaterials.21losed overlock stitchwith edge threadFor decorative hems on light fabrics,e.j g. for underwear.L.For simultaneously closing and sergingone or several labric plies. An overlock seamLthat comes next to an industrial seam.22Light-knit patchwork stitchFor sewing light-knit fabricsAlso as a fancy-stitch seam on knitted fabrics.23Pullovei stitchElastic closing and serging seamfor open knit materials.24Honeycomb stitchFor sewing on elastic threads, coveringterry-cloth seams and for fancy hemsft252670717374-----Closed overlock stitchFor closing and serging seams formaterials that fray easily.Fagoting stitchFor joining corsetry pans and foroverstitching that fray easily1 Cross stitch27727273VProgramNo.—22 23 24 25 26 27Flat joining seam for elastic butt joinedfabric plies.Also suitable as a fancy hemFully automatic linenThe buttonhole is stored in threebuttonholepro set lengths, e. g. for bed linen,underwear and blousesLinen buttonholeStitch length and width adjustable,thus very suitable for difficult matendlssuch as silk or viscous fabricsf Stretch buttonholeFor stretch materials,IFully automatic eyeletCan be re-called in different sizesButton sewing programFully automatic sewing of bullonsin various sizes.
0,aa,a,----a,P%Ja,)*))) IIjIIIF—iIIIIIilI—ihiIIIIitI—Ii hulkhI’’’I’’J0IIIlIiJil. . . . II‘qi qr—’ip qr. . ‘‘liii %J01101Ill(1IIi IIIHmpIll11111111111111111!1111111101‘I I I liii! I- 45g01zrriw1L1JFi
SSSSSSSSSSSSI. .5SSI.’I.’.’ iI. .5:a’S.I.’5:U.’SIISS
/.-
Operating the sewing machineTedmb& secdonPages 11 to29
IIIIIIIIIIIIIIIIIIIIIIIIIIIIII
Technical sectionElectrical connectionPages 14, 15Detachable work supportWinding the bobbinPage 16Bobbin casePages 17 18, 19Page 20Bobbin thread tensionPage 21Threading the needle threadNeedle threaderPage 22Page 23Drawing up the bobbin threadPresser foot lifterPage 24Thread trimmerPage 24Changing the sewing footDual feedPage 25Pages 26, 27Top feedPage 27Changing the needlePage 28Needle thread tensionPage 29Lowering the bottom feedPage 29Page 24
Cover-casePlace the enclosed mains cord, foot control andinstruction book in the compartment of the covercase.Top coverOpen the folding cover (37) upwards.IProgramsrhe programs of the sewing machine are illustratedn the inside of the top cover.Electrical connectionConnect the mains cord between socket (30) of thesewing machine and the wall socket
Connecting the foot controlConnect the plug of the foot control with the connection socket (31)of the sewing machine.The sewing speed is regulated by pressing the pedal.Main switchWhen the main switch (1 5) is switched on, thesewing lamp lights upThe sewing machine i now ready to use.
AAccessory compartmentOpen the accessory compartment (16).Detachable work supportSwing out the detachable work support (1 6) to theleft using both hands.Sorting the accessoriesThe enclosed accessones are marked with numbers.Sort them into the corresponding compartments ofthe accessory box.Removing the detachable work support(free-arm)In order to sew using the free-arm, swing the clutchable work support to the left and lift it upwards out ofthe hole.When you replace and swing it in again make u1:the detachable work support is flush with the treearm of the sewing machine
IIaaIaaaIIaaaaaaaaaaaaaPreparing the machine for bobbin windingHold the hand wheel (1 0) firmly and turn the releasedisk (11) fully in the direction of the arrow. Duringbobbin winding the needle will not move.I’Placing the bobbinSwitch off the main switchPlace the empty bobbin so that the black pin of thebobbin winder (29) snaps into the slot of the bobbin.Push the bobbin to the rightNote:The bobbin can only be wound if it is moved fully Ithe right
LeWinding the bobbin from the reel holderPlace the sewing thread on the reel holder (27). Toobtain free movement of the thread and hold thethread reel firmly, fit an unwinding disk of the rightsize for the thread reel.ThreadingPlace the thread into guide A from behind and pull itthrough opening B to the right Wind the threadclockwise a few times around the bobbin.Switch on the main switch (1 5)Hold the end of the thread firmly and press the footcontrol. As soon as the bobbin is full, the windingaction will stop automatically. Cut the thread, pushthe bobbin to the left and take it offIDo not forget:Turn the release disk (11) fully back again. Then turnthe hand wheel (1 0) towards you until it snaps in.0
,4iIi41frIISSIIISISISISSWinding from the second reel holderInsert the second reel holder (28) in the hole intended for it and place a reel of thread on it.ThreadingPlace the thread into guide C and pull it throughopening B to the right Wind the thread clockwise afew times around the bobbin.Switch on the main switch (1 5)Hold the end of the thread firmly and press the footcontrol, As soon as the bobbin is full, the windingaction will be stopped automatically. Cut the thread,push the bobbin to the left and take it offDo not forget:Turn the release disk (11) fully back again. Then turnthe hand wheel (1 0) towards you until it snaps in.TIP: If the machine is already threaded, you can windthread from the second thread reel without having tounthread the machine.riIIIII433
Hook coverSwitch off the main switch—loki the hook cover (33) at the side andopen it tohe front.Taking out the bobbin caseLift the latch of the bobbin case and pullthe bobbincase out Release the latch and take outthe emptybobbinread tensionobtain optimum seam appearance anddurability make sure the needle andbobbin thread tensions arerectly adjusted to each other. ic. tne threads are interlaced between tIre two fabric plrvs. For fancy seaiTrsI buttonholes the thread interlace shoulrlbe visible on the underside of the fabric.IIIIIIIIIIIII1
lnsertinj the bobbinIris(3rt tli( lull Inibtun iii ii l,ll,irdoing 50, pull tire tIm ilther iri(1(r tt’risrcnr iriii(j b11riopening (see arrow)Whenririi ,iulA,ii i”t’ iiiCheck:When you pull tho thread theclockwise.lrln niust turnChecking the bobbin thread tensionHold the bobbin case by the thread and move yourhand sharply upwards. The uobbn case must slipdownwards a little with eucti baud movement.itCorrecting the tension:Turn adjusting screw C just a little to the left todecrease the bobbin thread tension.Turn screw C just a little to the right to increase thutension.Inserting the bobbin caseLift cover F and push the bobbin cac fully oiili puof the sewing hook Opening E of the bobbin Cemust face upwards.Check:Pull the bobbin threud sharply, the bobbin cannot fall out of the hook.
Threading the needle th,e.idSwitch off the main switchRaise the presser loot lifter (23 \Nliv do LI yto touch the hand wheel. Take 1 stitoli u ma RI t,11up lever to highest position. Place the tI rood to ill itreel holder (27) and fit an unwinding disk of tin a jI itsize.Now, using both hands, pull the thread into guide Aand under thread guide hook D. Pass the threadthrough the threading slot (20) and downwards. Pollthe thread around stop E into the right hand threading slot and upwards to the take-up lever (22).The thread must be pulled into the take-up lever fromleft to right. Then pass the thread downwards againin the right-hand threading slot and behind threadguide F.Finally pass the thread from the side between one ofthe two thread guides (19).Jo thread the needle, please refer to the next page./IIIIII
Needle threaderIn order to make threading of the needle easier andquicker the PFAFF needle threader is provided.Lower the sewing foot (see next page). Take onestitch to bring needle to its highest position. Turn thehand wheel until the needle is at its highest point.Place the needle thread over hook 0 and hold it taut.Move the threader (1 8) fully downwards and turn ittowards the needle so that the small hook R goesthrough the needle eye. Place the thread into thehook from the underside.Turn the threader towards the rear, releasing thethread carefully, and allow the threader to moveupwards. You can now pull the end of the threudthrough the needle eye.
IIPresser bar lifterThe sewing foot is raised or lowered with the presserbar lifter (23).obbin threadlose the hook cover (33) and pull the thread undere sewing foot to the left—.IDrawing up the bobbin threadRaise the sewing foot. Hold the needle thread andtake one stitch towards you until the needle is at thetop again and the bobbin thread has formed a loop.Pull the needle thread to draw up the bobbin thread.Thread trimmerPull the threads from the back to the front over thethread trimmer (36).IIIIIIIIIIIIIIIIIIIIIIIIIIIII
A.Removing the sewing tootTurn off the main switchSet the needle at its highest point Press the sewingfoot upwards at the front and downwards at the backat the same time so that it disengages from thesewing foot holder (1 7).Check:Please check that the sewing foot is properly engaged by raising the presser bar lifter.Engaging the sewing footPlace the sewing foot under the sewing foot holder(1 7) so that when the presser bar lifter is lowered, tlpins of the foot engage in the sewing foot holder.
IIIIIhe built-in dual fabric feedon industrialor sewing difficult materials PEAFF offer the ideal solution: built-in dual feed. The same asfabricis fed erialewing machines it feeds thepucker, Then light or difficult materials such as silk and rayon fabrics the dual fabric feed prevents ngperFectensuresyen feeding action alsoIIIiIIIIIIIIIIIIIII
Engaging the top feedpush the top feed (38)Raise the sewing foot Nowso that it snaps in place.Disengaging the top feedrs at the markedHold the top teed with two fingen a little and outdowplaces. Push the top feed (38)ly upwards (see alsoto the rear, and let it move slowthe illustration on page 26 .important!cutout at the backfeed, only use sewing feet withFor all sewing jobs with the top2/
ø//////Changing the needleSwitch off main switchTo remove: Lower thc sewing foot dnd set thneedle at its highest point. Now loosen the fixingscrew (24) and pull the needle out downards.To insert: The flat side A of II te tiedIe must face tuthe rear. Lower the sewing foot and insert theneedk:, pushing it rip as tar as it will gu. Hold thuneedle and tightet tire fixing screw (24) fit n ily.
IIIIIIIUIIIUIIUIIUUIUUUIIBBSetting the needle thread tensionSet the required amount on the needle thread tension(21) using mark A.The normal setting for sewing is 4 to 5. For embroidering and buttonhole sewing between 2 and 3.Lowering the feed dogFor ccrtain sewing work, e.g darninq, the teed dogii,s to be dropped. To do this, open the hook coverarid press slide B fully to the right Now the feeddog is lowered
—— —————— ————————————— ——— ———— ——
Operating the sewing machineProgram keysFunction keysControl slide keysPages 31 to 40
SSSS1S:-SSSSPFAFFSSSSSSElektronic section Program keysClear keyPage 34 Needle positionsPage 35Stitch width slide keyStitch length slide keyPage 35 5 U5SSSS:--Balance slide keySlow sewingPage 34Page 36Page 37Page 38Needle position up/downButtonhole/tacking!single patternsReverse sewingPage 40Twin needlePage 40Page 38Page 39:electronic 6250
1 I Obl--—LL6—--- LL—-— L-PFAFFLi— LiL2LSJelectronic 6250Made in Geemanyrogram keysis switched on, program 00 willrhe PFAFF electronic 6250 has two program keys. When the machineappear automatically in the liquid crystal display (1 3).number 7 the machine willJse the left program key (12) to select tens digits from 0 to 7. After you reachfrom 0 to 9. After numberdigitsunitsselecttokeyprogramrightreturn automatically to number 0. Use thetens digit stays as it ojumpnotdoes9 the machinesewing.dduringchangebecannote.g. from 29 to 20). The selected programClear keyThe clear key (14) has two functions.1. You can set a program you have started back at the beginning again.2. You can cancel a previously saved buttonhole- or darning program.34
0 0.5 VI L4.J rO2’’1 13L2LaIiSetting the stitch widthns:The stitch width slide key (6) has two functiowidth fromlights up and you can set the required stitchdiodeupperthekeyslidethe1 When you move0 to 6 mm; infinitely variable.key (6).Please observe the note concerning slide.0.56,cL‘I‘IJ O2’i L.1LiL2Setting the needle positionpositions.diode lights up and you can set up to 1 3 needle2. When you move the slide key (6) the lowerThis is possible in programs 02, 03, 06 and 07.Note concerning slide key (6):a basicm is selected, the electronic system will makeWhenever the machine is switched on or a prograprogram setting.slide key isis moved. It goes out again as soon as theThe green diode does not light up until the slide keymoved back to the basic setting again.
IIIoiouoOlfl SCUbOSSCu!C6C pio soo6 iipaAbLu siuin6n 613111BS DISPq 0111 I IAo( opis oq iun dii iq6ij TOU SO()() 0[II 1(1pttuII) oftiII(IO)(eUijiuioisAsD!uOJjDcI(a‘p0130(05 si iuei6njd e Jo1! O1ftJ3’:(L) Aoj opqs fiuiIiJUO pOqOl!MsIA3110’) 0ONAovuiui wu’ L oII B )JAieuip qDlils piiflbwlOSi’onoA jue dn n 6 pop1OMOOqI (L) Aa epijs oqi(W1IIB1GIl) 1htIflIA3!suap/4i-ILiI.I-.T:*--i.-9U) Aj01 itii’iiioidUI SOOqUOfli1qso.‘OP!IS f5U!UJOUOO ooq aouJC) stii6uai lUeJJ4!pis osucoiusqo cronoA (L) Anpi;jo qi6uoquonqnqi‘!flSajq?IJeA A1ovu!ju :ww g 01sowoijl15ui qiis paiinhoj oqi os ueo nbA pundii sq6i poip ioddnoq:suorpun4 00J41Aa apils eqi a’\Ow nutSseq (L) Aoi Op!(Sii u1(lItliOiliLflfiU0 111!1S OlliFEltI11.z i 1‘--9P9 ‘rLvvv O!/tr’L2 ‘c7-“1ii -90**4’
C 0.21-0-7 HLi0-9Setting the bldnceThe buleuce slide key (8) hos two functionsWhen you move II s ol!(i key the upper diode lights up rind you con detsostitcl res.1The farther you move [Iwi! he r rore do iSe.inkey right, the longer the reverse stitches will hoThe larthoryon 0ev: the key ieft, [hewilt he loss denseshorterliflC311 ofii:htclIoS of tho porkIIsoWn.the reverse shtches will he sewn. :o 11w otitches otthe poh’IHPlease observe the note be’ow concerning slide key (8).IIi)I07—ii-II)09Setting the pattern length2.When you move the slide l’j’(8) rh: lwe diojo l:hits up arid you can set he eWili’ ‘lseven steps frour Li In L3Note concerning slide key (8):Wliiiiover the machurt’swtr’h’:l on-P0(11) is:slectt’rh, the eheCtiOflicSWO 1’:setting.hi’ qroei( diode does not light up until [lie slide key is moved. It goes out aproniv’! hoik Ici the basic selling again.0) ‘i” ‘II)
.1-F unction keysand an additional twin-needle indicator.lh PFAFF electronic 6250 has four function keys1 Slow sewingup. The machine now sews at half sewing speed. PressWIeu you pius key (1) the green diode will lighte sews at full speed again.h ky dgdlu; tIm green diode goes out and the machinVa‘-Needle position up/downautomatically. Press key (2 and the red diode willWIii’,u’vt’i you stop sewing, the needle will move upin the fabric. Press the key again; the diodelight tip. If you stop sewing now, the needle will stay downtically.automa;o,s uut iiid the needle will rise againIIIIIIIIIIIIIIIIIIIIIIIIIIIISI
117’vuaaft rns3. Buttonholes/tacking/single patteKey (3) has three functions:1. Buttonholes71 / /2.your own buttonhole lengths in programsWith this key you can determine and save2. Tackingbeginning lthe green diode will light up. The seam, orIf this key is pressed before sewing is begun,diode goes out again.the pattern, is tacked automatically, then the3, Single patternsduddiode will light rip. A seam is sewn immedidlely,If this key is pressed during sewing, the greengoes out again.pattern is sewn at the end. The green diode
nri11a-,-4IIIIIIII4. Reverse sewingBefore sewing, press key (4); the green diode lights up. The machine now sews backwards.As soon as you press the key again, the green diode will go out and the machine sews forwardsagain. If you press the key during sewing, the PFAFF electronic 6250 will sew backwards as long as youhold the key. Then the green diode does not light up.t.IIIIIII*v /‘Twin needle indicatorIn some of the programs the diode of the twin needle indicator lights up. This means that you must not nscthe twin needle. If you reduce the stitch width and the diode goes out, it is then possible to sew with twinneedle.IIIIII
Sewing and embroideringUtility and fancy stitchesPages 41 to 7141
SIIIIIIIIIIIIIIIIIIIIIIIIII
Utility and fancy stitchesNon-elastic stitchesElastic stitchesOverlock stitchesCovering stitchesButtonholesFancy stitchesSewing tablePages 45 to 50Pages 51 to 53Pages 54 to 55Pages 56 to 58Pages 59 to 62Pages 63 to 71Page 44
IIIIISExplanation of tables for sewingrecommendationsWhenever a program is selected, the machine sets abasic stitch length, stitch width and balanceautomatically.
Now, using both hands, pull the thread into guide A and under thread guide hook D. Pass the thread through the threading slot (20) and downwards. Poll the thread around stop E into the right hand threa ding slot and upwards to the take-up lever (22). The thread must be pulled into the take-up lever from left to right. Then pass the thread .