Transcription
1
IntroductionThanks for using Addictive Drums 2. We had a lot of fun creating this software and hope that you alsohave a great time using it within your music compositions.Please take time to have a read through this manual. As well as covering the basic functions ofAddictive Drums 2 we also describe some nice tricks that we hope will make your workflow evensmoother.Stay Addicted!/ The Addictive Drums Team2
ContentsIntroduction . 2Quick Start Guide . 7Main Manual for Addictive Drums 2 . 10What is Addictive Drums 2? . 10Sounds . 10Effects . 10Beats & Fills . 10ADpak & MIDIpak expansions . 10How do I use Addictive Drums 2? . 11What do I need to run Addictive Drums 2? . 11Overview of AD2 . 11The Top Section . 12A.B.C.D.E.F.G.H.Loading Indicator . 12Preset Menu/Preset Display . 12Save Preset . 13Preset “Next/Previous” Buttons . 13Logo (Show Program Information) . 13Play Button . 13Page Select Buttons . 13Help Button [?] . 13The Main Section . 14GALLERY PAGE . 14EXPLORE PAGE . 15KIT PAGE . 16Kitpiece Slot functions . 17The Kitpiece Browser . 18EDIT PAGE – (Top) . 19Kitpiece Select & Controls . 19Kitpiece Selection . 193
Basic Settings . 19Mics control . 19Kitpiece Controls . 20EDIT PAGE – (Bottom) – Channel Inserts . 21Introduction . 21Microphones and channels . 21A. Snare Buzz . 21B. Kick & Snare Close Mics Balance . 21Room Distance . 22The Bus Channel . 22Channel Insert Effects . 23Noise . 23MultiFX unit . 23EQ . 23Output . 23Channel Insert Effects - Bus and Master channels . 24Cut . 24Copy/Paste . 24Send FX section . 24Selecting a channel for editing . 24Turning on and off ALL inserts on a channel at once . 24FX Page . 25A. Delay . 25B. Crossfader & Delerb Graph . 25C. Reverb . 26D. EQ . 264
E. Output Section with Routing . 26F. FX Sends . 26BEATS PAGE . 27Overview . 27The different sections . 28A. Filters . 28B. Grid Search . 28C. Main Beat List . 28D. Variant List . 28E. Beat Info . 28F. Beats Gallery Tab . 28G. Shortlist Tab . 29H. Transform Tab . 29I. Transport Section with Beat Visualization . 29The Power Map Engine . 30MIDI file Naming Conventions . 30The Mixer Section . 32Overview . 32The Mixer Section - Channel Settings . 33Using separate outputs in AD . 33The Audio Recorder . 34Snapshot . 35Drag and Drop Presets. 35THE MAP WINDOW – the Basics . 35A.B.C.D.E.F.G.H.I.Map Preset Menu . 37MIDI Monitor . 37Global Velocity . 37Advanced Settings . 37Kitpiece and Velocity Settings . 37Kitpiece Slot Selector . 38Stroketype List. 38Keyboard View . 39OK/Cancel Buttons. 395
MAP WINDOW – Advanced Settings . 40CC HiHat . 40CC HiHat Tab . 42Pedal CC Value . 42CC Reverse . 42CC Number . 42CC Number Secondary . 42Foot Close Sensitivity . 42Foot Splash Sensitivity . 42Positional Tab . 43Chokes . 43CC Positional Snare . 43Snare Position Reverse . 43Snare Position Controller . 43Snare Position Range . 43Velocity Compensation . 44CC Positional Ride . 44Cym Chokes Tab . 44Stroketypes Explained . 45Automation . 46For every Kitpiece . 46For every Mixer Channel . 46For the Bus and Master Channels . 466
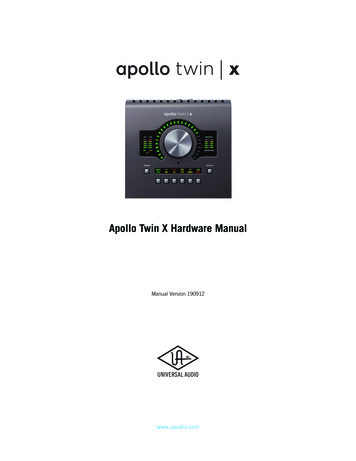
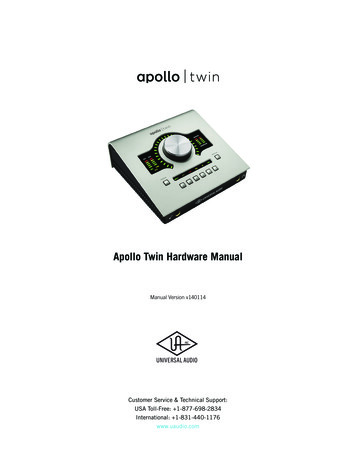
Quick Start GuideIf you want to dive straight in and get to grips with AD2, this “Quick Start” should set you on the rightcourse. If you are thirsting for a more in depth overview of AD2, then you should perhaps skip thissection and head on to the main manual sections that follow after . Please note; if you are running thedemo version of AD2 then be aware that the content is different from the full tPresetBrowserBrowserClickwhich lets you choose which preset toWhichload. lets you choose which preset to loadClick on a Kitpieceto audition it.Press the play button to hear thecurrently selected MIDI beat.The mixer lets you set the microphone levelsfor the drum kit. You want to give it somewellie? Then turn it up!7
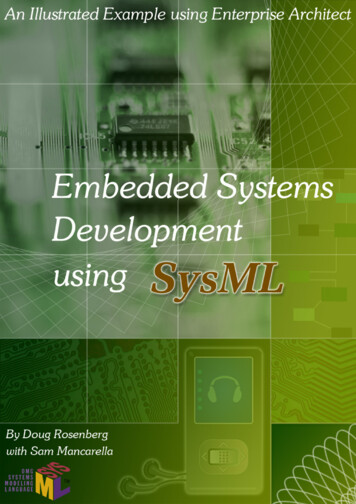
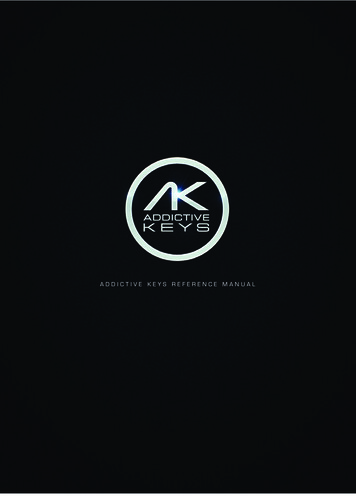
Addictive Drums 2 pagesThe top right of AD2 gives you instant access to all available pages in the user interface. The KIT pagelets you select the Kitpieces for your drum set. The EDIT & FX pages give you complete control overthe included effects, while the BEATS page lets you select a single beat from your drum beats. Thequestion mark opens up the help menu with direct links to the manual and MIDI keymap.Kitpiece slotsClick the L (list) button to showall available Kitpieces for thisslot.The up and down arrows letyou browse the Kitpieces.By activating the solo or mutefunctions you can listen toindividual drums or silencedrums completely.BeatsAD2 comes with beats for aselection of genres. To quicklyfind a beat for your song, tryusing the filter search options.You can also type in a word in thesearch box or even search byspecific time signatures orcategories. When you find a beatthat you like, just drag and drop itinto your DAW host.8
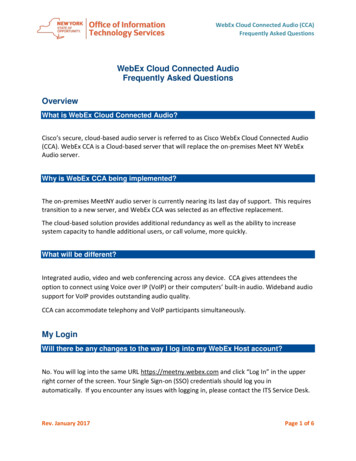
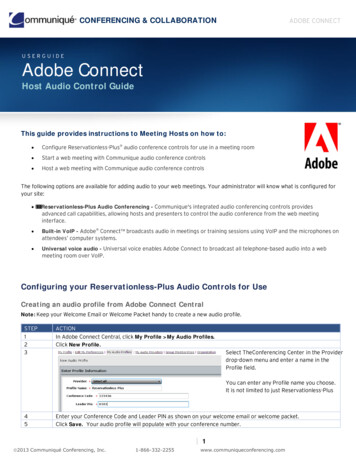
Syncing Addictive Drums 2 to your hostYou can sync AD2 to your DAW host tempo by simply switching on the “Sync Tempo” button found onthe Transport within the Beats Page. If you select “Sync Play/Stop” the beat will be triggered by usingthe main transport control on your DAW.Using an Electronic Drum Kit with AD2Clicking on the Map Presetopens up a drop downmenu with map presetssuitable for your electronicdrum kit.If you have an electronic drum kit hooked up to your computer and host software, you can use it totrigger the sounds in AD2. Access the Map Window by clicking on the “?” in the top right corner ofAD2. Open the Map Preset menu and select your electronic drum kit if it is listed there. After that itshould just be a matter of record enabling the Addictive Drums 2 track in your DAW host and startbanging! If you electronic drum kit is not listed in the Map Preset menu – try the GM Map Preset. Itworks with most electronic drum kits.That’s it for the quick start guide; we recommend that you delve further into this manual to getdeeper into the details!9
Main Manual for Addictive Drums 2What is Addictive Drums 2?Addictive Drums 2 is a virtual instrument, like its’ predecessor “Addictive Drums”. AD2 takes drumproduction within your computer to a new level.Sounds-All sampled drum/cymbal sounds are recorded with a multichannel mic setup, just as youwould record a real drum kit.Extensive layering, capturing every nuance from the softest to the hardest stroke, combinedwith alternating samples throughout, provides unparalleled realism.Kit piece linking and the bonus Trig Kitpieces allow for layering, adding an extra sonicdimension to your drum sounds.Effects-Shape your sound with the built in effects in AD2 - each channel has EQ, Compressor, Dist,Transient Shaper, Tape Saturation and more, as well as 2 send effects with reverb and delay.Beats & Fills-A library of MIDI files in different styles, all easily accessible from within AD2 gives you thebuilding blocks to create drum tracks quickly. Without you needing to create beats yourself.ADpak & MIDIpak expansions-Expand your Addictive Drums 2 with more kits (ADpaks), kitpieces and MIDI files (MIDIpaks).10
How do I use Addictive Drums 2?Addictive Drums 2 is available both as a virtual Instrument plugin to use within many DAW programsand as a stand-alone instrument running on your computer.What do I need to run Addictive Drums 2?Registration, authorization and installation are done through the XLN Online Installer. You will need anactive internet connection, a computer that meets our basic operating requirements and if you wishto trigger the drum sounds externally a midi controller or electronic drum kit. Running AD2 as a plugin requires a compatible DAW host. Take a look at this link to see our e/#requirementsOverview of AD2Opening up AD2 you will see that the program consists of a Top Section and a Main Section. The Topsection is always present regardless of where you are within the program. The Main Section changesdepending upon which Page you are on.11
The Top SectionAs illustrated in the diagram above, the Top Section is subdivided into the following 9 areas:A. Loading IndicatorThis shows you when AD2 is loading stuff from disk. Although you can play AD2 while it keepsloading in the background, there may initially be silence or audible glitches until the LoadingIndicator finishes and goes “off”.B. Preset BrowserHere the currently loaded Preset is displayed. Clicking in this area brings up the PresetBrowser, where you can load presets by type, ADpak or your own Presets. You can share yoursaved presets together with other AD2 users. Clicking on the Sound Ideal function buttonenables you to sort through your presets by selecting the amount of processing that has beenapplied to each preset. This is displayed as a level indicator with values ranging from Naturalto Extreme.12
C. Save PresetUse this feature to save your presets. You choose the Name, Type and “Sound Ideal” setting.There is also a MIDI Preview function that allows you to save a MIDI beat with its’ preset.D. Preset “Next/Previous” ButtonsThe 2 Up/Down buttons select the next or previous preset.E. Logo (Show Program Information)Clicking on the nice shiny Addictive Drums 2 logo takes you to a special Program Informationpage. Here you will find program version information (which is good in support matters) andalso credits, special thanks and acknowledgements from the XLN Audio team.F. Play ButtonThis is a double of the play button within the transport on the Beats Page. Starts and stopsthe currently selected midi file.G. Page Select ButtonsAD2’s Page Sections has six different pages:- GALLERY: Shows an overview of the ADpaks with links to Explore Maps for these.- EXPLORE: Shows the ExploreMaps for each ADpak with preset and basic controls over thevarious shown parameters.- KIT: Shows an overview of which kitpiece is currently loaded.- EDIT: Shows various controls for shaping your drum sound.- FX: Shows controls for the 2 built in “Delerb” effects.- BEATS: Shows the MIDI file library with beats and fills in various styles and tempos.H. Help Button [?]This button brings up a sub menu with these selections:- Map Window (for more info see the Map Window section of this manual)- Refresh MIDI library (this rescans the midi library so that newly created beats- Reference Manual PDF- XLN Audio Web (opens your internet browser and follows a link to our web site)- About (same as clicking the logo [D] above)13
The Main SectionThe main section is the principal work area for AD2 and is divided into six separate pages.GALLERY PAGE-This page shows the various available ADpak kits that can be used with AD2. A description ofthe ADpak will be shown as will some ExploreMaps for that ADpak. You can select to see allExplore Maps by clicking on the ghosted out image in the top right hand corner.14
EXPLORE PAGE-The Explore page is where you get to select which ADpak you wish to load up into AD2. It alsoshows the various ExploreMaps associated with each ADpak. These include some basiccontrols of the various parameters that are on offer such as Kick, Snare levels etc. You canaudition the kitpieces on display by clicking on the drums. The presets that come with the kitare also on this page. If you don’t own the kit, you will see a headphone icon instead, indicatingan audio demo for the preset that you can listen to.15
KIT PAGEThe AD2 “kit” has 18 Kitpiece slots. Each Kitpiece slot shows you an image of the selected Kitpiece.Click on the image to audition the sound. The pad is velocity sensitive: the higher up you play, thelouder the volume.16
Kitpiece Slot functionsA.B.C.D.E.F.G.H.I.Kitpiece Slot NameLoad button (opens up the Kitpiece browser with an overview of the available Kitpieces)Up/Down buttons for Kitpiece selectionMidi Activity IndicatorKP Mute & SoloCurrently loaded kitpiece name (click to get a list of all available Kitpieces)Edit Button (takes you to the Edit Page with this Kitpiece selected)Kitpiece Volume (for quickly adjusting the overall level for a Kitpiece)Tom Sets (opens up a menu with options for saving/loading toms in groups, for example, allthe Sonor Toms). The pitch settings of the toms are saved in the Tom Set; you won’t hear anychanges to the pitch until you enable it.J. Drag and drop the link symbol to link from the Kick or Snare drums to other Kitpieces so thatthey sound at the same time.17
The Kitpiece BrowserClicking the “L” button in the top left corner of the Kitpiece Slot brings up a new window, the KitpieceBrowser. Here you can view all the available Kitpieces that can be loaded into the Kitpiece slot. Theseare sorted with acoustic stuff first, then brushed, then percussion, then electronic.(It will also show Kitpieces that you do not currently own, these are marked with NO LICENSE tags.)To load a Kitpiece simply double click on it. At the bottom of the window all of the stroke types can beheard by clicking on the various play buttons.18
EDIT PAGE - (Top)Kitpiece Select & ControlsThis provides lots of control over the raw sounds. You can adjust the Overhead and Room levels andpanning individually for each Kitpiece. There is also extensive sound shaping possibilities using theKitpiece Controls. You have control over the Response, Pitch, Pitch Envelope, Volume Envelope and aHP/LP Filter. Kick and Snare also has a Tone Designer as an option to the Pitch envelope.Tip: right clicking will allow you either copy all the settings or copy the setting for the individual module(Response or Pitch settings for example).Kitpiece SelectionEach of the Kitpieces can be selected for editing by clicking on the corresponding button under theKitpiece Slot.Basic SettingsFor each Kitpiece you can set the following:Mics control-Overhead Level, Pan and WidthRoom Level, Pan and Width19
Kitpiece ControlsResponse: this controls how velocity affects the volume, filter and sample selection. You can alsoselect to either turn on or off alternate sample hits.Pitch: This controls the pitch of the entire KP /-12 semitonesOH/RM Offset: Offsets the OH & Room channels /- 12 semitonesTone Designer: The Tone Designer is available for kick and snare, and lets you control the tone of thedrum by changing the frequency response over time. The frequency response curve is displayed atthe top, and is customized and unique for each Kitpiece. By reducing ringing overtones or boominglow end, you can easily make a drum sound more "dampened" without changing the overall volume.Pitch Envelope: Control the Pitch Start, Hold Time, Release Time. You can let velocity control theamount of Pitch Envelope applied using the velocity level control.Volume Envelope: Control the velocity to Attack, Decay Time, Sustain Level, Sustain Hold Time andRelease Time.Cut: A High Pass / Low Pass Filter.20
EDIT PAGE – (Bottom) – Channel InsertsIntroductionIn keeping with how a real drum kit is traditionally recorded and mixed we have recorded the kitsusing close, overhead and room mics.Microphones and channelsAll Kitpieces include overhead and room recordings, and these are all routed to the stereo channelsOverhead and Room. Kick, Snare, Hihat, Xtras and Toms were recorded with close mics as well.Hihat, Xtras and Toms have one close mic channel each.Kick and Snare have 2 close mic channels:-“Top”/”Bottom” for Snare“Beater”/”Front” for KickA. Snare BuzzTo further enhance the realism we have recorded the buzzy sound the snare makes wheneverthe kick or toms are played. The volume of the Snare Buzz can be adjusted with the “Buzz”slider. This does not affect the sound when playing the snare, but rather how much “buzz” thesnare generates when you play the kick or the toms.B. Kick and Snare Close Mics BalanceThe balance of the two close mics on Kick and Snare can be adjusted with the horizontalslider under the image. In general adding in more of the lower mic on snar
- Reference Manual PDF - XLN Audio Web (opens your internet browser and follows a link to our web site) - About (same as clicking the logo [D] above) 14 The Main Section The main section is the principal work area for AD2 and is divided into six separate pages. GALLERY PAGE