Transcription
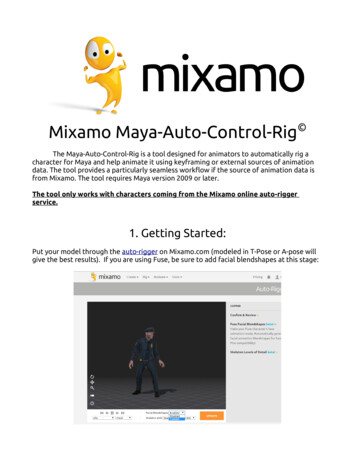
Mixamo Maya-Auto-Control-Rig The Maya-Auto-Control-Rig is a tool designed for animators to automatically rig acharacter for Maya and help animate it using keyframing or external sources of animationdata. The tool provides a particularly seamless workflow if the source of animation data isfrom Mixamo. The tool requires Maya version 2009 or later.The tool only works with characters coming from the Mixamo online auto-riggerservice.1. Getting Started:Put your model through the auto-rigger on Mixamo.com (modeled in T-Pose or A-pose willgive the best results). If you are using Fuse, be sure to add facial blendshapes at this stage:
If you want animation on your rigged character, apply a motion to it and download both theAuto-Rigged Character without animation (T-Pose is fine) and the motion separately in FBXFormat.In Maya, import your auto-rigged character with the latest version of the FBX plug-in (makesure the fbxmaya.mll plug-in is loaded Window Settings/Preferences Plug-in Manager):Installing the ScriptPlace the MayaAutoControlRig folder in your scripts directory:C:/Users/ Username todesk/Maya/(Version)/scriptsWindowsMacRun the main python script (Mixamo Auto Control Rig v 1 6 0.py ). You may want tomake it a shelf button for easy access:
2.Rigging Your Character:In the Rig tab, Press the Rig Character button:*If the size of the controls are too large or small, you can use the Create OverrideBounding Box button and scale the cube before hitting Rig Character. The rig is undoable,so you can undo and try a different scale if the first time doesn't work well.You now have a fully animatable rig of your character. There are display layers andselection sets for your convenience. You may keyframe-animate normally, but the realpower of the rig is its ability to use motions from Mixamo.com.If your character has FacePlus-compatible facial blendshapes, the script will create controlsfor that as well.Options:If Add Pelvis (“hula”) Control is checked, the skeleton will be modified to allow theinclusion of a separate hip control. This will give the animator control of the pelvis withoutaffecting the upper body. The side effect is your new skeleton will no longer match the
original.In the Utilities tab, there are some additional options for more advanced users. If you haveadded an additional skinned mesh to the rig after initial creation, use the Remake MeshInfonode button.If you wish to add your own joints to the rig and be able to use the export functionality withthem, select the new joints and press the Make Extra Joints Infonode from selectionbutton.Lastly, but most awesomely, is Make Dynamic Chain Rig from selection. To create adynamic joint chain (or single joint) that works with the rest of the rig's functions, firstparent the skinned joint chain (or the single joint) into the main Bind Skeleton, select thebase of the new chain, and then hit the button. You now have dynamics appropriate forfollowthrough on hair, props, etc. You can create colliders and other fanciness at yourliesure. This function is powered by ZV Dynamics, written by Paolo Dominici.*In the Batching Tab, you can find some useful features for batching the dynamics ofseveral files at once.Suggested Workflow with a Pelvis Control:Rig the character with Add Pelvis Control checked. Then, with Export Mesh withSkeleton checked, click Export Baked Skeleton. You will now have a clean fbx that lookslike the first one you downloaded, but has the new joint hierarchy. Any animationdownloaded for the original character will hook up correctly and be converted to motionswith the extra joint on export. Optionally, you can upload the newly exported character toMixamo.com and apply motions on it directly.
3. Applying Animation Data To Your Rig:With your Control Rig Scene open, click the Import Animation to Control Rig button.Browse to the fbx animation file. Be careful of your import settings and check scenesettings for things like framerates.You can now animate on top of the animation data with the control rig.
4. Animating on motions Non-Baked on the control rig:Using the rig unbaked lets you animate additively on top of your motion with clean, zeroed,non-keyed controls without the need for animation layers. You also have access to a keyable animation data multiplier attribute (AnimDataMult). This allows you to quicklyexaggerate portions of a motion, to tone them down, or if set to 0, turn off the animationdata completely so you can hand-key your own animation. The default is 1 to fully followthe animation data.You may choose to clean the controls at any time, preserving your animation edits whilezeroing out the controls. To re-zero your rig's controls, press the “Clear AnimationControls” Button. The animation will play twice. Be aware that this also deletes keys on allcustom attributes except for FK/IK switches and clears the rig's animation layers.5. Animating on motions Baked on the control rig:Another option is to bake the animation to the controls by pressing the “Bake Animationto Controls” button. This will put a keyframe on every frame on all of the controls'translate and rotate attributes. The animation will play twice.After baking, you will probably want to use animation layers. See Maya's documentationfor more information on animation layers.You may bake at any time, but just like clearing animation controls, baking deletes keys onall custom attributes except for FK/IK switches and clears the rig's animation layers.
6. Exporting Animations:Once you are done animating, you may export the animation by clicking “Export BakedSkeleton”:The animation will play once and then an Export Dialog Box will open. If you export as fbx,the file will look like a motion downloaded from Mixamo.com: a clean, baked skeleton andmesh.Options:If you wish, you may include the geometry as well by clicking on the Export Mesh withSkeleton checkbox. Referenced rigs with blendshapes will not be able to export withmesh. You must import the referenced rig first.If you are producing for mobile games and want to have the animation baked veryefficiently, use the Reduce Keyframes on Non-Essential Joints option. The joints neededthrough the character's core will not be touched, but unessential joints like fingers will bereduced. Remove End Joints will delete the unnecessary joints at the ends of chains.Dynamics Pose-Match Frame is if you are used the Make Dynamic Chain Rig utility for thischaracter. It will determine how much to ease in the dynamics for looping.
7. Controls and Attributes:Most controls on the rig have an AnimDataMult attribute which, when the rig hasanimation data connected and is not baked, can exaggerate, tone down, or turn off theunderlying animation on that body part.global CTRL:*The Global Control is for offsetting overall placement,rotation, and scale for the rig.Hand and Foot IK CTRLs:*The IK controls for the feet have a number of customattributes for pivoting the feet in different ways likeFootRoll and ToeTap.*If you would like to have the IK controls stick to theglobal, you must set AnimDataMult to 0 andParentToGlobal to 1.*FollowBody makes the IK controls behave more like FK.For instance, with FollowBody at 1, the IK foot controlswill follow changes in the Pelvis CTRLElbow and Knee IK CTRLs:*The pole vector controls have the sameParentToGlobal and FollowBody attributes as thehands and feet.*GuideCurve toggles the visibility of the lines pointingto the knees and elbows, used only for a visual indicationof which PV belongs to what body part.*FollowFoot constrains the PV to the foot, so as yourotate and translate the foot, the PV follows. It will alsomaintain its distance in Z from the knee joint.
Hand and Foot Options:*The option controls for the hands have finger attributeslike Finger Curls and Spread*The options controls are where the FKIK attributes arefound.Head CTRL:*The only unique attribute to be aware of on the head isInheritRotation. 1 will behave like normal FK, 0 willmake the control stay oriented to the world.
The Maya-Auto-Control-Rig is a tool designed for animators to automatically rig a character for Maya and help animate it using keyframing or external sources of animation data. The tool provides a particularly seamless workflow if the source of animation data is from Mixamo. The tool requires Maya version 2009 or later.