Transcription
Maya Muscle AdvancedTechniques10The Maya Muscle Advanced Techniques tutorials assume that you have a basic familiaritywith the main tools and features of Maya, as well as basic Maya rigging knowledge. At theend of the tutorials, you should have a good feel for how to use the Maya Muscle skin deformerfor your own characters and projects.This chapter includes the following tutorials: Rigging simple muscles on page 205 Rigging muscles on page 241Rigging simple musclesIntroductionThe Muscle Builder example is designed to offer a basic overview of Maya Musclefeatures as applied to cMuscleSpline-based muscles.205
This example shows you the basic workflow and features of Maya MuscleBuilder in six lessons: Lesson 1: Setting up Basic Skin Deformation on page 206 Lesson 2: Painting Sticky Weights to Bones on page 213 Lesson 3: Setting up Simple Muscles on page 219 Lesson 4: Painting Sticky Weights to Simple Muscle on page 226 Lesson 5: Setting up Sliding Deformation on page 231 Lesson 6: Setting up Jiggle Deformation on page 237Preparing for the LessonsTo ensure the lessons work as described, confirm that you have Maya Muscleloaded. The Muscle menu displays in the main menu bar if Muscle is loaded.If you need to load Muscle manually, see Load Maya Muscle on page t is recommended that you save your work periodically and at the end ofeach section as you progress through this tutorial, however sample files of thefinished scene for each lesson are also included.Lesson 1: Setting up Basic Skin DeformationThis lesson shows you how to set up an object to be deformed by the Muscledeformer with bones and joints. In this lesson you will prepare a rig for basicskin deformation and set initial weighting on your mesh.NOTE If you already have an object with a Maya skinCluster applied, you caneasily convert it to use Muscle following a workflow similar to this lesson. SeeConvert Maya skin to Maya Muscle on page 62 to learn how to convert askinCluster to the Muscle setup.206 Chapter 10 Maya Muscle Advanced Techniques
Open the scene for the lesson1 Load the tut dragonLeg basic START.ma file.This scene contains a basic polygon mesh of a leg, some joints with asimple IK chain rig with animation on it, and some background lights.You can use the Display Layer Editor to show and hide various parts ofthis rig.2 In the Display Layer Editor, turn off the "lyrSkin" and “lyrLIGHTS” layersto hide the skin and view the underlying rig.3 Scrub the timeline to view the animation.You can see the basic IK rig setup as the leg moves back and forth overtime. In addition to the basic Maya joints, there are two polygon boneobjects for the hip blade and kneecap.Set up musclesCurrently, there is no stable root joint for this rig. Rather than creating a Mayajoint as the root, and since you will be using the Muscle deformer for skinning,you can create a capsule object to use as the root.Capsules are like joints, except that they have a true size and thickness andcan be used by the Muscle skin deformer as both joints for Sticky weightingand actual sliding effects. They effectively work as bones, and are faster thanpolygon mesh bones.To create and set up a capsule object1 Select Muscle Muscles/Bones Make Capsule to create a capsule object.A capsule object appears at the origin. A group called “grpMUSCLES” thatholds all created capsules and muscles is also created to aid in keepingyour rig hierarchy clean.NOTE Since capsules are locators, you must have Show Locators turned onthe scene view’s Show menu in order to see them.2 Select Muscle Simple Muscles Set Muscle Parameters to open theMuscle Builder window.The top of the Muscle Parameters tab allows you to edit basic attributesfor capsules, bones and muscles.Lesson 1: Setting up Basic Skin Deformation 207
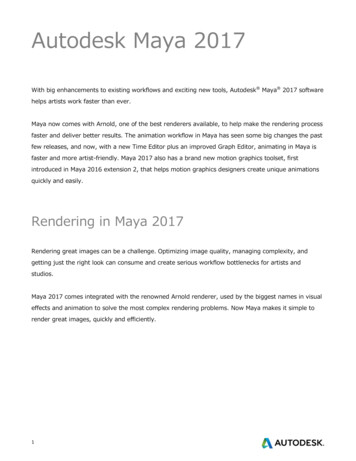
NOTE You can also use the Attribute Editor or Channel Box to control Muscledeformers and settings for any capsule, bone, or muscle.3 In the Muscle Object Settings, adjust the capsule’s Length to a value of4. If you wish, you can adjust the other muscle object settings.4 Close the Muscle Builder window when you are finished editing theparameters.5 Move and rotate the capsule to a position beside the boneBlade shape asshown in the following image. This is a good location for your root object.Since only objects that have a cMuscleObject shape node can be connectedto the Muscle skin deformer for skinning, you need to convert all of thejoints and polygon bones.Convert the joints to bonesRather than manually creating a capsule by hand for each joint, Maya Muscleprovides an automatic way to convert joints to capsules so that they can bedirectly connected. Converted joints function as both a regular Maya jointand a Muscle capsule object.1 Select all of the joints in the dragon leg rig.2 Select Muscle Muscles/Bones Convert Surface to Muscle/Bone on page129.208 Chapter 10 Maya Muscle Advanced Techniques
Since you are converting joints and not a surface, a Joint to CapsuleConversion window appears. You need to know which axis is runningdown the length of the joints in your rig. The default for Maya is X.However, on this rig a custom Joint Orient tool was used to get a cleanerjoint rotation axis. It is highly recommended you use this sort of tool toset up your Orient a joint’s local axes manually before rigging.3 Click Y-Axis , since the y-axis runs down the length of the joints in thisscene.Each joint is also converted to also be a capsule object. Using the toolslearned so far, you can adjust the colors and lengths of the capsules.Since you did not originally select the polygon bone objects when youconverted, you must also convert these mesh objects so that they alsocan be connected into the Muscle deformer for skinning.4 Select the kneecap and blade bone objects, then select Muscle Muscles/Bones Convert Surface to Muscle/Bone.The polygon mesh objects are properly converted and connected to anew cMuscleObject shape node.Lesson 1: Setting up Basic Skin Deformation 209
While there is no visible change, this shape now exists and can be seenin the Channel Box. You can also use the Muscle Builder dialog box toturn on display of the shape and adjust colors or other features as well.Make sure you leave the Strength setting at 1.0.Now that you have a series of joints and polygon mesh objects that have beenconverted to work with the Muscle skin deformer, you can apply the skindeformer and connect the muscle objects.Apply the Muscle skin deformerFor the Muscle skin deformer, only select the mesh you are applying the skinto. You connect the bones and muscles afterwards.To apply the Muscle skin deformer1 Turn on the “lyrSkin” layer in the Display Layer Editor and select thedragon leg skin mesh.2 Select Muscle Skin Setup Apply Muscle System Skin Deformer.As the deformer is applied, a dialog box appears to pre-calculate requiredinformation for the Relax deformer in case you use it later.When the process is complete, the dragon leg mesh looks the same, butit now has the Muscle skin deformer applied. You can view thecMuscleSystem1 node in the Channel Box.At this point, animating the mesh will have no deformation effect, becauseyou have not yet connected or weighted any bones or muscles to the skinmesh. In the next steps, you will connect all the capsules and bones.210 Chapter 10 Maya Muscle Advanced Techniques
Connect the muscle objects1 Go to frame 0 in the Time Slider to make sure the bones/capsules are intheir default base pose.2 Select the following in the Outliner: All of the capsule objects created in the previous lesson, including theroot capsule object and all the joints that you converted to capsules. The two polygon bone objects (boneKneeCapRt and boneBlade). The skin mesh (pSkinMesh).3 Select Muscle Muscle Objects Connect selected Muscle Objects.After a moment, all the bones are connected into the Muscle deformer.At this point, scrubbing the timeline still does not produce any motionon the skin mesh because you have not yet applied the default skinweights.Apply default weightsApplying default weights to bones and polygon mesh objects is similar toweighting with the Maya skinCluster. The points on the skin will move whenthe capsule/bone moves.To apply default weights1 Select the skin mesh (pSkinMesh).TIP If the Muscle Paint tool is open, you can see the weights when theoperation is complete.Lesson 1: Setting up Basic Skin Deformation 211
2 Select Muscle Weighting Apply Default Weights.The Default Weights tool appears. There are several options available,depending on the selected Weight type. See Default Weights tool on page161 for a detailed description.3 Select Sticky from the Weight drop-down menu.4 Set the Smooth value to 3. The Smooth value sets how many iterationsthe smooth operation applies.5 Click Apply Default Weights.Now that you have applied default Sticky weights, scrubbing the timelineshows the effect. The skin mesh moves when the bone capsules move.This concludes the first lesson of the Simple Muscles tutorial. A completedfile for this lesson, tut dragonLeg basic END.ma, can be found in the samplefiles directory.Beyond the LessonIn this lesson you learned how to: Create a capsule object Convert joints to bone capsules Apply the Muscle deformer to a skin mesh Connect bone and capsule objects to a skin mesh Apply default weights to a rigNow you are ready to refine the default weighting on your dragon leg meshby painting weights with the Muscle Paint tool.212 Chapter 10 Maya Muscle Advanced Techniques
Lesson 2: Painting Sticky Weights to BonesIn the next steps you will paint some weights on the mesh. The Muscle Painttool lets you paint capsule, bone, muscle, and other types of weights, as wellas set weights on points, much like a component editor.Open the scene for the lesson1 Load the previous scene you worked on or load thetut dragonLeg paintBones START.ma file.This scene contains the dragon leg with connected bones and capsuleobjects. The dragon leg mesh is set up with default Sticky weights appliedto the capsules for basic skin deformation.You can use the Display Layer Editor to show and hide various parts ofthis rig.Paint weightsAfter you apply default weights to the bones and polygon mesh objects, youcan use the Muscle Paint tool to refine those weights. You can choose to raiseor lower the effect of the default weights by further painting weights on theskin mesh.1 Make sure the scene view shading is set to Smooth Shade All.2 Select the skin mesh object (pSkinMesh) then select Muscle Paint MuscleWeights.The Muscle Paint tool appears and the mesh displays in Paint mode, ina black color.The Muscle Paint tool provides many of the same basic features as theartisan paint tools. See Muscle Paint tool on page 156 to learn more aboutits specific attributes.3 Select Sticky from the Weights drop-down menu.4 Select "jntShoulder" in the Influence list and turn Replace on.Lesson 2: Painting Sticky Weights to Bones 213
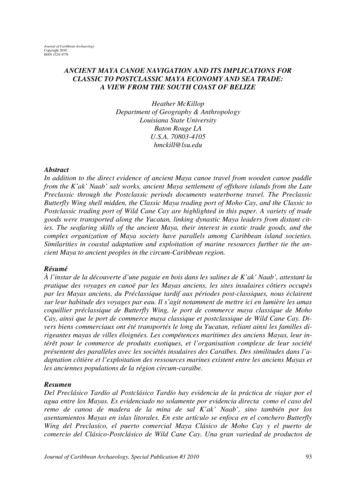
5 In the “jntShoulder” or hip area of the dragon leg, paint weights to theshoulder (hip) bone.TIP You can press and hold down the "b" key while dragging in the sceneview to adjust the size of the brush.214 Chapter 10 Maya Muscle Advanced Techniques
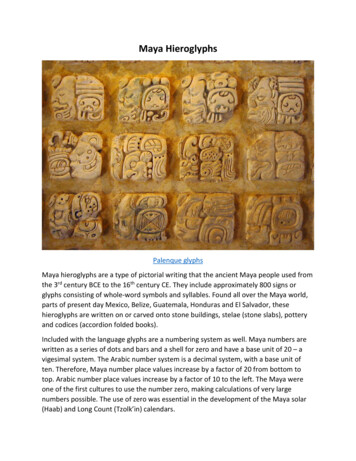
6 When you are finished painting weights, close the Muscle Paint tool andscrub the timeline. The points on the skin move when the capsules andbones move.In the next steps, you set weights on specific points, rather than paintthem on the entire upper leg.Set weights to specific points1 Open the Muscle Paint tool and select the "jntLegUp" object in theInfluence list.2 Turn off Paint mode in the Muscle Paint tool.The painting features are now disabled in the Muscle Paint tool, and thepoints of the skin mesh appear.3 Select the specific points on the upper leg where you want to set weights.Lesson 2: Painting Sticky Weights to Bones 215
TIP Use the Lasso Tool for more precision when selecting points.Notice that the Live Update option is on. This means as you drag theWeight slider the weights update interactively. When Live Update is off,you can set the weight value, but the weight does not change until youclick Set Weight/Flood.When you have multiple points selected and Live Update is on, theWeight slider automatically adjusts to show the average weight to thecurrent object for the selected points. For example if you select somepoints where the mesh is black and where the mesh is red, the Weightslider shows the average value of those points.4 Use the Weight slider to drag the value to 0.5. Notice that the color turnsyellow to show this area has half the weight.5 Continue dragging the slider up to 1.0. The selected points on the dragonleg mesh are now weighted 100% to the upper leg bone.Smooth weightsIn the next steps, you will smooth the transition between the shoulder (hip)and upper leg joint. To make sure weights don’t get re-normalized to otherbones, you can lock weights for them all.1 Clear your selection, then turn Paint mode on in the Muscle Paint tool.216 Chapter 10 Maya Muscle Advanced Techniques
NOTE It's important that you have no points selected when you turn Paintmode back on. If you turn Paint mode on with some points selected, onlythose points are paintable. When you turn Paint mode on with nothingselected, the entire mesh becomes paintable again.2 In the Influence list, select everything except for the jntShoulder andjntLegUp bones, then right-click and select Enable Lock/Hold Weight onhighlighted items from the menu.A HOLD marker appears next to each joint, meaning the current weightsfor those items are locked and cannot be adjusted, even if you paintaround that item. You can now safely smooth weights between theshoulder and upper leg only, since those are the only two joints currentlyunlocked.3 Select jntLegUp in the Influence list, and turn on Smooth.4 Paint along the top edge of the upper leg a few times.5 Scrub the timeline to see the smoother deformation between the shoulderand upper leg.6 Select all the items in the Influence list, right-click and select DisableLock/Hold Weight on highlighted items to continue painting on otherbones.Lesson 2: Painting Sticky Weights to Bones 217
7 Continue to paint and smooth weights to the joints/capsules for basicrigid bone type skinning with the techniques you have learned in thislesson. Leave the weights on the polygon knee cap and blade at zero, asyou can use those objects for Sliding effects in a later lesson.When you are finished, you should have a basic skin setup with bones. Youcan load the tut dragonLeg paintBones END.ma file to see an example ofbasic Sticky weights painted for bones.Beyond the LessonIn this lesson you learned how to: Paint sticky weights to bones using the Muscle Paint tool Apply weights to specific points on a mesh Apply Smooth weights for better transition between weightsPainting Sticky weights to bones or capsules gives an effect similar to MayaskinClusters. The main benefits of the Muscle skin deformer for this type ofwork is both the color feedback, as well as the ability to use other features ofthe deformer such as Sliding, Jiggle and so on as discussed in the followinglessons.In general, it is recommended that you first paint weights to only the capsulesand bones on your mesh before working with muscles and Sticky weights.This can help keep your weighting structured and organized.218 Chapter 10 Maya Muscle Advanced Techniques
Lesson 3: Setting up Simple MusclesIn the previous lessons, you set up the Muscle deformer with only capsulesand bones. This gives you a good foundation to build your additional skinningfrom. In this lesson you learn how to create muscles and set up muscledeformation on your mesh.Open the scene for the lesson1 Load the previous file you worked on, or load thetut dragonLeg muscles START.ma.This file has the dragon leg with all the muscles and bones connectedwith default and basic Sticky weights applied to the capsules.Create a simple muscleWhile you can convert and rig any existing NURBS surface to be a muscle,Maya Muscle provides a tool to easily build and set up muscles interactively.In the next steps you use the Muscle Builder to create simple muscles.To start, you build a muscle that stretches from the shoulder to the lower leg.1 From the main menu, select Muscle Simple Muscles Muscle Builder.The Muscle Builder appears.Lesson 3: Setting up Simple Muscles 219
2 Using the Outliner, do the following to load the muscle Attach Objects: Select the "jntShoulder" capsule and click Select the "jntLegLo" capsule and clickfor Attach Obj 1.for Attach Obj 2.Thesebuttons load the selected objects into the Attach Objectfields for you.3 Click Build/Update.A muscle shape is generated from the start Attach Object (Attach Obj 1)to the end Attach Object (Attach Obj 2). You may want to change yourscene view to wireframe or X-ray mode while you work.TIP You can click the Attach Obj 1 or Attach Obj 2 buttons to directly selectthe attach locators and position them in the scene view.For this tutorial, you can leave the parameters in the Build tab at theirdefault settings. If you wish, you can adjust the simple muscle settings.See Build tab on page 146 to learn about the attributes of the Muscle BuilderBuild tab.NOTE If you scrub the timeline, the muscle stays attached but will not yetsquash or stretch properly because you have not yet set up deformation.Once your muscle is generally placed and set, you can sculpt the muscleshape into something more specific.Sculpt the simple muscle shape1 In the Muscle Builder, switch to the Cross Section tab.This tab has three main sections. The list on the left shows you each crosssection of your muscle. Typically the first and last cross sections areadjusted. There are two view panels showing you the view of all of yourmuscle cross sections down the length and from the side.220 Chapter 10 Maya Muscle Advanced Techniques
2 Select Curve 3 and Curve 5. Note that you can move them on the X- andZ-axis in the view panel.Selecting one or more items in the Cross Section curve list selects thosecurves. You can then move them in the view panels here, or in the sceneview.3 Click Edit Cross Section at the top of the tab.The cross sections are now active for editing and the view panelsautomatically switch to component mode so you can directly edit thepoints of the cross section curves. Selecting other cross sections highlighttheir points.4 Continue editing the cross sections until you are happy with the shapeof the muscle.Lesson 3: Setting up Simple Muscles 221
TIP You can pan in the view panels of the Muscle Builder. To easily re-centerthe view panels, click the Cross Section tab again.5 When you are finished, click Edit Cross Section again to turn off theediting mode.You are now finished sculpting your muscle. In the next steps you finishthe building process and rig the muscle to deform properly.Finalize the simple muscle1 In the Muscle Builder tool, switch to the Finalize tab.This tab lets you choose how to deform and rig your muscle. For furtherinformation about the attributes of the Finalize tab, see Finalize tab onpage 147.2 Ensure the Muscle Spline Deformer is selected, and Num Controls is setto.NOTE This gives you three movers: one at the start, one at the middle, andone at the end of the muscle.222 Chapter 10 Maya Muscle Advanced Techniques
3 Click Convert to Muscle.A warning dialog appears to notify you that this operation will finalizethe cross sections of this muscle. The dialog also lets you select the basename of the muscle and created controls.We recommend that you stick to a useful and readable naming schemeso that you can easily select and weight the muscles in the Muscle Painttool later. For example, if you created a muscle located near the upperleg, on the rear side in the center, you could name it "hamstringsCenter".4 Enter a name and click OK.After a moment, the muscle is rigged and a cMuscleObject shape nodeis created. In wireframe mode, you can see three yellow box controls.These controls can be animated and have Jiggle settings on them thatare created and constrained to the proper capsules.5 Click the Muscle Parameters tab and scroll down.This section lets you customize the deformers on the selected muscles.You can also directly manipulate some of the controls in the AttributeEditor or Channel Box.To see the deformer attributes in the Channel Box, select the musclesurface. Also, note that some settings for the cMuscleSplineDeformerexist on the cMuscleSpline node and not on the deformer node.Lesson 3: Setting up Simple Muscles 223
6 Scrub the timeline frame by frame to see the muscle squash and stretch.When that is done once, you can jump to any frame, and adjust MuscleParameters at any point or time and the playback is still correct.Adjust the squash and stretchBefore you set the muscle’s squash and stretch, it's a good idea to set theminimum and maximum length of the muscle. By default, the muscle’sminimum squash is set to half its original length, and its maximum stretchis set to double its original length. When the muscle length changes to thesesettings, you get the maximum amount of volume change.To adjust the squash and stretch length settings1 Make sure the scene view shading is set to Smooth Shade All and the“lyrSkin” is turned off.2 Leaving the Muscle Parameters tab of the Muscle Builder open, do thefollowing to define the Squash pose: Select the "FootIKMover" control and raise the leg to a squashedposition. Select the muscle surface. In the Spline Length Settings section, click Set Current as Squash.This sets the muscle’s minimum squash value to the current length.3 Do the following to define the Stretch pose: Select the "FootIKMover" and move it down so the leg is fullyextended. Select the muscle surface. In the Spline Length Settings section, click Set Current as Stretch.Setting the minimum and maximum stretch length values cause thesquash/stretch settings to more directly affect the visual output, sincethey are more closely related to the actual lengths the muscle is changingby. This can also help stop stretching from losing volume too much. Inaddition, this makes the Dampen On Squash and Dampen On Stretchvalues work properly.4 Adjust the Stretch Volume Presets as required.Make sure you have the muscle surface selected so that changes you makein the Muscle Builder affect the muscle. The stretch settings let you set224 Chapter 10 Maya Muscle Advanced Techniques
the basic X- and Z-axis radial volume change for the start, middle andend of the muscle.If you are getting flipping when the muscle contracts, changing theUp-Axis can fix this. When the muscle is bent, the aim values set howthe tips orient themselves.TIP You can play the animation and adjust the settings while the animationplays. Clicking a Stretch Volume preset automatically sets the values to oneof several preset values.View the Jiggle parametersFor Jiggle on simple muscles, you have overall control from the start to themiddle to the end of the muscle. If you rig a muscle and create more thanthree movers, you can also directly set specific Jiggle values on the yellowmovers. You can experiment to see the effect of the Jiggle Presets on page 151located on the Muscle Parameters tab of the Muscle Builder window.To view the Jiggle parameters1 Play the animation.2 As the animation plays, click each of the Jiggle Presets buttons to see theeffect.Beyond the LessonIn this lesson you learned how to: Create a simple muscle using the Muscle Builder Sculpt and finalize a simple muscle Adjust muscle parametersLesson 3: Setting up Simple Muscles 225
Because you have rigged the muscle with the cMuscleSplineDeformer, youcan also do custom muscle shaping to get exact control over how the musclelooks at various lengths. For further information on this and other informationon muscles and their parameters, see: cMuscleSplineDeformer node on page 190 Set up a Muscle Spline deformer on page 35As you build more muscles, note that in some cases, you may want musclesand bones to penetrate. For example when using Shrink Wrap on page 197, it'sbetter to have a solid mass of muscles even if they penetrate than to have gapsor spaces between them.You can now go back to the Build tab, select new settings, and continuebuilding more muscles for your rig using the techniques you have learned. Acompleted muscle rig for this lesson called tut dragonLeg muscles END.ma.Lesson 4: Painting Sticky Weights to Simple MuscleIn the previous lessons, you created muscles and bones and set skin weightsfor the bone capsules. In this lesson, you add weights for simple muscles. Thisis the same process as weighting for bones, except with muscle weights, themesh deforms not only when the muscle moves as a whole, but also when itssurface moves or jiggles. Since the skin mesh is effectively attached to themuscle surface with Sticky weights, when the muscle jiggles or bulges, so doesthe skin that is weighted to it. This step alone can give a high level ofadditional realism and interest to your rigs.226 Chapter 10 Maya Muscle Advanced Techniques
Just as you connected the bones in an earlier lesson, you first need to connectthe muscles to the Muscle skin deformer. Since they were created with theMuscle Builder, they are already rigged with the cMuscleObject shape nodeand can be immediately connected.Load the tutorial file1 Start with your file from the previous lesson, or load thetut dragonLeg sticky START.ma.This file has the skin mesh weighted to the bone capsules, and the musclesare set up and attached to the bones.Visualize the Sticky Bind distanceUnlike weighting to bones, when weighting to muscles the skin mesh pointsare bound to the surface of the muscle. Setting this operation up takes sometime, so when the muscles are first connected a "Sticky Bind" operation iscalculated from the skin to the muscle. In order to speed up this calculation,only points within a certain distance from the center of the muscle arecalculated. For example, a muscle for a character’s left arm will typically doesneed to be weighted to points on the characters right leg. Thus, only pointsclose enough to the muscle are calculated.To control this, once you attempt to connect a simple muscle, a dialog boxappears asking you what distance to use. Typically, using the Auto-Calculatevalue is sufficient, but there may be cases where you want to preview the effectof this value. As an example, we can take a muscle and visualize the StickyBind distance for it.Any points within the Sticky Bind distance are calculated, and can be weightedto the muscle properly. Any points outside this distance are ignored. Notethat this process is simply setting whether the point is allowed to be weighted,it does not actually do any weighting. Any points outside the distance canhave weights set, but usually deform incorrectly. If you set the distance toolow, you can always go back and re-bind Sticky (even to the entire mesh) later.1 Select a simple muscle in the rig. For example, select the simple musclelocated on the upper thigh.Lesson 4: Painting Sticky Weights to Simple Muscle 227
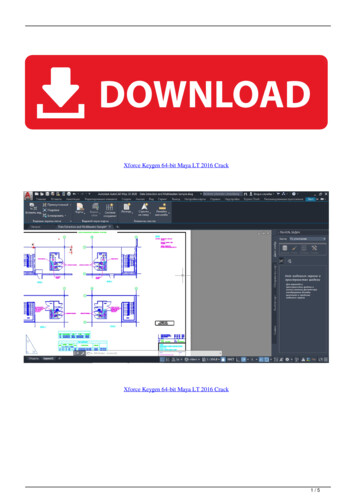
2 From the main menu, select Muscle Muscle Objects Visualize StickyBind Distance for selected Muscle Objects.A yellow visualization sphere appears around the selected muscle.You can look at the sphere's radius to determine its distance and adjustthe radius to see how a larger or smaller value would work. The sphereitself is just a temporary object and has no relevance to the muscle, otherthan to visualize the distance.3 Delete the sphere when you are finished.Now you can connect the muscle surfaces to the skin.228 Chapter 10 Maya Muscle Advanced Techniques
Connect muscle objects1 Go to frame 0, and do the following: Ensure the bones and muscles are in their default base pose. Select all of the NURBS muscles and the skin mesh.2 Select Muscle Muscle Objects Connect selected Muscle Objects.Since you have one or more simple muscles selected, a dialog box appearsasking how you want to handle the Sticky Bind distance. For informationabout the dialog box options see Sticky Bind Maximum Distance dialogbox on page 155.3 For the purposes of this lesson, click Auto-Calculate.Each muscle is connected to the Muscle skin deformer and set up to allowfor Sticky weights. When this process is complete, the muscle weightscan be painted the same as bone capsule weights.Paint muscle weights1 Select the skin mesh.Lesson 4: Painting Sticky Weights to Simple Muscle 229
2 From the main menu, select Muscle Paint Muscle Weights.The Muscle Paint tool displays. Just like when you painted the capsuleweights, you can use this tool to paint or set Sticky weights for themuscles.3 In the Weights drop-down menu, select Sticky.4 Select a muscle in the Influence list.5 A good way to paint muscle weight is to slowly add up weight from thebones onto the muscle. To do this: Set the Weight value to a small value, such as 0.1, and select Add asthe paint mode. Paint weights for the muscle on the skin. Scrub the timeline to see how the animation looks with thisdeformation.TIP You can also right-click the Weight slider to select from preset weightsin increments of 1/10th.6 Continue to add weight for each muscle until you get deformation effectsyou like. Notice how the skin moves along with the muscle surface asthe Sticky weights are added to the muscle.7 Practice painting Sticky weights for other muscles or open thetut dragonLeg sticky END.ma file for a rig completed with Sticky weightspainted for bones and muscles. This file also has an adjusted animationto display muscle deformation.230 Chapter 10 Maya Muscle Advanced Techniques
TIP Don't worry about interpenetration of the muscles since typically you donot render the muscles, only the skin. In the next lesson, you add Slidingw
Maya Muscle Advanced Techniques The Maya Muscle Advanced Techniques tutorials assume that you have a basic familiarity with the main tools and features of Maya, as well as basic Maya rigging knowledge. At the end of the tutorials, you should have a good feel for how to use the Maya M