Transcription
ENGLISHDISTRANSPALATAL DISTRACTORS (TPD Classic – TPD All-in-one – TPD Neo)THESE INSTRUCTIONS FOR USE MUST BEENGLISHREAD CAREFULLY PRIOR TO CLINICAL USEIntended useSurgically assisted rapid palatal expansion (SA-RPE) with a transpalatal distraction device is an establishedtechnique by which the upper jaw is surgically weakened at the buttress areas and widened by an expansion devicethat is fixed in the palate.The maxilla regains its initial strength in the consolidation period after the distraction phase.Surgi-Tec recommends to: use a TPD All-in-one if the distraction module can cover the required distraction distance; use a TPD Classic if the distraction module needs to be changed during the treatment; use a TPD Neo if a slim shape is appropriate.IndicationsTranspalatal distractors are indicated when transpalatal distraction is needed to facilitate treatment of: Maxillary constriction; Dental malocclusions; Dental crowding; Mouth breathing; Smile aesthetics.Contraindications Pre-existing or suspected infection at or near the implantation site. Known allergies and/or hypersensitivity to implant materials. Limited blood supply and inferior or insufficient bone quality to attach the abutment plates. Patients who are incapacitated and/or uncooperative during the treatment phase. Patients suffering from unsatisfactory oral hygiene. Patients with a history of immune deficiency, steroid therapy, problems with blood clotting, uncontrolledendocrinological disease, rheumatic disease, bone disease, diabetic problems or cirrhosis of the liver orany other systemic or acute disease. A TPD must not be used if the patient receives radiotherapy of the head. TPD Classic and TPD All-in-one: patients that have difficulties to distinguish the colour marks on the device(e.g. colour vision deficiency). Patients with gingival and periodontal diseases. If the space between the right and left palatal crests is less than 15.5 mm, no TPD can be placed.Possible adverse effects Loosening of the implant from loosening of screws or screw failure. Hypersensitivity to metal or allergic reactions. Oral hygiene problems. Asymmetric expansion. Difficult removal due to bone overgrowth. Teeth damage. Phonetic problems Maxilla drop during treatment. Possible dentoalveolar changes. Morbidities related to orthognathic surgery:Soft tissue irritation, nerve damage or root penetration through surgical trauma.Early or late infection, both superficial and deep.Elevated fibrotic tissue reaction around the surgical area.Postsurgical swelling.Nasal bleeding.Prolonged fatigue or pain postoperatively.False aneurysms.Arteriovenous fistulas.Obstruction of lacrimal canal after maxillary osteotomy.Temporomandibular Joint (TMJ) problems.Frequent maxillary sinusitis,Instable maxilla.Warnings and precautions Read all available documents before first use. Check the packaging for integrity, do not use if package is damaged.Never use products that have been damaged by transport or improper handling. Products labelled as ‘non sterile’ are already cleaned and delivered in non-sterile see-through pouches.They only have to be sterilized in their original packaging before use.EN IFU TPD 19-07-2022pag 1/12Surgi-Tec NV
ENGLISHDISTRANSPALATAL DISTRACTORS (TPD Classic – TPD All-in-one – TPD Neo)THESE INSTRUCTIONS FOR USE MUST BEENGLISHREAD CAREFULLY PRIOR TO CLINICAL USE Products labelled as ‘sterile’ are gamma irradiated and delivered in sterile see-through pouches. They areready to be used unless the original packaging has been damaged. If the package is damaged pleasenotify the manufacturer immediately. Do not use the medical device after the use by date indicated on theLabels. Store the sterile device in a dry and dust-free environment. TPD’s may only be used by medical personnel who hold the correct professional qualifications and arefamiliarised with the procedure. Consult step by step procedures for detailed procedure instructions.Follow appropriate procedures for patients who are on anticoagulant, antiplatelet or aspirin therapy.Treatment group: adults and children with confirmed skeletal maturity, but a surgeon must always rely onhis/her clinical judgement when deciding whether to use a particular product when treating a particularpatient.Do not bend the abutment plates during placement of the TPD to adapt it to the patient’s palate.Advice the patient not to apply excessive forces or tamper with the device after implantation.Respect the latency period of 5 to 7 days before starting distraction. Preferably activate the distractor onemarking per day, and a maximum two markings per day, to avoid over expanding.Inform the patient regarding the possible adverse effects. Stress the importance of oral hygiene and thenecessity for periodical follow-up.Inform the patient clearly that a diastema between the incisors will occur; (between 4 and 10mm), this willlater be corrected by the orthodontic treatment after the distraction is achieved.Discuss the expectations of TPD-surgery with the patient.The patient should be advised to report any unusual changes in the midface and/or mandible region to thesurgeon and should be closely monitored if an asymmetric change occurs.Surgi-Tec does not recommend a specific surgical procedure for a specific patient.The operating surgeon is responsible for choosing the appropriate transpalatal distractor for each specificcase.Surgi-Tec advises to use only suitable Surgi-Tec screws and related Surgi-Tec instruments.TPD’s are intended for single use and may not be reused.Re-use may compromise the structural integrity of the device and may create a risk of contamination dueto the transmission of infectious material between patients. This could result in injury to the patient oruser.The TPD shall be removed when no longer needed for orthodontic treatment.Implants that were used in a patient and removed, have to be disposed as medical waste in a dedicatedcontainer, in accordance with all local guidelines and/or your institution ‘s safety program.Asymmetric expansion of the TPD could result in corrective orthognathic surgery. Sterilization of Products labelled as ‘non sterile’ Surgi-Tec TPD abutment plates are made of Titanium Grade 2 – DIN 3.7035The TPD distraction modules, osteosynthesis screws and locking screw are made of Titanium Grade 5 –DIN 3.7165 TPD’s are appropriately medically cleaned by Surgi-Tec according to a validated procedure and aredelivered in non-sterile see-through pouches ready to be steam sterilized in the hospital. The devices donot have to be unpacked and cleaned. They can be sterilized in their original packaging. The labels wereprinted for this purpose using appropriate ink. In this way, traceability can always be guaranteed. The steam autoclaves must be in accordance with EN285 respectively EN13060 regarding validation,servicing, maintenance and control. Surgi-Tec recommends that sterilization is performed in accordance with following EN ISO 17665 validatedprocess parameters-Cycle: Pre-Vacuum (Dynamic air removal)-Temperature: 134 C - 137 C-Exposure time: minimum 3 minutes-Drying time: 30 minutes (in autoclave chamber) The responsibility for the maintenance and qualification of the sterilization equipment used and thevalidation of user specific sterilization process lies with the user. After sterilization, the products must be stored in a dry and dust-free environment.The maximum storage time is dependent on different factors such as the sterile barrier employed, storagemanner, environmental conditions and handling. The user should define a maximal storage time for sterile products until use. Within this defined time theproducts have to be used or reprocessed again.These IFU and additional information can be found on the internet at www.surgi-tec.com/instructions.The summary of safety and performance can be found in Eudamed public website:https://ec.europa.eu/tools/eudamedEN IFU TPD 19-07-2022pag 2/12Surgi-Tec NV
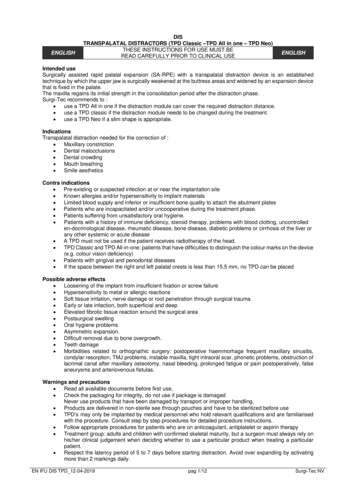
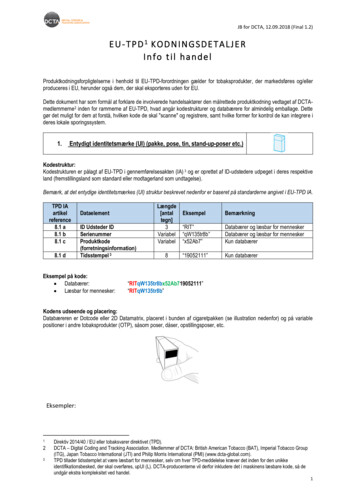
ENGLISHDISTRANSPALATAL DISTRACTORS (TPD Classic – TPD All-in-one – TPD Neo)THESE INSTRUCTIONS FOR USE MUST BEENGLISHREAD CAREFULLY PRIOR TO CLINICAL USEStep-by-step procedureTrans Palatal Distractor - TPD NeoATTENTION Preoperative planning is advised in full cooperation with the surgeon and the orthodontist.The accurate device can be chosen by the use of the TPD Dummies.Each dummy is an exact copy of its corresponding TPD. (Abutment plates and distraction module).Take care when presenting the dummies into the palate, to assess the mucosa thickness.STEP 1Corticotomies are performed as usual for surgically assisted rapid palatal expansion (SA-RPE), with transection ofthe median, anterior and lateral support (Fig la-d). The median support is split by a median buccal approach. Septalrelease is performed. Bleeding from a small artery within the osseous triangle forming the lateral nasal wall andlateral maxillary walls frequently occurs and must be treated adequately to avoid postoperative bleeding problems.The transsection can be performed with a round bur (preferably 33 mm to allow drainage into the sinus) for thelateral support, a small Lindemann bur or a smaller round bur for the anterior support, as well as with a small straightsharp osteotome for the median support. Mobilisation of the segments is done by prying motions with the osteotome(Fig ld). Control by hand if both segments show equal.Fig 1aFig 1bFig 1cFig 1dSTEP 2After application of local anaesthesia with a vasoconstrictor,two incisions of 1 cm long are made in the palatal gingiva overthe roots of the second premolars (3/2 expansion canine/first molar)or the first molars (parallel expansion when the pterygo-maxillaryjunction is also released) (Fig 2). A small relieving incision is madeperpendicular to end in the middle of the first incision.Fig 2STEP 3While placing the device, a placing instrument (Ref. 03-506W ) can be used to keep thedistractor in a correct position to insert a screw.The abutment plate of the TPD Neo, marked with the character "L" (left),is placed subperiosteally, on the bone surface on the left side of the patient (Fig 3).The abutment plate of the TPD Neo, marked with the character "R" (right),is placed on the right side of the patient.By this way the distraction module of the TPD Neo is placed with the locking nut onthe right side of the patient.Caution: Both characters L (left) and R (right) need to be clearly visible while looking in the mouth.STEP 4Insert the first 7 mm monocortical self drilling screw of 2.0 mm diameter(Ref.70-707S), only halfway depth with the internal pentagon screwdriver insert (Ref. 99-909S)mounted in its handpiece (Ref. 99-901A) (Fig 4).Insert the second 7mm screw only halfway depth as well.EN IFU TPD 19-07-2022pag 3/12Surgi-Tec NV
ENGLISHDISTRANSPALATAL DISTRACTORS (TPD Classic – TPD All-in-one – TPD Neo)THESE INSTRUCTIONS FOR USE MUST BEENGLISHREAD CAREFULLY PRIOR TO CLINICAL USESTEP 5Place the TPD Neo hinged key (Ref.03-751A) horizontally into the mouth of the patient and bring the head of thekey over the distraction module of the TPD Neo (Fig 5a).Alternative activation is also possible with the TPD Neo patient key (Ref. 03-750S) (Fig 5 b).Gently push the handle of the hinged key distally to rotate the module from cranially to caudally (downwards) andactivate until light pressure is obtained between the two bone surfaces.Warning:While placing the TPD Neo avoid at any time to try activation in opposite direction. If so, the distractor module willbe blocked against the abutment plates, and this handling will cause inevitable breakage of the distraction rod.STEP 6Once the distraction module is in horizontal position, tighten rigidlyboth osteosynthesis screws by using the internal pentagon screwdriver insert(Ref. 99-909S) mounted in its handpiece (Ref. 99-901A) (Fig 6).Activate the module until a diasteme occurs of 2 mm between the incisorsto control the opposition force.Deactivate by means of the TPD Neo patient key (Ref. 03-750S)in opposite way, until the incisors become on their original place and tension disappear.One resorbable suture on the posterior incision line is a safe measureagainst postoperative bleeding from the palatal branches.Fig 6STEP 7Tighten the locking nut by means of the TPD Neo patient key: (Ref. 03-750S) while holding the module by meansof the TPD Neo hinged key (Ref.03-751A) (Fig 7)AttentionDo not tighten the locking nut hardly to avoid damaging the screw-thread of TPD Neo distraction rod.Fig 7STEP 8After one week latency period loosen the locking nut by means of TPD Neo patient key: (Ref. 03-750S) while holdingthe module by means of the TPD Neo hinged key (Ref.03-751A) ( Fig 7)EN IFU TPD 19-07-2022pag 4/12Surgi-Tec NV
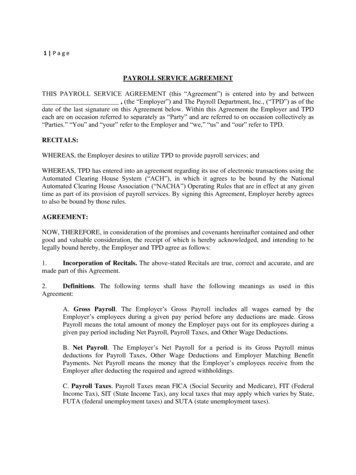
ENGLISHDISTRANSPALATAL DISTRACTORS (TPD Classic – TPD All-in-one – TPD Neo)THESE INSTRUCTIONS FOR USE MUST BEENGLISHREAD CAREFULLY PRIOR TO CLINICAL USESTEP 9ActivationThe patient is asked to activate the TPD Neo 1/3 mm (1 colour code) once daily with the TPD Neo patient key (Ref.03-750S) by rotating it downwards, from cranially to caudally until the next colour code appears. Colour codes arered, yellow and blue (3 colour codes 1 full turn 1 mm.).Attention: use of the TPD patient keyBring the patient key head over the module, with the handle close to the upper incisors (Fig. 8) and pull downwardsuntil the handle touches the lower teeth.Remove the key and repeat this procedure, if necessary, until the next color code appears.In difficult cases (restricted mouth opening) the TPD Hinged key (Ref.03-751A) can be useful (Fig 9).Fig 8Fig 9STEP 10 Achieved expansion periodOnce the necessary expansion is achieved, the locking nut must be tightened by means of the TPD Neo patientkey: (Ref. 03-750S) while holding the module by means of the TPD Neo hinged key (Ref.03-751A) (Fig 7)Control after the first stabilization if the osteosynthesis screws are still fixed. Retightening is recommended underlocal anesthesia.Attention:Do not tighten the locking nut hardly to avoid damaging the screw-thread of TPD Neo distraction rod.STEP 11The consolidation period should be at least 4 months.STEP 12 Orthodontic treatmentArch wire appliance is needed to control a perfect dental arch and to avoid a U-shape arch phenomena.This to control the expansion less or more anterior, or posterior.Orthodontic treatment can start from four to six weeks after the placement of the distraction device.STEP 13 Removal of the TPD Neo Apply local anesthesia. Unscrew the locking nut by means of TPD Neo patient key: (Ref. 03-750S) while holding the module bymeans of the TPD Neo hinged key (Ref.03-751A) (Fig 7) Unscrew a few turns, the osteosynthesis screws in the abutment plates of the TPD Neo. De-activate the distraction module of the TPD Neo with the of TPD Neo patient key: (Ref. 03-750S) (revolvethe key upwards - from caudally to cranially) - revolve three full turns upwards. Remove the osteosynthesis screws and close the distraction module to complete removal.EN IFU TPD 19-07-2022pag 5/12Surgi-Tec NV
ENGLISHDISTRANSPALATAL DISTRACTORS (TPD Classic – TPD All-in-one – TPD Neo)THESE INSTRUCTIONS FOR USE MUST BEENGLISHREAD CAREFULLY PRIOR TO CLINICAL USEStep-by-step procedureTrans Palatal Distractor - TPD All-in-oneATTENTION Preoperative planning is advised in full cooperation with the surgeon and the orthodontist.The accurate device can be chosen by the use of the TPD Dummies.Each dummy is an exact copy of its corresponding TPD. (Abutment plates and distraction module).Take care when presenting the dummies into the palate, to assess the mucosa thickness.STEP 1Corticotomies are performed as usual for surgically assisted rapid palatal expansion (SA-RPE), with transection ofthe median, anterior and lateral support (Fig la-d). The median support is split by a median buccal approach. Septalrelease is performed. Bleeding from a small artery within the osseous triangle forming the lateral nasal wall andlateral maxillary walls frequently occurs and must be treated adequately to avoid postoperative bleeding problems.The transsection can be performed with a round bur (preferably 33 mm to allow drainage into the sinus) for thelateral support, a small Lindemann bur or a smaller round bur for the anterior support, as well as with a small straightsharp osteotome for the median support. Mobilisation of the segments is done by prying motions with the osteotome(Fig ld). Control by hand if both segments show equal.Fig 1aFig 1bFig 1cFig 1dSTEP 2After application of local anaesthesia with a vasoconstrictor,two incisions of 1 cm long are made in the palatal gingiva overthe roots of the second premolars (3/2 expansion canine/first molar)or the first molars (parallel expansion when the pterygo-maxillaryjunction is also released) (Fig 2). A small relieving incision is madeperpendicular to end in the middle of the first incision.Fig 2STEP 3While placing the device, a placing instrument (Ref. 03-706W ) can be used to keep thedistractor in a correct position to insert a screw.The abutment plate of the TPD All-in-one, marked with the character "L" (left),is placed subperiosteally, on the bone surface on the left side of the patient (Fig 3).The abutment plate of the TPD All-in-one, marked with the character "R" (right),is placed on the right side of the patient.By this way the distraction module of the TPD All-in-one is placed with the holesfor the locking screw on the right side of the patient.Caution: Both characters L (left) and R (right) need to be clearly visible while looking in the mouth.STEP 4Insert the first 7 mm monocortical self drilling screw of 2.0 mm diameter(Ref. 70-707S), only halfway depth with the internal pentagon screwdriver insert (Ref. 99-909S)mounted in its handpiece (Ref. 99-901A) (Fig 4).Insert the second 7mm screw only halfway depth as well.EN IFU TPD 19-07-2022pag 6/12Surgi-Tec NV
ENGLISHDISTRANSPALATAL DISTRACTORS (TPD Classic – TPD All-in-one – TPD Neo)THESE INSTRUCTIONS FOR USE MUST BEENGLISHREAD CAREFULLY PRIOR TO CLINICAL USESTEP 5Place the TPD All-in-one hinged key (Ref.03-951A) horizontally into the mouth of the patient and bring the head ofthe key over the distraction module of the TPD All-in-one (Fig 5a).Alternative activation is also possible with the TPD patient key (Ref. 03-950S) (Fig 5b).Gently push the handle of the hinged key distally to rotate the module from cranially to caudally (downwards) andactivate until light pressure is obtained between the two bone surfaces.Warning:While placing the TPD All-In-one avoid at any time to try activation in opposite direction. If so, the distractor modulewill be blocked against the abutment plates, and this handling will cause inevitable breakage of the distraction rod.STEP 6Once the distraction module is in horizontal position, tighten rigidlyboth osteosynthesis screws by using the internal pentagon screwdriver insert(Ref. 99-909S) mounted in its handpiece (Ref. 99-901A) (Fig 6).Activate the module until a diastema occurs of 2 mm between the incisorsto control the opposition force.Deactivate by means of the TPD patient key (Ref. 03-950S) in opposite way,until the incisors return to their original place and tension disappears.One resorbable suture on the posterior incision line is a safe measureagainst postoperative bleeding from the palatal branches.Fig 6STEP 7Rotate the module in a position that one of the three screwholes forthe locking screw becomes visible.Insert the locking screw (Ref. 99-100S) in the screwhole with the smallscrewdriver (Ref. 99-101A) or the screwdriver insert (Ref. 99-909S). Use this screwdriverto avoid damaging the screw-thread in the module (Fig 7).STEP 8After one week latency period the locking screw (Ref. 99-100S) has to be removed by usingthe small screwdriver (Ref. 99-101A) or the screwdriver insert (Ref. 99-909S).STEP 9ActivationThe patient is asked to activate the TPD All-in-one 1/3 mm (1 colour code) once daily with TPD patient key (Ref.03-950S) by rotating it downwards, from cranially to caudally until the next colour code appears. Colour codes arered, yellow and blue (3 colour codes 1 full turn 1 mm.).Attention: use of the TPD patient keyBring the patient key head over the module, with the handle close to the upper incisors (Fig. 8) and pull downwardsuntil the handle touches the lower teeth.Remove the key and repeat this procedure, if necessary, until the next color code appears.In difficult cases (restricted mouth opening) the TPD Hinged key (Ref.03-951A) can be useful (Fig 9).EN IFU TPD 19-07-2022pag 7/12Surgi-Tec NV
ENGLISHDISTRANSPALATAL DISTRACTORS (TPD Classic – TPD All-in-one – TPD Neo)THESE INSTRUCTIONS FOR USE MUST BEENGLISHREAD CAREFULLY PRIOR TO CLINICAL USEFig 8Fig 9STEP 10 Achieved expansion periodOnce the necessary expansion is achieved, the locking screw (Ref. 99-100S) must be inserted in one of the threescrewholes of the TPD All-In-one module, by means of the small screwdriver (Ref. 99-101A) or the screwdriverinsert (Ref. 99-909S).Control after the first stabilization if the osteosynthesis screws are still fixed. Retightening is recommended underlocal anesthesia.Attention:Make sure that the module is opened sufficiently so that the screw hole is free for insertion of the locking screw.Before inserting the locking screw, clean accurate the screw hole.Do not tighten the locking screw hardly to avoid damaging the screw-thread of the TPD module. Beware to insertthe locking screw if some friction occurs. In case of any friction, turn the screwdriver slowly from right to left andback until the correct entrance is found in the thread of the screw hole, and there is no friction feeling while insertingthe locking screw.STEP 11The consolidation period should be at least 4 months.STEP 12 Orthodontic treatmentArch wire appliance is needed to control a perfect dental arch and to avoid a U-shape arch phenomena.This to control the expansion less or more anterior, or posterior.Orthodontic treatment can start from four to six weeks after the placement of the distraction device.STEP 13 Removal of the TPD All-In-one Apply local anesthesia. Clean carefully the insert hole in the locking screw, before inserting the small screwdriver (Ref. 99-101A)or the screwdriver insert (Ref. 99-909S). Unscrew the locking screw (Ref. 99-100S) Unscrew a few turns, the osteosynthesis screws (Ref. 70-707S) in the abutment plates of the TPD All-inone. Deactivate the distraction module of the TPD All-in-One with the TPD patient key (revolve the key upwards- from caudally to cranial) - revolve three full turns upwards. In case distraction rod is damaged by the locking screw, the rod needs to be cut. Remove the osteosynthesis screws (Ref. 70-707S) and close the distraction module to complete removal.EN IFU TPD 19-07-2022pag 8/12Surgi-Tec NV
ENGLISHDISTRANSPALATAL DISTRACTORS (TPD Classic – TPD All-in-one – TPD Neo)THESE INSTRUCTIONS FOR USE MUST BEENGLISHREAD CAREFULLY PRIOR TO CLINICAL USEStep-by-step procedureTrans Palatal Distractor - TPD ClassicATTENTION Preoperative planning is advised in full cooperation with the surgeon and the orthodontist.The accurate device can be chosen by the use of the TPD Dummies.Each dummy is an exact copy of its corresponding TPD. (Abutment plates and distraction module).Take care when presenting the dummies into the palate, to assess the mucosa thickness.STEP 1Corticotomies are performed as usual for surgically assisted rapid palatal expansion (SA-RPE), with transsectionof the median, anterior and lateral support (Fig 1a-d). The median support is split by a median buccal approach.Septal release is only performed in unilateral expansion. Bleeding from a small artery within the osseous triangleforming the lateral nasal wall and lateral maxillary walls frequently occurs and must be treated adequately to avoidpostoperative bleeding problems. The transsection can be performed with a round bur (preferably 33 mm to allowdrainage into the sinus) for the lateral support, a small Lindemann bur or a smaller round bur for the anterior support,a 1 cm wide sharp osteotome for the median support. Mobilization of the segments is done by prying motions withthe 1 cm wide osteotome (Fig 1d). Control by hand if both segments show equal.Fig 1aFig 1bFig 1cFig 1dSTEP 2After application of local anaesthesia with a vasoconstrictor,two incisions of 1 cm long are made in the palatal gingiva over the rootsof the second premolars (3/2 expansion canine/first molar) or the firstmolars (parallel expansion when the pterygo-maxillary junction is alsoreleased) (Fig 2). A small relieving incision is made perpendicular to endin the middle of the first incision.Fig 2STEP 3The abutment plates (Ref.03-800A) are placed subperiosteally, on the bone surface (Fig 3). Care should be takento place the plates high enough, horizontally and opposite to each other. Be aware that the abutment plates aremarked left (L) and right (R). The plates are fixed with 7 mm monocortical self-drilling screws of 2,0 mm diameter(Ref.70-707S) (Fig 4).Caution: Both characters L (left) and R (right) need to be clearly visible while looking in the mouth.Fig 3EN IFU TPD 19-07-2022Fig 4pag 9/12Surgi-Tec NV
ENGLISHDISTRANSPALATAL DISTRACTORS (TPD Classic – TPD All-in-one – TPD Neo)THESE INSTRUCTIONS FOR USE MUST BEENGLISHREAD CAREFULLY PRIOR TO CLINICAL USESTEP 4One resorbable suture on the posterior incision line is a safe measure against postoperative bleeding from thepalatal branches (Fig 5).Fig 5STEP 5Placement requires some prying of the bone segments and adjusting of the width of the module (Fig. 6). The moduleshould be placed such that expansion will occur when the patient rotates the patient key (Ref. 03-905S) fromcranially to caudally. This means with the holes for the locking screw to the right. Insert the locking screw (Ref. 99100S) in the screwhole with the small screwdriver (Ref. 99-101A) or the screwdriver insert (Ref. 99-909S). Use thisscrewdriver to avoid damaging the screw-thread in the module (Fig 7).Fig 6Fig 7AttentionThe module is preferably fixed bilaterally to the bicuspids with a fine titanium ligature for safety reasons. Small holesare for that purpose provided in the distraction rod (Fig 8).Fig 8STEP 6After one week latency period the locking screw (Ref. 99-100S) has to be removed by using the small screwdriver(Ref. 99-101A) or the screwdriver insert (Ref. 99-909S).EN IFU TPD 19-07-2022pag 10/12Surgi-Tec NV
ENGLISHDISTRANSPALATAL DISTRACTORS (TPD Classic – TPD All-in-one – TPD Neo)THESE INSTRUCTIONS FOR USE MUST BEENGLISHREAD CAREFULLY PRIOR TO CLINICAL USESTEP 7 ActivationThe patient is asked to activate the TPD 1/3 mm (1 colour code) once daily with the TPD patient key (Ref.03950S) by turning it downwards until the next colour code appears. Colour codes are red, yellow and blue (3 colourcodes 1 full turn 1 mm).Attention: use of the TPD patient keyBring the patient key head over the module, with the handle close to the upper incisors (Fig. 8) and pull downwardsuntil the handle touches the lower teeth.Remove the key and repeat this procedure, if necessary, until the next color code appears.In difficult cases (restricted mouth opening) the TPD Hinged key (Ref.03-951A) can be useful (Fig 10).Fig 9Fig 10STEP 8The module can easily be exchanged for a larger model when this seems necessarySTEP 9 Achieved expansion periodOnce the necessary expansion is achieved, the locking screw (Ref. 99-100S) must be inserted in one of the threescrewholes of the TPD Classic module, by means of the small screwdriver (Ref. 99-101A) or the screwdriver insert(Ref. 99-909S).Control after the first stabilization if the osteosynthesis screws are still fixed. Retightening is recommended underlocal anesthesia.Attention:Make sure that the module is opened sufficiently so that the screw hole is free for insertion of the locking screw.Before inserting the locking screw, clean accurate the screw hole.Do not tighten the locking screw hardly to avoid damaging the screw-thread of TPD module. Beware to insert thelocking screw if some friction occurs. In case of any friction, turn the screwdriver slowly from right to left and backuntil the correct entrance is found in the thread of the screw hole, and there is no friction feeling while inserting thelocking screw.STEP 10The consolidation period should be at least 4 months.STEP 11 Orthodontic treatmentArch wire appliance is needed to control a perfect dental arch and to avoid a U-shape arch phenomena.This to control the expansion less or more anterior, or posterior.Orthodontic treatment can start from four to six weeks after the placement of the distraction device.STEP 12 Removal of the TPD: Apply local anesthesia.Clean carefully the insert hole in the locking screw, before inserting the small screwdriver (Ref. 99-101A)or the screwdriver insert (Ref. 99-909S).Unscrew the locking screw (Ref. 99-100S).De-activate the distraction module of the TPD Classic with the TPD patient key (Ref.03-950S) and removethe module .In case distraction rod is damaged by the locking screw, the rod needs to be cut.Unscrew the osteosynthesis screws (Ref.70-707S) and remove the abutment plates (Ref.03-800A).EN IFU TPD 19-07-2022pag 11/12Surgi-Tec NV
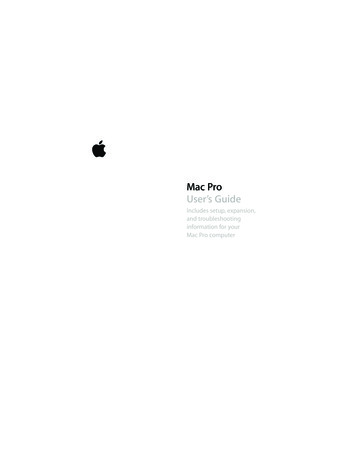
ENGLISHDISTRANSPALATAL DISTRACTORS (TPD Classic – TPD All-in-one – TPD Neo)THESE INSTRUCTIONS FOR USE MUST BEENGLISHREAD CAREFULLY PRIOR TO CLINICAL USEExplanation of symbolsPlease observe instructions for useDo Not Re-useReference numberLot numberManufacturerNon sterile productDo not use if package is damagedMedical deviceUnique device identifierSterilized using irradiationUse-by dateCaution1639Medical device Class II.bBASIC UDI-DI : 540700775DISEQMANUFACTURED BY“SURGI-TEC”Poortakkerstraat 439051 SINT-DENIJS-WESTREM – BELGIUMwww.surgi-tec.comEN IFU TPD 19-07-2022pag 12/12Surgi-Tec NV
The TPD distraction modules, osteosynthesis screws and locking screw are made of Titanium Grade 5 - DIN 3.7165 TPD's are appropriately medically cleaned by Surgi-Tec according to a validated procedure and are delivered in non-sterile see-through pouches ready to be steam sterilized in the hospital. The devices do