Transcription
AN809I NTEGRATING THE CP210 X V IRTUAL C O M P ORT D RIVERINTO T H E A NDROID P L A TF O R M1. IntroductionThis document describes how to build an Android kernel and the steps needed to integrate the CP210x virtualCOM port (VCP) driver in to the build.Android is based off of the Linux kernel, so there is already support for the CP210x device built in to the kernel.However, CP210x support is not included in a default kernel build configuration for most Android devices.There are many devices that can run the Android operating system (OS), as well as several different versions of anAndroid operating system. Because Android is open source, it can be changed based on the needs of devicemanufacturers, wireless carriers and other developers. This fact makes it difficult to provide the exact steps forrebuilding, as each developer may be using different hardware and a different build of Android specific to thathardware.This document was written based on the experience of building an Android Jelly Bean (4.3.1) kernel for aPandaBoard using a TI OMAP4430 processor. The Android port used originates from the 13.10 release fromLinaro. Build materials and information on this specific release can be found at http://releases.linaro.org/13.10/android/panda/. If you are using another platform, you should consult the manufacturer's website to get theAndroid distribution support for your device. Although the steps below are targeted to Jelly Bean on thePandaBoard, developers can follow similar steps to download and rebuild the kernel for other platforms. For anyother needs specific to Android, visit the Android Developer website athttp://developer.android.com.2. MaterialsTo build a custom Android kernel and image, you will need: CP210xUSB to UART Bridge Evaluation Board Target Android Device (PandaBoard) SDcard to hold OScables for connectivity (HDMI video cable, network cable, USB power cable, USB to RS232 adapter) Any SourceDistribution for Target Android Version (Linaro 13.10 - JellyBean 4.3.1 Android Release forPandaBoard) Toolchain to build the Source Distribution (Android NDK, Revision 9C) Development System Running Linux (Ubuntu 12.04 LTS)3. OverviewThe basic steps to integrate support for the CP210x driver are: Createbootable image on an SD Card from the Android source distributionthe Android build tools for the target Android source and platform Download the Android source tree for the target platform Modify the configuration of the kernel to include the CP210x and other required drivers Build and install the new image to the target platform media DownloadRev. 0.1 1/14Copyright 2014 by Silicon LaboratoriesAN809
AN8094. Create Bootable Image on an SD CardIn order to replace the kernel on a device’s media, you will need to create a bootable device. Typically, a sourcedistribution will contain prebuilt binaries that can be loaded directly on to an SD Card. Loading a complete prebuiltimage enables you to make sure that the version works on your platform and allows you to replace only the kernelinstead of rebuilding the entire Android distribution from scratch.Linaro provides these prebuilt binaries for its supported devices. The following instructions describe how to useyour development system to download the prebuilt images to a PandaBoard device and test that the PandaBoardcan boot and run Android without any issues.1. Use Android 4.3.1 (Jelly Bean) for the PandaBoard from Linaro’s 13.10 release version. The specificversion can be found under the Linaro Engineering Builds on http://releases.linaro.org/13.10/android/panda/. Download the following files to the development system to a known and accessible location, suchas your home directory: boot.tar.bz2 system.tar.bz2 userdata.tar.bz22. Next, on the development system, install and update for the Linaro Image Tools: sudo add-apt-repository ppa:linaro-maintainers/tools sudo apt-get update sudo apt-get install linaro-image-tools3. Disable the automount so you can properly image your SD card: dconf write /org/gnome/desktop/media-handling/automount false dconf write /org/gnome/desktop/media-handling/automount-open false4. To image your SD card, first find out what the device name is. Start by inserting your SD card and running: dmesg5. You should see something similar to the following at the end of your log:sdb: sdb1 sdb2 sdb3 sdb4 sdb5 sdb6 6. Navigate to the directory where the boot/system/userdata.tar.bz2 files were downloaded. Ensure that thedevice above is indeed associated with your SD card (otherwise you can erase your hard drive) and createthe media using the Linaro imaging tools: linaro-android-media-create --mmc /dev/sdc --dev panda --bootboot.tar.bz2–-system system.tar.bz2 --userdata userdata.tar.bz27. Next, install the graphics libraries to the device (do this immediately after creating the media, beforeremoving the SD card): wget http://people.linaro.org/ vishalbhoj/install-binaries-4.0.4.sh chmod a x install-binaries-4.0.4.sh ./install-binaries-4.0.4.sh2Rev. 0.1
AN8098. Finally, restore the automount: dconf write /org/gnome/desktop/media-handling/automount true dconf write /org/gnome/desktop/media-handling/automount-open true9. The SD card is now ready to boot. Insert it into the SD card slot on the PandaBoard and hook up a monitorto the HDMI output and a keyboard and mouse to the USB ports. Connect the RS232 connection up toyour development system. This is the Android debug port, and will output logging information from thePandaBoard at a baud rate of 115200, 8N1. This also serves as a root terminal in to the device. Onceeverything is connected, power the board to start the boot sequence. If this works, then you can move onto the next steps of replacing the kernel image on this device.5. Download the Android Build ToolsTo build the source from an Android distribution, you will need the toolchain that can build the source for yourplatform. This can be different between devices, so check with the manufacturer to find out what toolchain to usefor your device.1. For Android Jelly Bean (4.3.1) on the PandaBoard, use the arm-linux-androideabi 4.6 version from theAndroid NDK, Revision 9C. This can be downloaded directly from the Android Developer website at: tml. Here is a link to the specific version:Android NDK, Revision 9C: inux-x86 64.tar.bz2After downloading these tools, extract them into a known and accessible location, such as your homedirectory.2. Next, you will need to set the PATH variable to include the specific path to the correct version of the prebuilttoolchain. In this example, we have extracted the Android NDK to the home directory and used thefollowing path to target the 4.6 version of the tools (replace username with your username): export PATH PATH:/home/ username .6/prebuilt/linux-x86 64/bin3. Additionally, a few other tools will need to be installed on your development system. Use the followingcommands to install them: sudo apt-get install git sudo apt-get install curl sudo apt-get install ncurses-dev sudo apt-get install uboot-mkimageRev. 0.13
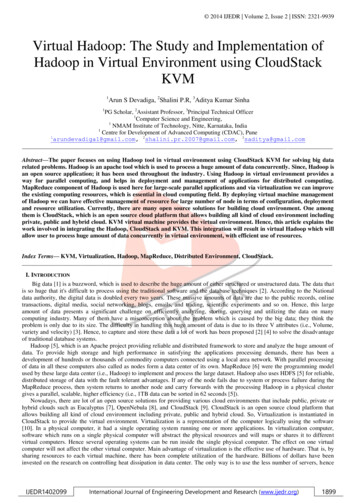
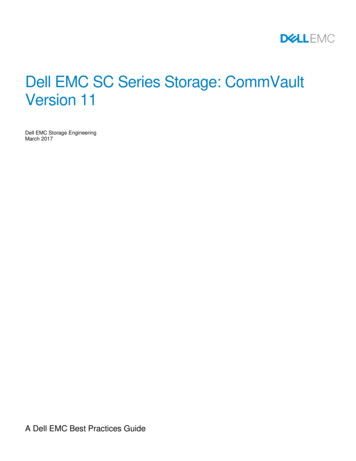
AN8096. Download the Android Source TreeNext, you will need to download the Android source. The manufacturer for your device should have its ownrepository for the download, or should be able to point to a specific revision to download.In this example, you will clone the Linaro PandaBoard source and checkout a version specific to the 13.10 build.This will allow you to rebuild the kernel and replace it on the media that was also created from 13.10.Note: The following steps were taken from Linaro’s build script “linaro kernel build cmds.sh”, and is how to obtain the versionto check out and links to rebuild. For reference, this file can be found at aro kernel build cmds.sh.1. Download the source for your development board: git clone git://android.git.linaro.org/kernel/panda2. Navigate to the source directory and checkout the source tree for version 13.10: cd linaro-kernel git checkout ca4b45c8f598951b828ca968f5953b8d5e85e34c7. Modify the Configuration of the KernelOnce the Android kernel source has been downloaded, you will need to create a configuration for the kernel. Linaroalready has a default configuration so it is easiest to start with this and add in your CP210x support. The followingsteps describe how to do this.1. Download the kernel configuration from Linaro to a “.config” file to be used by the build: curl -q http://snapshots.linaro.org/android/ e/3/kernel config .config2. Use the menuconfig to update the configuration for CP210x support: make ARCH arm menuconfigIn the menuconfig UI, navigate to the Device Drivers section:4Rev. 0.1
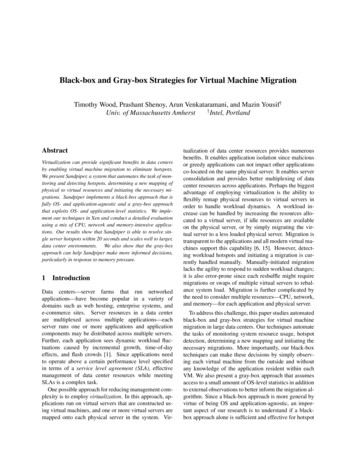
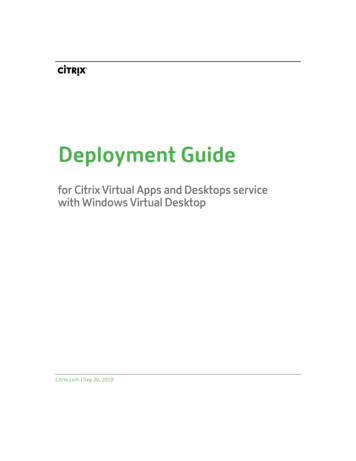
AN809Figure 1. menuconfig: Device DriversThen navigate to the USB Support section (this should already be marked with a *).Figure 2. menuconfig: USB SupportRev. 0.15
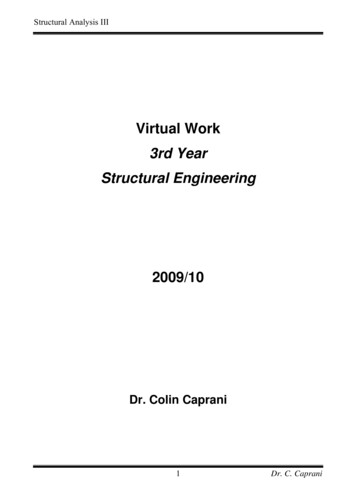
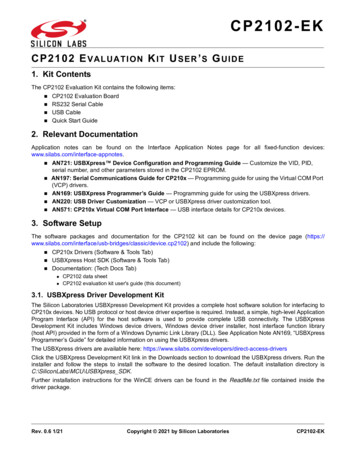
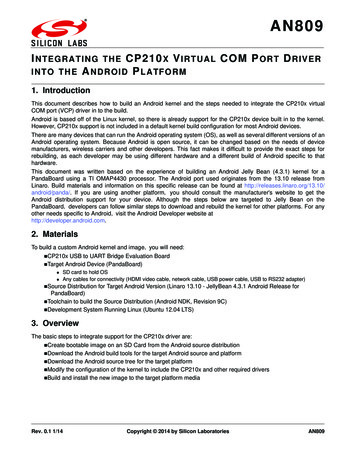
AN809Then navigate to the USB Serial Converter Support section. Press the space bar until this item shows up as a *,then enter the section to edit the USB converter support:Figure 3. menuconfig: USB Serial Converter SupportHighlight USB Generic Serial Driver and press the space bar until this item shows up as a *. Then navigate down tothe USB CP210x family of UART Bridge Controllers and press the space bar until this item shows up as a *. Finally,exit it out of each section:6Rev. 0.1
AN809Figure 4. menuconfig: USB Serial Converter FeaturesOn the final page, select Yes to save the configuration in to the “.config” file:Figure 5. menuconfig: Save ConfigurationRev. 0.17
AN809At this point everything is setup to build the CP210x in to the kernel.Note: The Android Jelly Bean (4.3.1) OS is based on a 2.6 version of the Linux kernel. Basic support for CP2101/2/3 devicesare included in the kernel by default, but the driver is not up to date for newer devices such as CP2104/5/8/9. To get support for these, you will need to replace the cp210x.c driver file in the source before you build your kernel image. Performthe following steps to replace the file:1. Download the Linux 2.6 driver from the Silicon Labs Software/Linux 2.6.x VCP Driver Source.zip2. Extract the cp210x.c file in to the kernel source tree. The original cp210x.c file is located in the tree under base kerneldirectory /drivers/usb/serial.3. Rebuild the kernel using the steps below.8. Build and Install the New ImageOnce you confirm your device works and boots off of the known media, you have downloaded the necessarytoolchain and the Android kernel source tree can build your kernel image.1. To build the source run the following command: make ARCH arm CROSS COMPILE arm-linux andorideabi- uImage2. When your build completes successfully, you can find your ‘uImage’ file under base kernel directory /arch/arm/boot.3. The final step is to replace the “uImage” file on the boot device with the new one. Reinsert the original SDcard that contains the prebuilt bootable image. You should see multiple partitions come up on this device.Navigate to the “boot” partition and delete the “uImage” file on the device, then copy over the new one fromyour build.4. The SD card is now ready to boot. Insert it into the SD card slot on the PandaBoard, hook up a monitor tothe HDMI output and a keyboard and mouse to the USB ports. Connect the RS232 connection up to yourdevelopment system using minicom or some other terminal program (115200, 8N1).9. Testing the CP210x Driver in AndroidWhen your PandaBoard boots up, you can plug in a CP210x device to the USB host port on the PandaBoard. Onthe host terminal connected to the Android debug port you should see something similar to the following output:[ 104.627380] usb 1-1.3: new full-speed USB device number 8 using ehciomap[ 104.764923] usb 1-1.3: New USB device found, idVendor 10c4,idProduct ea60[ 104.772338] usb 1-1.3: New USB device strings: Mfr 1, Product 2,SerialNumber 3[104.786437] usb 1-1.3: Product: CP2104 USB to UART Bridge Controller[104.803405] usb 1-1.3: Manufacturer: Silicon Labs[104.810241] usb 1-1.3: SerialNumber: 0001[104.836822] cp210x 1-1.3:1.0: cp210x converter detected[104.845794] usb 1-1.3: cp210x converter now attached to ttyUSB0The last line will specify what tty device the CP210x will be accessible through, in this case it is “ttyUSB0”.8Rev. 0.1
AN809To do a quick test to see that data is going through the device type the following commands in the Android debugport terminal: stty –F /dev/ttyUSB0 115200 stty –F /dev/ttyUSB0 –aspeed 115200 baud;stty: /dev/ttyUSB0line 0;intr C; quit \; erase ?; kill U; eof D; eol undef ;eol2 undef ; swtch undef ; start Q; stop S; susp Z; rprnt R;werase W; lnext V; flush O; min 1; time 0;-parenb -parodd cs8 hupcl -cstopb cread clocal -crtscts-ignbrk -brkint -ignpar -parmrk -inpck -istrip -inlcr -igncr icrnl ixon ixoff-iuclc -ixany -imaxbel -iutf8opost -olcuc -ocrnl onlcr -onocr -onlret -ofill -ofdel nl0 cr0 tab0 bs0vt0 ff0isig icanon iexten echo echoe echok -echonl -noflsh -xcase -tostop echoprtechoctl echokeThe first command will set the baud rate, then the second command will show the baud rate has been set(underlined and in green above). Hook your CP210x device up to another terminal set to that baud rate, 115200.Then we can see that data goes across by typing the following command in to our Android debug port terminal: ls /dev /dev/ttyUSB0This should display the directory listing for /dev on your Android device in the other terminal and confirm that it istransmitting data across the CP210x as expected.Note: Some CP210x devices flush buffers on close, so the directory listing might not be complete since the open, data transmission, and close happen quicker than data can exit the device. Certain devices can be configured to avoid this behavior by using the steps outlined in application note, “AN721: CP21xx Device Customization Guide.” Under normaloperation where an application is developed, the port should be kept open for the duration of the time needed for transmission or configured to not flush buffers on closed if supported and desired.10. ConclusionThis application note explained how to build the CP210x VCP driver into an Android kernel. Upon completion ofthese steps, a developer can then utilize the CP210x device as a data transmission or data acquisition device forAndroid. The device can be used in applications developed for the Android platform as services or end userapplications developed with the Android SDK.Rev. 0.19
Simplicity StudioOne-click access to MCU andwireless tools, documentation,software, source code libraries &more. Available for Windows,Mac and Linux!IoT Portfoliowww.silabs.com/IoTSW/HWQualitySupport and ualitycommunity.silabs.comDisclaimerSilicon Labs intends to provide customers with the latest, accurate, and in-depth documentation of all peripherals and modules available for system and software implementers using orintending to use the Silicon Labs products. Characterization data, available modules and peripherals, memory sizes and memory addresses refer to each specific device, and "Typical"parameters provided can and do vary in different applications. Application examples described herein are for illustrative purposes only. Silicon Labs reserves the right to make changeswithout further notice and limitation to product information, specifications, and descriptions herein, and does not give warranties as to the accuracy or completeness of the includedinformation. Silicon Labs shall have no liability for the consequences of use of the information supplied herein. This document does not imply or express copyright licenses grantedhereunder to design or fabricate any integrated circuits. The products are not designed or authorized to be used within any Life Support System without the specific written consent ofSilicon Labs. A "Life Support System" is any product or system intended to support or sustain life and/or health, which, if it fails, can be reasonably expected to result in significant personalinjury or death. Silicon Labs products are not designed or authorized for military applications. Silicon Labs products shall under no circumstances be used in weapons of massdestruction including (but not limited to) nuclear, biological or chemical weapons, or missiles capable of delivering such weapons.Trademark InformationSilicon Laboratories Inc. , Silicon Laboratories , Silicon Labs , SiLabs and the Silicon Labs logo , Bluegiga , Bluegiga Logo , Clockbuilder , CMEMS , DSPLL , EFM , EFM32 ,EFR, Ember , Energy Micro, Energy Micro logo and combinations thereof, "the world’s most energy friendly microcontrollers", Ember , EZLink , EZRadio , EZRadioPRO ,Gecko , ISOmodem , Precision32 , ProSLIC , Simplicity Studio , SiPHY , Telegesis, the Telegesis Logo , USBXpress and others are trademarks or registered trademarks of SiliconLabs. ARM, CORTEX, Cortex-M3 and THUMB are trademarks or registered trademarks of ARM Holdings. Keil is a registered trademark of ARM Limited. All other products or brandnames mentioned herein are trademarks of their respective holders.Silicon Laboratories Inc.400 West Cesar ChavezAustin, TX 78701USAhttp://www.silabs.com
AN809 8 Rev. 0.1 At this point everything is setup to build the CP210x in to the kernel. Note: The Android Jelly Bean (4.3.1) OS is based on a 2.6 version of the Linux kernel. Basic support for CP2101/2/3 devices are included in the kernel by default, but the driver is not up to date for newer de vices such as CP2104/ 5/8/9.