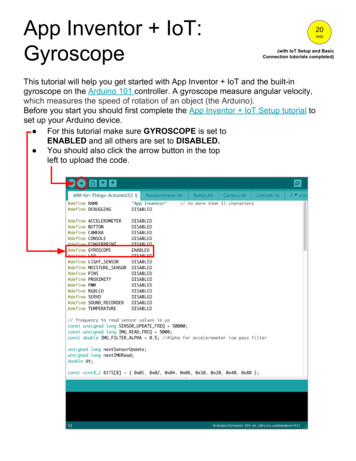
Transcription
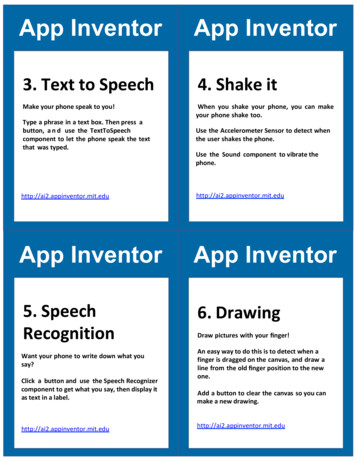
App InventorApp Inventor3. Text to Speech4. Shake itMake your phone speak to you!When you shake your phone, you can makeyour phone shake too.Type a phrase in a text box. Then press abutton, a n d use the TextToSpeechcomponent to let the phone speak the textthat was typed.Use the Accelerometer Sensor to detect whenthe user shakes the phone.Use the Sound component to vibrate appinventor.mit.eduApp InventorApp Inventor5. SpeechRecognition6. DrawingWant your phone to write down what yousay?Click a button and use the Speech Recognizercomponent to get what you say, then display itas text in a label.http://ai2.appinventor.mit.eduDraw pictures with your finger!An easy way to do this is to detect when afinger is dragged on the canvas, and draw aline from the old finger position to the newone.Add a button to clear the canvas so you canmake a new drawing.http://ai2.appinventor.mit.edu
Card 4: Shake itDrag these components on the viewer:Card 3: Text to SpeechDrag these components on the viewer:Sensors:User Interface:Media:Media:Click the Blocks button and snap theseblocks together.Click the Blocks button and snap these blockstogether.When the user shakes the phone, the soundcomponent vibrates the phone for 500milliseconds.When the button is clicked, the phone willsay the text inside of the textbox.Card 6: DrawingDrag these components on the viewer:Card 5: Speech RecognitionDrag these components on the viewer:User Interface:User Interface:Drawing and Animation:Height: 300 pixelsWidth: 300 pixelsMedia:Click the Blocks button and snap theseblocks together.Click the Blocks button and snap these blockstogether.When the user drags a finger on the canvas, aline is drawn between the start and stop.When the button is clicked, the SpeechRecognizer starts listening. When its finishedlistening, the text is shown in the label.
App InventorApp Inventor7. Fling a Ball8. Tilt to MovePlay ball on your phone!Use a finger on your phone to swipe a balland have the ball move in that direction.When a user flings their finger on a Canvas,the heading and the speed of a ball on thecanvas can be set to the heading and speed ofthe user’s finger.Make a ball move around as you tilt yourphone.As you tilt the phone, the ball will “roll” in thatdirection. The steeper the tilt, the faster theball will “roll”. It does this by updating theball’s heading and speed every second tomatch the angle and magnitude from theOrientation Sensor.http://ai2.appinventor.mit.eduApp InventorApp Inventor9. Take a Picture10. Make a VideoRecord a video in your app.Take pictures of your friends inside of yourapp.Click a button to take a picture using theCamera component. After the picture is taken,change the background of the screen to be thepicture.http://ai2.appinventor.mit.eduClick a button to start recording a videousing the Camcorder component. After you’refinished, put the video in a Video Playercomponent, and press a button to watch thevideo.http://ai2.appinventor.mit.edu
Card 8: Tilt to MoveDrag these components on the viewer:Card 7: Fling a Ball.Drawing and Animation:Drawing and Animation:Height: 300 pixelsWidth: 300 pixelsDrag these components on the viewer:Height: 300 pixelsWidth: 300 pixelsPlace ball ontop of canvasPlace ball ontop of canvasSensors:Click the Blocks button and snap theseblocks together.When the Timer fires, the ball’s heading andspeed are set to the angle and magnitude ofthe Orientation Sensor.Card 10: Make a VideoDrag these components on the viewer:User Interface:x2Media:Click the Blocks button and snap theseblocks together.When the user flings the canvas, the ball’sheading and speed are set to the finger’sheading and speed.Card 9: Take a PictureDrag these components on the viewer:User Interface:Media:Height: 200 pixelsWidth: 200 pixelsClick the Blocks button and snap these blockstogether.Click the Blocks button and snap these blockstogether.When the user clicks Button1, the videorecording starts. After the recording isfinished, the video is put in the video player.When the user clicks Button2, the video plays.When the user clicks Button1, the user cantake a picture. After the picture is taken, itbecomes the background image for Screen1.
App InventorApp Inventor1. How to use theQuickStart cards2. Connect to thePhone/TabletOn the front of the card, there is a descriptionof something you can do with AppInventor.The back of the card tells you whatcomponents and blocks to use, and anexample of code.http://ai2.appinventor.mit.eduApp Inventor11. Install your Appon the Phone/TabletUse the AI2 Companion App on yourAndroid phone or tablet to install yourApp Inventor projects as real apps.http://ai2.appinventor.mit.eduYou can download the AI2 CompanionApp to your Android phone or tablet totest out your App Inventor projects.http://ai2.appinventor.mit.eduApp Inventor12. Use theBackpack to copycodehttp://ai2.appinventor.mit.edu
Card 2: Connect to the Phone/TabletDownload the Companion AppGo to the Play store and search for MIT AI2 Companion.Download for free, Install, and Open.Card 1: How to Use the QuickStart CardsGo to http://ai2.appinventor.mit.edu andcreate a new project (you need a gmailaccount).Click the category and drag the components tothe viewer. For Example, if you see:Media:Get the connection code by scanning or typingChoose “connect with Code” to type in the code or“scan QR code” (this will bring up the camera). Thecode will be provided on your AppInventor page.Connect to AI2 Companion AppGo to http://ai2.appinventor.mit.edu and open aProject. Click the “Connect” button and select “AICompanion”. Scan the QR code on the screen with yourAndroid device, or type it in. The code should now berunning “like magic” on the phone/tablet. If theconnection is lost, click Connect Reset Connection andtry again.Card 12: Use the Backpack to Copy CodeUse existing code as a starting point for new codeTo copy code you need to use the AppInventor Backpack, found in the upperright corner of the Blocks screen.Drag the code into the Back pack. Theappearance of the icon will change to afull backpack. The code will still exist inthe original program.Copy in as much code as you like.Move to the new Project or Screen. Click on theBackpack to open it. Pull the desired code out ontoyour screen.The Backpack will be cleared when you log out of AppInventorthen click the categoryname (Media), and drag thecomponent (TextToSpeech)to the viewer.Click the Blocks buttonthe top rightClick a drawername and drag theblocks together.Connect to your Androiddevice to test out your project (see card #1)Card 11: Install your App on the Phone/TabletAllow Unknown Sources on Phone/TabletYou need to allow apps that are not in the GooglePlay store to be installed on your Android device.Open the Settings application. Select Securitythen check "Unknown Sources".On some phones, you may need to go toSettings Applications Unknown SourcesOption 1: Install the App using the MIT AI2Companion app on the phoneSee directions on Card 2 to install MIT AI2 Companion.Go to your AppInventor page and open the completedProject. Click “Build” and select “QR code for .apk”.When the app is built, scan the QR code with thephone. Follow instructions on your phone to install.Option 2: Install the App using an email accountGo to your AppInventor page and open thecompleted Project. Click “Build” and select “save.apk to computer”. When the app is built, attach the.apk file to an email and send it to an email accounton the phone. Open the attachment and followinstructions on your phone to install.
Download the Companion App Go to the Play store and search for MIT AI2 Companion. Download for free, Install, and Open. name ( Get the connection code by scanning or typing Choose "connect with Code"to type in the code or "scan QR code"(this will bring up the camera). The code will be provided on your AppInventor page.